
I’ve been using coil building for vases because it works with the kind of simple clay projects I usually do at home.
It gives me room to shape taller forms without needing extra tools or a wheel.
Over time I started wanting them to look a bit cleaner and more current instead of the usual style.
These are the approaches that felt right after I tested them out myself.
They might give you some practical options to try in your own work.
Coiled Vase with Horizontal Ridges and Exposed Base

A tall tapered vase formed from stacked coils creates clear horizontal ridges that run the length of the piece. The upper section is finished with a matte off-white slip while the foot is left bare to show the natural terracotta clay underneath. This treatment keeps the focus on the coil construction and produces a slim silhouette that suits a single stem or dried flower.
The narrow profile fits easily on a windowsill or small shelf without taking up much room. You can vary the coil thickness or decide how much of the base stays exposed to change the balance between the two tones. The same shape scales down quickly into a shorter version that works as a desk holder or small planter. The visible ridges give the piece enough texture to stand out in photos without added decoration.
Two-Tone Coil Vase with Horizontal Ridges
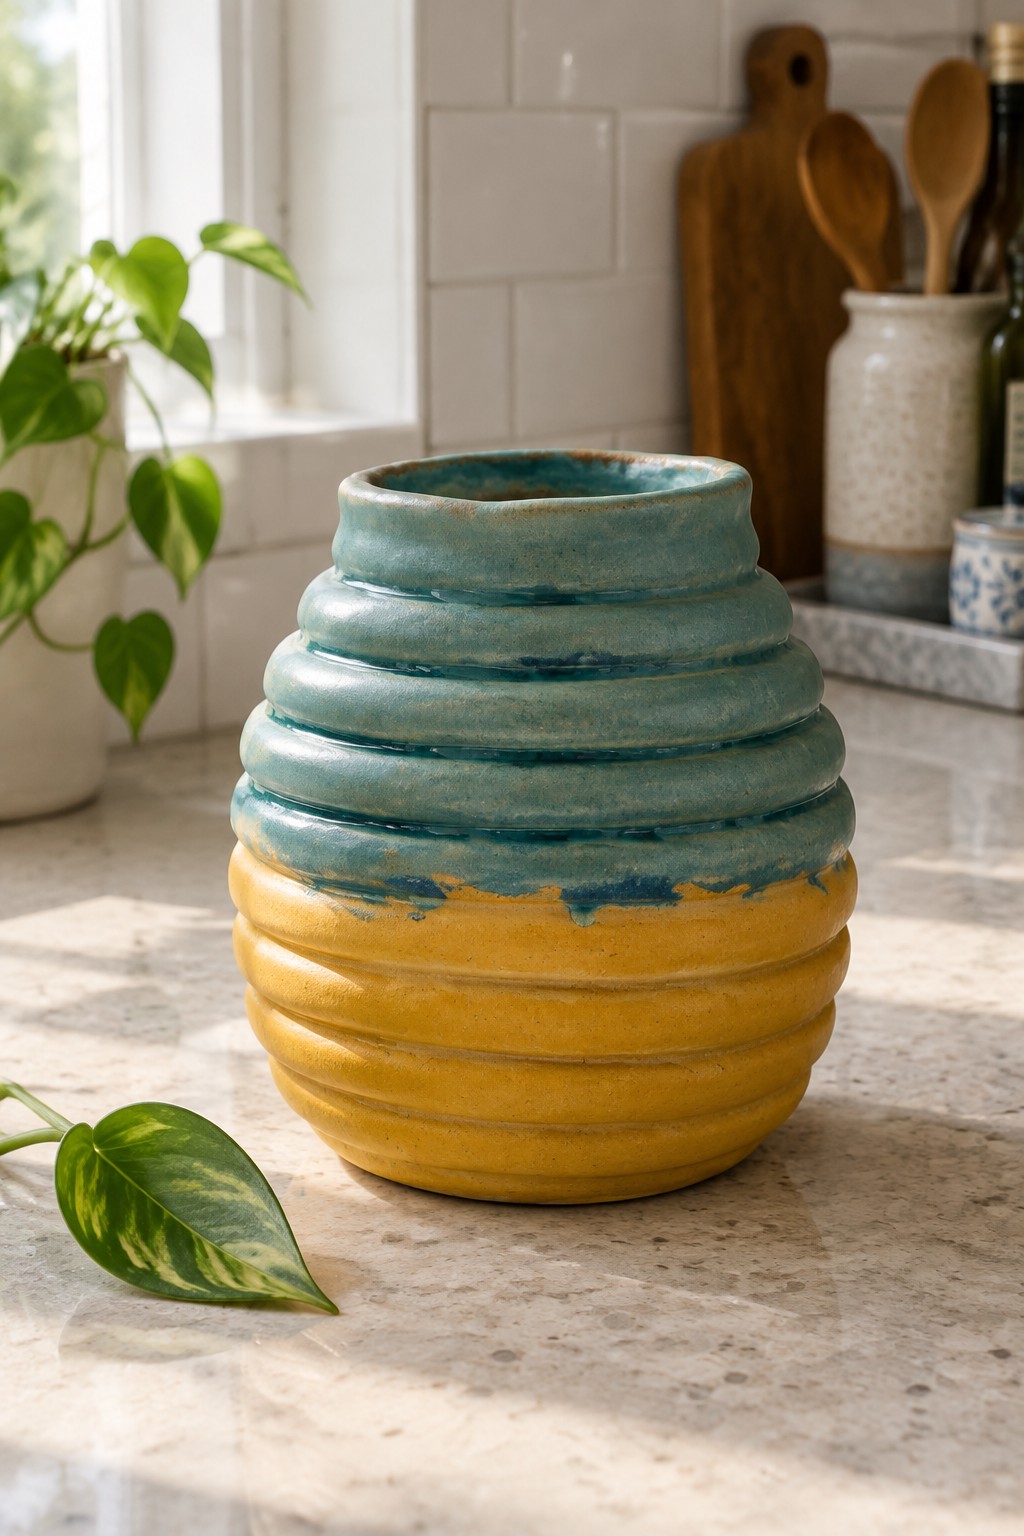
This coil vase is built from stacked rings of clay that create strong horizontal ridges around the body. The upper half is covered in a teal glaze that stops midway down, letting a warm yellow glaze cover the lower section and highlight the coil texture. The rounded, low shape keeps the piece compact while the color split draws attention to the handmade construction.
The wide belly and short height make this shape practical for a kitchen counter or dining table where a taller vase would crowd the space. You could repeat the coil method using a single glaze or move the color break higher to create different proportions. The same stacked ridge technique also works for a smaller planter or a lidded jar if you want to adapt it beyond a vase.
Horizontal Coil Vase with Speckled Indigo Glaze

A tall vase formed from stacked coils produces even horizontal ridges that run the full height and catch light across the surface. The deep blue glaze with scattered pale speckles adds depth while keeping the focus on the ridged texture rather than added patterns. This method turns the coil construction itself into the main design element, creating a vase that reads as both functional and sculptural.
What makes this idea useful is how the repeating ridges give the piece visual weight without extra carving or painting. You could scale the same stacking approach down for a shorter bud vase or switch to a matte black glaze for a more understated version. The shape also works well for holding branches or dried stems, and the strong color stands out against lighter shelves or mantels where simpler forms might disappear.
Coil Vase with Horizontal Ridges and Side Notch

A coil-built vase uses stacked horizontal coils to form both the body and the surface texture. The shape stays rounded through the middle then tapers slightly before opening into an uneven, wavy rim. A large notch cut into one side breaks the silhouette and creates an opening that shows the interior wall. This keeps the focus on the coil construction while giving the finished piece a sculptural outline.
What makes this idea useful is how the notch adds visual weight without requiring extra pieces or attachments. The same form works well as a standalone decor object on a low shelf or side table where light can hit the ridges from the side. You could scale the notch down or place several smaller ones around the body for a different effect. For a simpler version, keep the coils even on one side and only add the cutout on the other to test the shape first.
Coil Vases Built with Exposed Horizontal Ridges

Small vases formed by coiling clay into stacked rings create a built-in texture that shows the construction method. The three examples here use the same basic shape but differ in surface treatment, with one finished in a pink matte glaze, another in layered green with white highlights, and the third in a brown clay body covered partially with white slip. The ridged surface catches glaze in the grooves and leaves raised areas lighter, which adds visual interest without additional carving or stamping. This approach works well for narrow vases meant to hold a few stems of dried flowers.
What makes this idea useful is how the coil texture does most of the decorative work once glaze is applied. The small scale makes this easy to adapt by adjusting the number of coils for taller or wider forms, or by testing one solid glaze color against the mixed finishes shown here. A piece like this works especially well grouped on a tray or placed on a windowsill where the light hits the ridges. For a gift, the same coil structure can be simplified to two or three coils and paired with whatever dried material is in season.
Coil Vase with Geometric Slip Bands
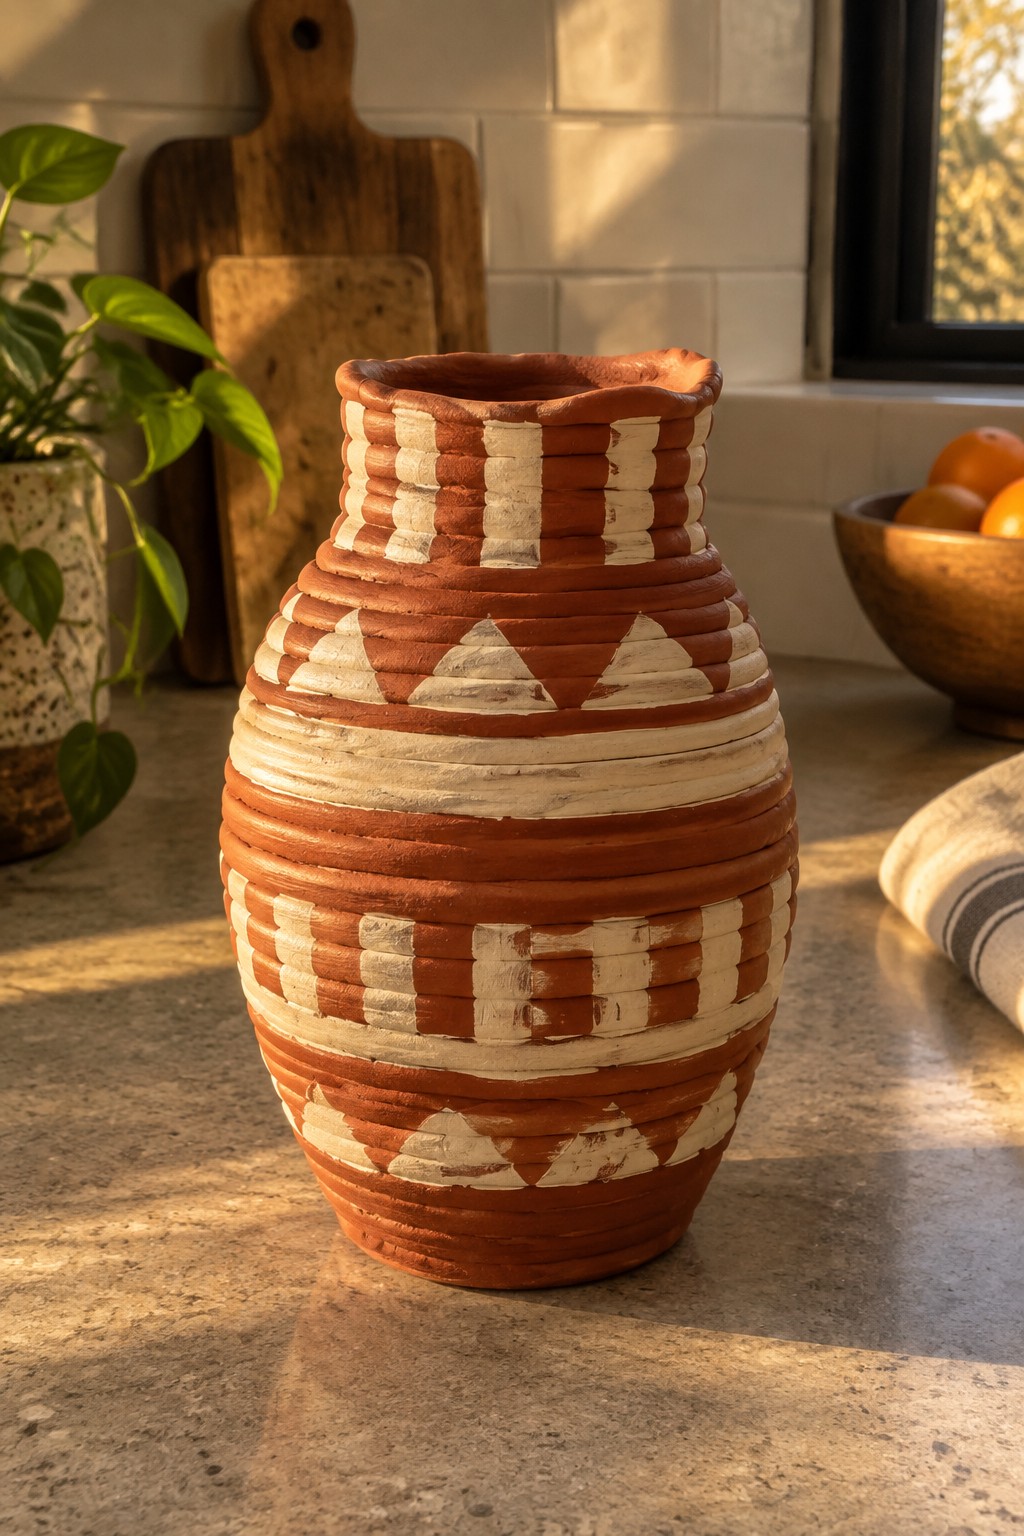
A coil-built vase forms a wide, rounded body that narrows into a short neck through stacked clay ropes. Natural terracotta clay alternates with white slip in horizontal bands that include triangles and checkerboard sections. The patterns sit directly on the coil ridges so the texture remains visible under the color. This creates a simple decorative vase that relies on repeating shapes rather than complex carving.
The wide belly gives the vase good stability on a counter while the narrow neck keeps stems upright. You can scale the same coil method and triangle motif down for a smaller planter or try the checker pattern on just the top half for a quicker version. The strong color contrast makes the piece easy to photograph against neutral backgrounds. For a fresh take, switch the white slip to a dark oxide or keep the pattern limited to two bands instead of covering the full height.
Stacked Coil Vase with Twin Necks

A coil-built vase made from stacked rings forms a rounded body that supports two separate necks rising from the center. The visible coil lines create horizontal texture while a mix of soft beige, pink, and blue-green glazes drips down the sides for added color variation. This shape works as a decorative vase for branches or dried stems rather than fresh flowers.
The double neck lets you split one arrangement into two smaller ones without needing extra containers. You can simplify the idea by using fewer coils for a lower profile or change the glaze colors to match a specific room. The same stacked construction also adapts easily to a single-neck version or a wider bowl shape if you want to try the technique on a different form.
Hanging Coil Vase with Rope Suspension

A tall narrow coil vase built with visible horizontal ridges works as a wall-mounted planter when a simple hole is added near the rim. Rope threaded through the hole lets the piece hang vertically so the elongated shape takes up minimal shelf space. The coil lines give the surface a clear handmade texture that pairs well with small plants like ferns. This approach fits the category of hanging planters rather than standard tabletop vases.
The shape does a lot of the work here because the narrow profile stays balanced when hung. You can adapt the same coil build for different lengths or swap the rope for leather cord if you want a different look. In a bathroom or narrow hallway this kind of piece gives you vertical plant space without needing a windowsill. For a gift it is easy to make a few at once and change the hanging height or clay tone on each one.
Coiled Pitcher with Horizontal Ridges

A coil built pitcher starts with stacked clay coils that are smoothed just enough to hold shape while leaving visible horizontal ridges across the surface. The green glaze settles into those grooves and runs slightly near the handle, creating contrast between the matte clay and the glossy finish. A simple pulled handle and formed spout turn the vessel into something that can pour as well as hold flowers or kitchen tools.
The shape does a lot of the work here because the rounded body and tapered base already read as finished once the coils are in place. You could scale the same ridges down for a smaller creamer or stretch the form taller for a flower vase without changing the glazing approach. This kind of piece stands out in a kitchen because the texture catches light and hides minor unevenness that often shows on smooth surfaces. For a gift, the same coil method works on a lidded jar or a utensil crock using the same glaze combination.
Stacked Coil Rings Create an Open Vase Form

This vase is built from horizontal coils stacked with deliberate gaps between each ring. The repeated circular bands create a rounded silhouette while the open spaces reduce visual weight and let light move through the sides. Rough clay texture on the exterior keeps the focus on the handmade construction. A smooth white glaze lines the inside to make the piece functional as a vase.
What makes this idea useful is how the spacing between rings can be changed to control how open or solid the final shape feels. You could adapt the same coil method to make a shorter version for a desk or stretch it taller for a floor piece. The ring structure also works for small lanterns if you add a tea light inside. For Pinterest, the strong silhouette and negative space make it easy to photograph from multiple angles without extra styling.
Raised Floral Relief on a Tall Coil Vase

A coil-built vase with a narrow neck and gently tapered body works well when you add raised daisy and leaf motifs down the front. The blue speckled glaze sits over a lighter base, letting the sculpted flowers stand out through color contrast and texture. The horizontal ridges from the coiling process add subtle lines that keep the surface from feeling flat once the glaze settles into them.
What makes this idea useful is how the relief can be created with simple stamping or appliqué before the final shaping is complete. The tall narrow form fits on a table or shelf without crowding other objects and still holds a decent bunch of stems. You could repeat just the leaf motif around the full circumference or scale the same design down for a smaller bud vase.
Ribbed Coil Planter with Speckled Glaze

A coil-built planter forms its wide, rounded body by stacking and smoothing ropes of clay, leaving the horizontal ridges visible as texture. The speckled beige glaze covers most of the exterior while leaving the interior rim exposed, creating contrast between the rough coils and the glossy finish. This style works well for medium houseplants because the open mouth and stable base support trailing foliage without tipping.
What makes this idea useful is how the coil ridges create surface interest using only basic hand-building steps. The rounded shape fits easily on counters or shelves where a taller vase would feel too formal. You could make a smaller version for desk plants or switch to an unglazed exterior so the coils stay matte and more absorbent. The same coil technique adapts quickly to simple bowls or catch-all dishes if you stop the build at a shorter height.
Tall Coil Vase in Soft Sage Glaze

A coil-built vase with a tall, tapered body and narrow neck gives you a simple form that holds single stems or small bunches without crowding. The light green glaze sits evenly across the surface and develops a faint crackle near the base, which adds texture while keeping the overall look clean. This shape works as a straightforward coil project because the vertical lines stay visible even after glazing.
What makes this idea useful is how the slim profile slips onto a nightstand or shelf without needing much room. You can adjust the coil height to make shorter versions for desks or slightly wider necks for bigger bouquets. The muted green stays easy to match with most linens and wood tones, so the vase keeps working as your decor changes. Scaling the same build down also turns it into a bud vase for gifts.
Exposed Coil Vase with Dripping Glaze

This coil vase leaves the lower half unglazed so the horizontal coils and clay ridges stay visible as texture. A light gray glaze covers the top section and runs down over the coils in uneven drips, marking a clear transition between the matte base and the glossy upper portion. The irregular rim keeps the overall form soft rather than rigid. The idea works because it treats the coil lines as a deliberate surface instead of hiding them under a full coat of glaze.
What makes this idea useful is how the drip line automatically creates a finished edge without extra carving or smoothing. A piece like this works especially well as a mantel vase or entry table accent where the height and texture can be seen from a distance. You could adapt the same approach by changing the glaze color, shortening the glazed section, or applying the drip on only one side for a more asymmetrical look. This would be easy to turn into a matching set of smaller vases by repeating the coil height and glaze stop point.
Stacked Pebble Coil Vase

A coil vase built from rounded, overlapping sections creates a sculptural form that looks like a stack of smooth river stones. The builder varied the size and placement of each rounded form to give the piece an irregular, organic silhouette while keeping the overall shape stable enough to hold water and flowers. A matte, speckled glaze in soft gray, beige, and muted green tones adds surface variation without overpowering the simple stacked construction.
What makes this idea useful is how the rounded stacking method builds height and visual weight with basic coil work. You can change the number or size of each section to create shorter versions for shelves or taller ones for floor display, and the same shape works for a small planter if you leave the top opening wide. The neutral glaze colors make it easy to match different flower arrangements or room styles, and the form stands out on Pinterest because it reads as both modern and natural at once.
Coil Vase with Horizontal Ridges and Gold Rim

A coil vase formed with consistent horizontal ridges creates a textured surface that adds subtle movement to a simple rounded shape. The body widens through the middle then narrows toward the base, giving it a stable, balanced profile that works for fresh flowers or dried stems. The matte cream exterior pairs with a glossy gold finish on the interior rim, creating a clean contrast that keeps the focus on the hand-built texture.
What makes this idea useful is how the ridges come directly from the coiling process, so the decoration happens during construction rather than after. You could repeat the same shape in a taller version for a mantel or shorten it into a wider planter for small houseplants. The gold rim is easy to adapt by using any metallic glaze or even leaving the rim plain if you prefer an all-matte look. This style stands out in photos because the horizontal lines give the surface clear visual interest without extra carving or painting.
Two Tone Coil Vase with Turquoise Glaze and Terracotta Base

A coil built vase uses horizontal coils to form a rounded body that narrows into a short neck. The upper half receives a glossy turquoise glaze while the lower half stays in its natural terracotta color, leaving the coil ridges visible across both sections. This split keeps the construction method visible and creates a clear visual break that highlights the vase shape.
The shape does a lot of the work here because the bulbous lower section balances the narrower neck without extra carving. You can adapt the idea by moving the glaze line higher or lower, or by swapping the turquoise for another color that still contrasts with the clay body. This vase works as a standalone display piece on a shelf or mantel where the two tones catch the eye. The same color split could be tried on a shorter planter or a larger jug form to change the scale.
Coil Vase with Raised Clay Face

A small coil-built vase takes on more character when you add basic face features using thin coils and small clay pieces for the eyes, brows, nose, and mouth. The rounded body and slightly flared rim stay simple, while the off-white matte glaze highlights the texture left from hand-building. This approach keeps the vessel functional for flowers or greenery while turning it into a clear decorative object rather than a plain cylinder.
What makes this idea useful is how little extra time the face actually takes once the coils are assembled. The small scale lets you try the technique without using much clay or shelf space, and the same face elements can be moved lower on a taller vase or added to a wider bowl form. You could swap the neutral glaze for a soft color or leave the features unglazed for more contrast. This kind of piece shows up well in photos because the face gives it an immediate focal point that plain coil vases often lack.
Frequently Asked Questions
What clay is best suited for creating modern coil vases? A clay body with good plasticity like stoneware or earthenware works well. It should hold its shape during building yet allow coils to blend smoothly without cracking. Test small samples first to ensure it matches your firing temperature and desired finish.
How thick should coils be for sturdy vase construction? Aim for coils about the thickness of your finger or slightly thinner for control. Thinner coils help achieve finer details in modern designs but require careful scoring and slipping between layers. Build the form gradually allowing each section to firm up before adding height to prevent slumping.
What techniques help prevent cracking in coil built vases? Score and slip every joint thoroughly then compress the seams with a rib tool from both inside and outside. Keep the clay at a consistent moisture level throughout the process. Cover the piece loosely with plastic between sessions to slow drying and reduce stress on the structure.
How can I add contemporary details to basic coil projects? Incorporate geometric patterns by varying coil widths or adding carved textures after the form sets. Use underglazes or slips in bold color blocks before bisque firing. Experiment with asymmetrical rims or integrated handles to give simple projects a sculptural modern edge.
Are these coil vase ideas suitable for beginners? Many ideas scale well for new potters by starting with shorter heights and basic cylindrical shapes. Focus first on even coiling and blending before attempting complex silhouettes. Practice on test pieces to build confidence then progress to taller or more detailed designs from the collection.

Pottery Path is my cozy corner of the internet where I share clay ideas, pottery inspiration, and simple projects you can recreate at home. I love exploring everything from air dry clay to handbuilt pottery to cute minis that brighten your day. My goal is to make clay crafting feel easy, fun, and welcoming for anyone who wants to try it.
You will find beginner friendly tutorials, creative pottery painting ideas, and lots of warm inspiration for slow and happy crafting. If you enjoy hands on creativity, this space will feel like home.