
I have been playing around with coil pottery in my studio for some time and it has helped me feel steadier when I sit down to work.
These ideas grew out of my own sessions where I tried different shapes and sizes without worrying too much about the outcome.
A few of them worked out well while others needed adjustments but each one gave me a bit more practice with the basics.
I wanted to share the ones that felt doable and useful if you are looking for ways to build your own skills step by step.
Coiled Mug Built from Stacked Horizontal Ridges

A coil pottery mug formed by stacking even horizontal coils produces a strong ridged texture that defines the entire surface. The interior carries a solid green glaze while the exterior shows a mix of exposed clay and light green with some dripping at the rim. This approach belongs to the mug category and relies on the coil lines themselves to create both the shape and the surface pattern.
What makes this idea useful is how the repeated ridges give the mug extra grip without needing extra carving or stamps. A piece like this works especially well as a kitchen or desk mug where the texture stands out next to smooth store-bought cups. The same coil method can be adapted by changing the spacing between ridges or by using a single glaze color inside and out for a simpler finish. For a beginner project the form stays straightforward while still producing a finished object ready for daily use.
Scalloped Rim Coil Bowl

A coil-built bowl with a scalloped rim gives you a relaxed way to practice even coil joining while creating something useful. The rim is built by overlapping and shaping coils into soft waves that catch light and glaze differently along each ridge. A light speckled glaze with peach and white variation adds contrast without extra decoration, and the overall form stays practical for holding fruit, keys, or small items on a surface.
The shape does a lot of the work here because the scalloped edge makes the bowl look finished even if your coils are not perfectly uniform. You could adapt the same rim style to a shallower tray or a taller planter by changing the coil height and curve. For a gift this size works well because it feels substantial but does not require a large workspace or long drying time. The technique also translates to other neutral glazes if you want to match existing kitchen or bathroom colors.
Coiled Cat Planter with Sculpted Ears

A coil-built planter forms the base shape, with extra clay added to create upright ears along the rim. Horizontal coils remain visible as subtle ridges that guide the application of striped pastel glazes. Black and pink painted details define the eyes, nose, and whiskers, turning the pot into a simple character piece that still holds a small plant.
The compact round form works well on a windowsill or shelf where space is limited. You can change the ear placement and swap the face markings to create a bear, fox, or rabbit version using the same coil method. The painted stripes help hide minor unevenness in the coils, which makes this a forgiving project for practicing wall thickness before moving on to more detailed work.
Wavy Coil Vase

A coil-built vase with repeated vertical waves creates a rippled surface that adds movement to a tall, narrow form. The ridges run the full height and give the piece visual weight without extra attachments or handles. Pale green glaze settles into the grooves and highlights the handmade texture while keeping the overall shape simple enough for everyday use.
What makes this idea useful is how the wavy surface covers small differences in coil thickness during building. You can repeat the same wave pattern on a shorter cylinder to make a bud vase or stretch it wider for a small planter. The shape sits well on a table or shelf where the ridges cast soft shadows. Swap the glaze color or adjust the wave depth to match different rooms without changing the core coil method.
Leaf-Shaped Ring Dish

A leaf-shaped ceramic dish works well as a ring holder because the curved surface and raised veins naturally keep small items from sliding around. The design relies on a simple organic outline with the leaf veins emphasized through a contrasting gold line that stands out against the soft pink glaze. This approach keeps the piece functional while giving it enough detail to serve as a tabletop accent rather than just plain storage. It belongs in the small tray or ring dish category and stays easy to handle because of its modest size.
The shape does a lot of the work here by providing instant structure and visual interest with minimal extra carving. You could adapt the same leaf form into a soap dish or key catch-all simply by adjusting the glaze to a matte finish or deeper tone. For a gift, something like this works especially well because the gold vein detail photographs cleanly and feels thoughtful without needing complex construction. The small scale also lets you test different leaf outlines or vein widths on the next round without committing to a large piece.
Stacked Cutout Tea Light Holder

A stacked ceramic candle holder made from three separate rings creates a simple vertical form that lets light escape through cut openings. Each ring has several rectangular windows cut into the walls so the flame shows through at different heights. The warm brown glaze on the outside helps the light stand out while the form stays compact enough for a tabletop. This approach uses basic stacking to turn plain rings into a working candle piece.
What makes this idea useful is how easily you can adjust the number of rings or the shape of the openings to fit your space. It works well on a coffee table or shelf where you want soft light without a large footprint. You could rework the same stacking method into a taller version for a mantel or shorten it to two rings for a smaller side table. The cutout pattern also carries over to other forms like square or oval rings if you want to change the look.
Coil-Built Triple Toothbrush Holder

A coil pottery toothbrush holder made from three connected cylinders gives you separate slots for multiple brushes while keeping everything in one piece. The stacked coils create horizontal ridges that add texture and strength without extra tools, and the shared wavy base keeps the holder stable on a countertop. One cylinder carries a simple painted face using underglaze dots and a line, which adds interest without changing the form. This project fits the bathroom holder category and shows how coil building can produce a functional multi-compartment object in a single session.
The shape does a lot of the work here by grouping brushes upright so they dry faster on a damp sink. You could scale the same connected coil layout down for a desk pen holder or widen the cylinders slightly for a kitchen utensil caddy. For a gift, something like this works well because the face detail is quick to paint and the form stays beginner-friendly in size. The speckled glaze finish also hides minor surface marks that often appear when first learning coil construction.
Spiral-Notched Yarn Bowl

A yarn bowl holds a ball of yarn in place while you knit or crochet. This one uses a wide, shallow form with raised horizontal ridges that run around the body. The key detail is the large spiral cutout on the rim that guides the yarn strand out cleanly and prevents it from rolling away. The mustard yellow and teal glaze is applied in uneven bands that follow the ridges, making the texture stand out.
What makes this idea useful is how the spiral notch turns a simple bowl into a working tool instead of just decor. You can make the opening larger or smaller depending on the yarn weight you use most. The same ridged shape works for a small plant pot or a desk catchall if you skip the notch on the next version. The bold two-color glaze also photographs well, which helps the finished piece stand out in project roundups.
Coil Built Ring Dish

A small coil-built ring dish gives you a compact spot to keep rings and other small jewelry in one place. The concentric ridges left from the coils add subtle texture under the blue speckled glaze, which helps the surface catch light without needing extra decoration. This approach keeps the piece simple and clearly handmade while still functioning as a finished object.
What makes this idea useful is how little space it takes on a dresser or nightstand. You can scale the same coil method up for a soap dish or down for an earring holder, and the shallow form works in either case. The speckled glaze also hides minor marks from daily use, so the dish stays looking good without special care.
Clay Sun Face Wall Hanging

A sun face wall hanging made from clay creates a simple decorative object that hangs flat against the wall. The center forms a rounded face with basic sculpted eyes, nose, mouth, and cheeks, while the outer rays extend outward in repeating curved shapes. Painted in layered yellows and oranges with visible brush marks, the design uses color contrast and raised edges to define each section without extra tools. This type of project falls into the decor object category for handmade ceramics.
What makes this idea useful is the flat back and simple hanging point that let it fit on any wall without taking shelf space. You could scale the same sun shape down for a smaller plaque or rework the ray pattern as a border around a bowl. The painted finish works in both indoor and covered outdoor spots, and the form adapts easily if you want to skip the face details and keep only the ray outline. For a gift, this shape needs less material than a full vase while still reading as a complete piece.
Coil-Built Spoon Rest with Glazed Trough

A spoon rest built from coils creates a long, narrow trough that holds cooking utensils while catching drips. The design uses stacked coils to form raised horizontal ridges along the sides and a deep center channel that gets coated in teal glaze. The unglazed clay rim and exterior keep the piece grounded on the counter and show the handbuilt texture clearly. This fits the kitchen item category and solves the common problem of where to rest a spoon mid-cook.
What makes this idea useful is how the elongated shape stays out of the way yet stays within reach on the stove. You could shorten the form to hold just one utensil or widen the channel slightly for a larger spatula. The contrast between the glossy interior and matte exterior translates easily to other kitchen pieces like a small tray or a garlic keeper. The same coil ridges would also work on a soap dish for the bathroom if you keep the scale compact.
Coiled Double Cellar for Salt and Herbs

A double compartment dish formed from coils creates a simple kitchen holder that keeps salt and dried herbs in separate sections. The connected shape uses one piece of clay to form two rounded wells side by side, with visible coil ridges giving the sides a stacked texture. A light speckled glaze covers the exterior while leaving the interior surfaces practical for food contact. This project falls into the kitchen item category and stays small enough to finish in a few sessions.
The shape does a lot of the work here by combining two storage areas without extra pieces. You can adapt the same coil layout to hold different spice blends or even use it for small desk items like paper clips and rubber bands. In a kitchen this kind of piece keeps seasonings close during cooking and reduces the need for multiple separate jars. For a gift it would be easy to rework by adjusting the well sizes or switching to a single color glaze on the whole form.
Coiled Soap Dish with Drainage Ridges

A coil-built soap dish gives you a simple bathroom tray that holds a bar of soap while the raised ridges inside keep it from sitting in water. The maker rolled out coils to form the rectangular base and sides, then added shorter coils across the bottom to create the ridges. A matte green glaze covers the piece but leaves some of the coil texture visible along the edges. This approach fits the category of functional bathroom items that stay practical without needing complex attachments.
The shape does a lot of the work here because the built-in ridges solve the drainage problem in one step instead of adding separate feet or a wire rack. You could adapt the same coil layout into a longer version for a toothbrush holder or shrink it into a small tray for jewelry. In a bathroom this size stays useful without taking up counter space, and the coil method makes it straightforward to adjust the length or depth on your next try. The idea stands out on Pinterest when people search for handmade soap dishes that actually work.
Coiled Snail Figurine with Glazed Shell

A coiled snail figurine works as a small decor object built from a spiral shell and a simple sculpted body. The shell uses coils to form the rounded shape, then receives a turquoise glaze with scattered white and blue dots for color contrast. The body stays in raw clay with minimal additions like short antennae and a basic face. This approach keeps the focus on the coil structure while using glaze to add visual interest without extra carving.
What makes this idea useful is how the coil method handles the shell volume quickly and leaves the body open for easy surface changes. You could scale the same form down for a ring dish or stretch the shell coils into a small planter base. The split finish between glazed shell and matte body makes color testing simple on one piece. For a gift, the compact size and clear spiral shape translate well to different color combinations without needing new molds.
Stacked Coil Vases with Horizontal Ridges

Coil-built vases made from stacked rings of clay produce these tiered, segmented shapes that stand out on a shelf. The coils create natural horizontal ridges that give the form structure and let glaze pool or highlight the texture. This method suits small to medium vessels designed to hold single stems or small bunches rather than large arrangements.
What makes this idea useful is how the coil width and placement control the final silhouette without needing extra tools or carving. A piece like this works especially well as a desk or windowsill vase where you want something compact but still visual. You could rework the same stacking approach into taller versions for bigger stems or shorten the sections to make bud vases in sets. The small scale makes this easy to try in multiple glaze colors for a coordinated group.
Coiled Cactus Incense Holder
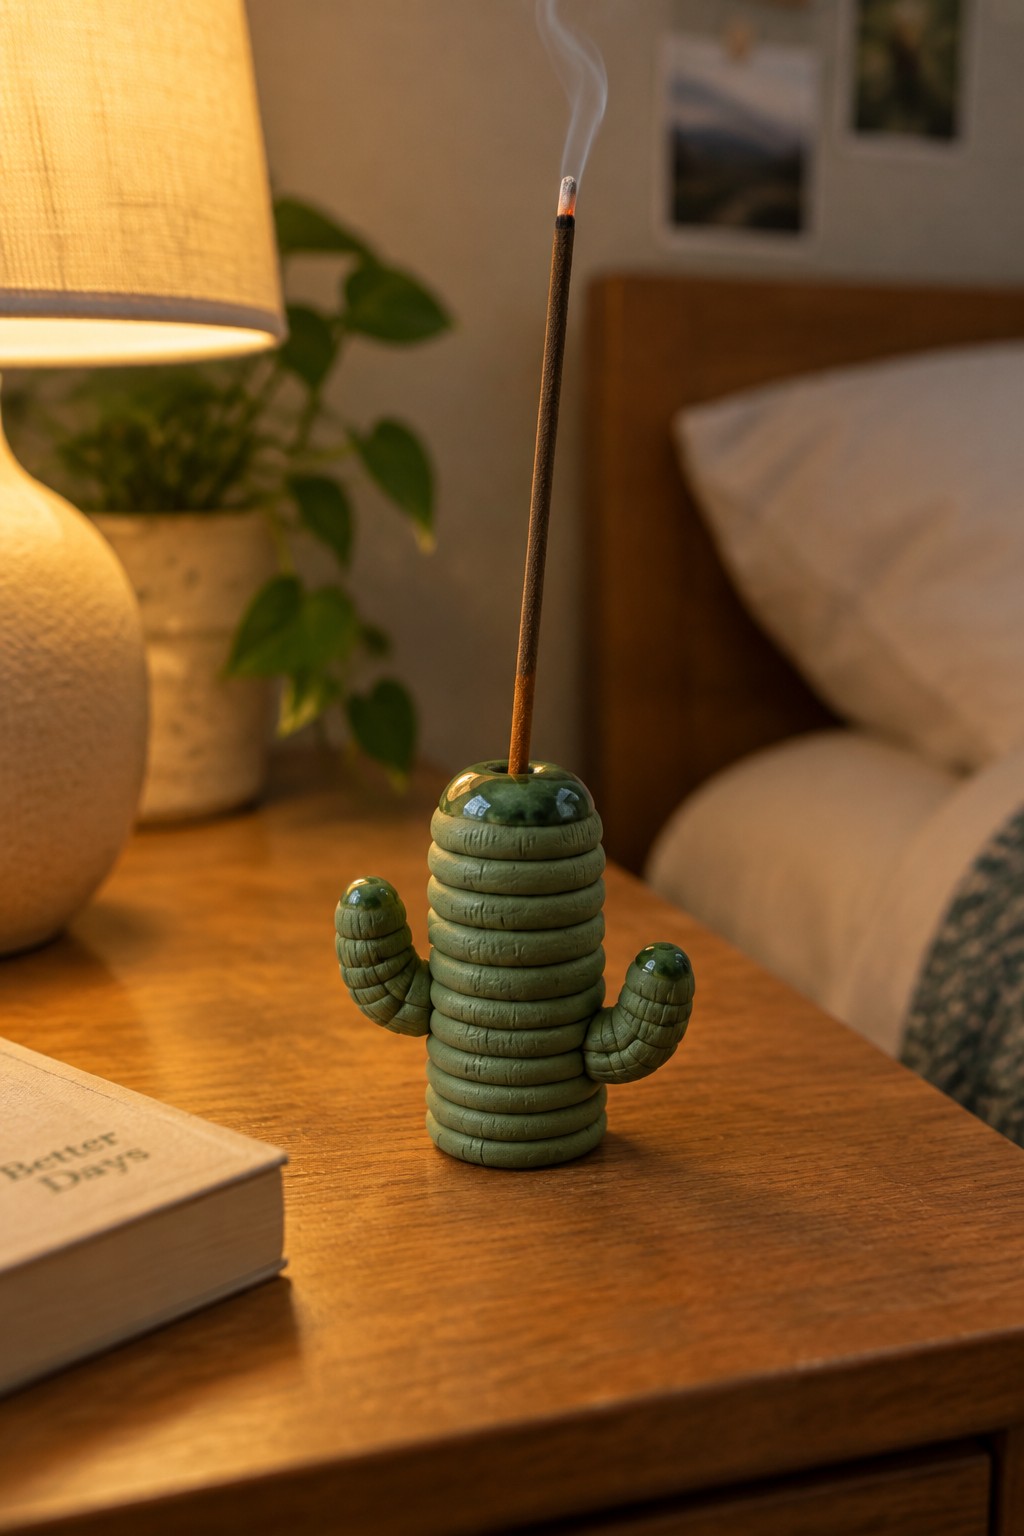
A coil-built cactus incense holder stacks rings of clay to create the main body and two small arms. The coils form visible horizontal ridges that give the piece its segmented cactus look while keeping the structure stable. A hole through the top holds an incense stick upright, and a simple green glaze covers the surface. This approach turns a basic coil technique into a functional tabletop holder.
What makes this idea useful is that the stacked coil method builds height and shape quickly without needing advanced tools. You can change the number or angle of the arms to create different cactus varieties or switch the glaze color for other plant styles. The small scale keeps the project manageable for practice sessions and leaves room on a desk or shelf without taking up much space. The same coil stacking works for making small trays or ring dishes by flattening the top instead of adding the hole.
Stacked Coil Egg Cups

These egg cups are made by rolling coils of clay and stacking them into short cylindrical forms that hold a single egg upright. Multiple coils are joined and smoothed on the outside, then painted with pastel bands and scattered black dots for a striped effect. The open ring shape at the top keeps the egg steady while the stacked base adds height and visual layers. This approach belongs to the kitchen holder category and relies on simple coil construction rather than wheel throwing.
What makes this idea useful is the way each cup can be built in one short session with very little clay. You can swap the order of the colored bands or change the dot spacing to match plates or mugs you already own. The small scale makes it simple to try different surface patterns without committing to a large piece. For a gift, a set of four in varied color combinations stands out because the design reads as intentional rather than random.
Coiled Hanging Planter with Rope Suspension

A coiled hanging planter built from stacked clay rings creates a wide, open bowl that works well for trailing plants. Three thick ropes thread through holes at the rim and tie into large knots that both support the weight and add visual structure. The speckled exterior keeps the focus on the clay texture while the smooth interior holds moisture for the plant roots.
What makes this idea useful is how the rope system turns a basic coil bowl into something that can hang on a balcony or porch without needing a stand. You can adapt the same shape by shortening the ropes for a lower ceiling or using thinner coils to make a smaller version for succulents. The open rim gives plenty of room for vines to spill over, and the design stands out in photos because the ropes and clay texture read clearly even at small sizes. For a gift, this shape works especially well since it combines a useful planter with a simple hanging method that most people can install with just a hook.
Coiled Bowl with Exposed Ridges and Glazed Interior

A small coil-built bowl is made by stacking short coils into an irregular oval shape and leaving the ridges visible on the outside. The interior gets a simple blue glaze while the exterior stays unglazed to show the clay texture and coil lines. This keeps the project focused on basic coil joining and shaping without extra carving or handles.
What makes this idea useful is that the compact size helps you practice even coil thickness and wall stability in one short session. You can adapt the same stacking method to create ring dishes, small soap holders, or shallow plant saucers by adjusting the width and height. The glazed interior makes the piece practical for holding jewelry or keys while the matte exterior fits a natural tabletop style.
Frequently Asked Questions
What basic supplies do I need to try these coil pottery ideas at home?
Start with air-dry clay or oven-bake clay if you lack access to a kiln, along with a rolling pin or dowel for making coils, a plastic knife or scoring tool for joining, and a damp sponge for smoothing. A non-stick work surface like a canvas mat helps prevent sticking, and simple household items such as toothpicks or cookie cutters can add textures from the 19 ideas without extra cost.
How can I make sure my coils stay strong and even while building the projects?
Roll coils to a consistent thickness by using the same pressure and length each time, then score and slip the edges before stacking to create solid bonds. Work in small sections rather than completing an entire form at once, which reduces sagging and lets you check for uniformity as you follow the creative ideas that focus on quick wins.
Which of the ideas work best for absolute beginners who want fast confidence gains?
Projects that use simple shapes like coiled bowls or basic cylinders let you see results in one session, building skills through repetition before moving to more detailed designs such as textured vases or animal forms. These straightforward builds emphasize practice over perfection so you gain momentum quickly.
How do I stop coil pieces from cracking as they dry?
Cover your finished work loosely with plastic for the first day or two to slow drying, then uncover gradually over several days. Keep coils no thicker than your thumb and avoid thin areas that dry faster than the rest, which helps the pieces from the 19 ideas stay intact through the full drying process.
What simple finishing steps turn these coil projects into polished final pieces?
Once dry, sand lightly with fine grit paper to smooth seams, then apply acrylic paint or a sealant for color and protection if you skip firing. Adding details like stamped patterns or slip trailing during construction enhances the creative look without extra tools, giving your pieces a professional appearance right away.

Pottery Path is my cozy corner of the internet where I share clay ideas, pottery inspiration, and simple projects you can recreate at home. I love exploring everything from air dry clay to handbuilt pottery to cute minis that brighten your day. My goal is to make clay crafting feel easy, fun, and welcoming for anyone who wants to try it.
You will find beginner friendly tutorials, creative pottery painting ideas, and lots of warm inspiration for slow and happy crafting. If you enjoy hands on creativity, this space will feel like home.