I have found that working with slabs is a straightforward way to learn handbuilding without a lot of special tools.
These projects let you practice rolling clay and putting pieces together in simple steps that build real skill over time.
In my studio I often turn to slab methods when I want to make something useful like trays or planters while getting better at the basics.
They keep things manageable and help avoid the frustration that can come with more complicated techniques.
I gathered these ideas because they have been reliable for me when starting out with pottery.
Slab-Built Mug with Pinched Spout

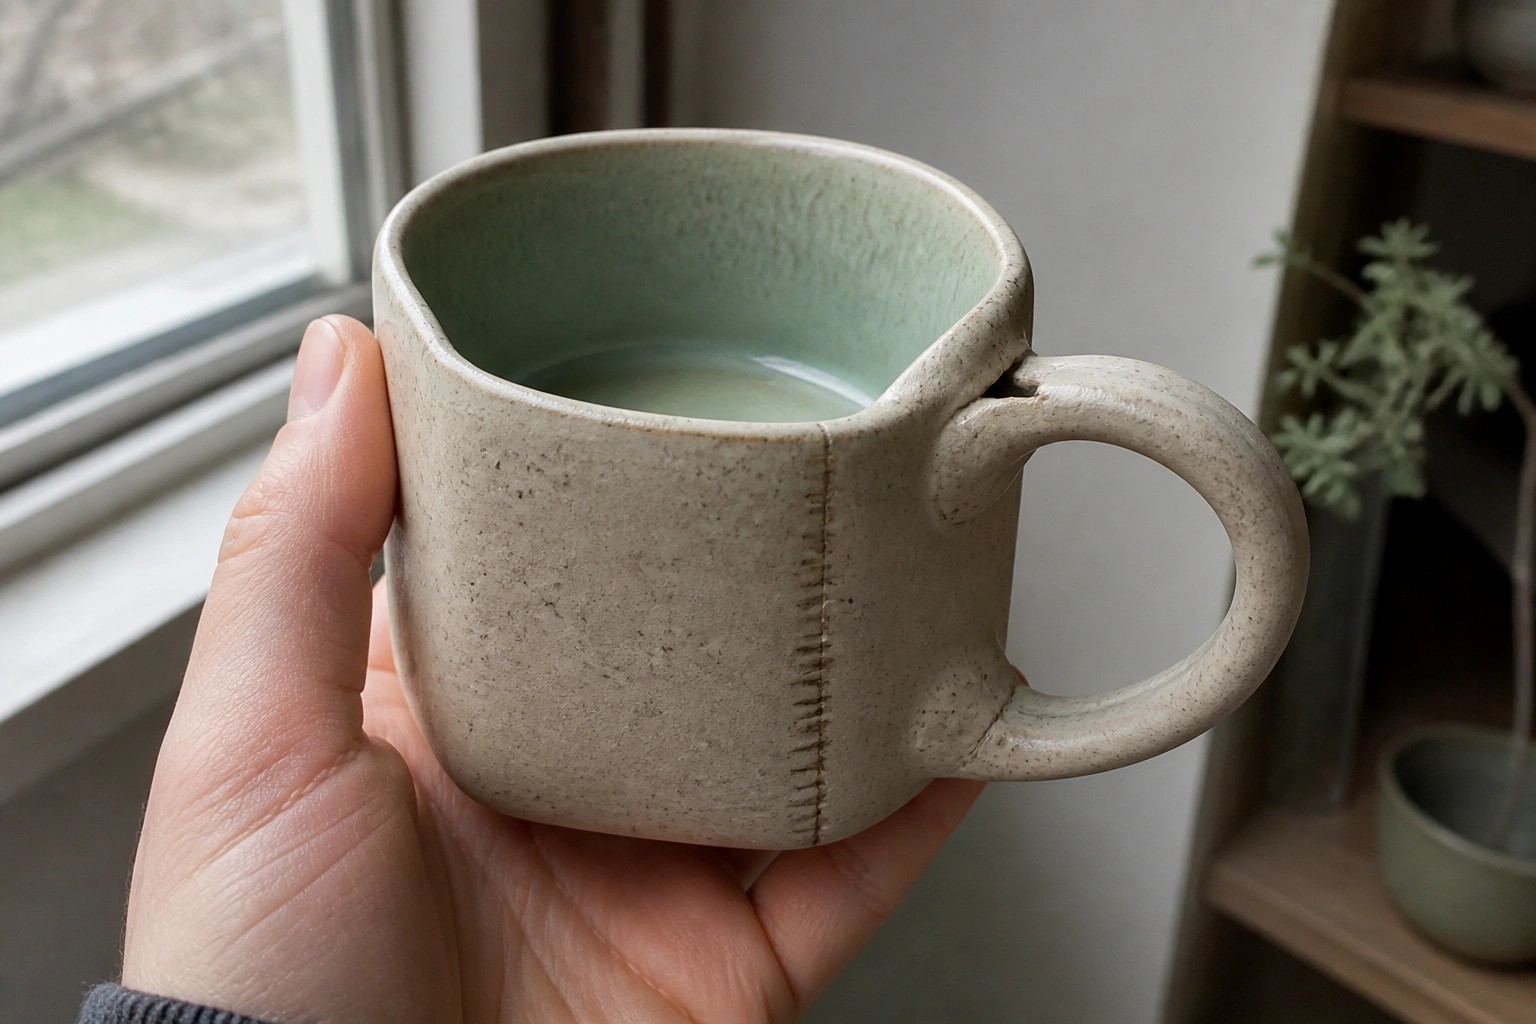
A slab mug built from a single rolled sheet forms a simple cylinder that gets joined along one edge and shaped at the rim. The pinched section creates a functional pouring lip while the attached handle stays proportional to the body size. Leaving the seam line visible with small impressed marks turns the construction join into a clear surface detail instead of something to hide. The unglazed speckled exterior paired with a solid interior glaze keeps the focus on the form and the handbuilt edges.
What makes this idea useful is that the spout requires no extra parts, just careful pinching before the clay stiffens. The same cylinder can be made taller for a small creamer or kept low for everyday drinking cups. For a gift, repeating the seam texture with a different stamp gives each piece a consistent family look without extra glazing work. In the kitchen this shape handles both hot drinks and small pours without needing a separate pitcher.
Shallow Bowl with Speckled Exterior and Coral Glaze

A wide, low ceramic bowl like this keeps the clay body visible on the outside while using a single bright glaze color on the inside. The speckled surface shows the natural clay texture, and the coral interior creates a clean contrast without added patterns or carving. This shape works as a basic slab project because it starts with a flat circle that can be pressed or draped into a simple mold.
What makes this idea useful is how the open form lets you test different interior glazes without changing the build. You could make several in the same size and swap the glaze color each time to see what stands out on your table. In a kitchen or dining area, the bowl holds fruit or bread while the color contrast draws attention next to plain dishes. For a variation, try the same slab shape but trim the rim tighter to turn it into a smaller catch-all for keys or jewelry.
Leaf Impressed Slab Tray
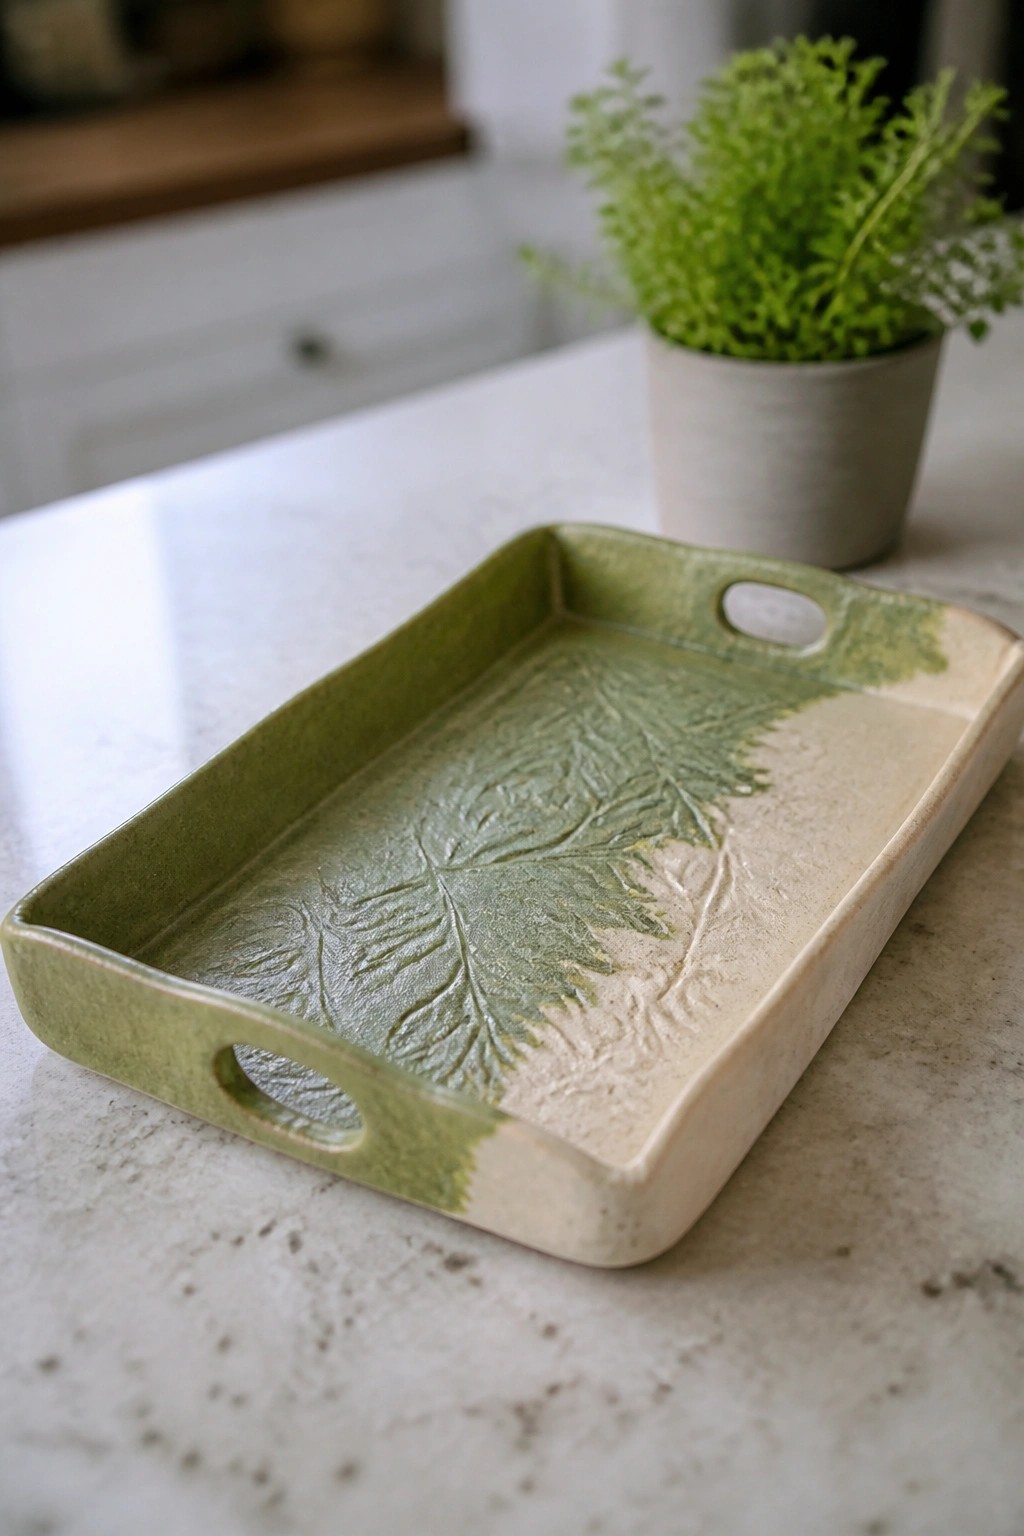
A slab built rectangular tray starts with a flat clay sheet formed into low sides and fitted with simple oval handles at each end. Real leaves pressed into the surface before firing leave behind raised vein details that catch glaze and create contrast. The green to cream glaze shift keeps the focus on the texture rather than on added decoration.
What makes this idea useful is that the leaf pressing step requires almost no extra tools beyond foliage from the yard. This shape works well on a kitchen counter for holding keys or mail or in a bathroom for soap and a washcloth. You could rework the same slab method into smaller square trays or a longer plant saucer by adjusting the dimensions and skipping the handles.
Slab Built Oval Spoon Rest
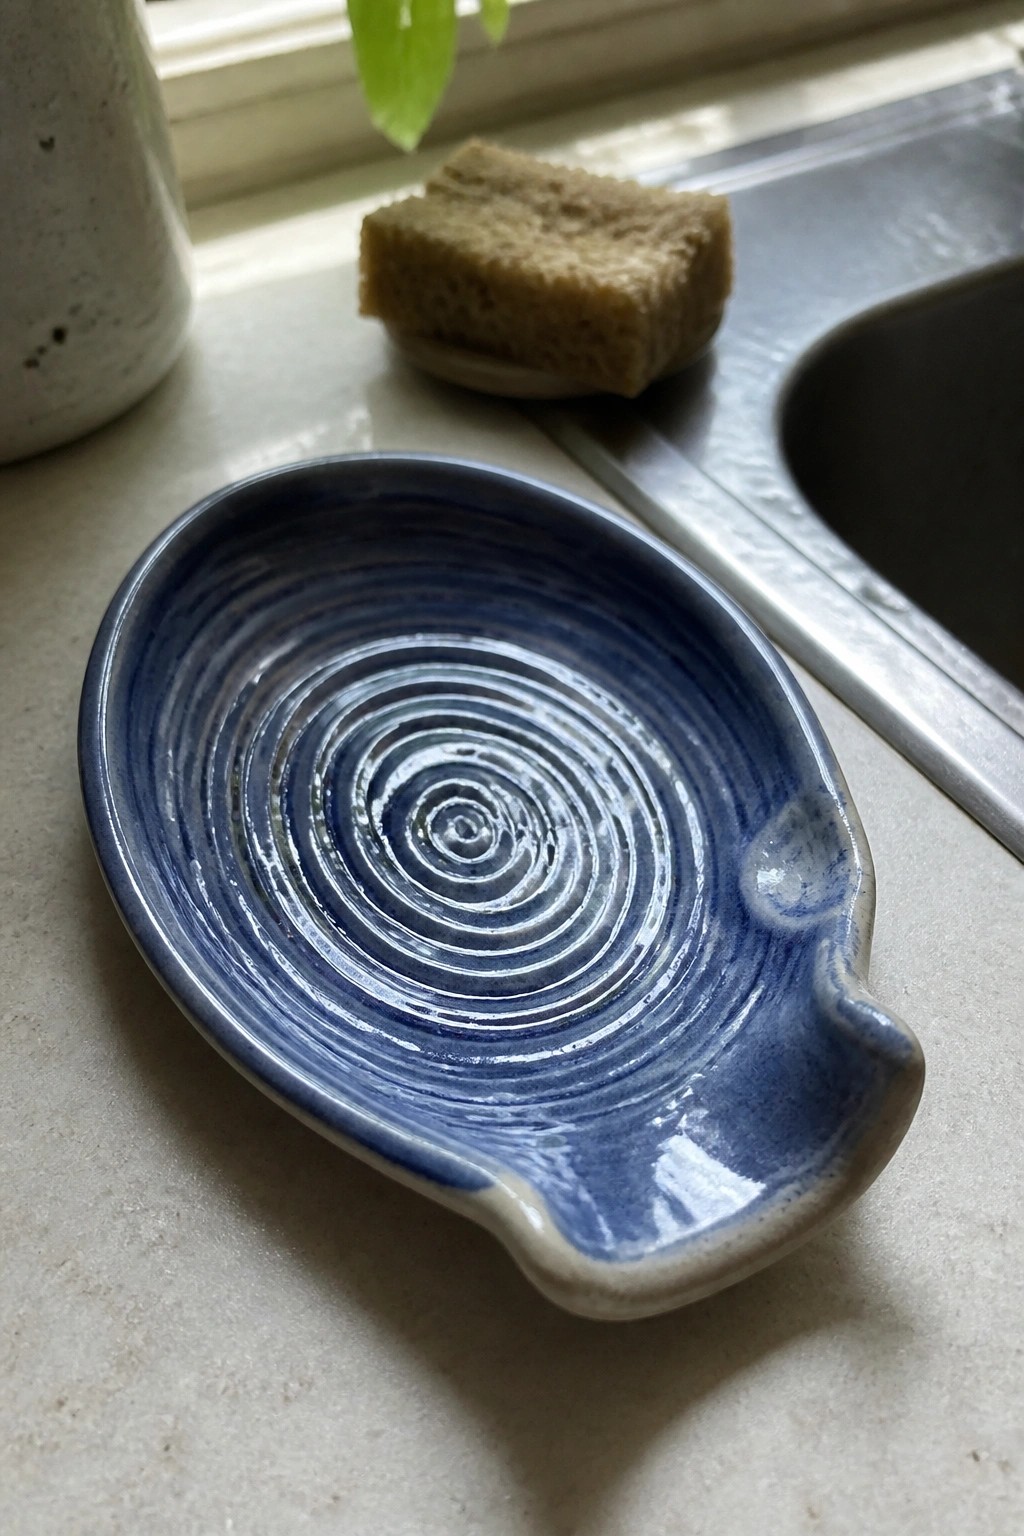
A simple oval spoon rest starts with a flattened slab of clay cut into an elongated shape. One end gets pinched or folded to create a small lip that catches drips from a spoon or utensil. The surface shows concentric circles created by dragging a tool through the wet glaze, giving the piece a clear focal point without extra decoration. This approach keeps the form low and stable while teaching basic slab shaping and edge finishing.
The shape does a lot of the work here because the oval layout fits neatly beside a stove or sink without taking much counter space. You can resize the slab for a longer version that holds two spoons or shorten it into a small soap dish for a bathroom. Changing the glaze pattern to stripes or leaving the surface plain still keeps the same practical form. For a gift, something like this takes little clay and fires quickly, making it easy to produce several at once.
Mitered Corner Slab Box
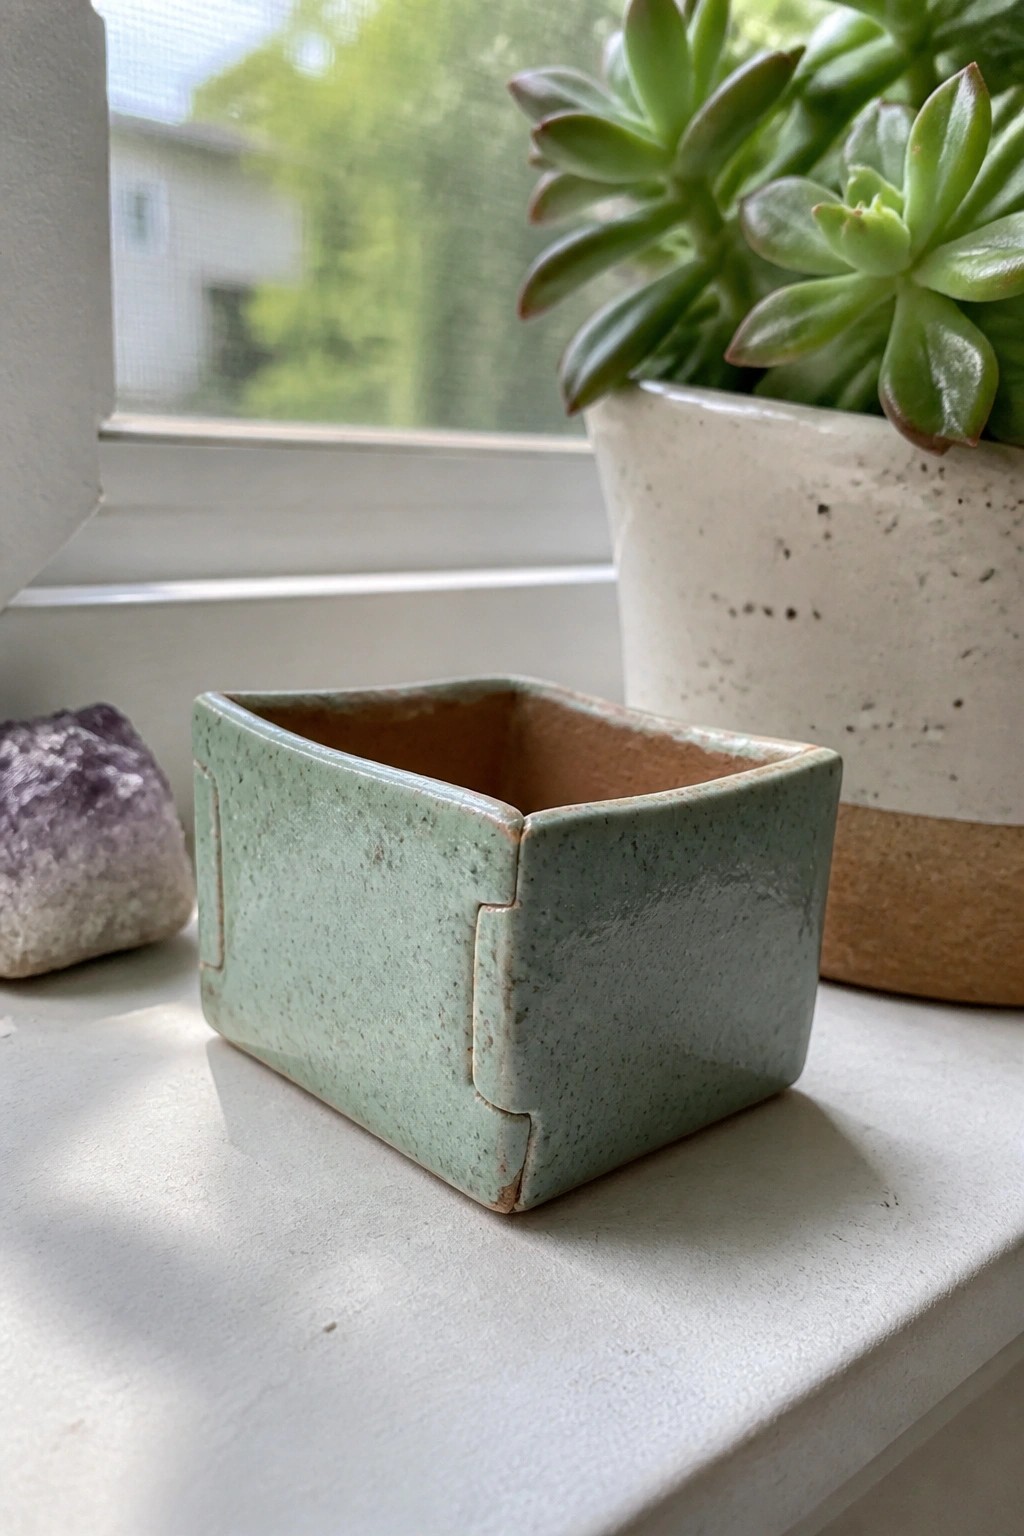
A rectangular container built from four clay slabs joined at mitered corners forms a small open box with straight sides and a flat base. The light green speckled glaze covers the exterior while the interior shows the natural clay color, and the visible seams emphasize the slab construction. This project centers on cutting accurate angles and joining slabs cleanly to hold shape during drying and firing.
What makes this idea useful is its compact size that fits easily on a desk or windowsill for holding jewelry, plant tags, or small tools. The angled corners give the form strength without added supports, so the same joinery method works for a longer tray or a slightly taller version used as a pencil holder. Scaling the slabs down turns the idea into a ring dish while keeping the focus on basic handbuilding skills.
Ring Dish with Painted Daisy Pattern

A small ceramic ring dish formed from a slab gives you a compact tray for keeping rings or small jewelry in one spot. The scalloped rim adds a simple finished edge while the hand-painted daisy repeats create a light pattern across the surface without crowding it. A soft off-white glaze keeps the focus on the flowers and lets the piece blend into a bedside table or dresser.
What makes this idea useful is how the same shallow slab shape works just as well for a key dish or loose change holder. You can change the flower spacing or switch to a single motif on one side to personalize it quickly. The small size means you only need a basic template and a few brushstrokes, so it is easy to repeat in different colors or adapt into a set of matching trays.
Fern Imprint Hanging Tile
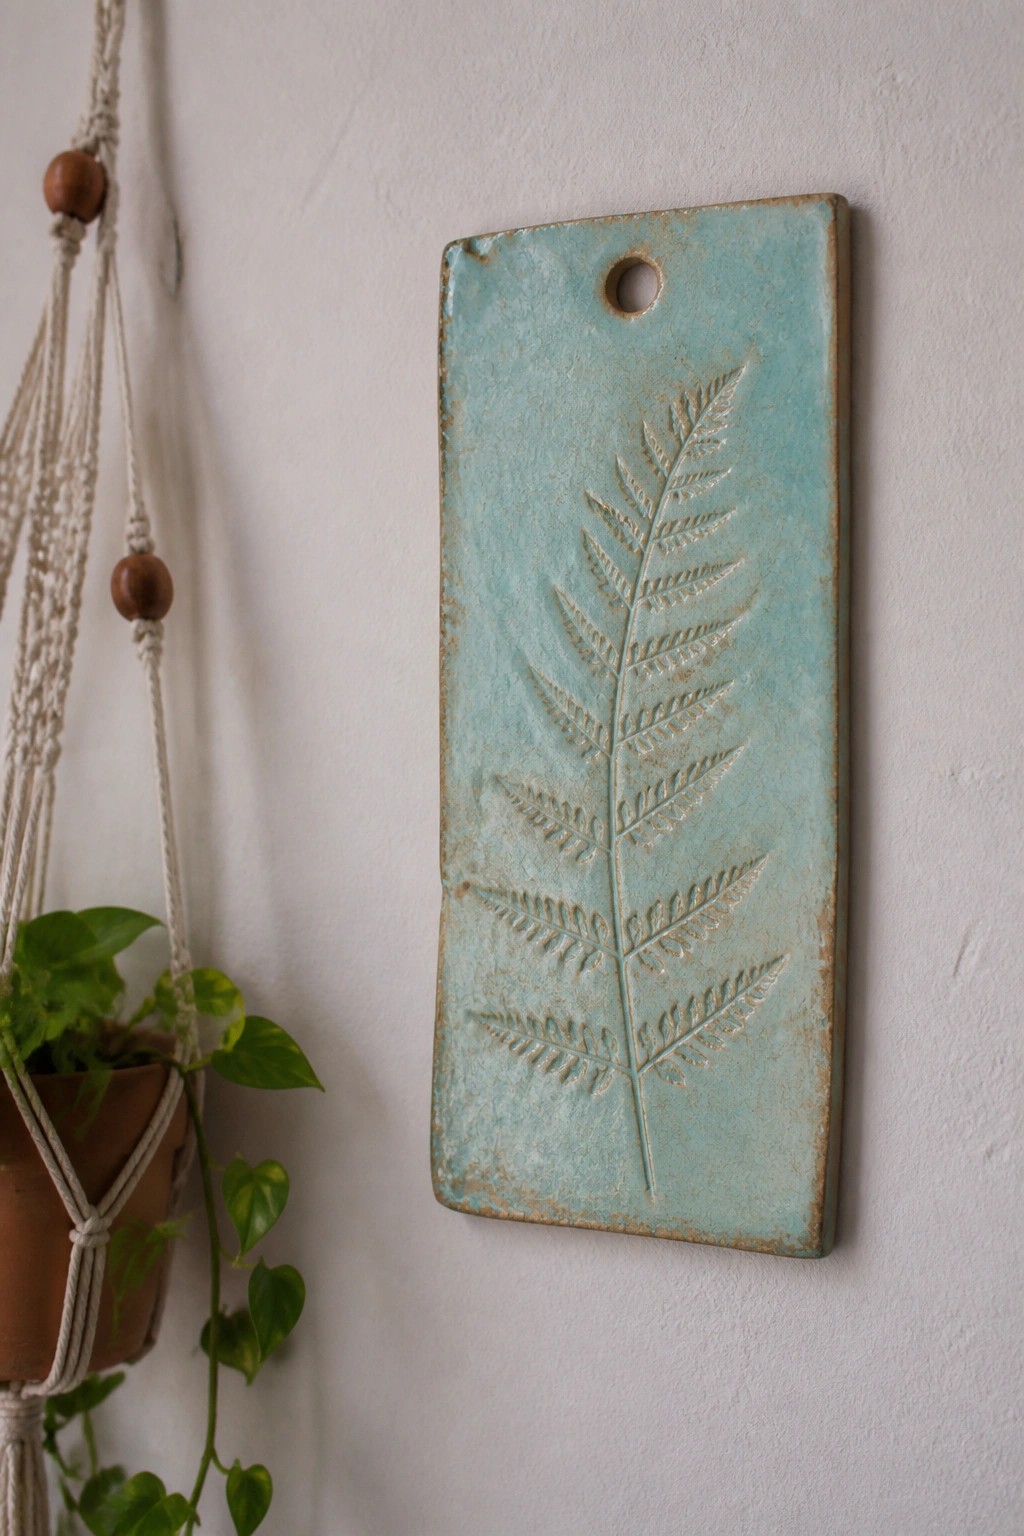
A flat rectangular slab forms the base for this wall tile, with a full fern frond pressed directly into the surface to create the raised pattern. The light turquoise glaze sits in the recesses while the raised leaf edges stay lighter, giving clear contrast to the natural details. A simple hole near the top turns the finished piece into something that hangs easily on a wall. This approach relies on slab construction paired with a one-step imprint from an actual plant.
What makes this idea useful is how the same slab size and hole placement can be repeated with different leaves or even multiple smaller fronds on one tile. It works well in a hallway or near a window where the color shows against a light wall. You could rework the rectangle into a shorter version for a soap dish or skip the hole and use it flat on a shelf. The imprint method keeps the project quick while still producing something that photographs clearly for project boards.
Ridge Soap Dish for Daily Use

A rectangular soap dish made from a slab of clay gives you a simple way to keep bar soap off wet surfaces. Parallel ridges molded into the top lift the soap and let water drain away between the grooves. The glossy coral glaze covers the entire surface and creates a smooth, easy-to-clean finish. Small feet underneath raise the dish slightly so it stays dry on the counter.
What makes this idea useful is how the ridges do the main job without extra parts. You can adapt the size to fit a double sink or shorten it into a smaller tray for guest bathrooms. Changing the glaze color lets it match tile or towels, and the same slab shape works for a sponge holder if you skip the ridges. A piece like this photographs cleanly for Pinterest because the lines and color read clearly even in small thumbnails.
Scalloped Rim Trinket Dish
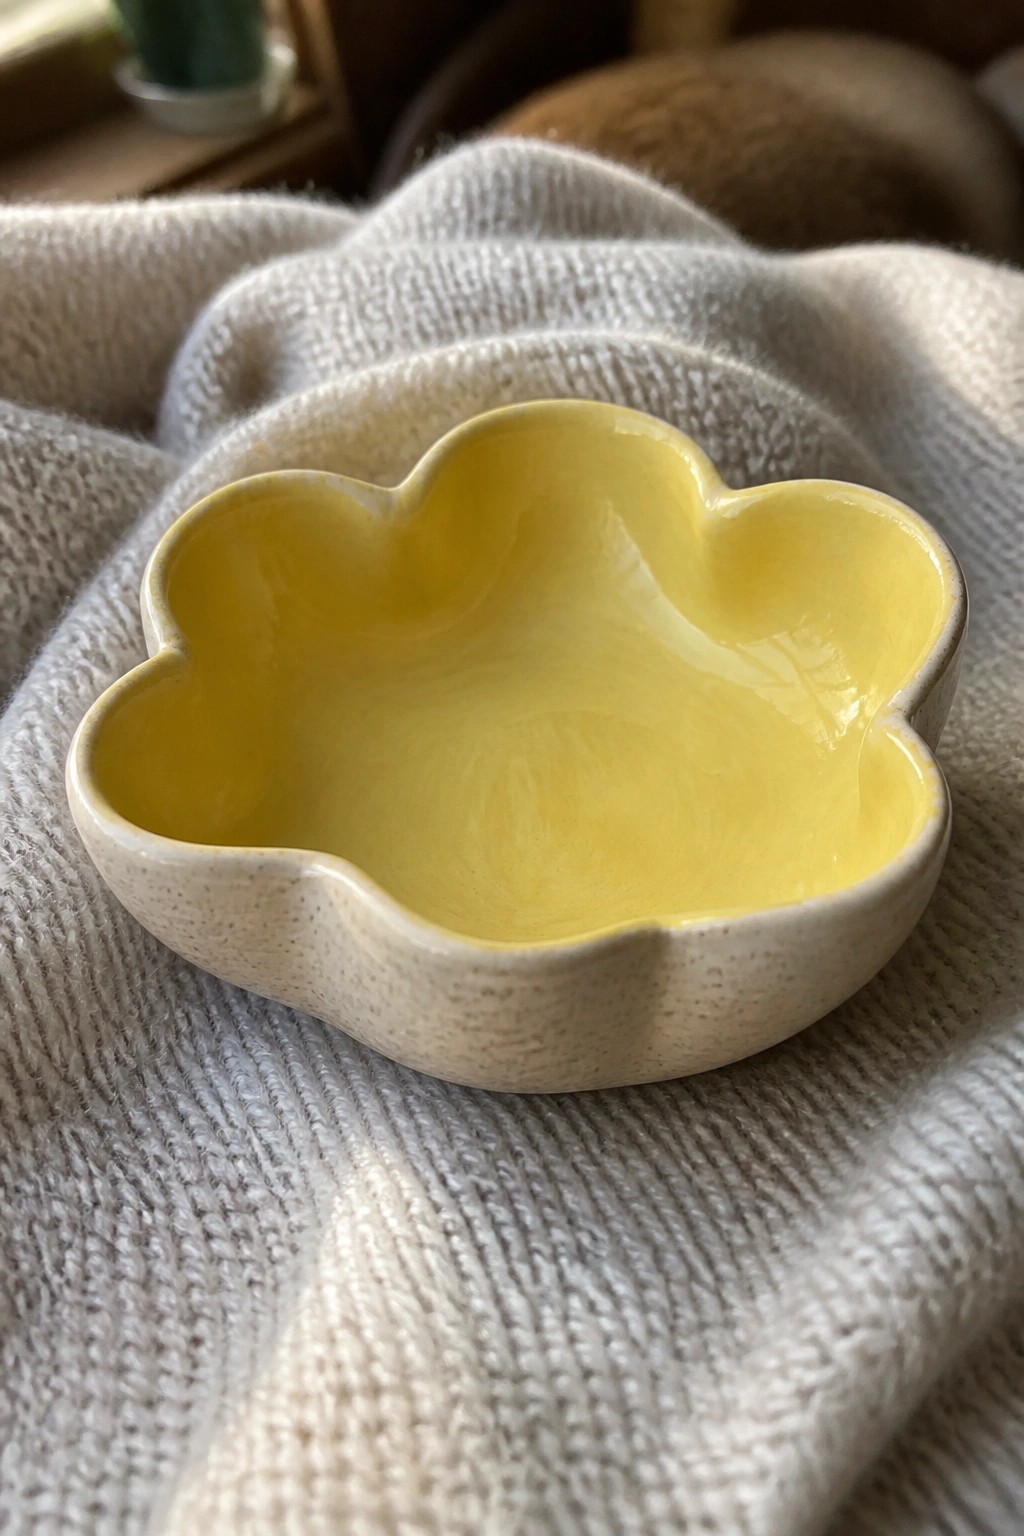
A small slab-built dish with a wavy, five-lobe rim gives beginners practice rolling even slabs and shaping soft curves. The bright yellow interior glaze creates a clear focal point while the speckled exterior keeps the form simple and grounded. This project fits the ring dish or catch-all category and stays useful because the shallow depth and wide opening work for everyday small items.
The shape does a lot of the work here by adding visual interest through the rim alone. You could scale the same pattern up slightly for a soap dish or down for a set of pinch bowls. In a bathroom or on a nightstand the yellow interior stands out against neutral surfaces, and the form adapts easily if you swap the glaze color or add a foot ring on the bottom.
Slab-Built Star Votive Holder
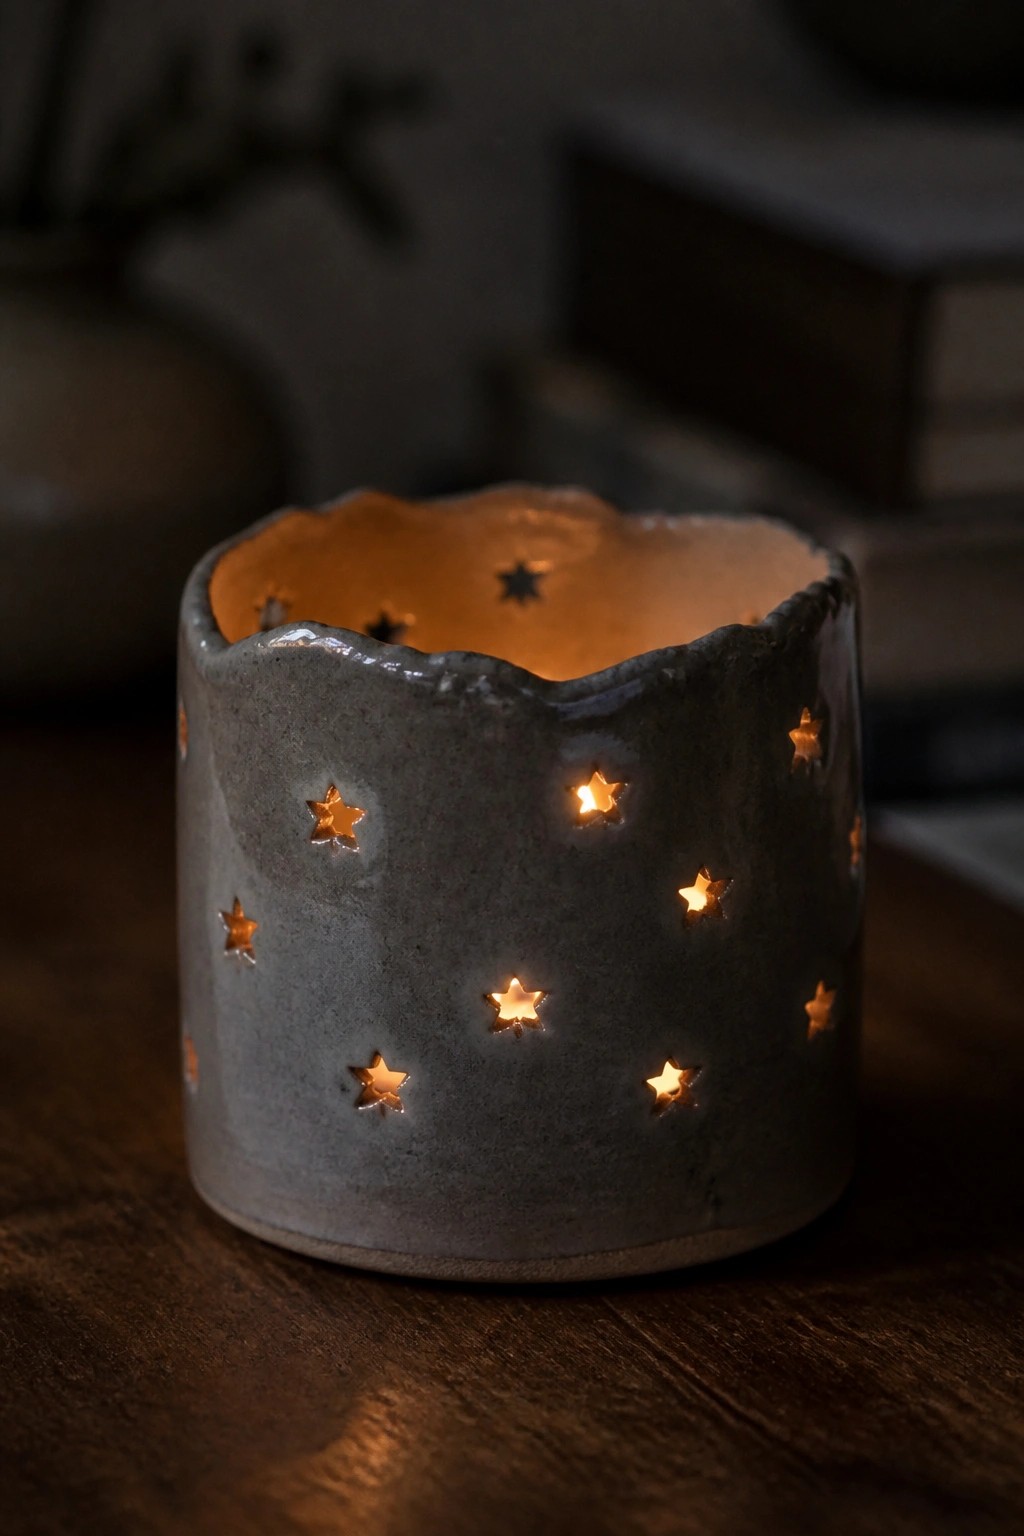
A slab-rolled cylinder makes a compact votive holder with multiple star shapes cut through the walls before assembly. The uneven top rim and matte gray surface keep the focus on the cutouts while the warm interior light shows through cleanly. This project teaches even slab thickness, precise piercing, and simple cylinder forming without needing a wheel.
What makes this idea useful is how the same template can be resized for a shorter tealight version or stretched taller for a pencil cup. The cutout pattern stands out on a shelf or desk without extra glaze work, and the shape adapts easily to a ring dish by flattening the sides or to a small planter by leaving the stars off one side. A piece like this photographs well for sharing because the light effect is easy to recreate with any warm bulb.
Slab-Built Salt Cellar with Pour Spout

A small salt cellar formed from a slab of clay creates a compact kitchen dish with a functional pour lip on one side. The rounded shape stays low and wide so salt is easy to scoop or tip out. A turquoise glaze lines the interior while the lower portion keeps the raw clay surface exposed. This approach turns a basic handbuilt bowl into a dedicated seasoning holder that sits neatly on a counter or table.
What makes this idea useful is how the added spout improves everyday function without extra parts. The same slab technique works for a sugar bowl or spice dish by adjusting the size and lip angle. You can change the glaze to match other kitchen pieces or leave more of the clay bare for contrast. The small footprint makes it simple to produce in multiples for gifts or to test different rim finishes.
Divided Slab-Built Caddy
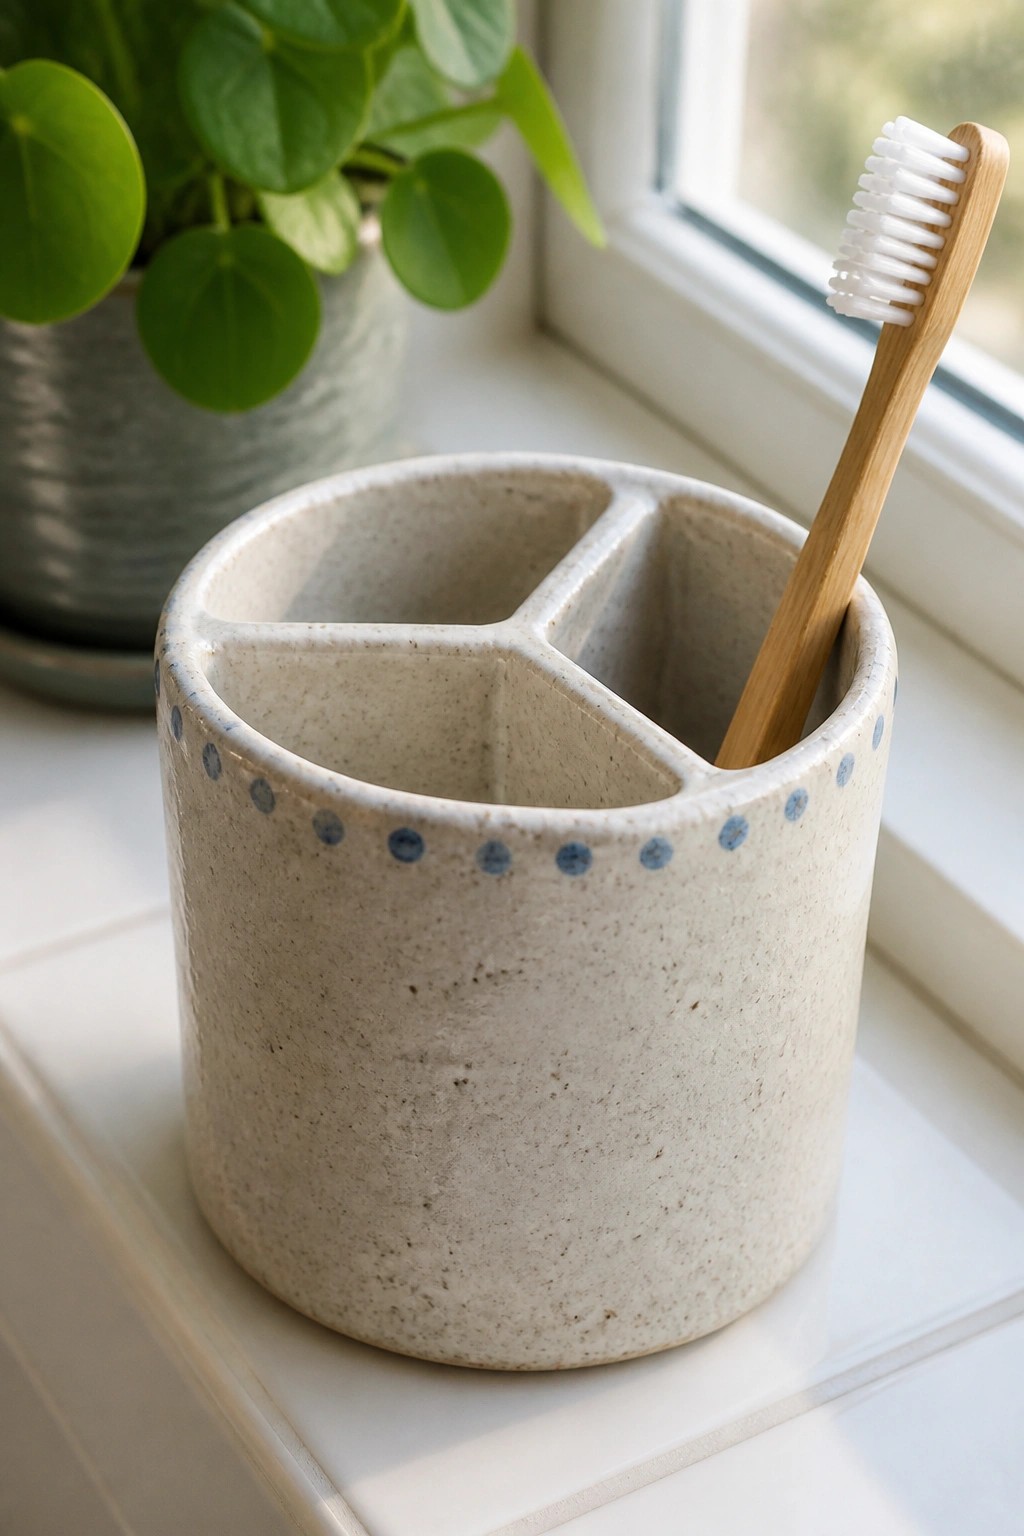
A divided ceramic caddy made from slabs gives you three separate compartments inside a simple round form. The light speckled clay body keeps the focus on the clean lines while the row of small blue dots along the rim provides just enough decoration. This shape works as a bathroom holder for toothbrushes, makeup brushes, or small tools, and the flat slab construction makes the walls and dividers straightforward to assemble.
What makes this idea useful is how the compartments add function without complicating the build. You could easily change the number of sections or resize the whole piece for a desk pen holder or kitchen utensil caddy. The dotted rim is simple to paint with underglaze before firing and helps the piece look finished even with minimal decoration. In a small bathroom, the compact scale keeps counters tidy while still holding several items at once.
Handbuilt Yarn Bowl with Rim Notch

A yarn bowl made from clay slabs creates a stable, low container that holds a full skein while you knit or crochet. Form the walls from a single slab rolled into a curve, then cut a smooth notch in the rim so the yarn strand pulls out without catching or tangling. Carved wave lines pressed into the sides add texture before glazing in a warm terracotta finish. This holder project shows how a basic bowl shape becomes more functional with one small cutout.
What makes this idea useful is the notch turning a plain bowl into a dedicated craft tool that sits steady on any surface. You could adapt the same slab construction for a smaller thread holder by reducing the diameter or skip the notch entirely to make a simple catch-all dish. The low profile works well on a lap or table without tipping, and the carved detail gives it enough visual interest to stand out in photos for a Pinterest board. For a first slab attempt, start with a template to keep the walls even before joining.
Three-Section Slab Utensil Holder

A rectangular ceramic caddy divided into three compartments keeps kitchen tools upright and sorted by type. Slab construction creates the straight sides, and each panel carries a different impressed texture of lines, dots, or chevrons. The soft green glaze covers the form evenly and leaves the clay surface matte.
What makes this idea useful is the way the compartments separate long-handled items without crowding. You can swap the textures for other stamps or rollers and still keep the same overall shape. The same divided form works for paintbrushes on a desk or makeup tools in a bathroom if you adjust the height. For a gift, this size holds just enough utensils to feel practical without taking up much counter space.
Minimalist Seated Cat Figurine
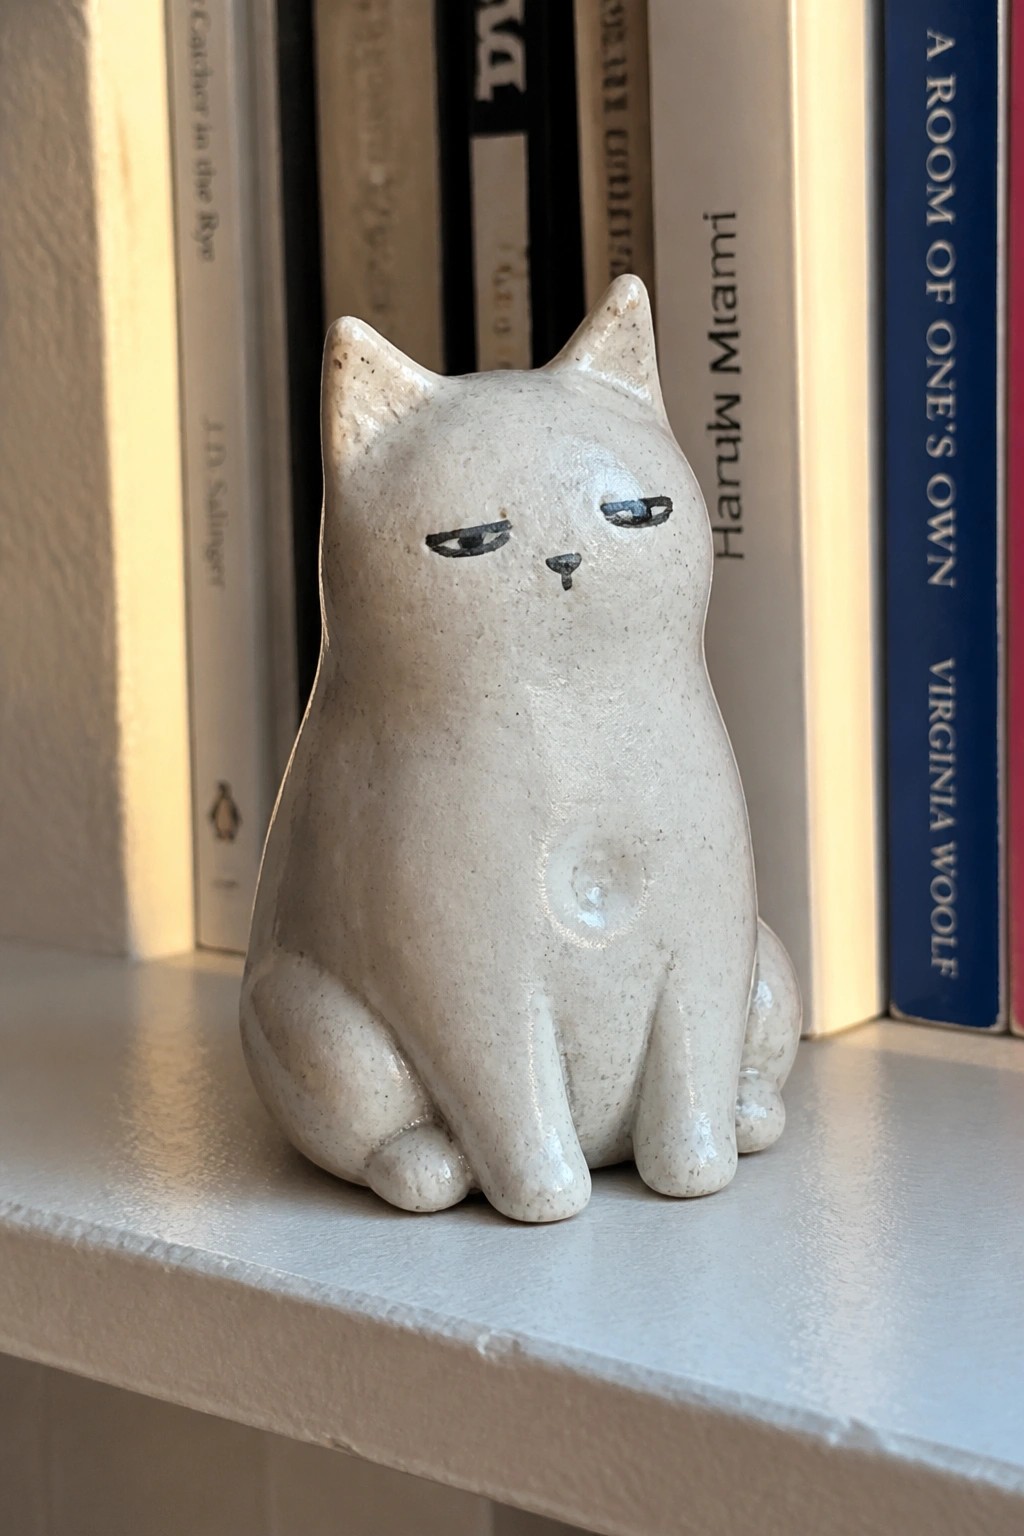
A seated cat figurine built from slabs gives beginners a compact form to practice joining and shaping without needing supports. The rounded body stays stable while small pinched ears and feet keep the silhouette simple. A speckled matte white glaze with just a few black painted marks for eyes and nose creates a clear focal point on an otherwise plain surface.
What makes this idea useful is that the same body shape can be made taller, shorter, or repeated in different sizes for a set. The painted face can be changed to other simple expressions or left off entirely for a more abstract version. This kind of small decor piece fits easily on a desk or shelf and works as a quick gift because it requires little clay and finishes fast.
Stamped Slab Napkin Rings
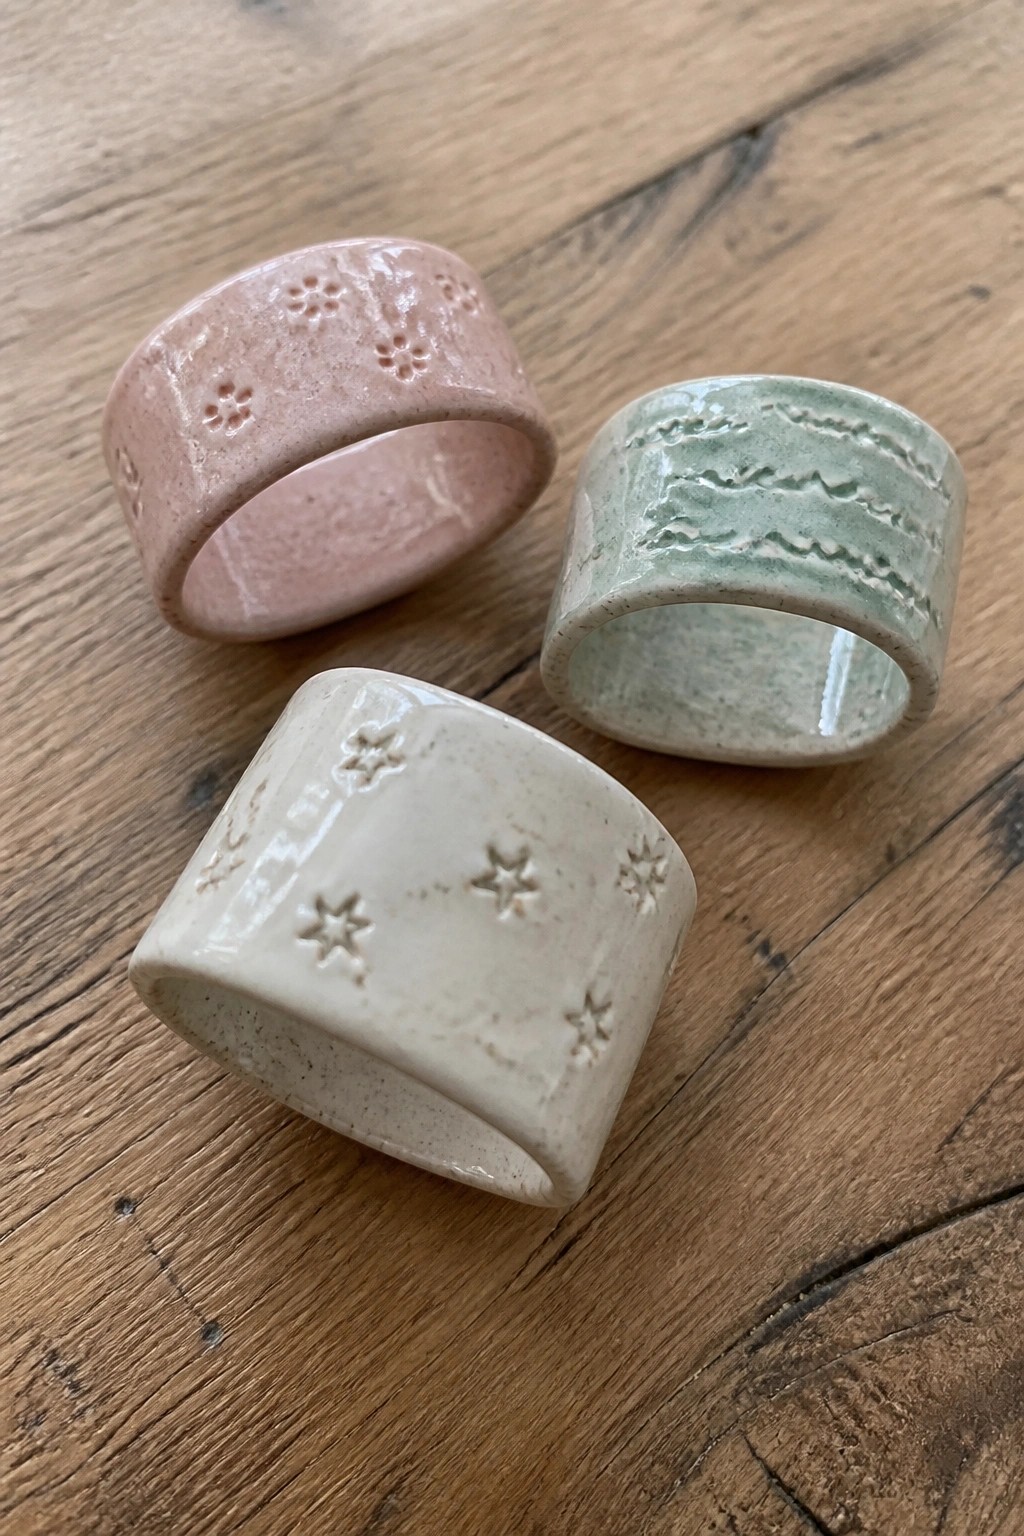
Napkin rings built from clay slabs let you practice rolling an even thickness, forming a clean cylinder, and joining the seam without distortion. The three rings here use simple impressed stamps—flowers on the pink ring, stars on the white ring, and wavy lines on the green ring—to add texture before glazing. Soft matte glazes in pastel tones keep the focus on the patterns while making the rings durable enough for repeated use at the table. The uniform height and smooth interior edges show how a basic slab can produce tidy, repeatable tableware.
What makes this idea useful is how quickly you can produce a matching set by cutting identical rectangles from one slab. Different stamp motifs and glaze colors let you coordinate with seasons or existing dishes without extra tools. The same cylinder form works for small plant labels or desk cord holders if you adjust the diameter. A finished set photographs well for sharing because the stamped patterns read clearly against the colored backgrounds.
Rectangular Slab Incense Holder

A flat rectangular slab formed from clay makes a simple incense holder with a shallow channel running down the center and a small raised cup at one end to hold the stick upright. The long narrow shape keeps the burning incense contained while the groove collects ash along its length. This style fits the holder category and works as a tabletop or shelf object where the smooth clay surface and clean lines keep the focus on the form itself.
What makes this idea useful is how the basic slab shape can be lengthened or shortened to match different table sizes or shelf depths. You could add a second cup for multiple sticks or widen the channel slightly for thicker incense varieties. The small footprint uses minimal clay and space in the kiln, so it serves as a quick test piece for new textures or matte finishes. In a living room or meditation area this kind of holder stays practical without taking up much room.
Slab-Built Sponge Tray with Drainage Slots
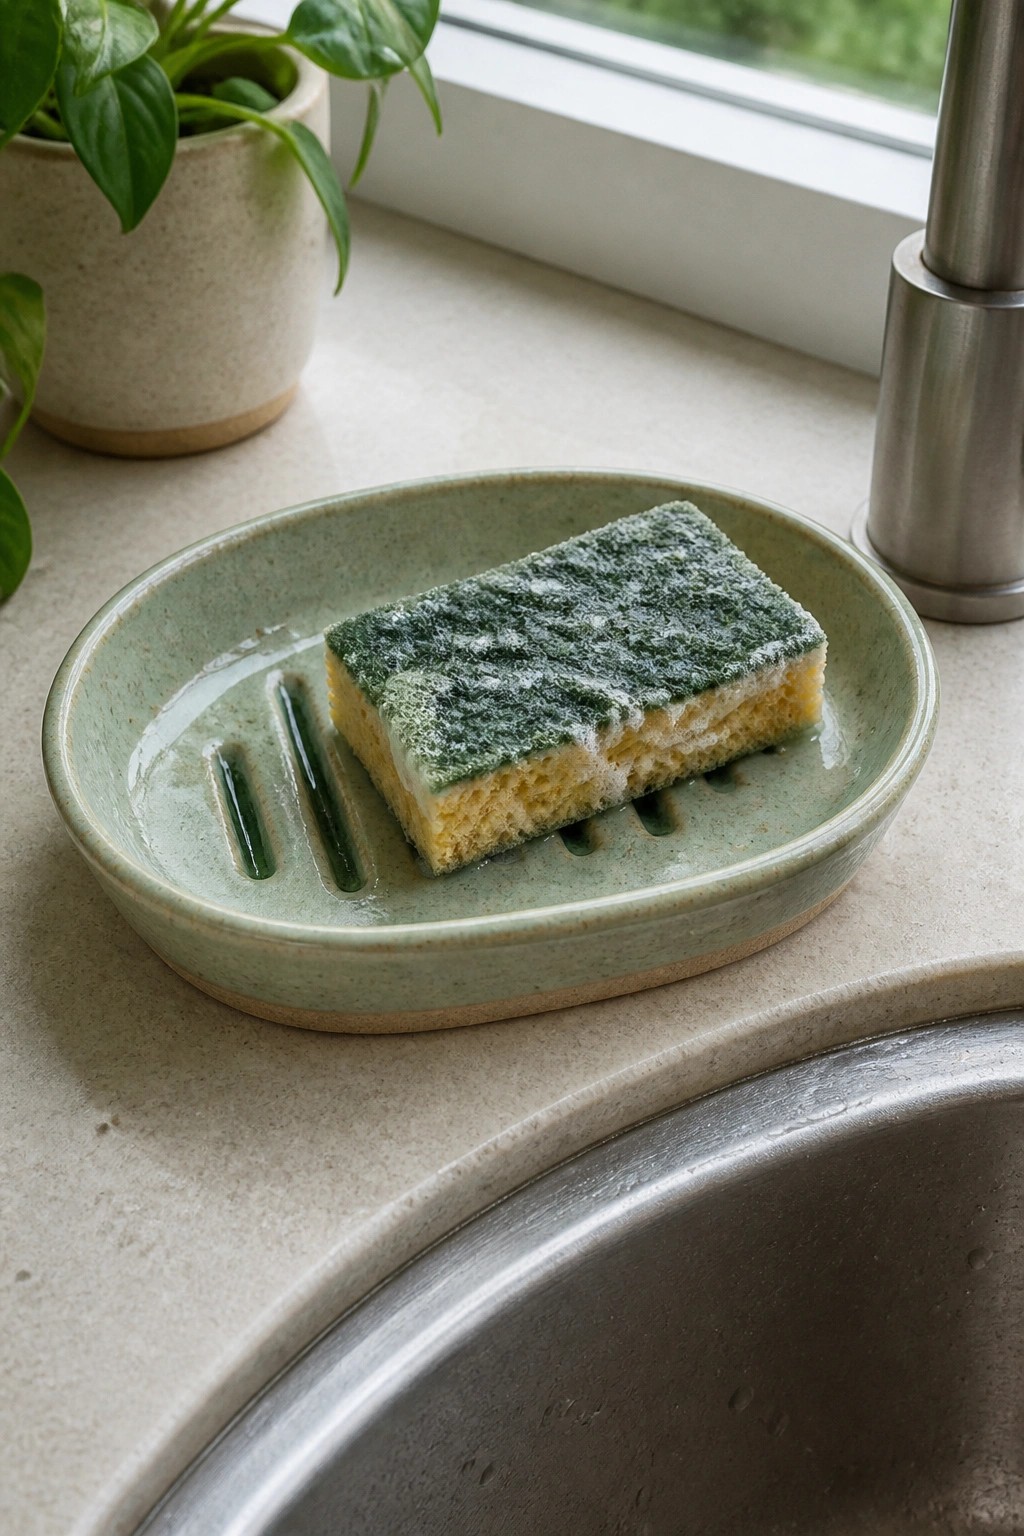
A flat slab formed into a shallow oval tray makes a practical sponge holder for the kitchen sink area. Several parallel slots cut through the base allow water to drain so the sponge stays drier. The light green speckled glaze covers the entire surface and creates a simple, unified look that fits everyday kitchen use. This project shows how to cut and shape a basic slab while adding functional details like the ridges that support the sponge.
What makes this idea useful is how the drainage slots solve a common problem with wet sponges sitting on a flat surface. You can change the tray size by rolling a larger or smaller slab to hold bar soap instead or to fit a different spot on the counter. Adding a low rim around the edge or testing other glaze colors lets you adapt it for bathroom use or as a small catchall. The straightforward form also works well on Pinterest boards focused on simple kitchen upgrades.
Hedgehog Shaped Planter
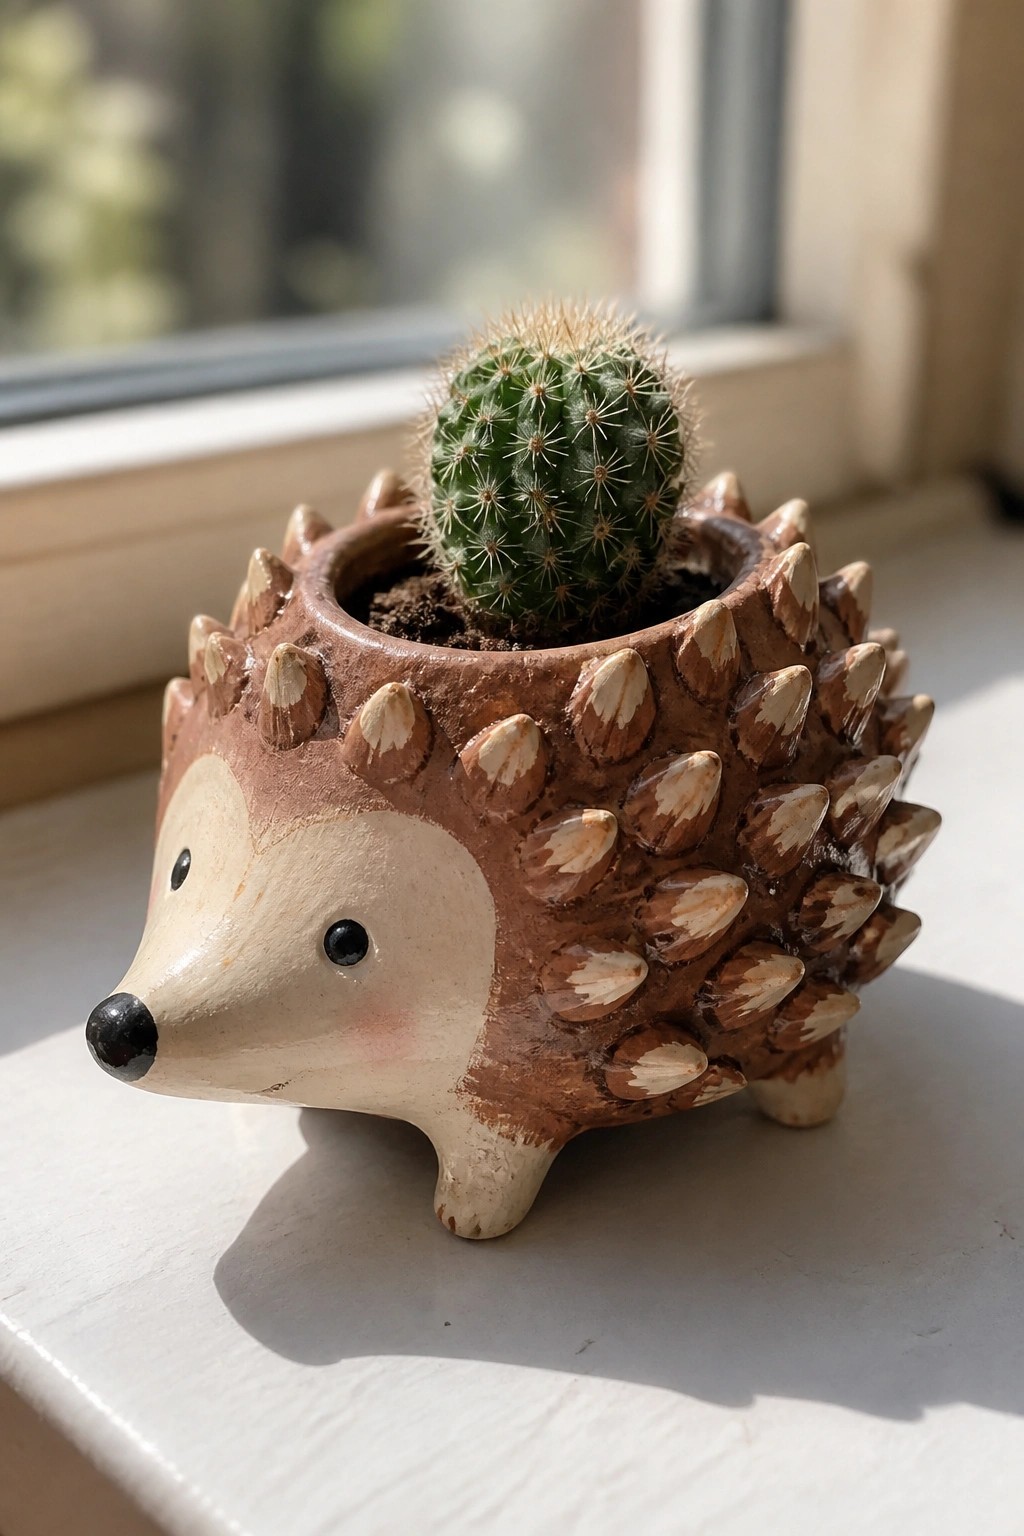
A hedgehog planter uses slab construction to create a small animal shaped container for succulents or cacti. The rounded body holds soil while sculpted spikes add texture across the back and a simple painted face defines the front. This approach turns a basic pot into a compact decorative holder that works on windowsills or shelves.
The small scale makes this easy to adapt by changing the animal or spike pattern to match other themes. It fits well for displaying single plants in limited spaces and can be reworked into a plain bowl by skipping the face and spikes. A version like this stands out in searches for plant decor because the animal form gives it a clear focal point.
Square Slab Jewelry Tray
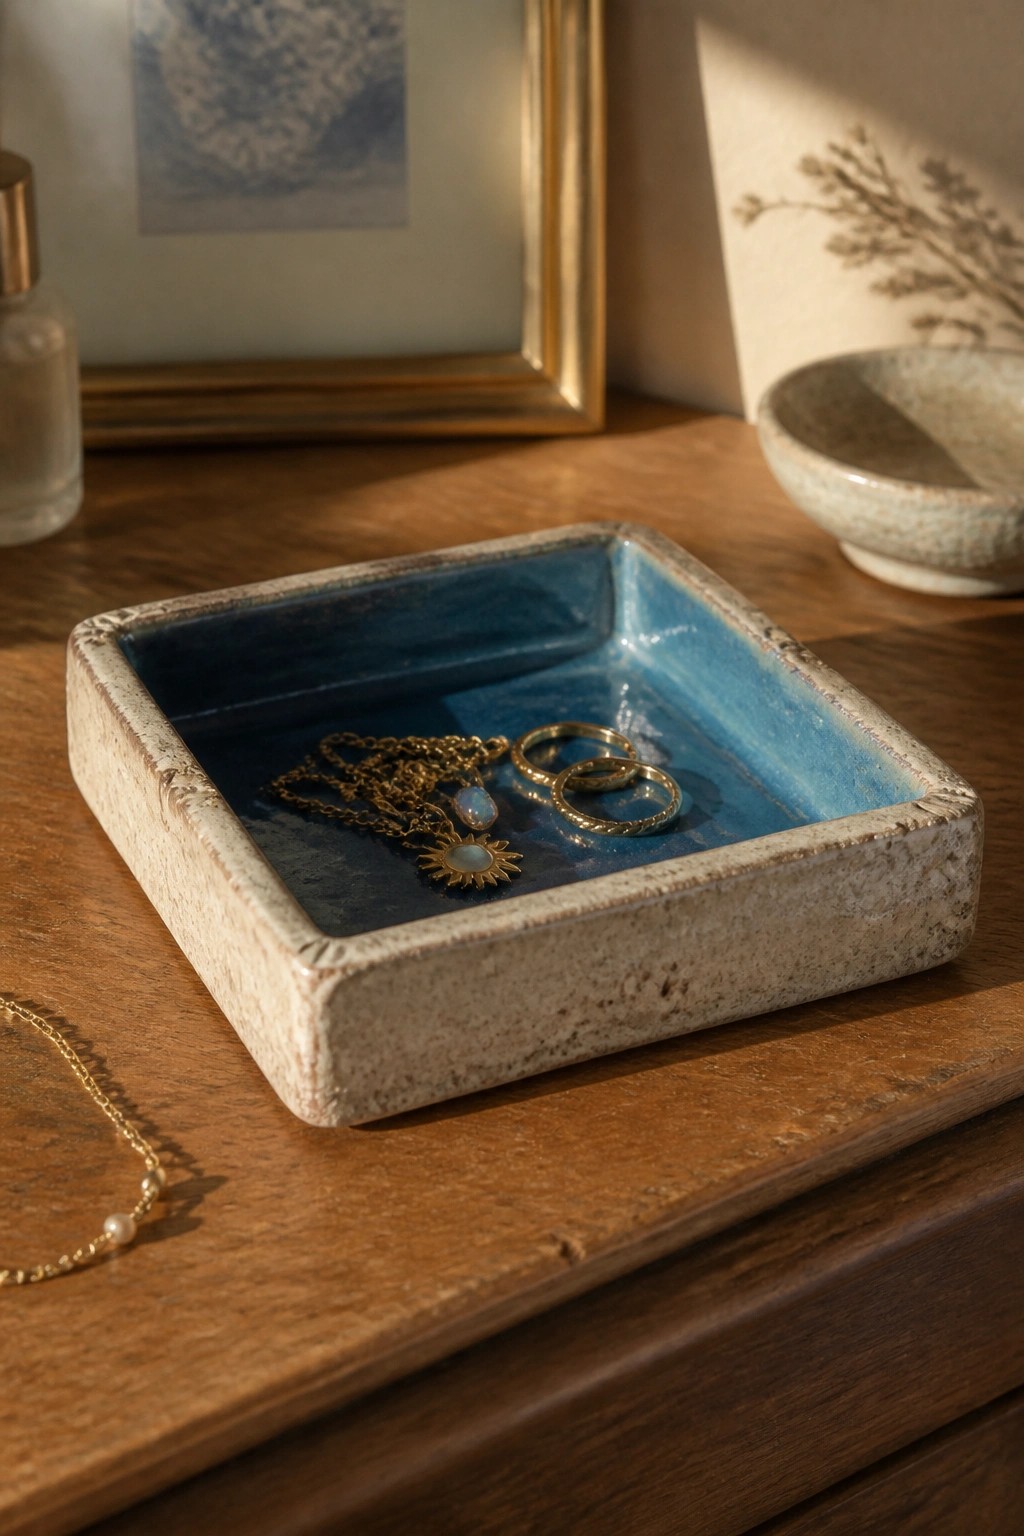
A square tray built from flat clay slabs creates a simple catch-all for rings, necklaces, and small items. Low walls formed by joining scored edges keep contents contained while the flat base stays easy to roll out evenly. A deep blue glaze on the interior contrasts with the unglazed, textured rim and exterior, making the shape stand out without extra decoration.
What makes this idea useful is how the basic rectangle adapts to different sizes with little extra effort. You can shorten the walls for a flatter version or widen the base to hold keys and coins on an entry table. The same slab layout works for bathroom soap dishes or desk organizers, and swapping the glaze color changes the look without changing the build steps.
Frequently Asked Questions
What basic tools and materials do I need to begin these slab pottery projects? Start with a few essential items that support handbuilding techniques. You will need a rolling pin or wooden dowel for flattening clay, canvas or plastic sheets to prevent sticking, a scoring tool like a fork or serrated rib, slip made from clay and water for joining pieces, and basic cutting tools such as a needle tool or wire cutter. Choose a beginner-friendly clay body like earthenware or stoneware that has good plasticity. A work surface protected with newspaper and access to a kiln for firing complete the setup. These items allow you to practice all twenty projects without extra expense.
How can I roll out slabs to an even thickness without specialized equipment? Place your clay between two wooden slats of equal height on a canvas-covered table. Roll the pin steadily across the clay while keeping it level on the slats. This method produces consistent thickness, usually around one quarter to one half inch for most beginner projects. Flip the slab occasionally and rotate it to avoid uneven spots. If the clay sticks, dust lightly with cornstarch. This simple approach teaches control and prepares slabs for cutting shapes used in boxes, trays, and tiles.
What steps prevent cracks when joining slabs for three dimensional forms? Score both surfaces thoroughly with a tool that creates grooves, then apply a generous layer of slip before pressing the pieces together firmly. Support the form with crumpled newspaper or foam inside while it dries to maintain shape. Work in stages rather than rushing large assemblies, and cover the project loosely with plastic overnight to equalize moisture. These habits reduce stress on seams and help the clay dry uniformly across all twenty projects.
How long should slab projects dry before they are ready for bisque firing? Allow pieces to reach a leather hard stage first, which takes one to three days depending on room humidity and thickness. Then move them to a slow drying area covered with plastic for another few days until bone dry. Test dryness by touching the clay; it should feel cool and no longer cool to the touch when fully dry. Rushing this process often leads to cracks, so patience during drying supports successful firing of items like mugs, plates, and ornaments.
What simple finishing techniques work well on completed slab projects before glazing? Once the clay reaches leather hard, smooth surfaces with a rib tool or damp sponge to remove fingerprints and refine edges. Add texture using stamps, found objects, or carving tools while the surface is still workable. Apply underglazes for color if desired, then let the work dry completely. These steps enhance the handbuilt look without requiring advanced skills and prepare pieces for a clear or colored glaze application after the first firing.

Pottery Path is my cozy corner of the internet where I share clay ideas, pottery inspiration, and simple projects you can recreate at home. I love exploring everything from air dry clay to handbuilt pottery to cute minis that brighten your day. My goal is to make clay crafting feel easy, fun, and welcoming for anyone who wants to try it.
You will find beginner friendly tutorials, creative pottery painting ideas, and lots of warm inspiration for slow and happy crafting. If you enjoy hands on creativity, this space will feel like home.