I have been working with coil pots for a while now and I like how layering the coils adds some depth to the shape.
It is a straightforward way to build without needing a wheel.
I gathered some vessel ideas that all use this layered approach.
They range from simple forms to ones with a bit more detail.
Maybe one of them will fit what you want to make next.
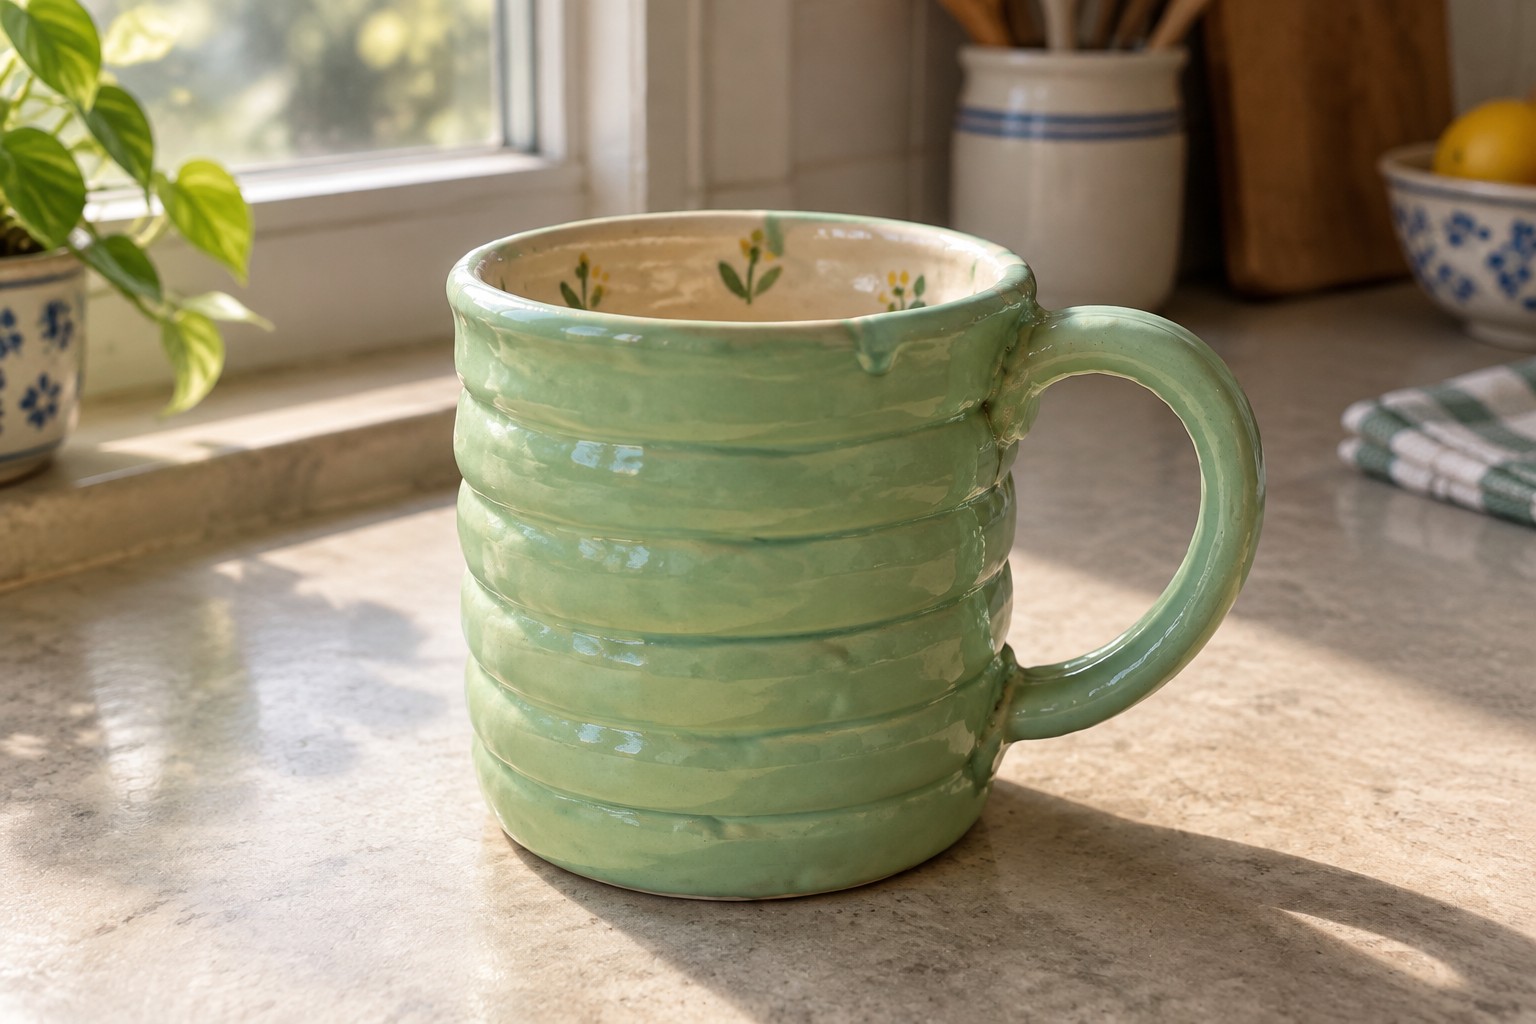
Stacked Coil Mug with Green Glaze and Painted Interior

A mug built from stacked coils forms the thick walls and creates the horizontal ridges that run around the outside. The green glaze sits in the grooves between coils to emphasize the layered construction while the interior rim carries a simple painted motif of leaves and a yellow flower. This approach turns basic coil building into a finished kitchen piece that still shows the construction method.
What makes this idea useful is how the ridges do the decorative work once the coils are stacked and smoothed. You could scale the same method down for smaller cups or widen the coils slightly to make a larger soup bowl and swap the interior painting for a different color or motif. In a kitchen this shape works well because the texture gives it presence on a shelf without needing extra carving or stamps.
Layered Coil Bowl with Glazed Interior Contrast

This bowl is built from stacked coils that remain visible on the exterior, creating a ridged terracotta surface. The interior is finished with a solid blue glaze that contrasts sharply with the rough coils. The shape stays low and wide, making it suitable as a serving bowl or decorative vessel where the construction method is part of the design.
What makes this idea useful is how the coils do the structural work while the glaze keeps the inside practical for food or display. You can adapt it by changing the interior color to match your dishes or by tightening the coils for a taller, narrower form. The same approach works well for smaller catch-all bowls or plant saucers where the texture on the outside adds interest without extra carving.
Layered Coil Vase with Blue Dot Details

This vessel uses stacked coils to form a tall, tapered shape where each layer remains visible as a raised horizontal ridge. The light glaze keeps the surface simple while small blue dots placed at irregular intervals create scattered points of contrast. The idea centers on letting the coil construction provide most of the texture instead of adding heavy surface carving or complex glazing.
The coil ridges do most of the visual work here, so the blue dots stay minimal and easy to apply. A piece like this works especially well as a dried stem holder on a shelf or windowsill. You could adapt the same build for a shorter version used as a utensil crock or swap the dot color to match other room colors. The straightforward decoration also makes it simple to repeat in different sizes without much extra planning.
Two-Tone Coil Planter with Horizontal Bands

A coil-built planter formed from stacked horizontal coils creates a rounded vessel that works well for small to medium houseplants. The upper coils receive a glossy coral glaze while the lower section remains in its natural speckled clay, producing a clear color break that highlights the construction lines. A drainage hole at the base keeps the piece functional for live plants. This method shows how basic coil layering can build both structure and surface pattern in one process.
What makes this idea useful is the way the ridges from the coils create texture that needs no carving or stamping. You could adapt the same stacked form for a shorter succulent pot or extend the height for a taller plant. The two-tone treatment is simple to copy by applying glaze only to the top coils before firing. On a shelf or table, the horizontal lines give the planter more visual weight than a smooth surface would.
Coiled Tray for Grouping Small Candles

A coil-built oval tray creates a stable, textured base for arranging multiple small candles in separate holders. The visible ridges and uneven glaze surface come from the layered construction, giving the tray enough visual weight to hold different holder styles without looking flat. This approach turns a simple vessel form into a functional display piece that keeps candles contained on a countertop or table.
What makes this idea useful is how easily the same tray shape can be adapted for other small items like salt and pepper shakers or essential oil bottles. You could shorten the oval into a rectangle if you want it to fit a narrow shelf or stretch the length to hold five or six candles instead of three. The neutral, mottled glaze works across kitchen, bathroom, or living room settings without competing with other colors. On Pinterest this kind of piece stands out because the handmade texture reads clearly even in a small thumbnail.
Stacked Coil Candle Holder

A coil vessel built from even, rounded coils stacked into a short cylinder creates a simple lantern form that works well for holding a tea light. The translucent amber glaze lets the flame glow through the walls while highlighting the ridges between each coil. This approach turns a basic layered construction into a light-diffusing object that sits easily on a table or ledge.
What makes this idea useful is how the coil ridges catch and scatter the light without needing extra carving or texture tools. You can scale the same stacked shape down for smaller votives or widen it slightly for a bigger pillar candle. The warm color works especially well outdoors at dusk or on a windowsill where the glow shows off the form. For a variation, swap the glaze for a matte finish in earth tones and keep the same coil layout for a different mood.
Rainbow Layered Coil Ring Dish
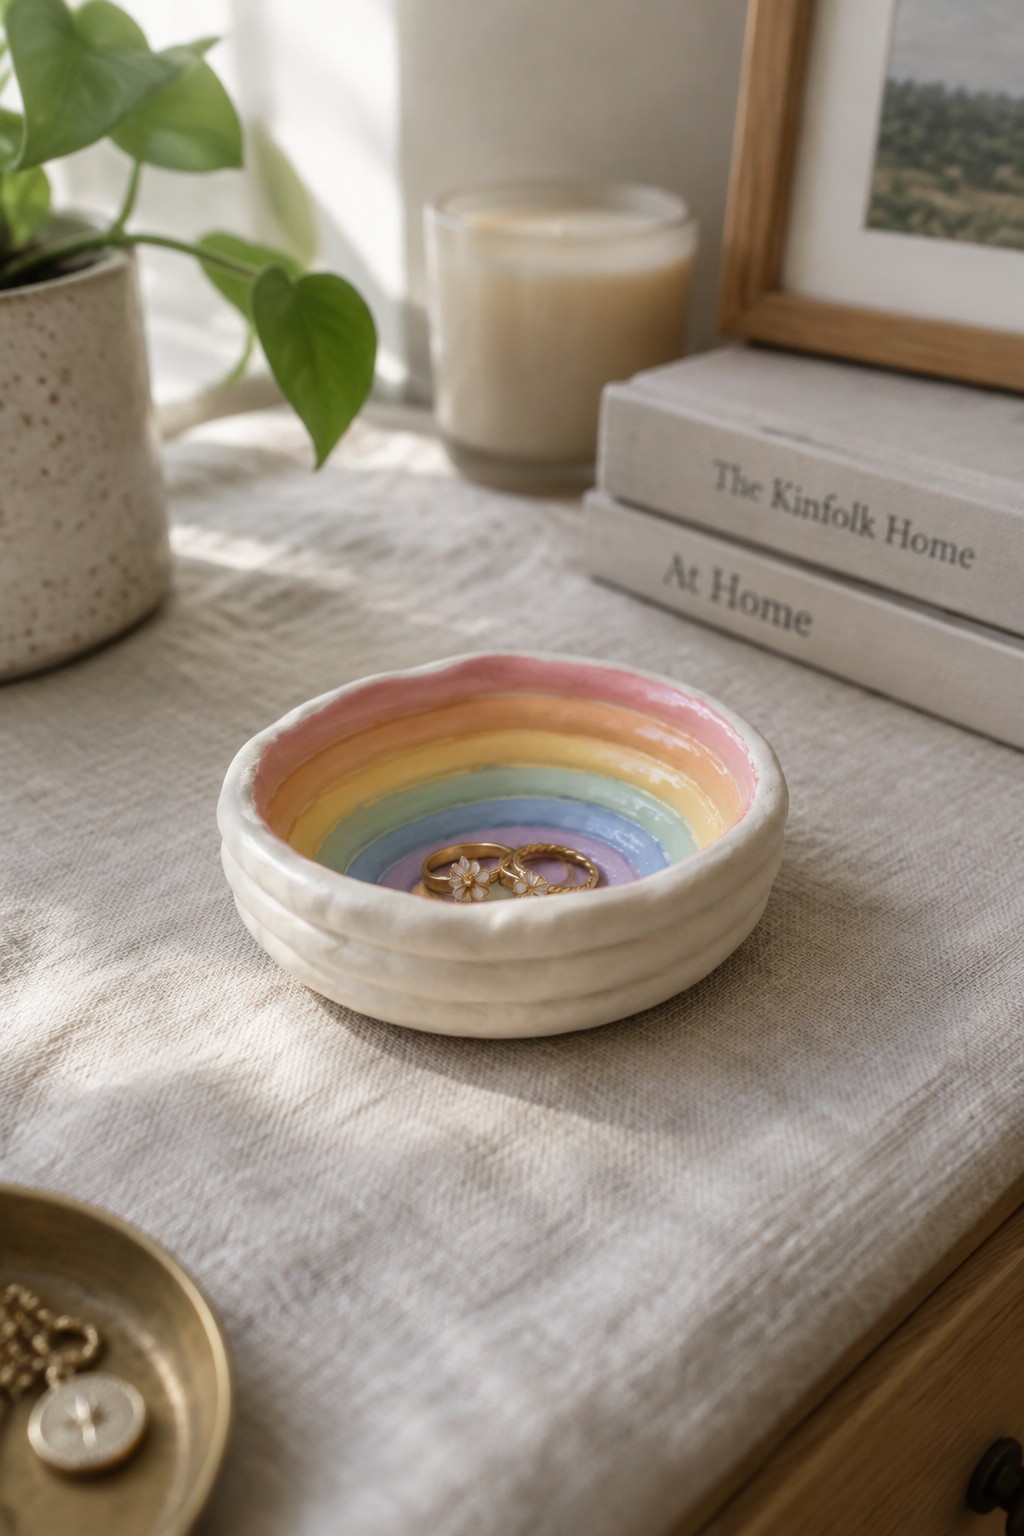
A small coiled bowl works well as a ring dish when the interior gets painted in wide concentric stripes of pink, orange, yellow, green, blue, and purple. The white rim stays plain and slightly textured, which keeps the focus on the color bands inside. This approach turns a basic coil vessel into a functional holder that catches the eye without needing extra sculpting or handles.
What makes this idea useful is the small scale, which means less clay and quicker drying time. The painted stripes are easy to adapt by changing the color order or using fewer bands for a simpler version. A piece like this works especially well on a nightstand or dresser where it can hold rings or small earrings, and the same shape could be made slightly deeper for keys or loose change. The bright interior helps the finished dish stand out in photos for sharing.
Coiled Ridge Spoon Rest With Simple Motif

A spoon rest built from layered coils creates a long, stable handle with raised parallel ridges that give the piece both grip and visual rhythm. The shallow bowl end stays smooth to hold a small painted carrot, keeping the focus on the functional dip while the textured coils add contrast. This kitchen item stays compact enough to sit beside a stove or on a prep counter without taking up much space.
The ridged handle technique works especially well for spoon rests because the coils naturally form channels that catch drips and make the piece easy to pick up. You could swap the carrot for a small herb sprig or initial to match other kitchen pottery, or stretch the same coil method into a longer version that doubles as a utensil tray. The small scale and simple motif make it a quick project that still stands out in a set of matching handmade kitchen pieces.
Double Coil Cellar for Seasonings

A double vessel built from stacked coils creates two small connected bowls that function as a salt and pepper cellar. Horizontal ridges from the coil construction run around each bowl, giving the surface a clear layered texture, while two contrasting glazes keep the sections distinct. One bowl carries a turquoise glaze and the other a mustard yellow, both leaving the lower portion of the form in raw clay. The narrow bridge between the bowls acts as a built-in handle so the whole piece stays together on a counter or table.
What makes this idea useful is how simply the same joined shape can be adapted for any two dry ingredients you use together. You could make a larger version for herbs and red pepper flakes or a smaller one to hold cotton swabs and bath salts in a bathroom. The coil ridges require no extra tools, and changing the glaze colors on each side lets you match existing kitchenware without extra work. In a kitchen this form keeps two staples within reach without needing separate dishes.
Tiered Coil Toothbrush Holder with Painted Stars
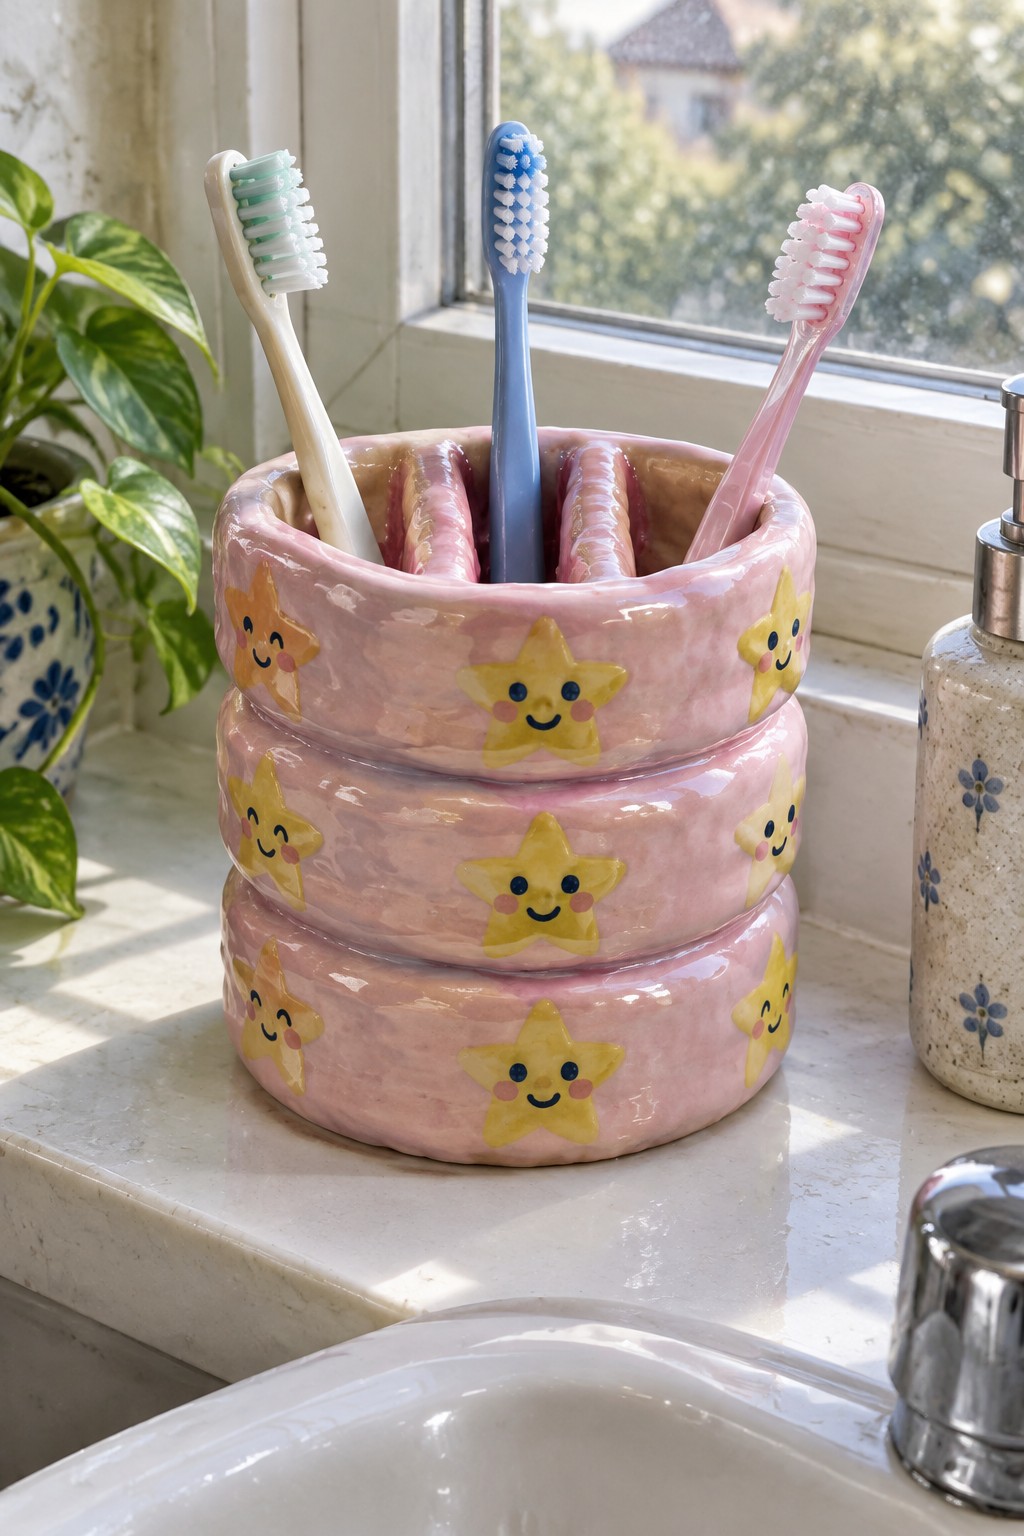
A stacked coil vessel works here as a bathroom toothbrush holder by building three separate rings into a compact tower shape. The coils create vertical dividers inside each level so brushes stand upright without touching. A soft pink glaze covers the form while simple yellow star faces are painted on the outside of each ring to add repeating visual interest without crowding the surface.
What makes this idea useful is how the tiered shape solves the common problem of brushes leaning against each other on a sink. The small overall size fits standard bathroom counters and makes the piece easy to move for cleaning. You could rework the same coil stacking method into a shorter two-tier version for just two people or change the painted stars to dots or stripes if you want a quicker surface treatment. For a gift this shape also translates well to a desk pencil cup by skipping the pink glaze and using a matte finish instead.
Two-Tone Coil Pitcher with Visible Horizontal Bands
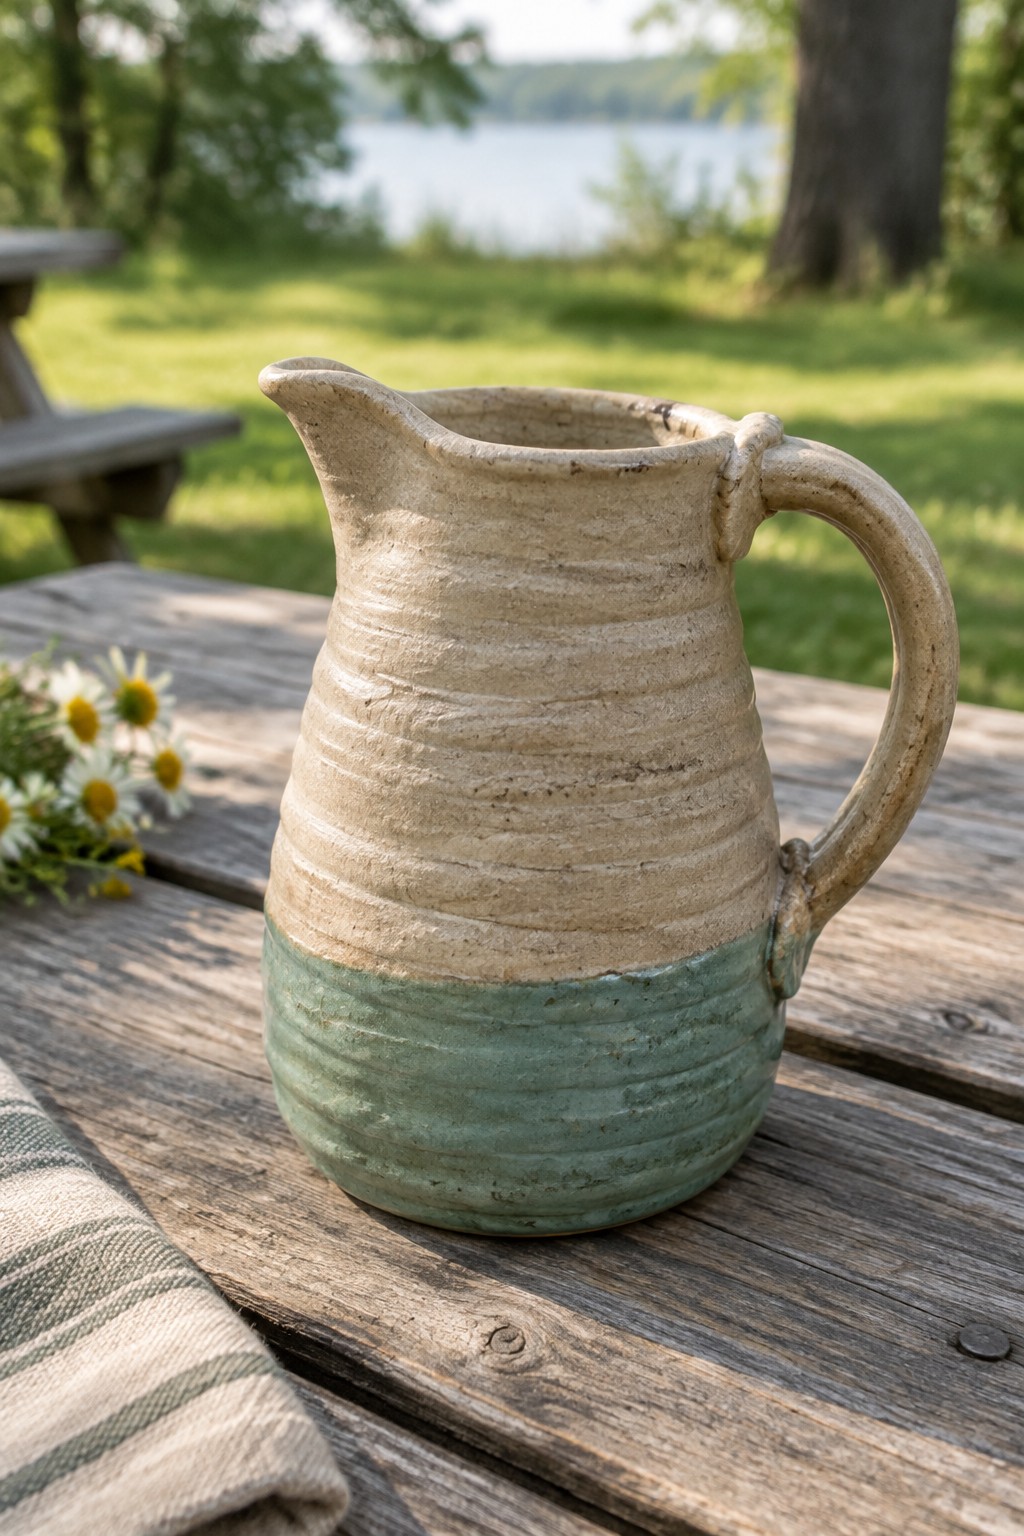
A coil-built pitcher uses stacked clay coils to form both the body and the integrated handle and spout. The horizontal ridges left from the coils create a consistent texture across the surface, while the two-tone glaze divides the form into a beige upper section and a muted green lower band. This approach keeps the construction method visible rather than smoothing it away, which gives the pitcher a straightforward, hand-built look that works as either a serving vessel or a decorative object.
The shape does a lot of the work here because the pitcher form already includes a spout and handle, so the coil texture and color split become the main design choices. You could adapt the same idea by changing the glaze colors, adjusting the height of the color break, or scaling the whole piece down for a smaller creamer. In a kitchen or on a table, the functional handle and spout make it more useful than a plain vase, and the visible coils help it stand out from wheel-thrown pitchers on Pinterest boards.
Layered Coil Yarn Bowl with Feeding Notch
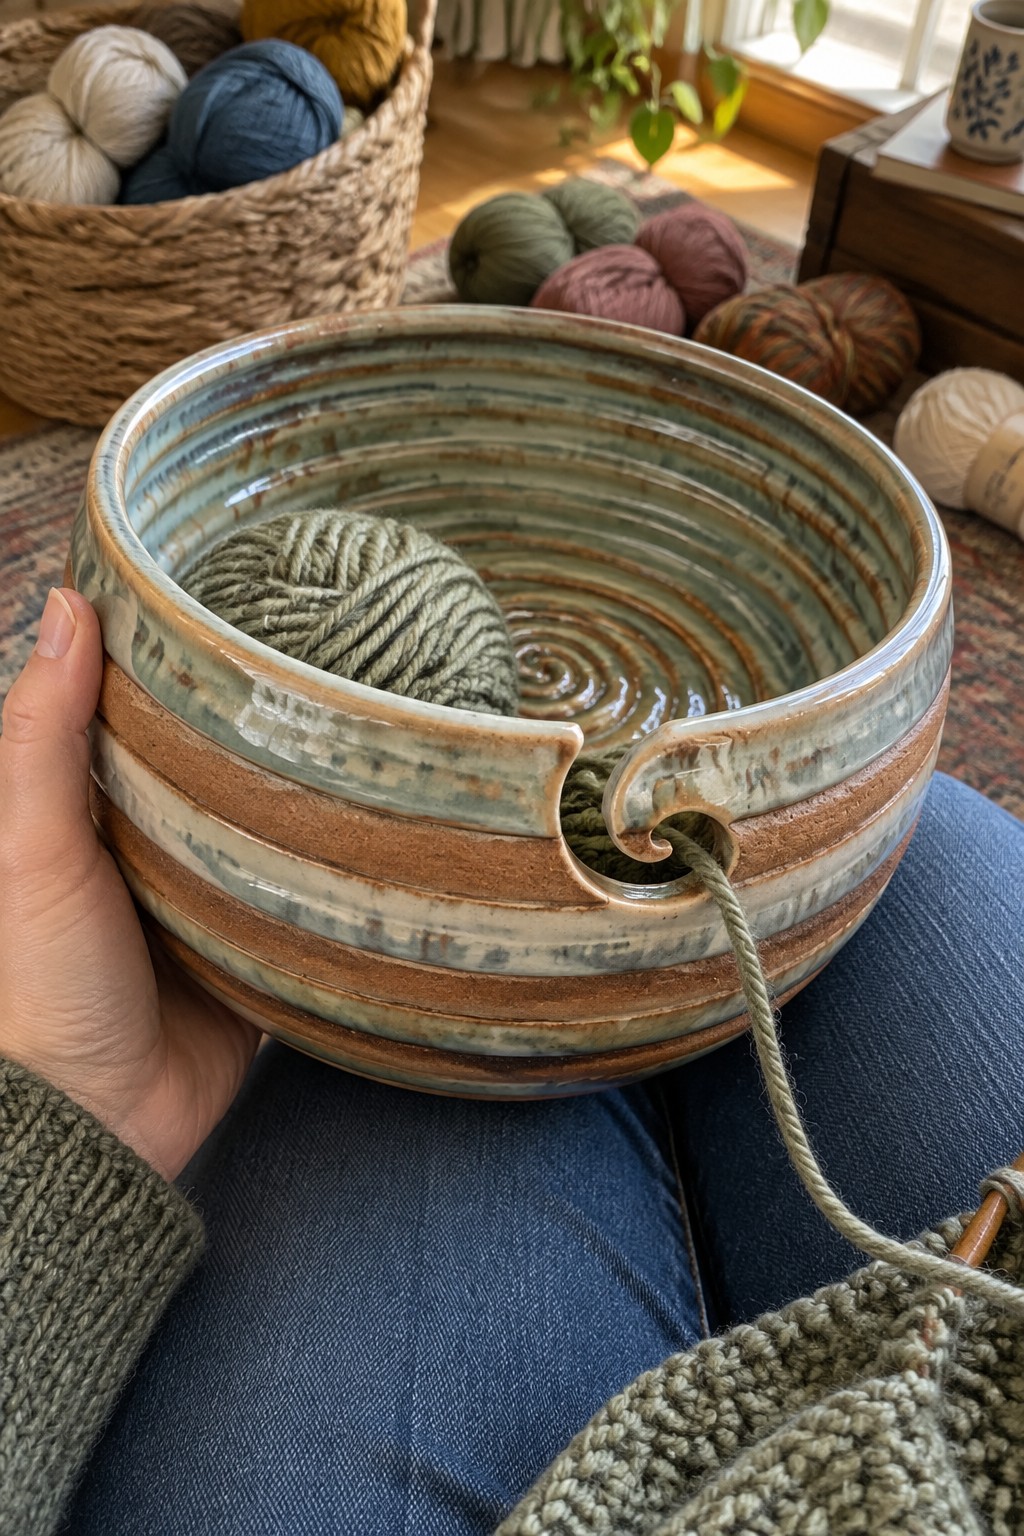
A yarn bowl formed from stacked horizontal coils creates a stable, rounded vessel sized to hold a standard skein. The coils are left partially exposed as textured bands around the exterior while the interior is smoothed into a spiral that helps the yarn rotate freely. A deep notch cut into the rim acts as a built-in guide so the strand feeds out cleanly during knitting or crochet without catching or tangling. The multicolored glaze settles into the coil lines, emphasizing the construction rather than hiding it.
What makes this idea useful is how the notch transforms an ordinary coil bowl into a dedicated tool for fiber work. The same horizontal layering approach can be repeated on a smaller scale for travel versions or widened for bulkier yarns. In a craft space the bowl keeps supplies contained yet accessible on a table or lap. The notch detail is simple to add once the final coil is placed, so the basic form can be adapted into other functional vessels like a small plant holder or a desk catch-all by changing only the rim treatment.
Coil Built Sponge Holder Bowl

A small coil built bowl makes an effective sponge holder for the kitchen sink area. The form uses stacked coils that create repeating horizontal ridges on the exterior while leaving a smooth, functional interior. A glossy deep green glaze accentuates the layered construction and gives the piece a durable surface that handles regular water exposure.
What makes this idea useful is how the coil ridges provide both texture and a stable shape that contains drips. You could adapt the same stacked coil method to create a matching soap dish or a slightly taller version for a utensil caddy. The open top and low profile keep the sponge accessible while allowing airflow for drying. In a kitchen, this kind of piece blends easily with other handmade ceramics and stands out on Pinterest as a simple, practical coil project.
Layered Coil Petals Form a Flower Ring Dish
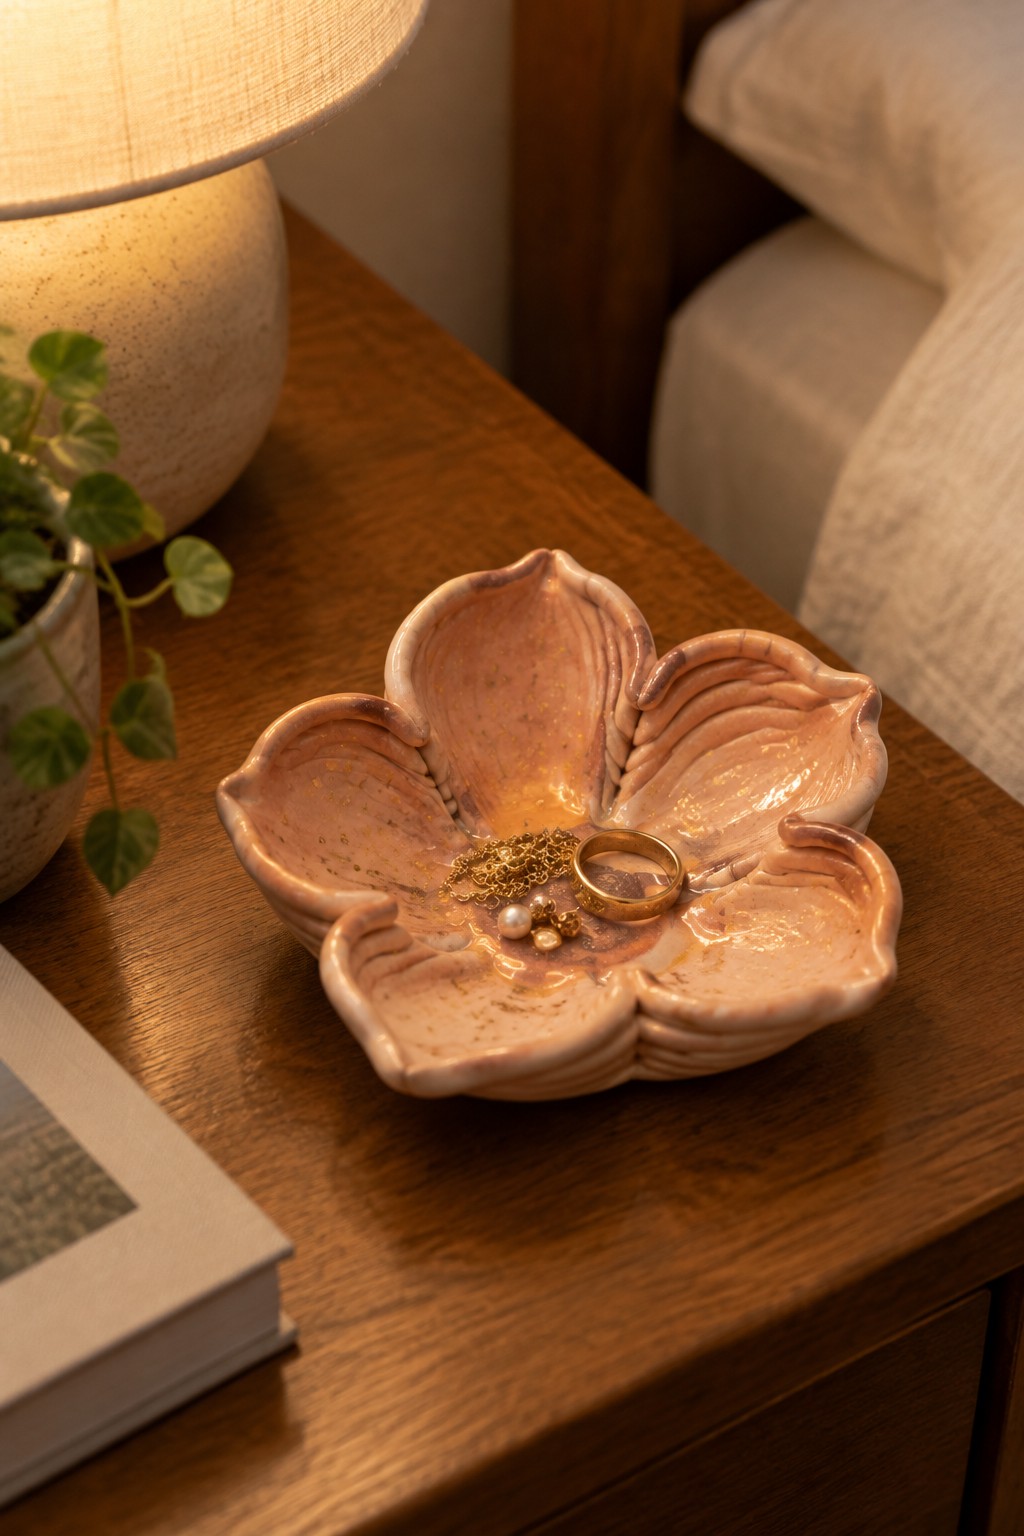
A small dish built from stacked coils shaped into overlapping petals creates a shallow bowl that works as a ring holder or jewelry tray. The coils are pinched and smoothed to form curved edges that rise and overlap, giving the piece clear structure without needing a separate mold. A soft pink glaze with gold flecks settles into the ridges between coils and adds subtle contrast to the form. This method suits any small catch-all where the vessel shape itself becomes the main decorative element.
The compact size fits easily on a nightstand or dresser for daily jewelry storage. You can scale the same petal layering down for a smaller trinket dish or widen the center coils to make a soap holder for a bathroom. Switching the glaze to a single matte color or adding extra outer petals changes the look without altering the basic coil technique. The flower outline reads clearly in photos, which helps the finished piece stand out in project roundups.
Layered Coil Bud Vase with Horizontal Ridges

A tall narrow vase built from stacked coils creates a clean tapered shape while leaving visible horizontal ridges around the body. The coils give the surface a subtle stepped texture that holds glaze unevenly, producing soft color shifts from light green to warmer tones where it pools. This approach works especially well for a single-stem holder because the narrow opening keeps flowers upright without extra mechanics. The overall form stays simple enough that the coil lines become the main design element rather than added decoration.
The shape does a lot of the work here because the tall silhouette fits easily on a narrow ledge or desk without taking much space. You could scale the same coil-stacking method down for a pencil cup or widen the base slightly to hold a small plant. The speckled glaze effect would also carry over well to other neutral or earth-tone palettes if you want to match different rooms. For a gift, this kind of piece stands out on Pinterest because the texture reads clearly even in small photos.
Stacked Coil Utensil Holder with Vegetable Stamps

A tall cylinder built from thick coils makes a sturdy kitchen utensil holder. The visible horizontal ridges from the coils create texture across the surface, while brown vegetable stamps of carrots, tomatoes, peppers, and beets add pattern without extra carving. This keeps the form simple and the decoration direct, turning a basic storage shape into something that fits on a counter.
What makes this idea useful is that the coil ridges already supply both structure and surface interest, so you only need stamps for the rest. You could shrink the same design to a shorter jar for spoons or stretch it taller for a flower vase. In a kitchen this shape keeps tools within reach and still looks intentional next to cutting boards or herb pots. The vegetable stamps are easy to swap for other kitchen themes like herbs or fruit if you want to change the look later.
Hanging Coil Planter with Painted Bands

A wall-mounted planter formed from stacked clay coils creates a sturdy basket shape with a looped hanger built into the top. Horizontal bands of light blue paint mark every few coil layers while leaving sections of the natural terracotta surface exposed. The rounded form and visible coil texture give the piece enough visual weight to stand out on a wall without extra decoration. This approach works as a straightforward planter that holds soil and small trailing plants.
What makes this idea useful is the way the coils already supply both structure and a built-in pattern for the paint to follow. The compact size fits narrow walls or apartment spaces where a hanging plant adds greenery without taking floor room. You could change the stripe color to match existing decor or leave the clay plain for a simpler look. The same coil-and-hanger method also adapts to a shorter tray shape or a taller vessel if you want to adjust the scale.
Layered Coil Bowl with Drippy Glaze Rim

A bowl built from stacked horizontal coils creates a tiered, textured surface that shows the construction method clearly. The yellow glaze applied along the top edge and allowed to drip between the coils adds bright contrast against the unglazed clay body. This approach suits a casual serving bowl or fruit holder because the repeated coil lines give the piece structure and visual rhythm without extra decoration.
What makes this idea useful is how the coil layers naturally catch and direct the glaze drips for an easy decorative effect. You could scale the same stacking method down for a small dip bowl or widen the coils for a larger bread basket. In a kitchen or picnic setting the earthy texture holds up well next to fresh food, and swapping the yellow for another bright glaze color lets you match different tableware. The straightforward coil work also photographs well for sharing the build process.
Layered Coil Creamer with Blue Dots

A small pitcher built from stacked coils gives you a compact creamer shape with a pinched spout and simple pulled handle. The visible horizontal ridges from the coil construction create a textured surface that accepts blue circular motifs without extra prep work. The off-white clay body keeps the dots crisp while the rounded form stays stable on a table.
What makes this idea useful is how the coil ridges do the decorative work before any color is added. You could repeat the same short body and spout on a taller version for a small milk jug or drop the handle entirely to make a matching sugar bowl. The dot pattern is easy to change with different stamp sizes or glaze colors if you want a set for everyday kitchen use.
Small Coil-Built Creamer with Dot Pattern

A small pitcher made from stacked coils forms the body, spout, and handle of this creamer. The visible horizontal ridges show the coil construction clearly, while the light base glaze lets the blue dots stand out without competing with the texture. The compact size and simple round motifs keep the focus on the form rather than elaborate surface work. This approach fits the category of kitchen vessels that stay functional while showing the building process.
What makes this idea useful is how the coil ridges give the piece a finished look without extra carving or slipping. The dot pattern can be adapted by changing the color, spacing, or size to match other tableware. In a kitchen, this shape works well for milk or cream at breakfast and scales easily to a taller version for syrup or sauce. The same coil-and-dot method could be reworked into a small vase or utensil holder by adjusting the rim and handle placement.
Frequently Asked Questions
What is the best way to start creating a layered coil vessel from the ideas in the article?
Begin by selecting a simple vessel shape like a bowl or vase from the 20 ideas. Roll out even coils of clay about the thickness of a pencil. Form a flat base first then stack and join the coils in even layers while smoothing the interior and exterior surfaces with your fingers or a rib tool. Work in sections to allow partial drying between layers which helps maintain the structure.
How can I prevent cracks from forming between the layers during drying?
Apply slip generously between each coil layer to create a strong bond. Cover the vessel loosely with plastic for the first day or two to slow the drying process evenly. Avoid placing the piece in direct sunlight or near heat sources. Check daily and gently compress any gaps that appear with a modeling tool before they widen.
What materials work best for achieving visible layered effects in coil vessels?
Stoneware or earthenware clays with grog content provide good texture and strength for layered builds. Experiment with mixing two different clay colors in alternate coils to highlight the layers naturally. For added interest some artists incorporate thin strips of colored clay or underglaze between layers before smoothing lightly to keep the lines distinct.
Which of the 20 ideas suit beginners who are new to coil construction?
Start with the simpler rounded forms or low bowls that use fewer coils and basic stacking patterns. These allow practice with joining and smoothing without complex shaping. Once comfortable move to taller vessels or those with subtle curves. Always keep the walls supported from inside with your hand while building to maintain even thickness.
How should I finish and fire a layered coil vessel to preserve its structure?
After the piece reaches leather hard refine the surface with sandpaper or a sponge to emphasize the coil lines if desired. Bisque fire slowly at a low temperature to reduce stress on the layers. Apply glaze thinly and avoid thick applications over joins. Use a kiln with a controlled ramp up to the final temperature to prevent warping or separation.

Pottery Path is my cozy corner of the internet where I share clay ideas, pottery inspiration, and simple projects you can recreate at home. I love exploring everything from air dry clay to handbuilt pottery to cute minis that brighten your day. My goal is to make clay crafting feel easy, fun, and welcoming for anyone who wants to try it.
You will find beginner friendly tutorials, creative pottery painting ideas, and lots of warm inspiration for slow and happy crafting. If you enjoy hands on creativity, this space will feel like home.