
I have been making coil pottery pieces for my own home over the past year.
It is a method that lets me build shapes slowly without needing a pottery wheel.
I came up with some designs for bowls and vases that fit my space and style.
A few decorative items also turned out better than I expected so I kept them around.
Here are twenty ideas based on what I have tried.
Coiled Bowl with Sunburst Interior Pattern

A coil-built bowl shows its construction through the stacked horizontal ridges that remain visible on the exterior after the form is finished. Inside, a mint green speckled glaze holds a simple radiating pattern of yellow brushstrokes that fan out from the center. This combination keeps the focus on the handmade surface while the interior design adds a clear focal point without needing complex carving or multiple glazes.
The shape does a lot of the work here because the coil ridges supply texture that would otherwise require extra tools or steps. You could repeat the same radiating motif on a smaller pinch-pot version for a ring dish or stretch the coil spacing on a wider base to make a larger salad bowl. In a kitchen this piece functions as both a serving dish and a countertop object, and the painted detail stays simple enough to test with basic underglaze even while your coil technique is still improving.
Coiled Vase with Dripping Glaze

A coil-built vase uses stacked rings of clay to build height and create a textured surface that holds glaze in the grooves. The white clay body lets the turquoise glaze run and pool naturally between the coils, forming vertical drip lines without extra tools or brushing. This method produces a tall vessel that works as a standalone decor piece rather than a functional container for flowers.
The stacked form gives the glaze a built-in path to follow, so you can test different drip effects by changing glaze thickness or firing temperature. You could scale the same coil structure down for smaller bud vases or widen the base to make a planter that still shows the running glaze detail. The idea stands out on Pinterest because the contrast between the matte coils and the glossy drips reads clearly even in small photos.
Coiled Hedgehog Planter with Raised Spines

A hedgehog planter built from coils creates a rounded pot body where the coils themselves form the spines. Small pads of clay are added on top for color variation in orange and green, then the whole surface is glazed to keep the texture visible. The head is pinched into a simple snout with feet added underneath so the pot sits level. This turns a standard coil pot into a plant holder that works for small houseplants or herbs.
What makes this idea useful is how the coil texture carries the design without extra carving tools. You can keep the same body shape but change the spine colors or skip the color dabs for a single glaze. The small scale makes it easy to try on a shelf or desk where a regular pot would look plain. For a gift, the same hedgehog form can be made shorter to hold succulents instead of a larger plant.
Stacked Coil Tealight Holder

A coiled pottery candle holder built from stacked rings forms a shallow bowl shape sized for a standard tea light. The coil construction creates distinct horizontal bands that catch light from the flame while the glossy yellow-brown glaze adds contrast and helps reflect warmth. This approach fits the candle piece category and stays simple enough to finish in a few sessions without needing a wheel.
What makes this idea useful is how the stacked rings let you adjust height quickly for different candle sizes or to match the depth you want. The small scale works well on a nightstand, shelf, or desk without taking up much space. You could rework the same coil method into a ring dish or small soap holder by widening the base or changing the glaze color to suit the room.
Spiral Leaf Wall Medallion

A round ceramic wall medallion built with a central spiral and radiating leaf reliefs gives you a flat, hangable decor piece instead of another bowl or vase. The design presses or carves leaves into the clay so they stand out against the grooved spiral, then a blue wash is applied so it pools in the recessed areas while the raised parts stay lighter. This approach keeps the focus on surface texture and pattern rather than function, making it a straightforward way to use leftover clay slabs or coil-built rounds.
What makes this idea useful is that the circular shape and rope hanger let you place it on any wall without needing shelf space or a stand. You could swap the leaves for other simple motifs like ferns or abstract lines and change the wash color to match a room’s palette. The small scale also makes it easy to try as a first relief project or to repeat in different sizes for a grouped display. In a kitchen or plant area, this kind of piece adds pattern without competing with functional pottery.
Scalloped Rim Ring Dish

A small coil-built bowl with a wavy scalloped rim works well as a ring dish or trinket holder. The coral glaze with white speckles gives it a bright, solid color that makes gold jewelry stand out. The spiral pattern left from the coils adds surface texture inside the bowl without needing extra tools or stamps. This shape stays compact so it fits on a nightstand, desk, or bathroom counter.
The small scale keeps clay use low and makes the piece quick to dry and fire. You can swap the coral for other solid glazes or change the rim to a simpler round edge if you want a faster build. This style adapts easily into a soap dish or small plant saucer by adjusting the depth. The wavy rim shows up clearly in photos, which helps the finished piece stand out when shared online.
Coil Built Bowl with Ridged Exterior and Glazed Interior

A coil-built bowl uses stacked ropes of clay to form both the structure and the surface texture. The outside shows clear horizontal ridges that emphasize the handmade construction, while the inside carries a mottled turquoise glaze that pools and shifts across the curves. This combination keeps the bowl simple in shape yet visually interesting through the contrast between the rough exterior and the smoother, colored interior.
The shape does a lot of the work here because the wide rim and deep walls suit serving or displaying fruit on a kitchen table. You could repeat the same coil ridges on a smaller bowl or a planter and swap the glaze for earth tones or a single solid color to fit different rooms. The visible coils also give the piece enough surface detail that it reads well in photos, which helps if you want to share the finished work online.
Coil Built Textured Spoon Rest

A long narrow tray formed from coils works well as a kitchen spoon rest. The interior carries repeated wavy impressions that create ridges to catch drips from cooking utensils. Speckled green glaze covers the piece, giving it a practical surface that resists stains and wipes clean easily. The shape stays slim enough to sit beside the stove without taking up valuable counter space.
What makes this idea useful is how the impressed texture does the functional work while keeping the form simple. You could shorten the same coil layout to make single-spoon rests or lengthen it for a narrow herb strip tray. In a kitchen this kind of piece keeps wooden spoons off the counter during cooking and stacks flat for storage. The stamped mark on the base also gives you an easy spot to add your own maker signature on future versions.
Coil-Built Mug with Painted Star Border

A coil-built mug uses stacked clay ropes to form both the walls and the visible horizontal ridges that run around the outside. The light glaze keeps the coil lines clear while the row of small blue stars painted near the base adds a simple repeated motif without covering the texture. This approach works well for a drinking vessel because the ridges give the surface interest and the stars stay low so they do not interfere with the handle or rim.
What makes this idea useful is that the coil texture carries most of the visual weight, so the painted detail can stay minimal. You could swap the stars for dots, dashes, or small leaves and use the same layout on a small bowl or planter. The size and weight shown here make it practical for daily coffee or tea, and the same coil-and-border method scales easily to a set of matching mugs. The painted stars also give a clear way to personalize the piece without adding complicated carving.
Coiled Yarn Bowl with Notch for Knitting

A coiled yarn bowl turns a simple stacked construction into a functional holder that keeps yarn in place during projects. The visible coils build up the sides while a cut notch on the rim lets the strand feed out cleanly without tangling. This shape works especially well as a dedicated knitting tool rather than a standard bowl or planter.
What makes this idea useful is how the notch adds a practical detail without complicating the coil build. You could scale the same form down for embroidery floss or up for chunky yarns, or swap the glaze for a matte finish if you want less slip on a tabletop. In a craft space this piece keeps supplies contained and easy to grab, and the design adapts quickly if you want to try a lidded version or add extra notches for multiple colors.
Coiled Vase with Horizontal Ridges and Wavy Rim

A coil-built vase starts with ropes of clay stacked and blended to form both the structure and the surface texture. This version keeps the coils visible as even horizontal ridges that run the full height, ending in a flared rim shaped into soft waves. The purple glaze sits unevenly on the ridges and drips in a few places, adding contrast without covering the handmade lines. The narrow body and modest height make it a straightforward vase for single stems or small cuttings.
The shape does a lot of the work here by letting the coil texture carry the visual interest. You could repeat the same ridges on a shorter, wider planter or a set of three bud vases in different glaze tones. The wavy rim is easy to adapt by pinching it more or less depending on the size you want. This kind of piece stands out on a shelf because the ridges catch light and shadow even when the glaze is simple.
Coiled Cat Figurine with Painted Details

A small decorative cat made by stacking clay coils creates the rounded body, with the coils left visible to form horizontal ridges that give the piece its shape and texture. The head, ears, paws, and tail are modeled separately and attached, then the face receives simple painted accents in blue, pink, and dark gray for the eyes, cheeks, nose, and paw lines. This approach falls into the category of handmade decorative figurines that rely on basic coil construction rather than wheel throwing or molds.
What makes this idea useful is the way the stacked coils do most of the visual work, so the form stays compact and easy to place on shelves or desks. You could adapt the same coil-stacking method to other small animals or abstract shapes and swap the painted face colors to fit different rooms or seasons. For a quick gift or desk accent, the small scale means it uses little clay and fires easily, and the painted details let you personalize it without extra carving or glazing steps.
Coiled Utensil Crock with Horizontal Ridges

A coil built utensil holder creates a tall, stable cylinder that keeps spoons, spatulas, and whisks within reach on the counter. The stacked coils form even horizontal ridges that give the surface depth and let glaze settle into the grooves for a richer green tone. This kitchen item works because the texture is built right into the construction rather than added later.
What makes this idea useful is how the same coil ridges can be adjusted for different heights or diameters to hold brushes, herb bundles, or even paint tools. You can keep the deep green glaze or switch to a matte finish if you want it to blend with other kitchen pottery. The shape also translates easily into a smaller version for a desk or bathroom without changing the building method.
Coil-Built Soap Dish with Drainage Ridges
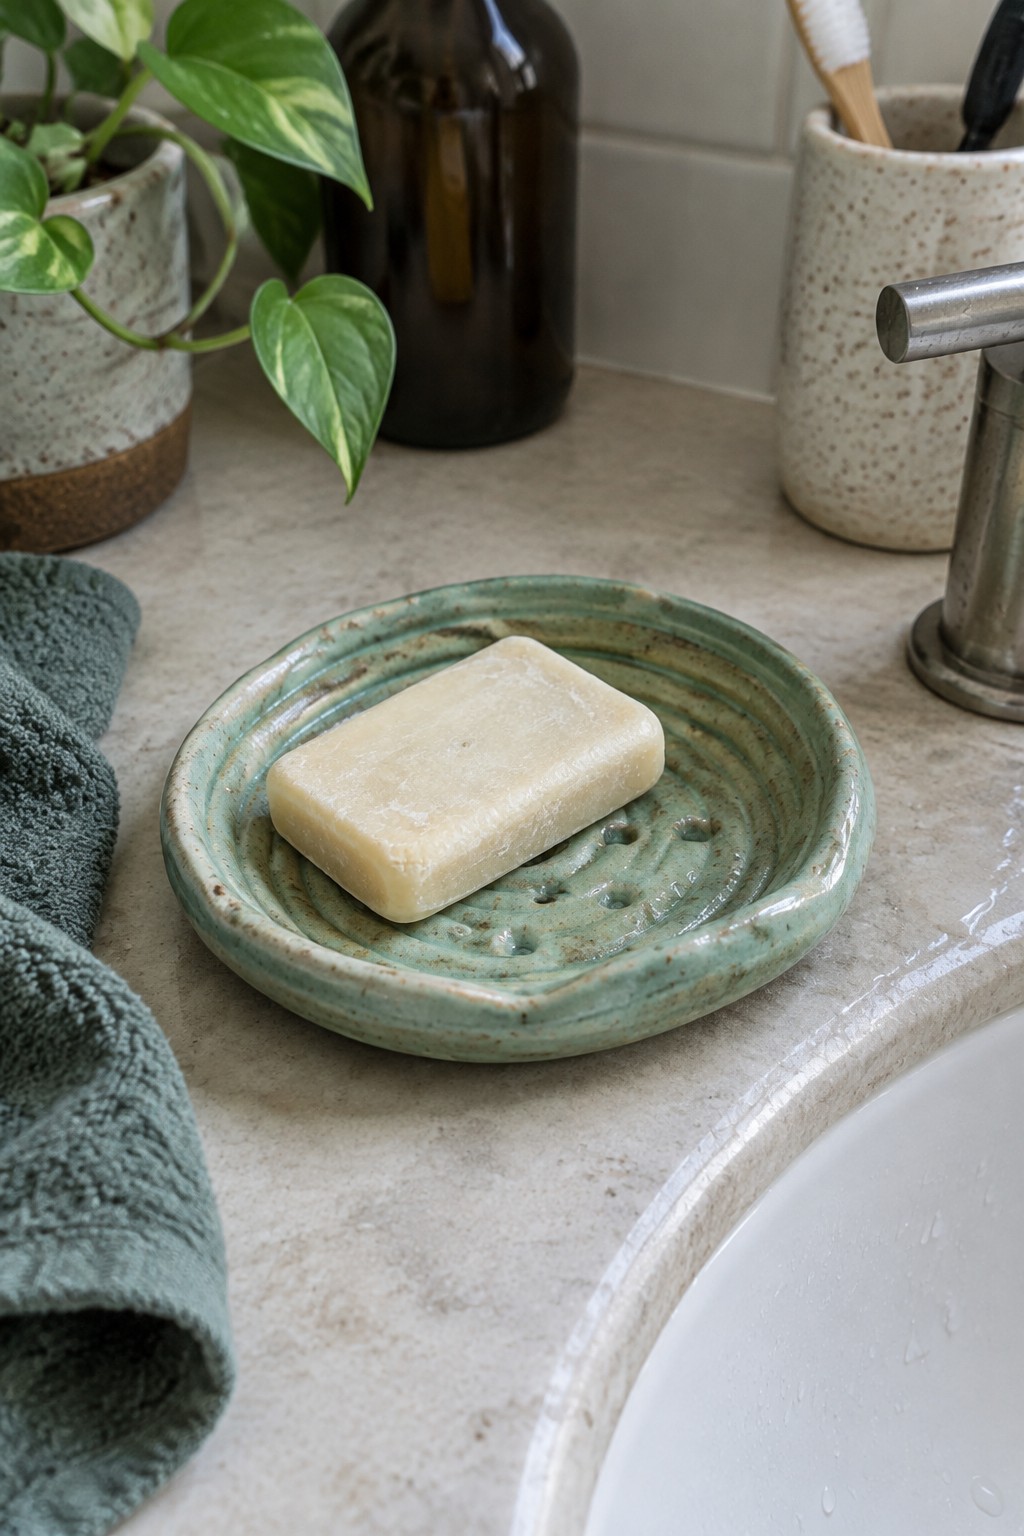
A shallow round soap dish made from coils gives you a functional bathroom piece that handles moisture better than a flat tray. The concentric ridges built into the base create channels that let water run off the soap instead of pooling underneath. Small holes spaced across the center speed up drying, while the speckled green glaze keeps the surface easy to clean and resistant to soap scum. This approach works especially well for coil projects because the ridges can be added directly during construction without needing extra tools.
The shape does a lot of the work here by turning a simple coil form into something that solves a daily problem in the bathroom. You can adapt the same ridge pattern to a smaller size for a ring dish or scale it up for a sponge holder near the sink. Adding a foot ring underneath would lift it slightly higher, which helps with airflow on humid counters. This kind of piece shows up well on Pinterest because the drainage detail makes it look more considered than a basic tray.
Coil-Built Incense Holder Tray

A narrow rectangular tray formed from coils makes a practical incense holder. The design features a shallow central channel and a small raised ring at one end that holds the stick upright while the rest of the tray catches ash. The speckled brown glaze keeps the surface simple and durable. This fits the decorative holder category for small tabletop objects.
What makes this idea useful is how the long shape gives smoke space to rise without crowding a surface. You could shorten the tray for a desk version or widen the channel slightly to hold a bundle of sticks. In a bathroom or entryway, the form stays compact while handling ash cleanly. The same coil layout works for a plain ash catcher without the ring if you want a quicker build.
Polka Dot Pedestal Bowl

A coiled pedestal bowl gives you a raised serving piece that works for fruit, snacks, or small decorative items. The wide basin sits on a stacked foot that adds height, while the exterior shows horizontal ridges from the coiling process. A soft green glaze covers most of the surface and pink dots are painted on afterward for contrast. This keeps the idea simple yet effective for a kitchen or dining table.
What makes this idea useful is how the pedestal shape lifts the contents so they stay visible without taking up extra table space. You could scale the same ridges and dot pattern down for a smaller nut bowl or swap the green base for another color to match different dishes. In a kitchen this form keeps produce handy while still looking intentional. For a variation, try the same dot motif on a flat tray or a low planter instead.
Coiled Spiral Ring Dish

A small coil-built bowl becomes a ring dish when you shape one side into a large spiral that curls upward from the rim. The marbled pink and white glaze flows across the coils and creates soft streaks that emphasize the handmade texture. This low, open form stays compact so it fits easily on a dresser or nightstand while holding a few rings or small items. The spiral detail adds visual interest without changing the basic function of a shallow bowl.
What makes this idea useful is how the added coil turns a plain pinch or slab bowl into something more sculptural with very little extra work. You could repeat the same spiral on a longer tray shape for a bathroom or desk, or swap the pink glaze for solid colors if you want a cleaner look. For a gift, something like this works well because it is small, quick to make, and ready to use right away. The compact size also makes it a good project for testing new glaze combinations without committing to a large piece.
Spiral Lemon Coil Platter

A shallow ceramic platter built from coils uses the visible spiral ridges as the main design element, with a flowing glaze in teal and yellow that pools along the coils. Painted lemons and leaves sit around the rim in the same color palette, creating contrast against the white clay body. This turns a basic coil form into a decorative wall piece or display tray rather than a deep serving bowl.
The shape does a lot of the work here since the wide, flat profile hangs flat without warping and shows off the full spiral pattern. You could swap the lemons for other simple fruit or leaf motifs to match different rooms or seasons. A piece like this works especially well in a kitchen or entryway where you want color on the wall but do not need it to hold food. The same coil spiral and painted accents could be scaled down into smaller plates or adapted into the base of a lidded jar.
Coiled Ceramic Toothbrush Holder with Fish Motifs
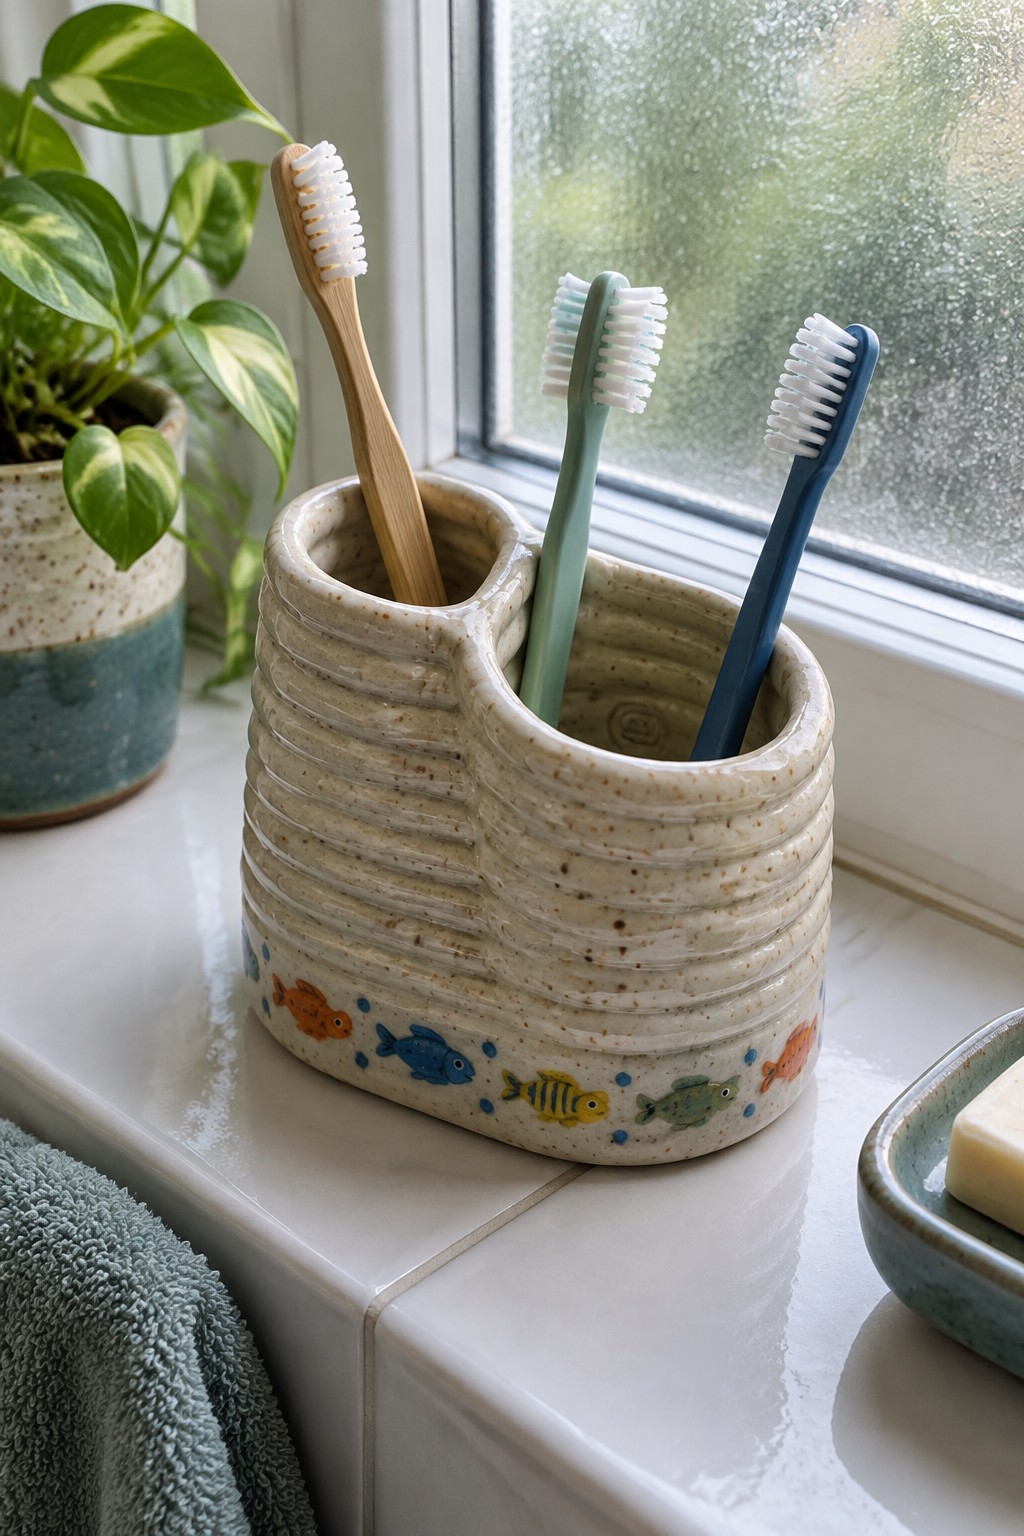
A divided coil-built holder gives you two separate slots for toothbrushes while keeping the piece compact enough for a bathroom counter or windowsill. The maker stacked coils to create the ridged walls and then added a band of painted fish and dots around the lower section before glazing. The speckled clay body shows through the glaze, and the simple painted details keep the surface lively without overcrowding the form. This turns a basic bathroom essential into a small storage piece that still reads as handmade pottery.
What makes this idea useful is the divided shape that solves the common problem of brushes leaning into each other. You can swap the fish motif for stripes, dots, or leaves to match different color schemes, or stretch the same coil technique into a taller version for makeup brushes or kitchen tools. The small footprint works well in tight spaces and the painted band gives you an easy way to add color without full-surface decoration. For a gift, the same layout in a single neutral glaze would still feel intentional while taking less time to finish.
Stacked Coil Decorative Totem

A stacked coil sculpture made from rounded discs builds a tall decorative piece that relies on simple repetition. Each layer is formed separately then stacked, with alternating matte brown and glossy blue sections to create clear visual breaks between the coils. The irregular edges and slight variations in thickness keep the form from looking too uniform while still maintaining balance. This approach fits coil pottery well because it turns basic rolled shapes into a finished object without needing complex joins or added parts.
What makes this idea useful is how the stacking method lets you control height and color placement easily. You can make fewer layers for a small shelf version or add more to reach a taller scale for a side table. The same structure works with different glaze pairings or even all one color if you want to emphasize texture instead. For a gift, something like this takes up little space but still reads as a complete handmade object.
Frequently Asked Questions
What type of clay works best for creating coil pottery bowls, vases, and decorative pieces? Stoneware or porcelain clays are excellent choices because they handle the coiling process well and fire to a strong finish. Earthenware can also work for beginners since it is more forgiving during drying. Always wedge your clay thoroughly to remove air pockets before rolling out even coils that are about the thickness of your finger for consistent walls.
How can I prevent my coil-built pieces from cracking as they dry? Build your forms slowly over several sessions to allow even drying from the inside out. Cover the piece loosely with plastic between sessions to control moisture loss. Score and slip each coil join carefully, and keep the walls no thicker than half an inch. Once the piece is leather hard, turn it upside down or on its side periodically so air reaches all surfaces evenly.
Are these creative coil ideas suitable for beginners or do they require advanced skills? Many of the ideas start with simple shapes like basic bowls or cylinders that anyone can try after practicing even coil rolling and joining. Beginners should focus first on mastering smooth seams and keeping walls straight before adding twists like integrated handles or layered textures. More complex designs with multiple sections or tall vases become easier once you gain experience with scoring and supporting the form with temporary props.
What tools besides clay are most useful for making decorative coil pottery? A basic set includes a wire cutter for slicing clay, a scoring tool or fork for joins, a rib tool for smoothing surfaces, and wooden modeling tools for adding details. Sponges help control moisture, while a banding wheel makes it easier to build and check symmetry. For textures, try stamps, found objects like leaves, or even a toothbrush to create interesting surface patterns on your vases and decorative pieces.
How should I finish and fire my completed coil pottery projects? Let the pieces dry completely to bone dry over one to two weeks, then bisque fire them in a kiln to around cone 04. Apply glaze in thin layers after the bisque firing and follow with a glaze firing at the temperature recommended for your clay. If you do not have access to a kiln, some air-dry clays can be sealed with varnish for indoor decorative use only, though they will not be as durable as fired work.

Pottery Path is my cozy corner of the internet where I share clay ideas, pottery inspiration, and simple projects you can recreate at home. I love exploring everything from air dry clay to handbuilt pottery to cute minis that brighten your day. My goal is to make clay crafting feel easy, fun, and welcoming for anyone who wants to try it.
You will find beginner friendly tutorials, creative pottery painting ideas, and lots of warm inspiration for slow and happy crafting. If you enjoy hands on creativity, this space will feel like home.