
I picked up coil pottery because it seemed like a straightforward way to work with clay at home.
My early pieces were mostly basic shapes that helped me get used to the technique without much stress.
Over time I found a few projects that felt manageable even on days when I did not have a lot of energy for crafting.
I have gathered some of those ideas here in case they are useful while you are learning the coil method too.
They focus on simple builds that do not require special equipment or advanced skills.
Coil-Built Mug with Visible Horizontal Ridges

A coil-built mug formed by stacking even clay coils creates a series of horizontal ridges that wrap around the body. The warm orange glaze sits on top of the textured surface without covering the layered lines, while the interior shows a lighter speckled clay body. This approach keeps the construction marks as the main visual element instead of smoothing them out. It fits the mug category and stays small enough to hold comfortably.
What makes this idea useful is that the ridges come directly from the coil process, so no extra tools are needed for decoration. The shape works well for a daily coffee or tea mug that sits nicely on a kitchen counter or desk. You could adapt it by changing the glaze color, making the coils thicker or thinner, or adding a second color along the ridges for contrast. The same coil method could be reworked into a small vase or planter by adjusting the height and opening width.
Coiled Cat Planter

A coil-built cat planter starts with stacked rings of clay that form both the round body and the surface texture at the same time. The ears are pinched from the top coils, while the face details like closed eyes, whiskers, and nose are added with simple scoring and a bit of slip. This approach keeps the pot functional for soil and a small plant while turning the coil lines into the animal’s stripes.
What makes this idea useful is that the same coil structure can be shaped into other animals by adjusting the ear placement and snout length. The small size fits easily on a narrow windowsill or shelf without taking up much space. You could skip the face details entirely and just use the coils for a plain striped pot, or add underglaze color before firing if you want more contrast. For beginners, the round form is forgiving because the coils naturally support each other as you build upward.
Citrus Painted Coil Bowl

A coil-built bowl gives you a simple, sturdy form that works especially well for adding painted details along the rim. This project uses basic orange and lime slice motifs in bright colors on the interior edge to create a kitchen-friendly piece. The light clay body keeps the fruit designs clear and easy to see, turning a plain coiled shape into a breakfast or snack bowl.
The shape does a lot of the work here because a medium bowl like this fits right into everyday use on a table or counter. You could swap the citrus slices for other simple painted motifs such as berries or leaves if you want to change the look. For beginners practicing coils, this idea keeps the building step straightforward while letting the painted rim add most of the visual interest.
Coil Built Ring Dish with Heart Accent

A small coil-built dish makes a practical ring holder or trinket tray for a dresser or nightstand. The maker rolled and stacked coils into a low, wide form that shows the construction on the outside while keeping the inside smooth. A single green glaze covers the interior, and a small heart stamp sits at the center as the only decoration.
What makes this idea useful is how quickly the same coil base can shift into other sizes. You can widen the shape for a soap dish in the bathroom or narrow it into a long tray for keys by the front door. The heart stamp works in any color or can swap for initials, a date, or a simple line pattern. The small scale means you finish the piece in one or two sessions and still end up with something that fits on a crowded surface.
Stacked Coil Candle Holder
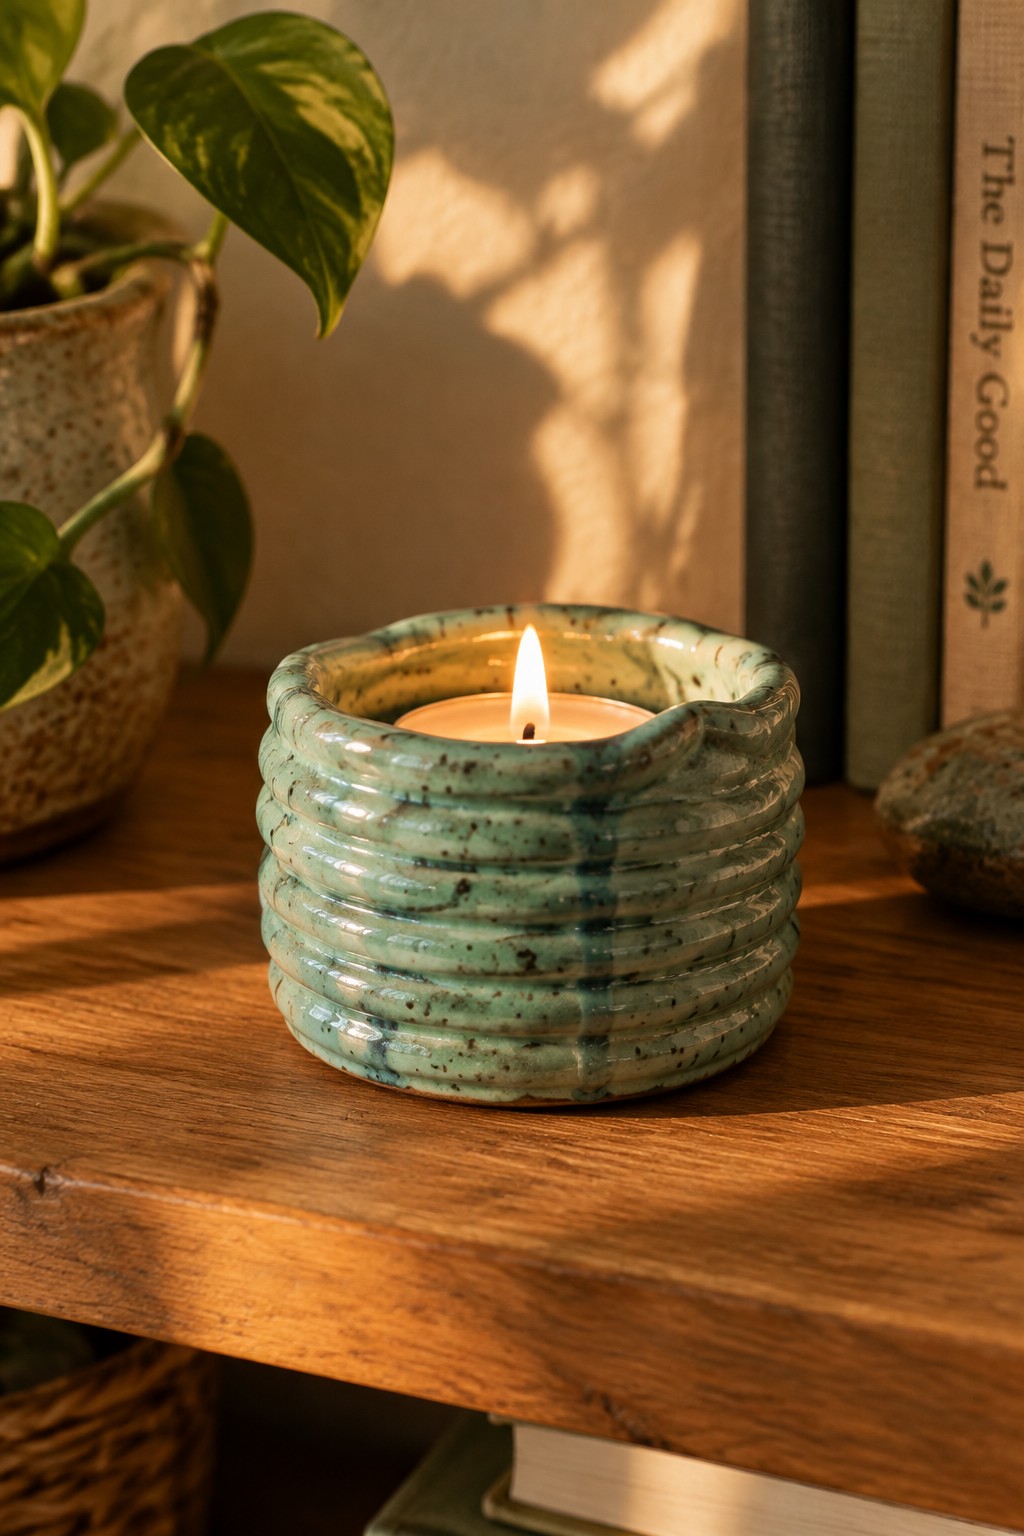
A coiled candle holder built from stacked rings of clay creates a compact vessel sized for a standard tea light. The maker forms short walls by placing coils directly on top of one another, leaving the seams visible so the construction method stays part of the finished surface. A mottled turquoise glaze settles into the grooves between coils and adds dark speckles that make the texture easier to read.
What makes this idea useful is how the coil lines do most of the visual work once the piece is glazed, so beginners can focus on keeping coil thickness consistent rather than chasing perfect symmetry. The small scale uses little clay and fits on a desk or shelf without taking up much room. The same stacked-coil shape can be reworked into a small match holder or a shallow ring dish by adjusting the interior height or leaving the top more open.
Coiled Spoon Rest for Kitchen Use

A long, narrow coil-built tray works as a spoon rest by cradling a wooden utensil along its length. The shape keeps the spoon elevated so drips stay off the counter, and the curved edges contain any mess. The green glaze over a light base creates a streaked, watery effect that highlights the coil ridges without needing extra decoration. This kitchen item stays simple in form while giving the coil structure a clear purpose.
The shape does a lot of the work here because the extended length matches a standard cooking spoon and the slight dip in the middle keeps it from rolling. You can shorten the coils for a compact version that fits beside the stove or widen them slightly to hold two utensils at once. In a kitchen this kind of piece stays handy near the sink or prep area and doubles as a small tray for tasting spoons during cooking. The same coil layout can be reworked into a longer version for spatulas or a shorter one for a single honey dipper.
Scalloped Ring Dish
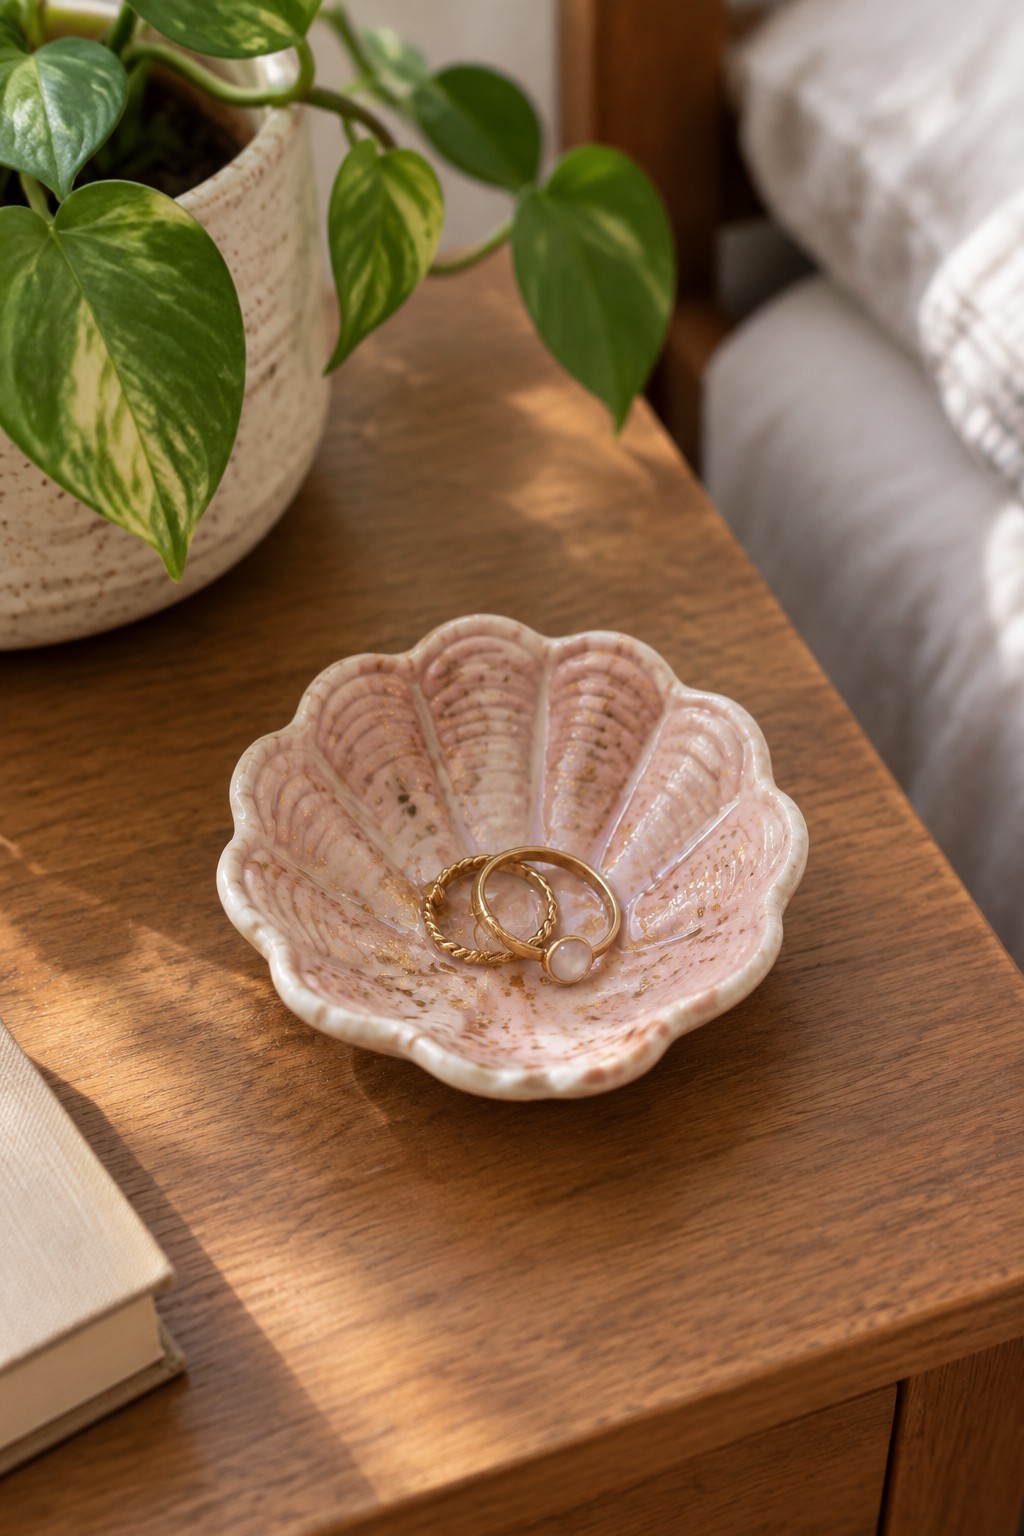
A small dish formed with coils and pinched into a scalloped rim makes a practical ring holder. The fluted edges create natural compartments that keep rings from sliding around, while a soft pink glaze with gold specks adds subtle texture and color. This shape stays compact enough to sit on a dresser or nightstand without taking up much space.
What makes this idea useful is how the same coiled base can be adjusted to different diameters for a soap dish or small catch-all tray. The rim detail helps the piece look finished even with simple glazing, and beginners can skip the scallops and use a plain round edge if the shaping feels difficult at first. For a gift, this size works well because it fits easily into a box and serves a clear purpose on a bathroom counter or desk.
Coiled Ridge Bud Vase

A small coil-built vase like this uses stacked coils to form a tapered shape that widens at the base and narrows toward the neck. The horizontal ridges left from the coils create a textured surface that shows the construction method clearly. This makes a simple holder for one or two flower stems rather than a large arrangement.
The narrow opening keeps stems from falling over while the rounded body gives enough weight to stay upright on a table. You could make the same form shorter for a desk or group three vases together in different glaze colors for a windowsill display. The visible coil texture also works if you want to leave parts unglazed for contrast or add a single band of color around the middle.
Coil-Built Hedgehog Figurine

A coil pottery hedgehog works as a small decor object where you build a rounded body first then add many short coils to form the spines. The brown glaze keeps the surface simple while the raised coils create texture and shadow that define the animal shape. This project fits the figurine category and shows how basic coil work can turn into a finished piece without needing extra tools or carving.
What makes this idea useful is that the coils serve two jobs at once by building volume and creating the finished surface. You could scale the same rounded body down for a smaller version or swap the spines for longer coils to try a different animal like a porcupine. The compact size makes it practical for a desk or shelf where it adds interest without needing much space. For practice sessions this shape also lets you focus on coil consistency and attachment while keeping the overall form straightforward.
Coil-Built Divided Salt Cellar
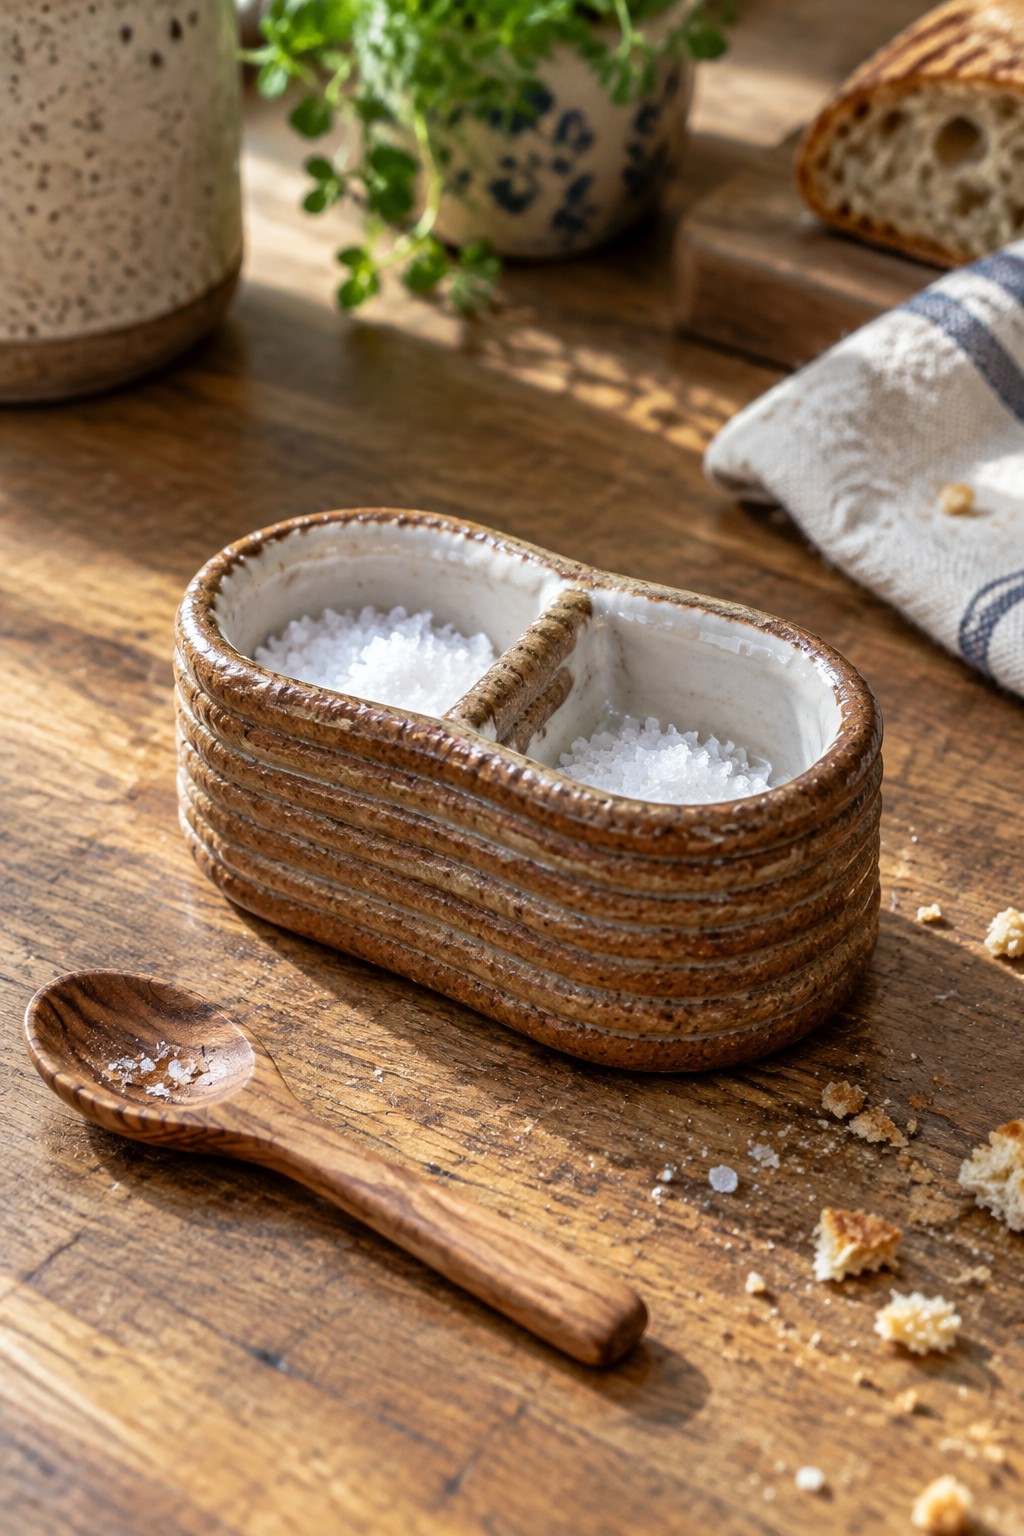
A divided salt cellar made with coils creates two separate compartments in one compact oval form. The low center wall keeps different seasonings apart while the stacked coils build up the sides with a clear horizontal texture. An earthy brown glaze on the exterior contrasts with the white interior, making the shape easy to read at a glance. This kitchen item stays small enough to sit on a table or counter without taking much space.
What makes this idea useful is how the divided shape works for salt and pepper or two different spices without needing two separate dishes. You can shorten the oval into a round version or stretch it longer to hold more. The coil ridges give the surface grip so it feels secure to handle, and the same form can be adapted into a small tray for butter or a holder for tea bags. In a kitchen this piece keeps seasonings within reach during cooking and takes only a modest amount of clay to build.
Three-Compartment Coil Toothbrush Holder

A coil-built ceramic holder formed from three connected cylinders makes a practical bathroom organizer for toothbrushes or small grooming tools. The rough textured exterior comes directly from the coil construction while the blue glaze inside each compartment creates a smooth, wipeable surface that contrasts with the matte clay. This shape keeps items separated and upright on a counter without needing extra space or a tray underneath.
What makes this idea useful is how the connected sections stay stable while still looking handmade rather than perfect. You can easily change the number of compartments or resize them to fit different items like makeup brushes or kitchen tools. The same coil method works for a two-section version if you want something smaller for a single sink or a guest bathroom.
Coiled Yarn Bowl with a Side Notch

A yarn bowl formed from coils creates a stable, low container that holds a ball of yarn while you knit or crochet. The thick walls and rounded shape prevent tipping, and a single notch cut into the rim guides the strand outward so it unwinds cleanly. The coil ridges remain visible beneath a light speckled glaze that emphasizes the hand-built surface without adding extra decoration.
What makes this idea useful is how the notch turns an ordinary bowl into a dedicated tool that keeps yarn from rolling across the table. The compact size fits easily beside a project bag or on a small desk, and the same form works for embroidery floss or thin cords if you adjust the notch width. You could simplify the design by skipping the glaze for a matte finish or scale the diameter up slightly for larger skeins without changing the basic coil layout.
Stacked Coil Sponge Holder
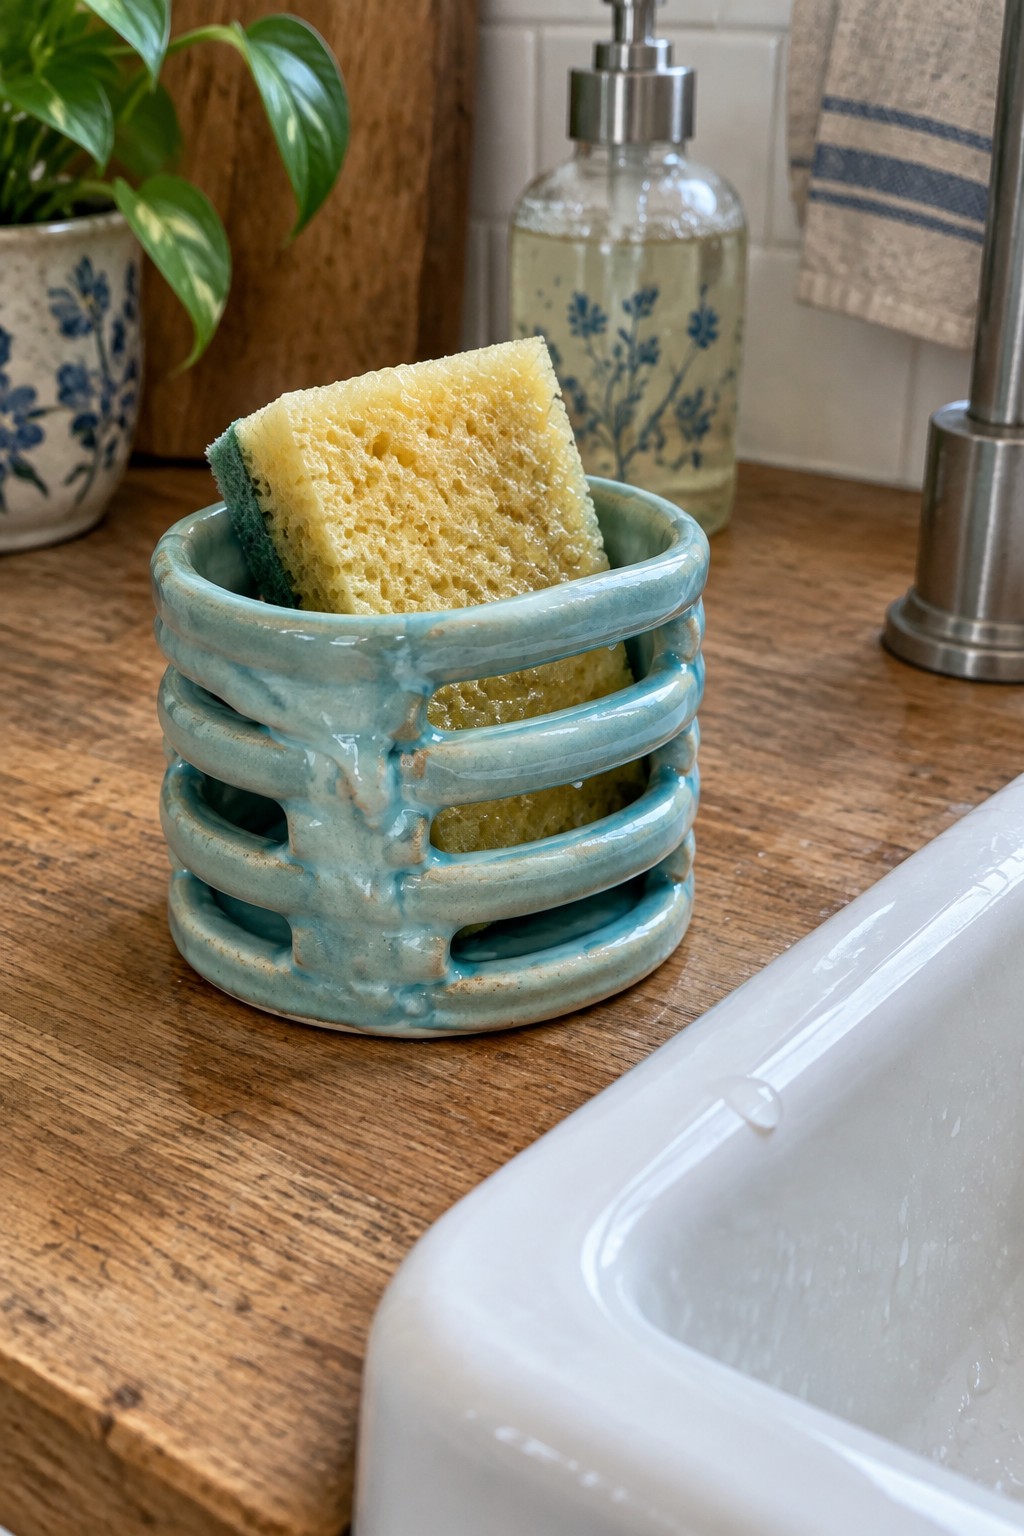
A coil-built sponge holder uses stacked horizontal rings to create an open cylinder that promotes airflow and drainage around a kitchen sponge. The gaps between the coils keep the sponge from sitting in water while the overall form stays compact enough to fit on a countertop. This kitchen item works well because the coil construction gives it natural ventilation without needing extra holes or feet.
What makes this idea useful is how the spacing between coils can be adjusted during building to match standard sponge sizes. The same stacked ring method could be tightened for a smaller scrub pad holder or widened slightly into a utensil caddy. In a sink area, this shape keeps sponges drier between uses and reduces mildew. For a bathroom version, the coils could be placed closer together to hold a bar of soap instead.
Coiled Spiral Wall Hanging with Leaf Details
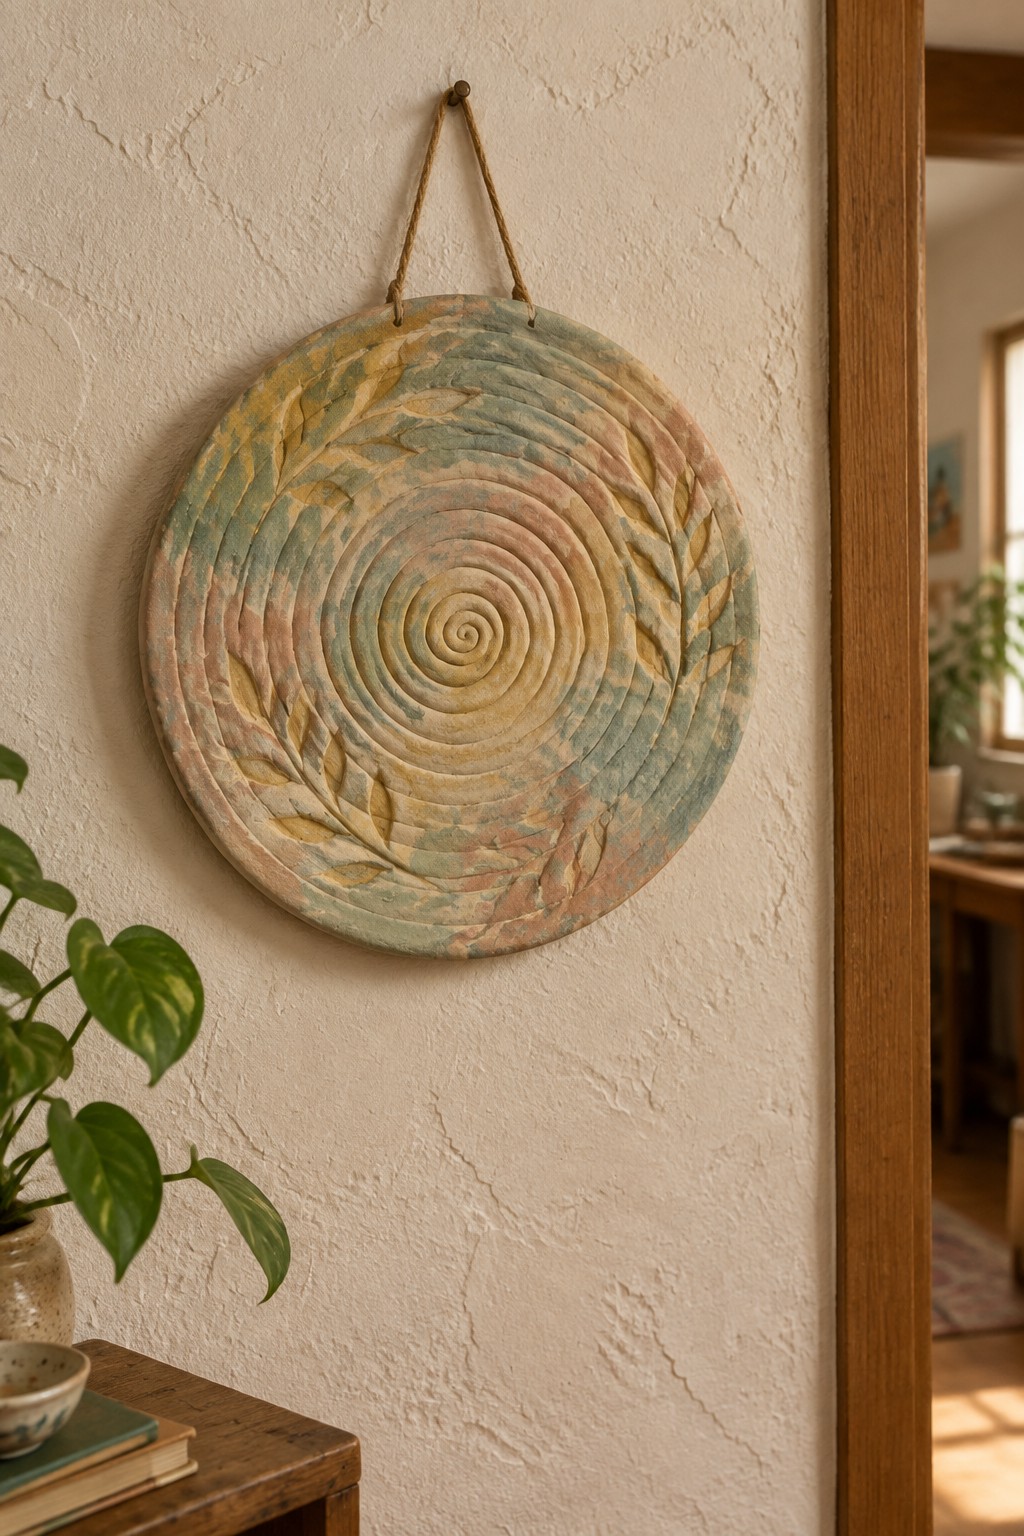
A flat circular plaque built from coils in a continuous spiral creates an eye-catching wall piece that highlights the coil method itself. The coils form raised concentric rings that tighten toward the center, while small sculpted leaves sit along the outer rings to break up the pattern and add surface interest. Muted washes of green, pink, and yellow keep the focus on the texture and form rather than on bold color. This approach turns a basic coil-building exercise into a finished decor object that needs no kiln stand or functional testing.
The round flat shape hangs easily and works well in living rooms or entryways where you want texture without bulk. You can simplify the idea by skipping the leaves and using one glaze color, or adapt it into a larger tray by widening the spiral and adding a rim. The same leaf-pressing technique transfers to smaller tiles or coasters if you want practice pieces before committing to a full wall size. A piece like this stands out on Pinterest because the spiral makes the construction method obvious at a glance.
Coiled Creamer and Matching Cup Set

A small pitcher built from stacked coils creates a simple creamer that pours easily at the table. The visible horizontal ridges show the coil construction clearly while the attached handle keeps the form functional. A light base glaze with blue drips adds color and lets the texture remain visible. This project fits the kitchen item category and pairs naturally with a matching coil-built cup.
What makes this idea useful is how the same coil method can be repeated to build both pieces as a set. The small size works well on a breakfast tray or beside a coffee maker without taking much space. You can simplify the handle or change the drip glaze colors to match other dishes you already own. The basic shape also adapts quickly into a small jug or syrup server if you want a second version.
Coil Built Ribbed Utensil Holder

A coil built utensil holder starts with stacked clay rings that create a tall cylinder with clear horizontal ridges. The coils give the piece both structure and texture while keeping the form simple enough for beginners. This kitchen item works as a practical counter caddy for spoons, spatulas, and other tools. The yellow glaze with its mottled finish highlights the ridges without covering the handmade coil lines.
What makes this idea useful is how the ribbed surface from the coils adds grip and visual interest at the same time. You could scale the same method down for a smaller desk organizer or widen the base for a brush holder. In a kitchen, the shape keeps tools upright and contained while the coil texture makes the piece look more finished than a smooth cylinder. The same approach works in other colors or with a matte glaze if you want it to match different counter styles.
Strawberry Painted Coil Plate

A shallow coil built plate gives beginners a straightforward shape to practice rolling and stacking coils into an even, wide form. The strawberry and daisy design works because the simple fruit shapes fit the round surface without crowding, and the red and green paint contrasts clearly against the light clay. Visible coil ridges add texture that shows the handmade process while keeping the surface practical for light food use. This type of kitchen item functions as a dessert plate or small serving dish.
The painted fruit motif helps the piece photograph well for sharing because the colors read quickly in a small image. You can swap the strawberries for other easy subjects like lemons or herbs on the same coil base, or enlarge the form into a bigger tray. In a kitchen this shape holds a few pastries or fruit without taking much space. The project stays simple enough to finish in a couple of sessions while still producing something ready to use or give.
Coiled Snake Incense Holder

A coiled snake incense holder uses the coil building method to create both the base and the functional part of the piece. The snake’s body forms a tight spiral that doubles as an ash catcher, while the head is raised to hold a stick in its mouth. The glossy blue glaze with darker streaks emphasizes the coil ridges and gives the form a clean, finished surface. This type of project works as a small decor object that combines sculptural shape with everyday use.
What makes this idea useful is how the spiral coil does most of the structural work without needing extra supports. You could simplify the head and turn the same coiled base into a plain tray or adapt the shape into a different animal for variety. A piece like this works especially well on a shelf or outdoor ledge where smoke can drift away. The compact size also makes it easy to practice consistent coils and test glaze effects before moving to larger projects.
Coil-Built Dipping Bowl with Spout

A small coil-built bowl with a pinched pouring lip makes a practical dipping dish for sauces or dressings. Coils let you form the walls and rim in one session, then add the spout by simply pressing one section outward while the clay is still soft. The earthy textured exterior and glossy interior glaze create contrast that highlights the handmade form without extra decoration.
What makes this idea useful is how the spout turns a basic bowl into a functional server that keeps sauces from dripping. The compact size works well for picnics, small tables, or as part of a larger dinnerware set. You could adapt the same shape into a larger version with a handle or make several in different widths for varied condiments. The coil method keeps the process simple while giving the finished piece enough weight to feel stable on the table.
Frequently Asked Questions
What supplies are essential for trying coil pottery ideas as a beginner?
To get started with coil building, gather air dry clay or pottery clay, a rolling pin or slab roller for flattening, a scoring tool like a fork or needle tool, water for slipping, and basic smoothing tools such as a sponge or rib. Many of the 19 ideas work well with these items, and you can add optional elements like a turntable for even shaping. Always keep your workspace clean to avoid contamination.
How can I make sure my coils stay consistent in size and shape for better results?
Roll coils between your hands or on a flat surface with even pressure, aiming for a uniform thickness around the diameter of a pencil or thicker depending on the project scale. Measure them periodically with a ruler and practice on scrap clay first. Consistent coils help the 19 beginner ideas hold their form during assembly and reduce the chance of weak spots in the finished piece.
What steps help join coils securely without visible seams?
Score the edges of each coil and the base where they meet, then apply slip made from clay and water to create a strong bond. Press the coils together firmly and smooth the inside and outside with a rib or finger while the clay is still moist. This technique works across most of the listed ideas and prevents separation during drying.
How long should coil pottery projects dry before firing or sealing?
Allow pieces to dry slowly at room temperature for at least one to two weeks, depending on thickness and humidity levels, until they reach a leather hard or bone dry stage. Cover them loosely with plastic at first to control drying speed and avoid cracks. For the easy beginner ideas, check the base and thicker areas carefully before moving to a kiln or applying sealant.
Which tools make smoothing and refining coil pots easier for new artists?
Use a metal rib for flattening surfaces, a sponge for blending seams, and a wooden modeling tool for details. These help achieve a polished look on projects from the list without advanced skills. Practice on small test pieces to see how each tool affects the clay before applying them to your main work.

Pottery Path is my cozy corner of the internet where I share clay ideas, pottery inspiration, and simple projects you can recreate at home. I love exploring everything from air dry clay to handbuilt pottery to cute minis that brighten your day. My goal is to make clay crafting feel easy, fun, and welcoming for anyone who wants to try it.
You will find beginner friendly tutorials, creative pottery painting ideas, and lots of warm inspiration for slow and happy crafting. If you enjoy hands on creativity, this space will feel like home.