I’ve been playing around with underglaze for a while now in my pottery projects.
Getting fine lines and small patterns can be a bit fiddly at times.
Over the years I’ve picked up some methods that make it easier to handle details without too much frustration.
Here are some techniques I’ve tested out myself.
They might help if you’re trying to add more intricate designs to your pieces.
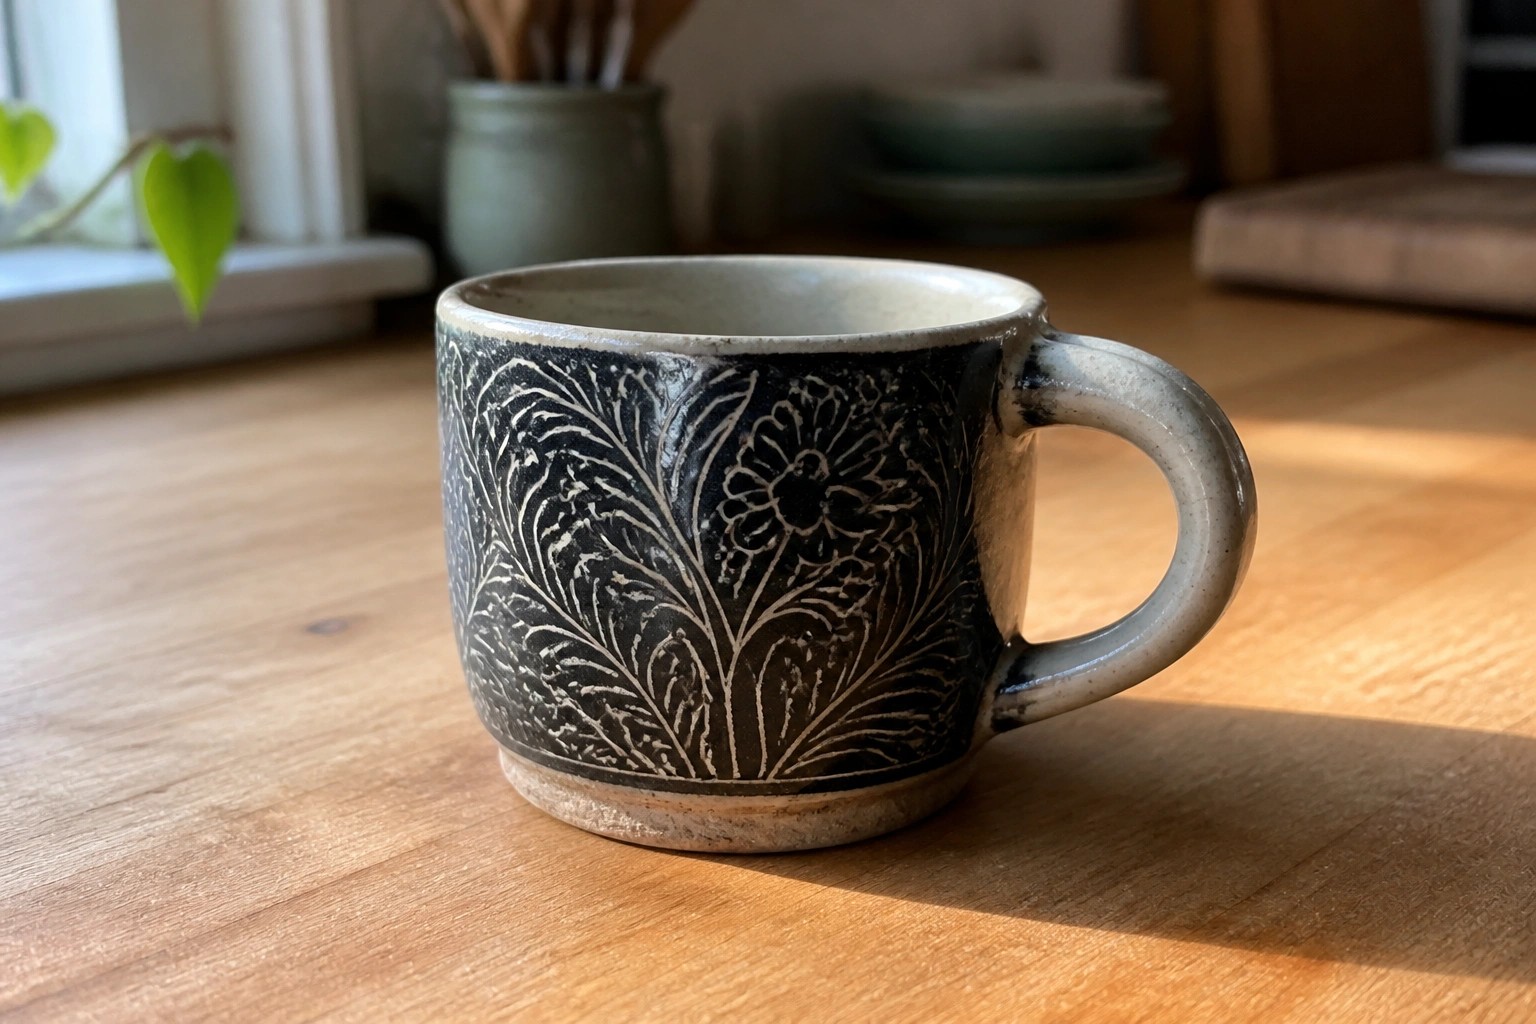
Botanical Line Patterns with Underglaze on a Mug
A stoneware mug covered in underglaze line work shows how fine botanical details can cover a curved surface without crowding it. Vertical stripes, crosshatching, and a central plant motif with multiple leaves create contrast against the dark ground. The technique keeps the pattern readable even on a small drinking vessel. This category of project works for anyone who wants to practice controlled brushwork or sgraffito on a practical form.
What makes this idea useful is that the same leaf and line layout can be simplified or expanded to fit bowls, small vases, or even lids. The mug shape keeps the decoration visible during daily use on a desk or kitchen counter. You could rework the central plant into a repeating border or shrink it for a set of espresso cups. The clean contrast also photographs well for sharing the finished piece.
Underglaze Botanical Line Drawings on Ring Dishes

A small round ceramic dish gives a clean surface for fine underglaze line work. The shallow form holds a single plant motif drawn with thin stems, leaves, and clustered seed heads. The speckled white glaze keeps the black lines sharp while adding subtle texture that does not compete with the drawing.
What makes this idea useful is how the compact size turns a simple sketch into a complete piece without requiring large areas of detail. The same plant drawing could move to a soap dish, a small spoon rest, or the base of a jewelry tray. For a gift these dishes fit easily on a nightstand or bathroom counter and need only basic underglaze application and a clear overglaze.
Striped Underglaze Bands on Oval Trays

An oval ceramic tray like this uses wide horizontal bands of underglaze in muted green, blue, and pink tones, separated by thin lines of exposed clay. The shape works as a small spoon rest or butter dish, and the straight bands give a clean, repeating pattern without needing fine brushes. The slight variation in band width and the natural clay color between them keep the design simple but structured.
The shape does a lot of the work here because the long oval surface lets the stripes run uninterrupted across the piece. This idea adapts easily to coasters, small plates, or even the inside of a shallow bowl by adjusting the number of bands. In a kitchen it functions as a spoon rest while still showing off the pattern, and the same banding approach can be reworked with different color combinations to match other tableware. The technique stands out on Pinterest because the stripes read clearly even in small photos.
Speckled Gradient Underglaze on a Compact Planter
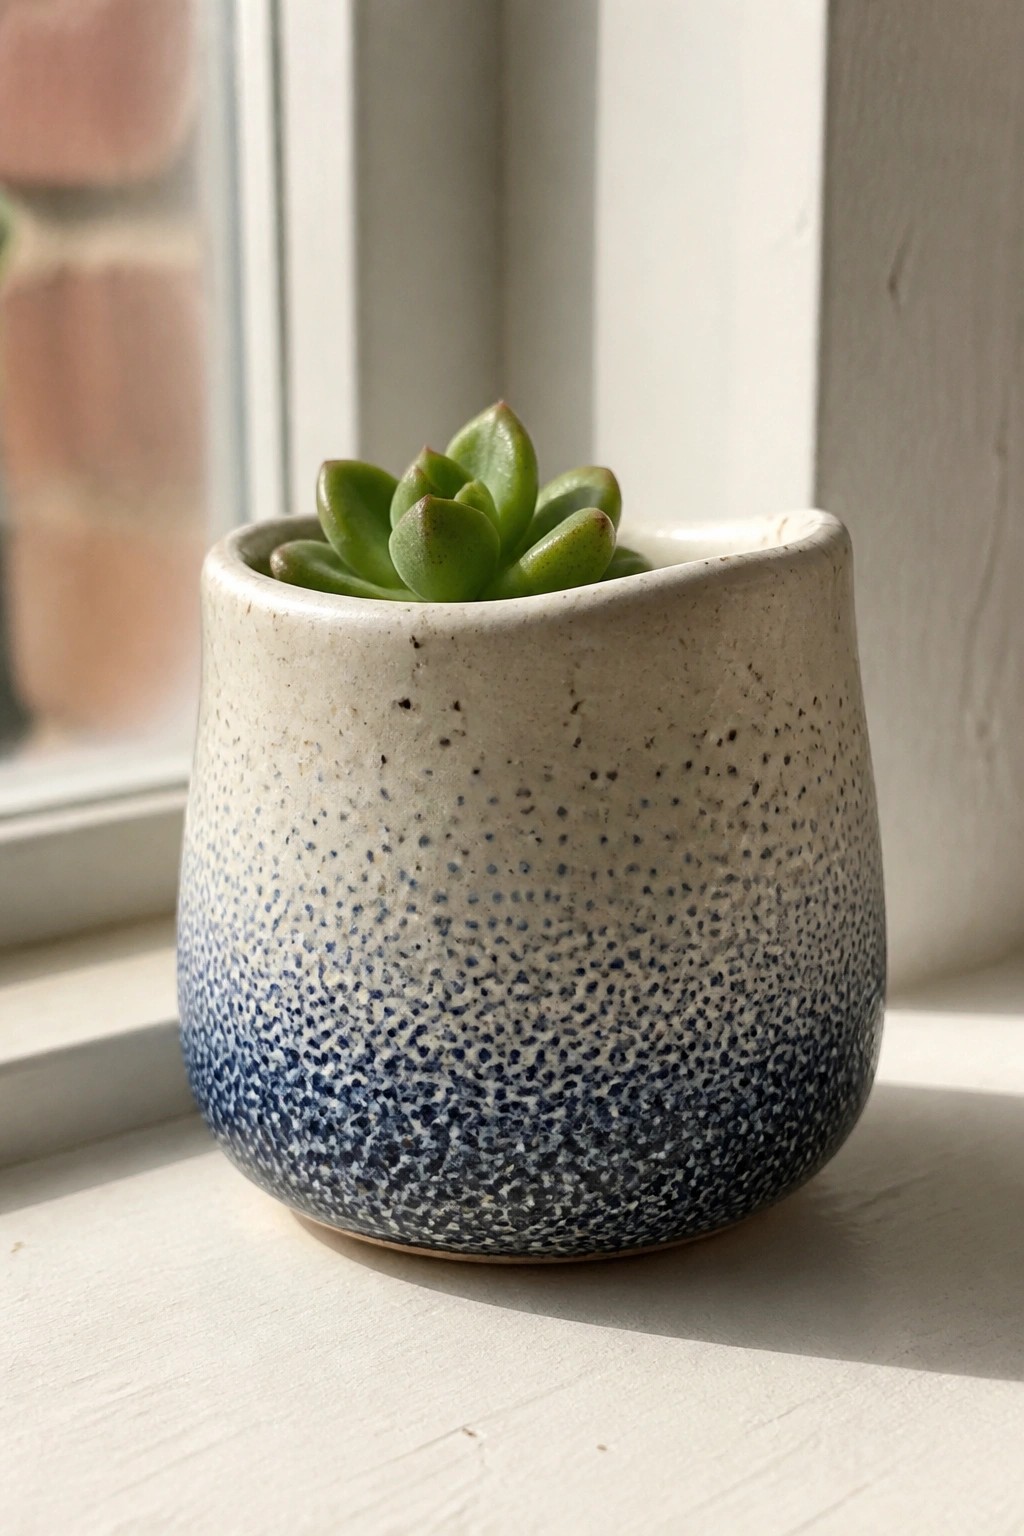
A small, rounded planter like this uses a simple dotted underglaze pattern to create a gradual shift from light speckled beige at the rim down to a heavier blue at the base. The dots give texture and depth without requiring fine brushwork, letting the color build naturally through repetition. This keeps the surface lively while staying subtle enough that the plant remains the main focus.
What makes this idea useful is how the small scale makes it easy to test underglaze dotting methods on a fast project that needs only one firing. You could rework the same gradient speckle on ring dishes, small trays, or pinch-pot holders by adjusting how dense the marks become toward the bottom. The shape also works well for desk use or as a gift that fits anywhere a standard mug would go.
Spiral Underglaze Lines Inside a Small Mug

A small handmade ceramic mug uses underglaze to create a continuous blue spiral that starts at the center of the interior and expands outward in even rings. The lines follow the curve of the bowl and stay confined to the drinking surface so the pattern remains visible during use. This keeps the decoration simple while still filling the space with a clear graphic motif. The thin, consistent line weight comes from careful brush control rather than heavy application.
What makes this idea useful is how the spiral adapts easily to any round interior. You can try the same layout on bowls, small planters, or the inside of a ring dish by working from the center outward with a fine brush. The contained scale makes it a good practice piece for underglaze line work before attempting larger surfaces. In a kitchen or on a desk, the pattern adds interest without competing with other items.
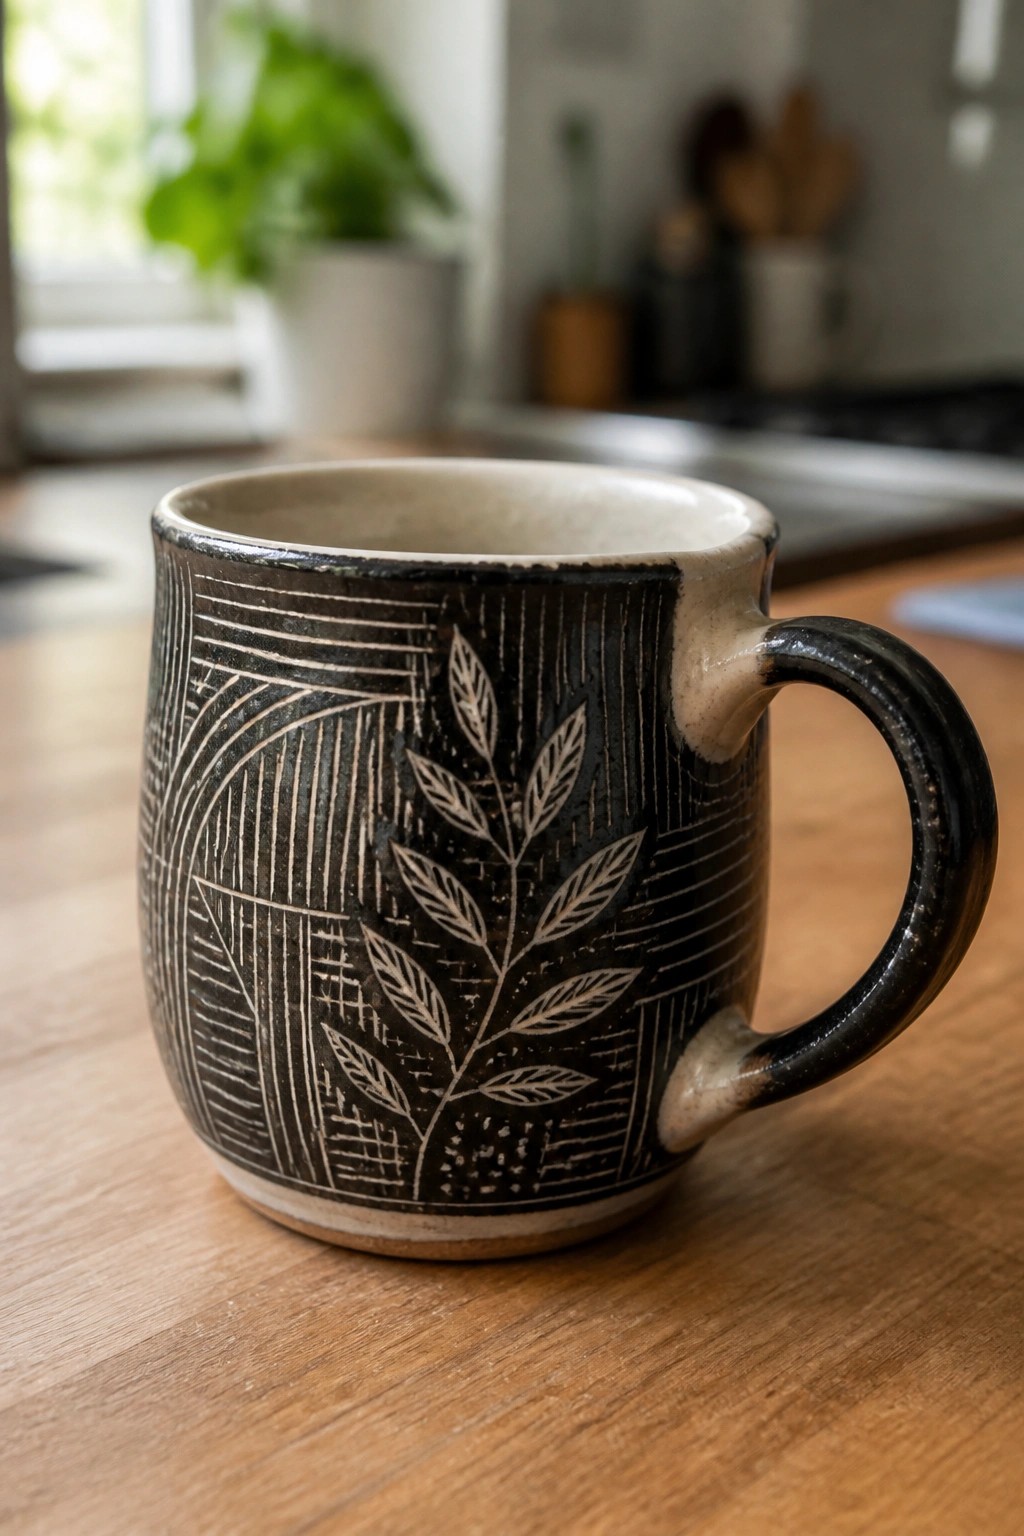
Underglaze Line Work for Botanical Patterns on an Oval Tray

A small oval tray uses a soft green glaze as the base for white underglaze lines that form a single branching plant with elongated leaves and two small daisy-style flowers. The lines stay thin and consistent, allowing the motif to spread across the surface while leaving negative space around the edges. This keeps the pattern readable even on a compact form where every detail has to work at close range.
The shape does a lot of the work here because the oval gives a natural frame for a centered plant design without needing extra borders. You could scale the same branching layout down for a ring dish or stretch it into a longer soap tray by adding more leaves along the sides. The muted background color also makes the white lines stand out in photos, which helps the piece show up clearly when shared as a surface decoration idea.
Masking Tape for Bold Underglaze Stripes

A small ceramic bowl works well for this approach because its curved surface lets the stripes wrap around without needing perfect precision. The maker applied wide bands of underglaze in two shades of blue, using masking tape to keep the edges straight and the white clay body visible between them. One stripe sits lower while the other angles upward, and a small drip adds a casual break in the pattern. The interior stays a single light blue wash so the exterior design stays the focus.
What makes this idea useful is how easily the tape method scales to other simple forms like mugs or plates. You can vary the stripe width or angle to change the look without learning new brush skills. The finished bowl sits comfortably on a counter or table as a catch-all or small serving piece. The same tape-and-under-glaze steps also work on a larger bowl if you want the pattern to read from farther away.
Loose Landscape Painting with Underglaze Washes on Tiles
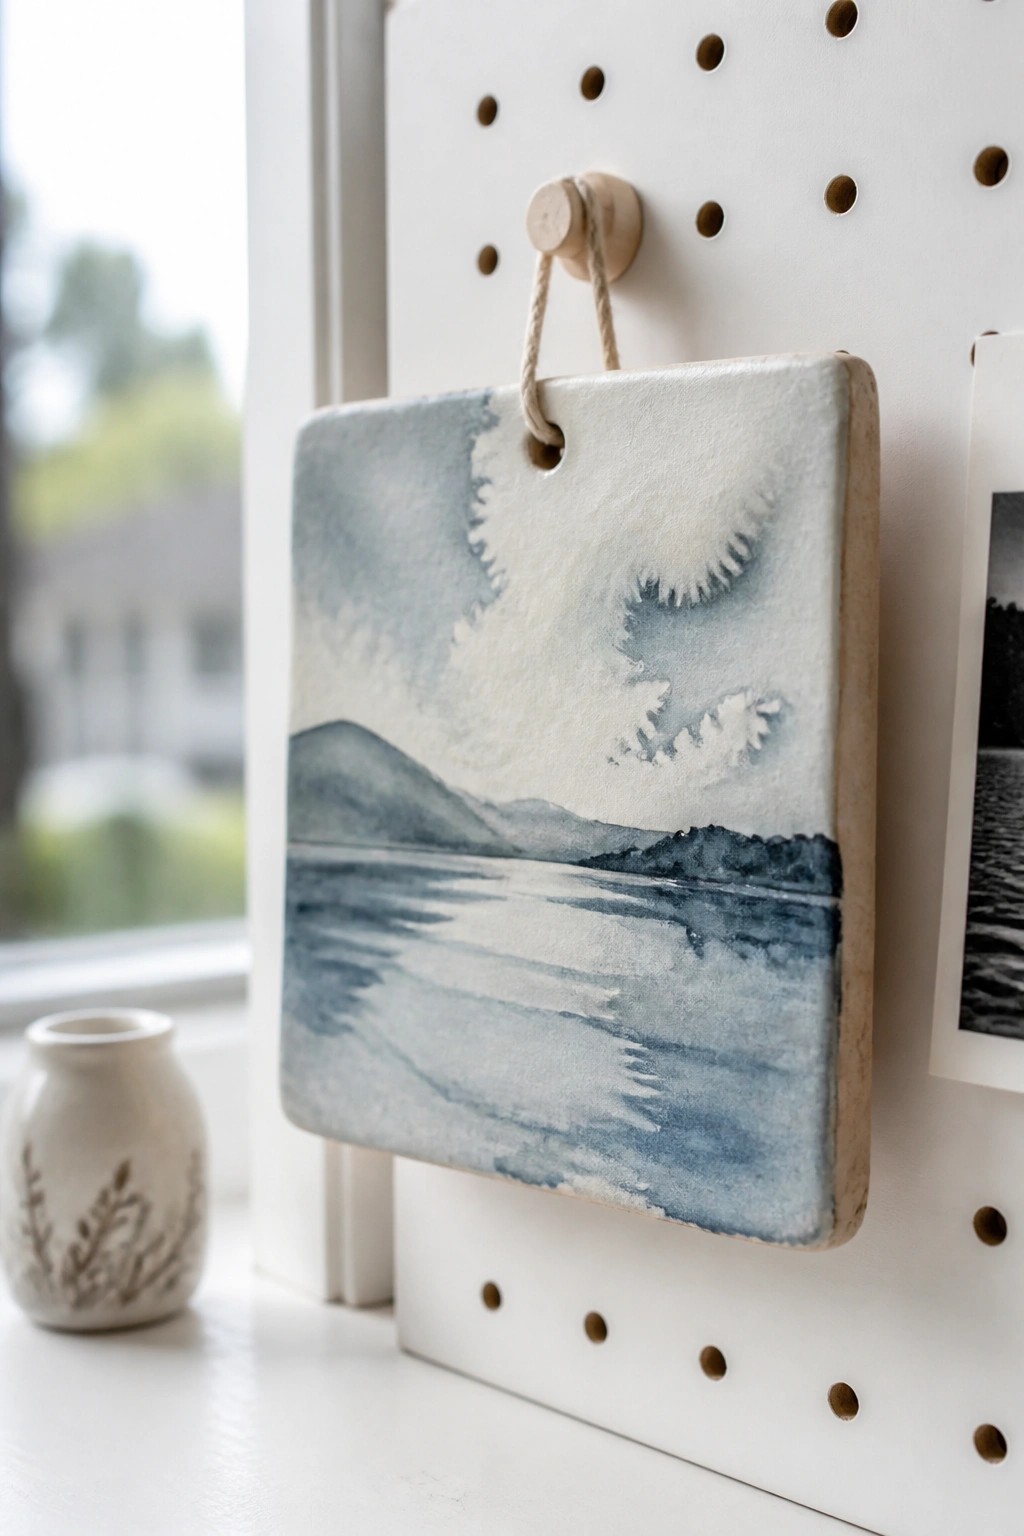
A square ceramic tile works well as a flat surface for painting a simple landscape with underglaze. Soft blue washes cover the sky and water areas while finer brush lines add ripples and cloud edges. The single hole at the top turns the tile into a hanging piece that needs no frame. This method keeps the focus on building depth through layered thin applications rather than many colors.
What makes this idea useful is how the tile shape lets you practice blending and fine line work without making a full vessel. You could repeat the same scene on smaller squares to create a row of matching wall pieces or switch the motif to abstract patterns while keeping the same hanging style. The format also adapts easily to testing new underglaze colors before using them on larger work. For display, one or two tiles take up little space yet show the technique clearly.
Sunburst Underglaze Pattern on a Small Salt Bowl

A small ceramic salt cellar or condiment bowl works well for this technique because the curved interior gives the underglaze room to show radiating lines without crowding. The maker applied blue underglaze in a tight starburst of fine lines and dots that start from the center and spread outward, letting the speckled clay body show through between the marks. This keeps the pattern readable even when the bowl holds salt or sugar and the light hits the surface from an angle.
The shape does a lot of the work here since the compact size lets you finish the underglaze lines in one sitting while still practicing control on a curve. You could repeat the same radial layout on a set of small spice dishes or shrink it further for ring dishes. In a kitchen this kind of piece sits neatly beside a pepper grinder or on a breakfast tray, and the same layout can be simplified to fewer lines if you want faster repeats for gifts.
Marbling Underglaze Layers on a Small Candle Holder

A compact ceramic candle holder gives a good surface for testing marbled underglaze patterns. The round, low form holds a tealight securely, and the gray-and-white veining is built by layering and dragging several underglaze colors before the final clear glaze. This keeps the focus on the pattern itself rather than on shape or added texture, which works well for small decor pieces where fine detail needs to show clearly.
The small size lets you practice the swirling and feathering steps on a single piece without using much material. You can adapt the same color layering to ring dishes or tiny trays by changing only the vessel diameter. On a nightstand or shelf, the finished holder sits neatly beside other objects without taking up space. Try the same marbling steps with a different color pair if you want the pattern to match a specific room scheme.
Small Floral Patterns on a Matching Saucer

A round ceramic saucer sits under a simple mug and carries a series of small blue underglaze flowers and leafy stems. The motifs are spaced evenly around the rim area and use thin lines for stems plus solid shapes for petals and leaves. This keeps the decoration contained to a flat, easy-to-reach surface while leaving the mug itself plain.
The compact size of a saucer gives you a low-pressure place to practice fine underglaze brushwork before moving to larger pieces. You can repeat the same layout on the foot of a bowl or the edge of a small tray with almost no extra planning. For gifts or kitchen use, a plain mug plus one patterned saucer reads as a finished set without requiring a full matching collection.
Paint Fine Fur Lines on a Ceramic Cat Figurine

A small sitting cat figurine lets you practice underglaze line work by first forming the basic shape and then adding many short, varied strokes to suggest fur texture across the body and face. The white base with blue shading creates contrast that makes the fine black lines stand out clearly on the ears, cheeks, and legs. This kind of project falls into the decorative figurine category where the painted details turn a simple sculpt into something more finished.
What makes this idea useful is that the compact size works on a shelf, desk, or plant stand without taking much space. You can reuse the same underglaze line technique on other small animals or change the color palette to match different rooms. For a gift, something like this stands out because the detail level looks considered even when the form stays straightforward.
Dense Floral Underglaze Across a Small Catch-All Dish

A small handmade ceramic dish becomes a ring holder or trinket tray when the interior is covered with a tight repeating floral pattern in underglaze. The design uses light motifs on a dark blue ground so the fine leaves and flowers stay legible even on the curved surface. The shallow form with one pinched rim keeps the piece compact while still giving enough area for the pattern to repeat several times.
The shape does a lot of the work here because the small scale lets you finish and fire the piece quickly without needing large kiln space. You can adapt the same dense pattern by shrinking the repeat for the inside of a mug or by placing just one motif cluster on a soap dish. In a bathroom or on a dresser this kind of piece keeps small items contained while the all-over pattern makes it look complete without extra carving.
Stenciled Grid Patterns in Underglaze
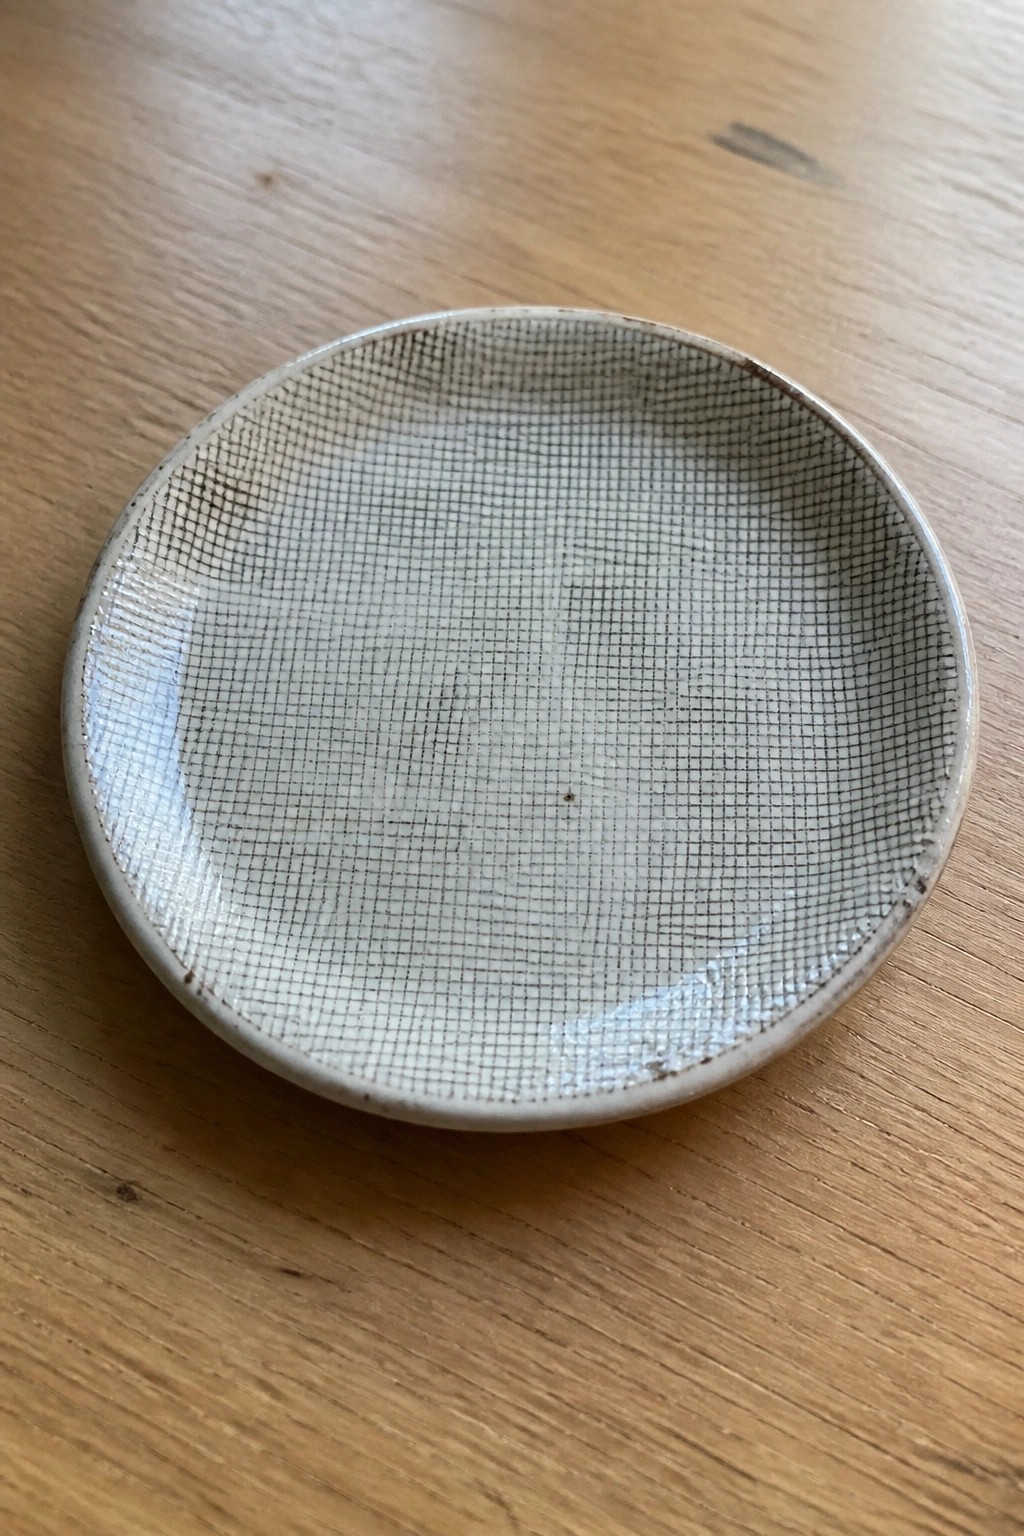
A small round dish works well for this approach because the flat interior gives plenty of room for a repeating grid. The design uses a precise mesh of fine lines applied in underglaze before the final glaze, creating strong contrast against the light clay body. The regular spacing of the lines makes the pattern read clearly even on a compact surface.
What makes this idea useful is how easily the same grid can be adapted to other small forms like a soap dish, ring holder, or catch-all tray. You can change the scale of the squares or swap the underglaze color to match different glaze combinations without altering the basic layout. The small size also keeps the piece quick to finish and simple to photograph for reference when trying the technique again.
Crescent Ring Dish with Dotted Underglaze Pattern
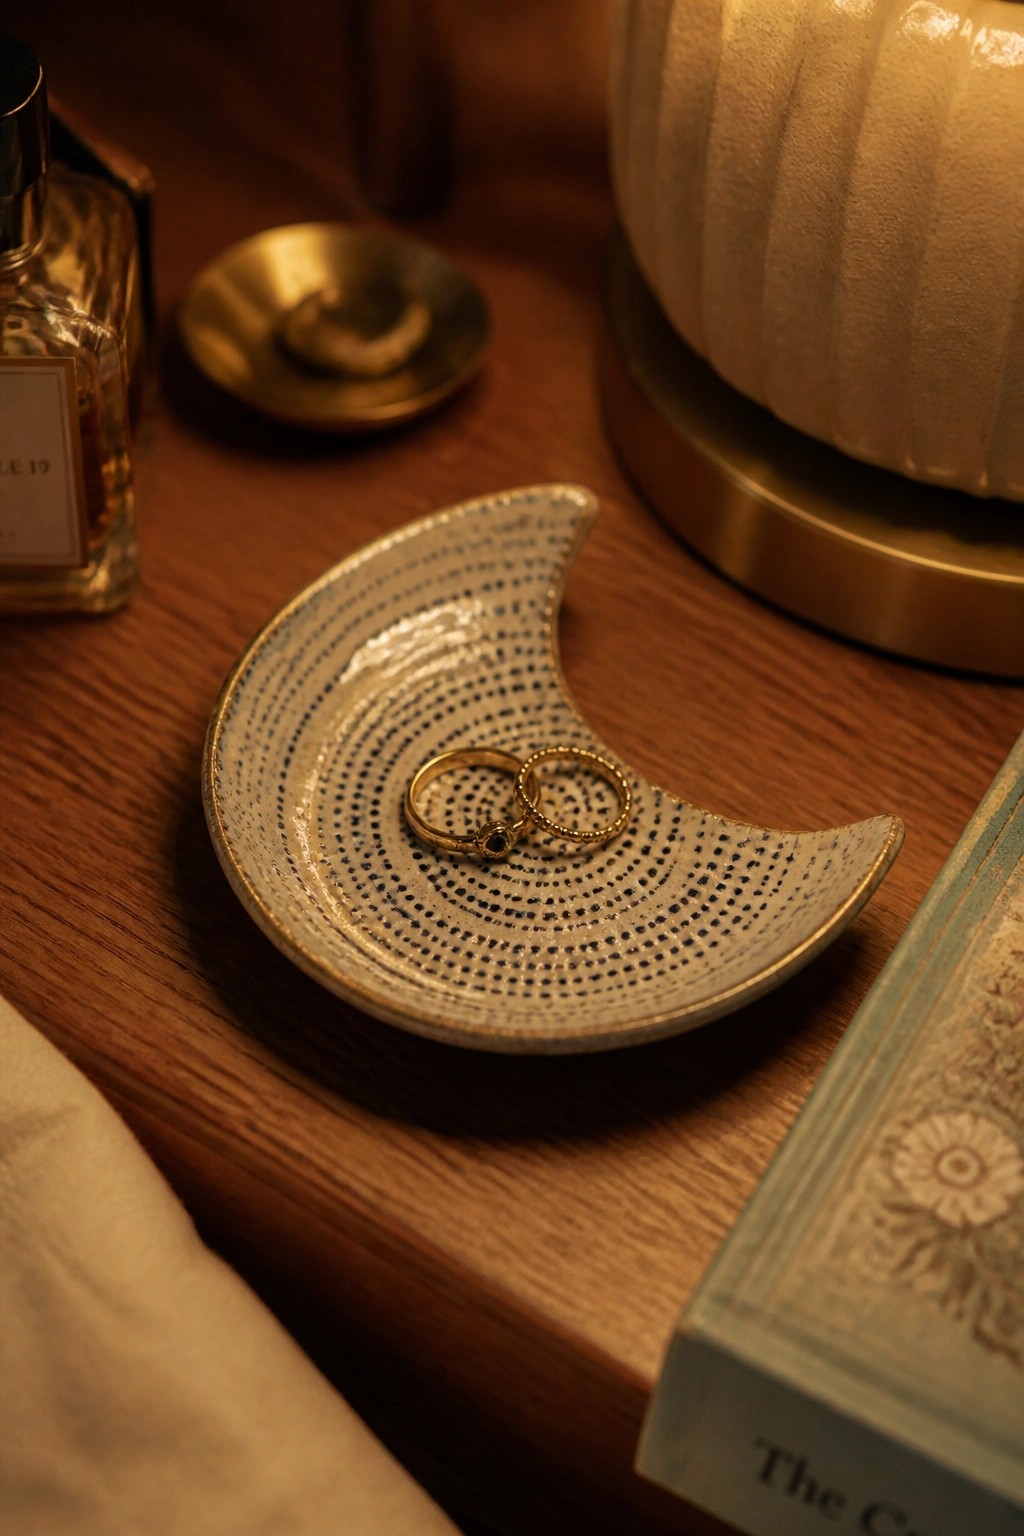
A crescent-shaped ring dish in ceramics gives you a compact place to drop rings and small jewelry at the end of the day. The maker applied underglaze in a tight dotted pattern that follows the curve of the form, creating a textured surface that still reads as simple from a distance. A light base glaze keeps the dots visible while a narrow gold edge finishes the rim. This kind of small tray counts as a practical decor object rather than a large serving piece.
What makes this idea useful is how the repeating dots let you practice fine underglaze control on a curved surface without needing a lot of space. The shape works especially well on a nightstand or dresser where it takes up little room yet keeps rings from rolling away. You could rework the same dotted pattern onto an oval or rectangular tray if you want a slightly larger version for earrings or keys. The small scale also makes it simple to test new underglaze colors or line weights before committing them to bigger work.
Fine Line Underglaze Landscapes on Divided Holders

A divided ceramic toothbrush holder keeps brushes upright and separated while fitting neatly on a bathroom counter or windowsill. The maker used underglaze to draw a simple landscape of trees and hills in fine lines around the cylinder, letting the natural clay color show through for contrast. The small drainage hole near the base and the textured lower band add function without extra pieces.
What makes this idea useful is how the narrow form and divided interior work for daily bathroom storage without crowding the space. You can scale the same line technique down for a soap dish or up for a small vase by adjusting the motif to the curve of each shape. The subtle color stays easy to match with other bathroom items, and the approach translates well to other small holders like desk organizers or plant saucers.
Fine Horizontal Lines Using Underglaze on a Small Pitcher
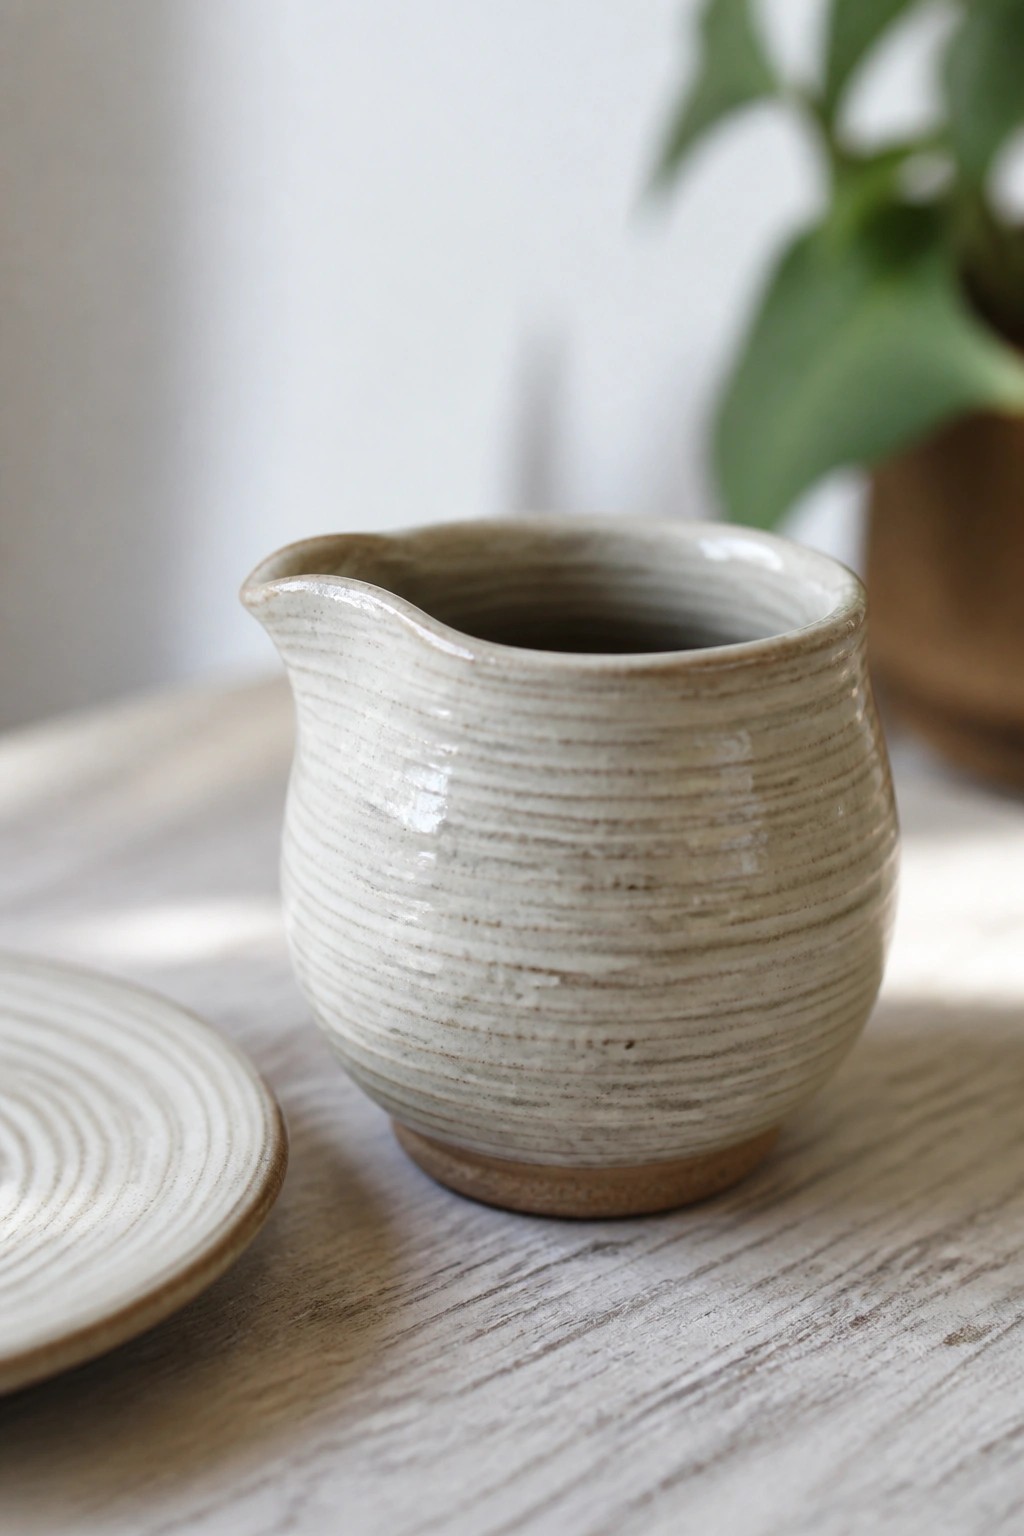
A small ceramic creamer or pitcher works well for this technique because its rounded form lets you wrap thin horizontal lines evenly around the entire surface. The lines run from the foot up through the body and into the spout area, creating a consistent striped pattern that adds texture without needing extra motifs or color blocks. This approach keeps the focus on the repetition of fine lines rather than on shape details or added decoration.
What makes this idea useful is how easily the same line spacing and thickness can be repeated on mugs, small bowls, or lidded jars. The compact size helps you maintain steady brush pressure while working around curves. You can simplify it further by using fewer lines or switch to vertical stripes if you want to try the method on a taller form. In a kitchen setting, a piece like this stands out on a table because the pattern reads clearly from a short distance.
Floral Crackle Pattern on Ceramic Ornaments
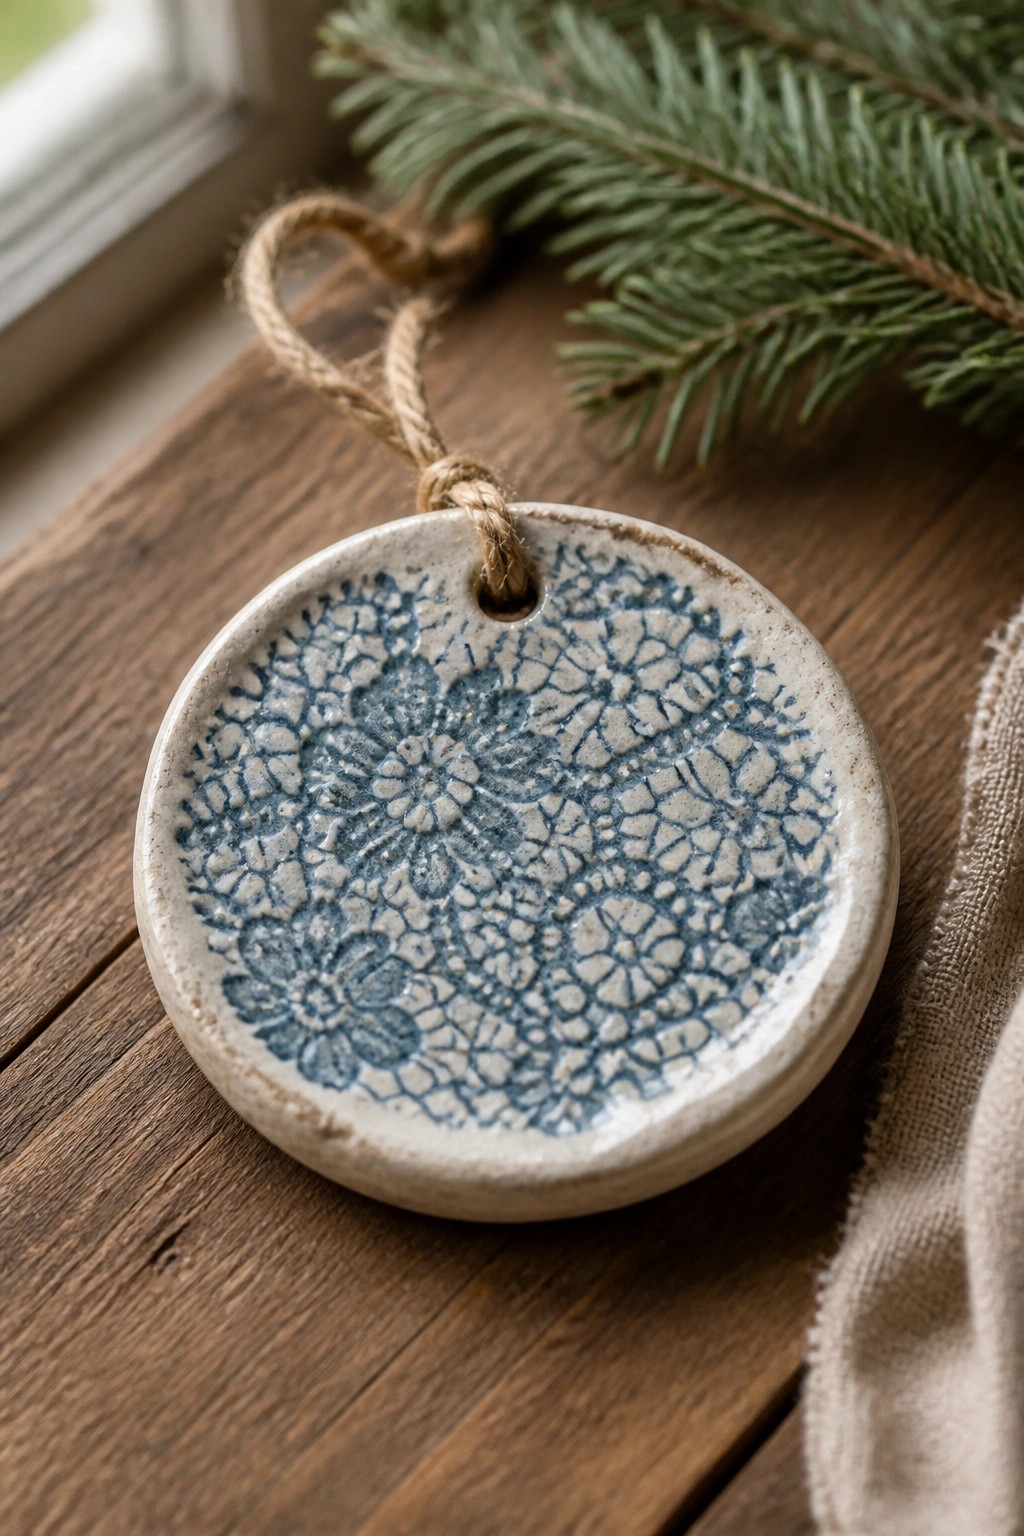
A small round ceramic disc makes a simple base for testing underglaze techniques on fine repeating patterns. The ornament uses a blue floral motif set into a lighter crackled field, with the design covering most of the surface while leaving a narrow unglazed rim. The flat shape keeps the small details sharp and lets the contrast between the solid flowers and the broken background show clearly. This approach fits the decor object category, where the piece can hang from twine or ribbon.
The small scale keeps material use low, so you can try the same pattern on several discs at once without much waste. The design adapts easily to earrings, gift tags, or drawer pulls by changing the hole placement or size. In a kitchen or entryway, a few of these add a consistent handmade accent without taking up space. You could swap the floral stamp for geometric lines or text and still use the same color layering method.
Fine Botanical Linework in Underglaze on a Ridged Soap Dish

A ridged soap dish gives underglaze patterns a built-in structure to follow. The blue leaf and stem motifs run across the white ceramic surface, with branches placed to echo the grooves rather than fight them. Two drainage holes sit inside the design without breaking the repeat. This keeps the pattern functional while letting the fine lines stay visible on a small bathroom piece.
The shape does a lot of the work here because the ridges already create natural sections for the motif. You can repeat the same leaf layout on a matching tray or tile set using the same underglaze. In a bathroom, this size fits easily on a counter and still shows the pattern clearly. The approach also scales down well if you want to test a new foliage arrangement on a test tile first.
Fine Vertical Lines Drawn with Underglaze on a Small Bud Vase

A compact bud vase in light clay uses thin vertical stripes of blue underglaze to create a simple repeating pattern across its rounded body. The lines are applied from the narrow neck outward so they follow the curve and stay evenly spaced as the form widens. This keeps the surface busy enough to be interesting but light enough that the shape itself remains the main focus. The finished piece works as a small decor object for a single stem or cutting.
What makes this idea useful is how the line spacing can be tightened or loosened to match any vase size without changing the basic method. The narrow profile fits on a shelf or windowsill where larger pieces would crowd the space, and the same underglaze approach could be moved to a mug or small pitcher with only minor adjustments to the layout. For a gift, the clean lines give it a finished look that still feels simple to make.
Marbled Underglaze on a Cone Ring Holder
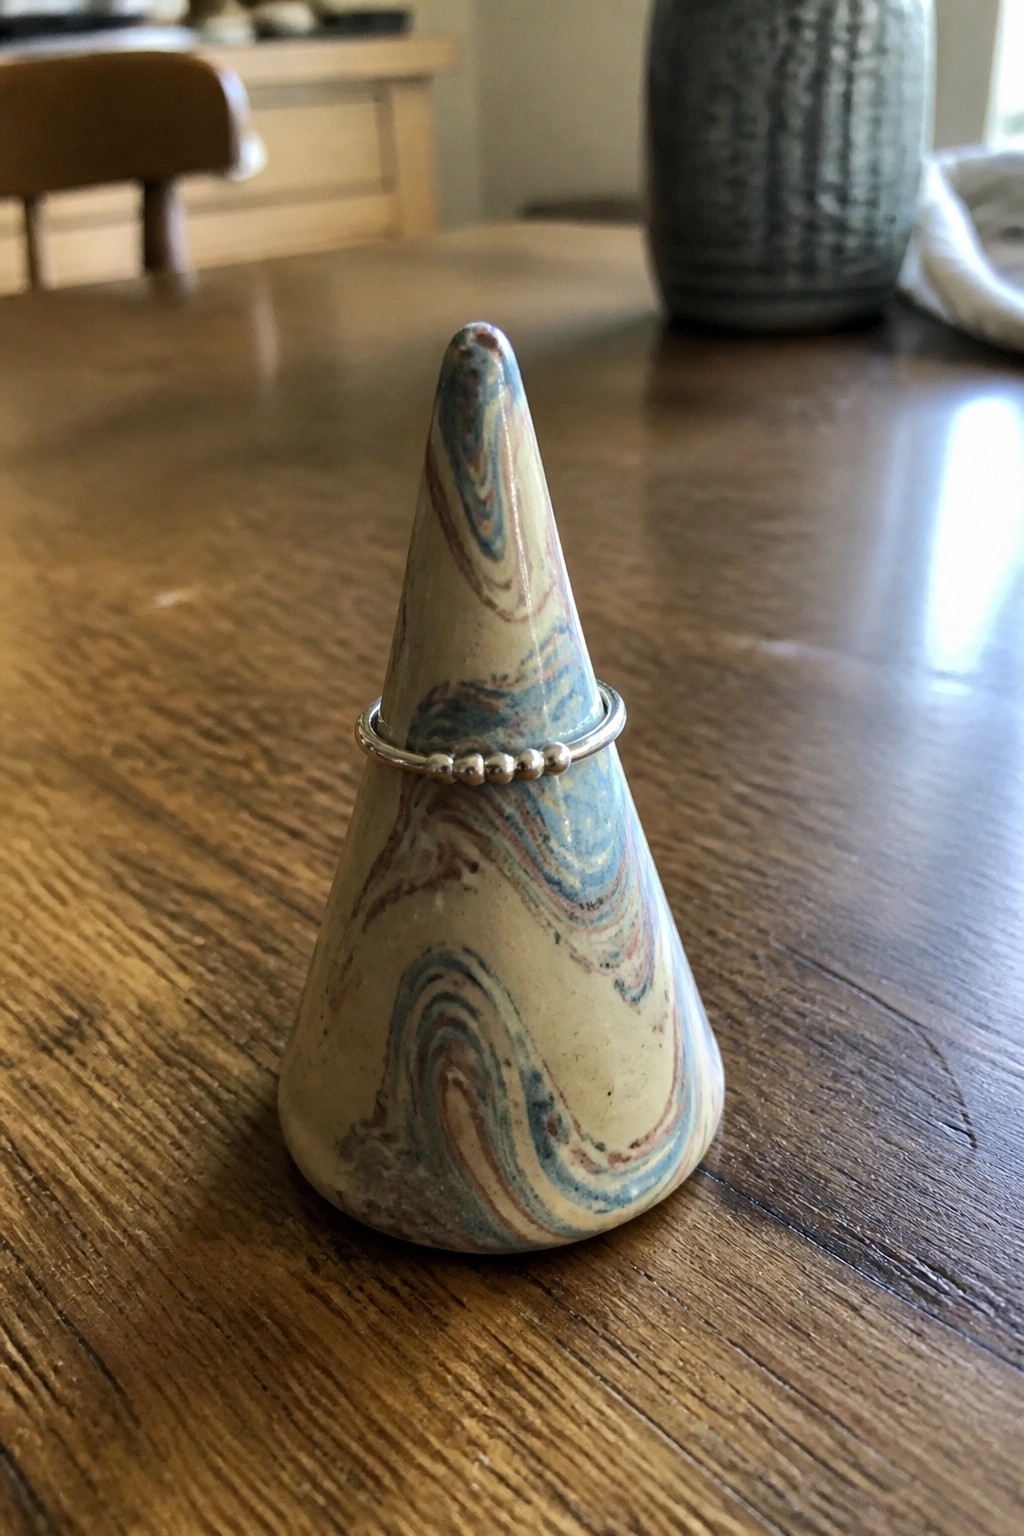
A cone-shaped ring holder made from pottery can be finished with a marbled underglaze pattern to add movement across the surface. The swirls of blue, brown, and off-white run continuously around the tapered form, creating a varied pattern that changes as you turn the piece. This works especially well on small holders because the simple shape lets the underglaze pattern stay visible from every angle without extra carving or lines.
The small scale makes it easy to test marbling techniques on a test piece before committing to larger work. You could repeat the same cone form for necklace stands or adapt the marbling method onto a flat ring dish or soap holder. In a bedroom or entryway, this kind of holder keeps rings organized while the pattern adds enough detail to catch attention on a shelf.
Mosaic Grid Patterns from Small Underglaze Squares
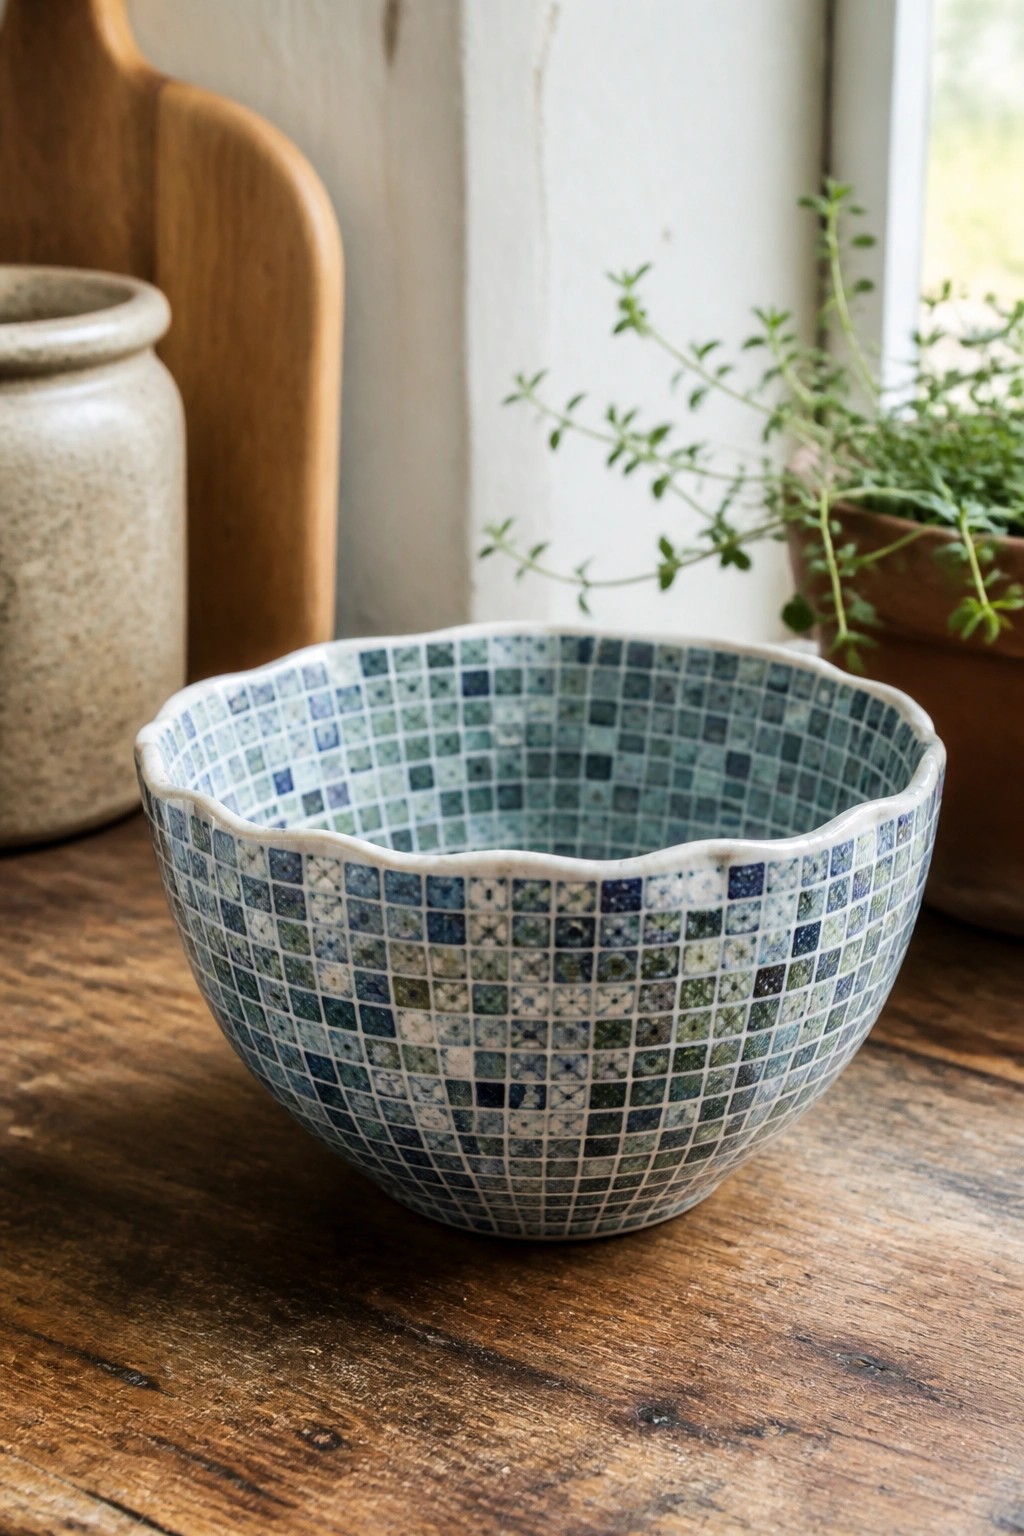
A ceramic bowl uses a tight grid of hand-applied underglaze squares in blues, greens, and soft neutrals to create a full-surface mosaic effect. The scalloped rim breaks up the pattern at the edge while the squares themselves stay uniform in size and spacing. This method covers the curved form evenly and keeps the design readable even from a distance.
What makes this idea useful is how the grid structure can be adjusted for different sizes of bowls or switched to mugs and plates without much change in process. You can vary the color mix within the squares or reduce the number of shades to speed up the work. A piece like this works especially well as everyday kitchenware because the pattern adds interest without competing with food. The same grid approach also transfers easily to trays or small lidded jars where you want a structured look rather than freehand drawing.
Using Underglaze Dots to Create Animal Portraits on Tiles

A flat square tile works well for this underglaze approach because it gives a stable surface for building an image entirely from small dots. The dog portrait is formed by varying the dot size, spacing, and color mix to suggest fur texture, eye highlights, and muzzle shading without any solid brushstrokes. This method keeps the details sharp even after firing and lets the base clay color show through in the background.
What makes this idea useful is that the tile shape is easy to produce in batches and can be turned into coasters, trivets, or framed wall pieces. The same dotting technique scales down for smaller items or can be adapted to other subjects like birds or cats by changing the color palette. For a gift, a single finished tile needs only simple packaging and stands out because the level of detail is not common on basic ceramic blanks.
Frequently Asked Questions
FAQ 1: What tools work best for creating fine lines with underglaze? Start with fine liner brushes in sizes 000 to 2, along with a steady hand or a brush rest for control. Pair them with underglazes that have a smooth consistency and test them on scrap clay to match your clay body. For even finer work, consider needle tools or transfer methods from the techniques discussed to keep lines crisp without hand fatigue.
FAQ 2: How do I stop underglaze from bleeding when adding small patterns? Apply thin layers and let each one dry completely before the next, using a fan or hair dryer on low to speed drying without disturbing the surface. Choose underglazes formulated for detail work and avoid overloading your tool. Many of the 23 techniques recommend a light bisque firing of the underglaze layer first to set the details before adding any clear glaze on top.
FAQ 3: Can these techniques be used on both greenware and bisque ware? Yes, most work on either stage but greenware allows carving or incising to combine with underglaze for added depth in patterns. On bisque, focus on painting or resist methods since the surface is firmer. Always check absorption rates and run a test tile because bisque may require slightly thicker application to achieve the same intensity after firing.
FAQ 4: What should I do if details fade or blur after the final firing? This often happens from too heavy a clear glaze or incompatible firing temperatures, so apply glaze thinly with a spray bottle to reduce movement. Test all color and glaze combinations on sample pieces fired to your kiln schedule. Several of the techniques include sealing steps like a low temperature pre-fire to lock in fine lines and small details before the glaze firing.
FAQ 5: How can I combine multiple techniques for complex designs on small pieces? Begin with a base layer using one method such as stenciling, then layer fine lines or stippling on top once dry. Keep the overall design simple at first and plan the sequence to avoid smearing. Practice the full process on similar sized test forms so you understand drying times and color interactions before committing to your main work.

Pottery Path is my cozy corner of the internet where I share clay ideas, pottery inspiration, and simple projects you can recreate at home. I love exploring everything from air dry clay to handbuilt pottery to cute minis that brighten your day. My goal is to make clay crafting feel easy, fun, and welcoming for anyone who wants to try it.
You will find beginner friendly tutorials, creative pottery painting ideas, and lots of warm inspiration for slow and happy crafting. If you enjoy hands on creativity, this space will feel like home.