I’ve been playing around with glaze layering on my pottery pieces for a while now.
It started when I wanted to get more interesting surfaces without adding too many new colors.
Some combinations give a nice sense of depth that I didn’t expect at first.
I’ve noted down a few approaches that seem to work consistently on different clay bodies.
These are just things I’ve tried in my own studio and found useful.
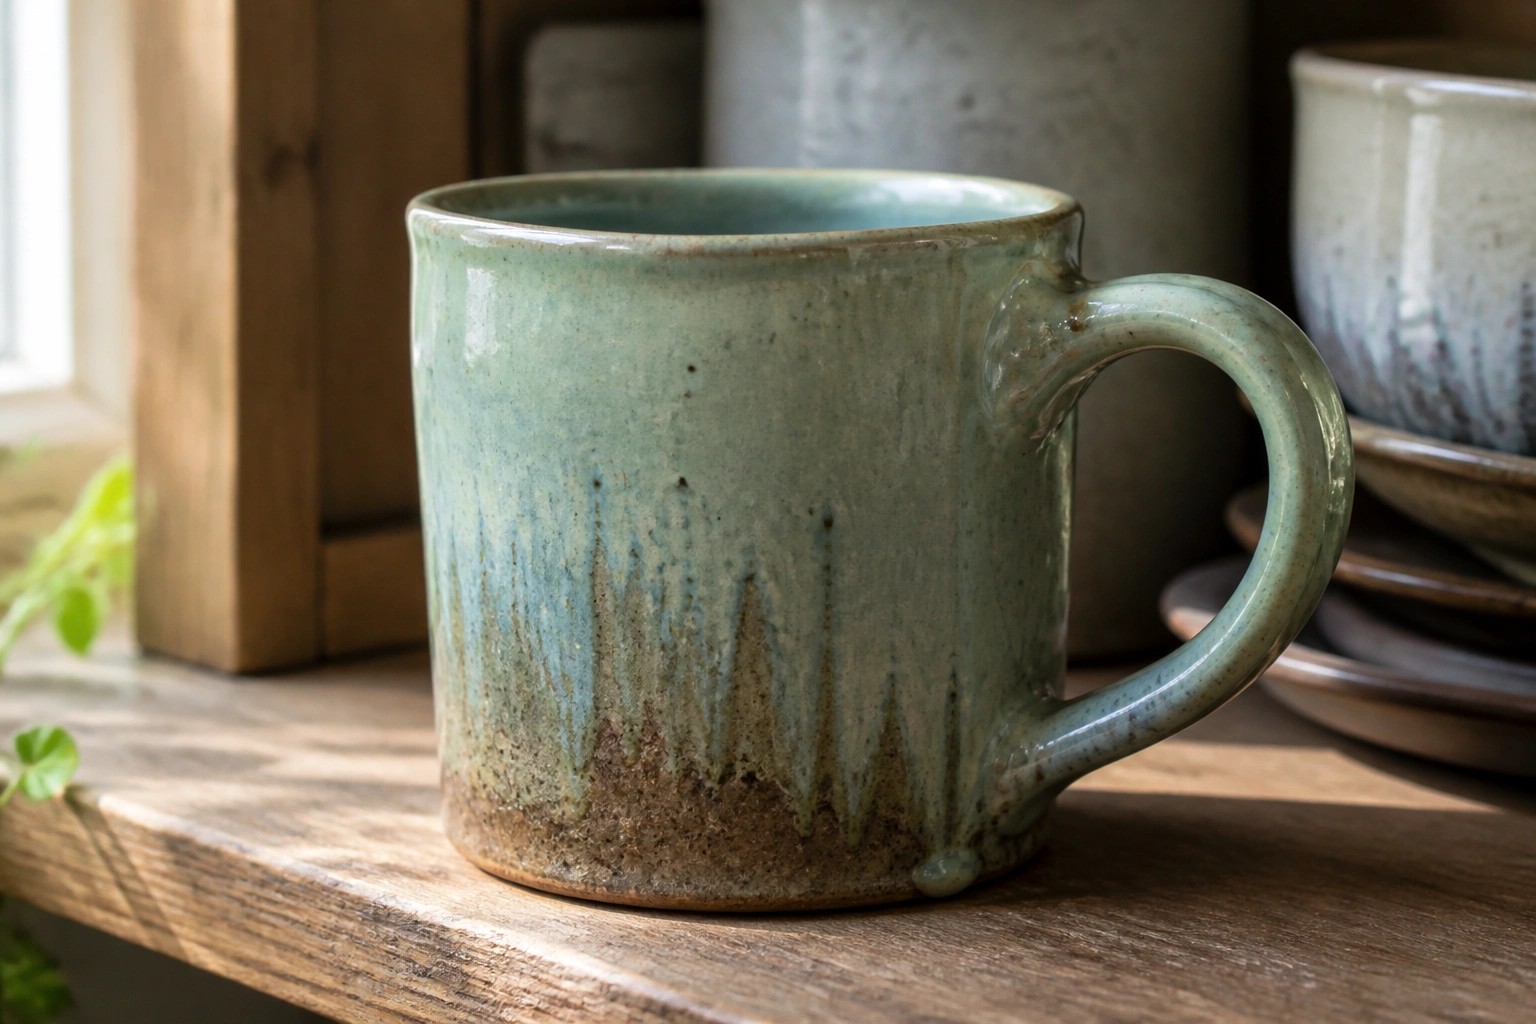
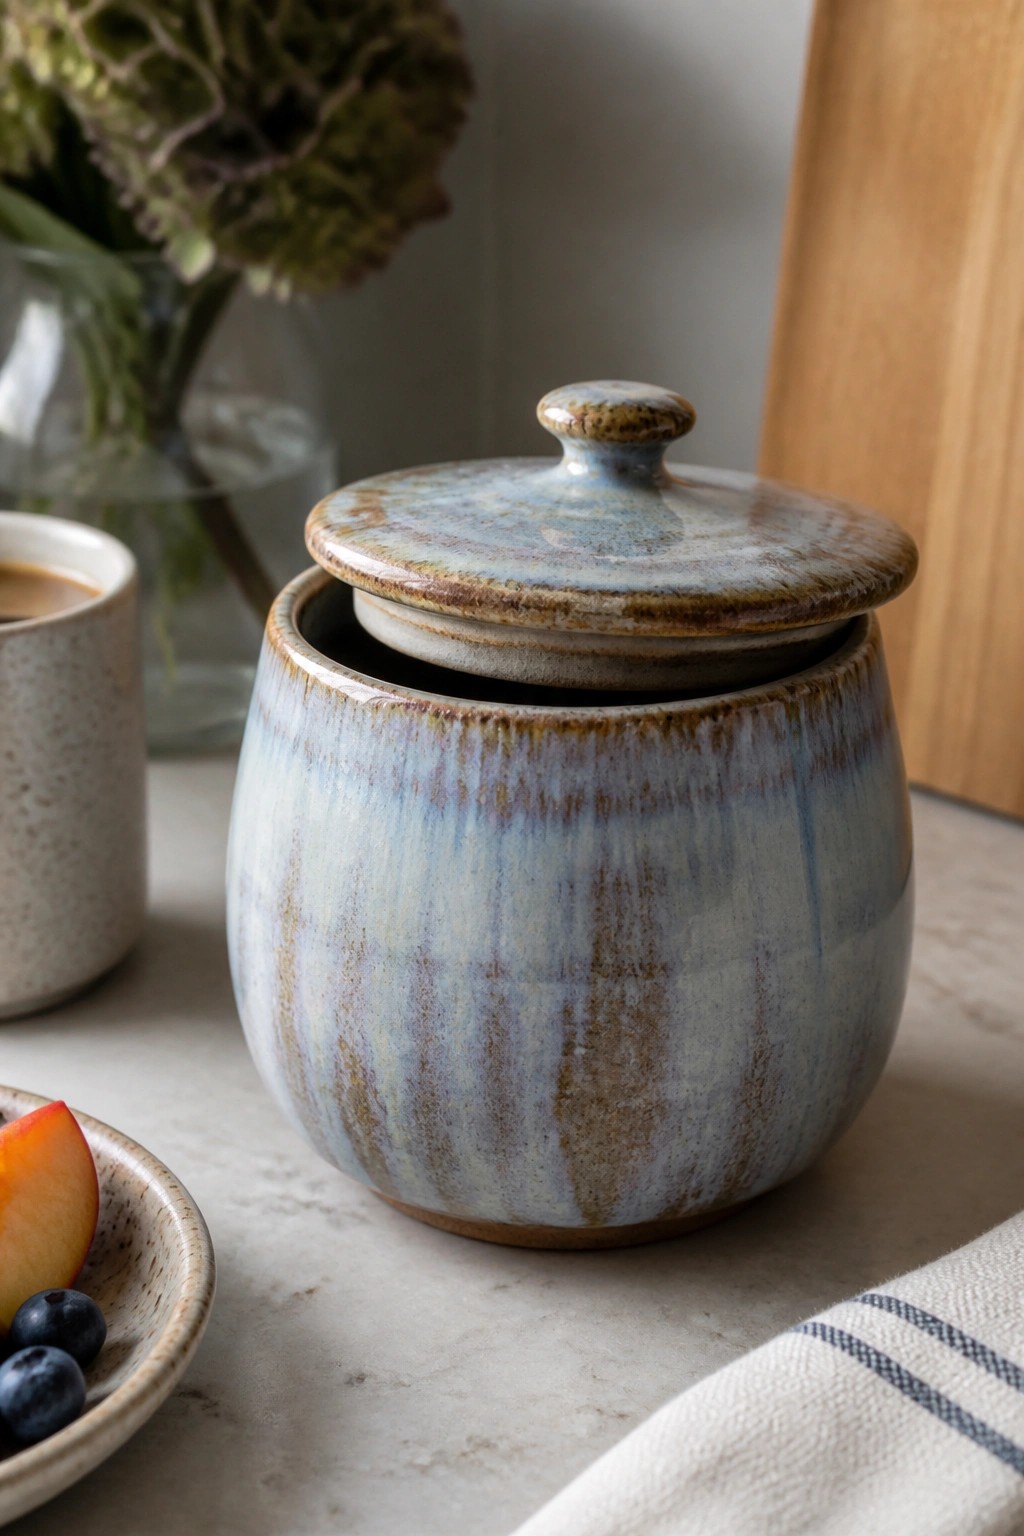
Layered Dripping Glazes on a Ceramic Mug
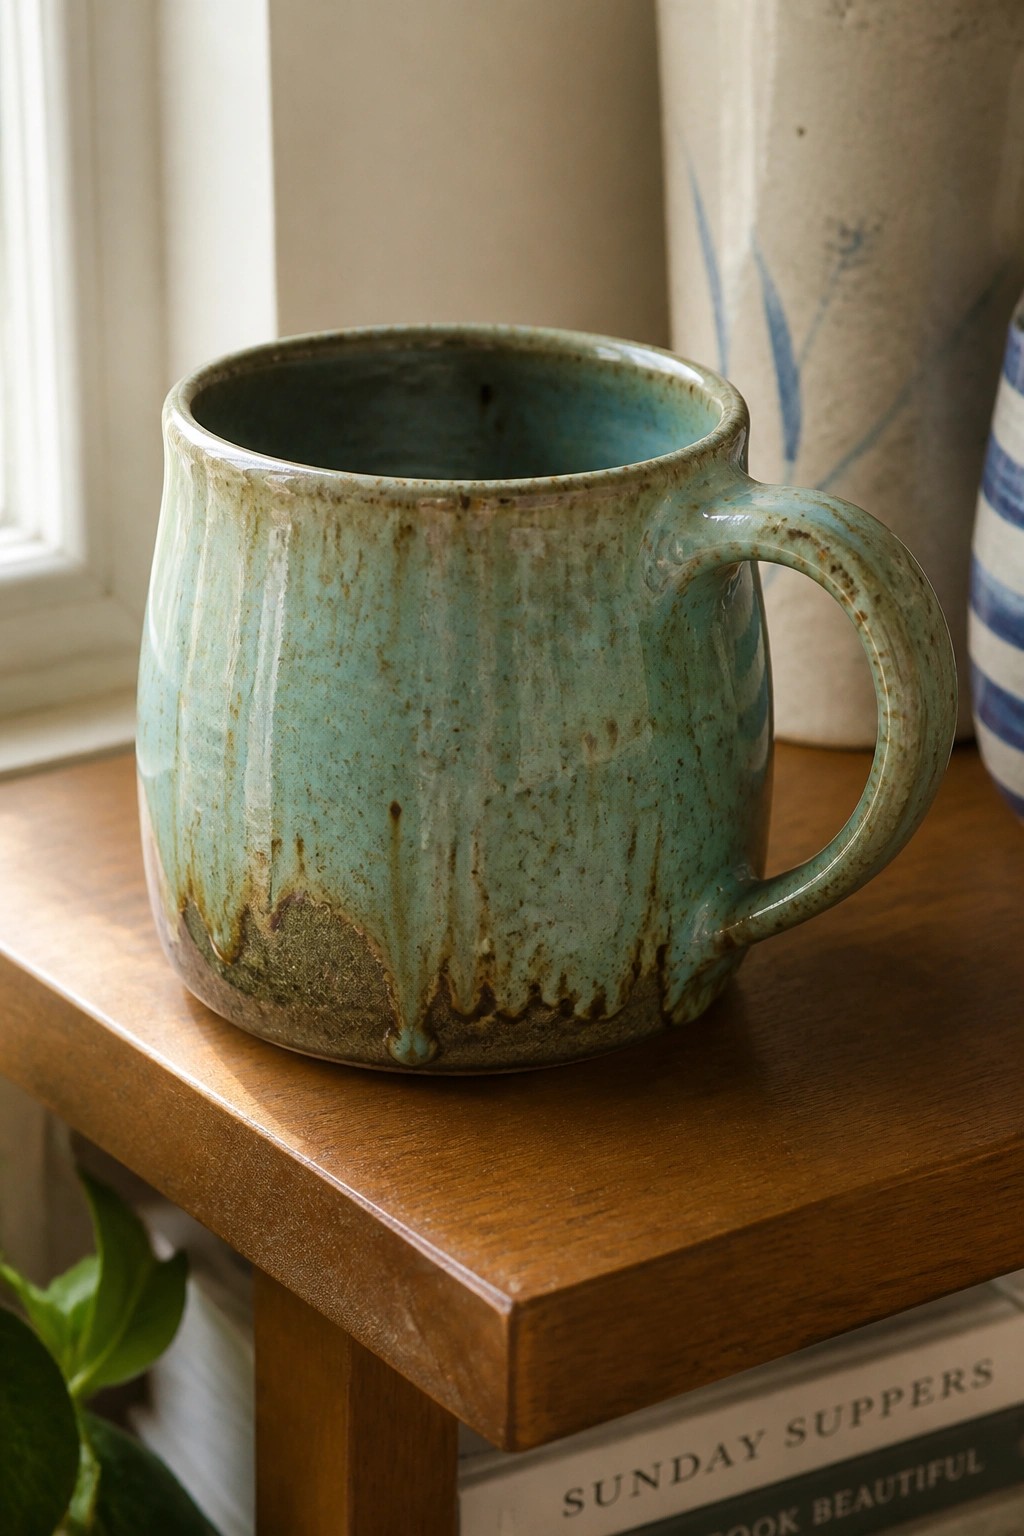
A ceramic mug finished with multiple glaze layers that run and interact during firing. The upper turquoise glaze flows downward in uneven streaks, shifting into darker earthy tones where it meets the lower layers and pools along the base. This creates vertical movement and subtle color transitions across the surface without added carving or texture. The approach works especially well on rounded forms like mugs because the shape encourages glaze flow and pooling.
What makes this idea useful is how the runny layering adds visual interest to a basic mug shape while keeping the piece fully functional for daily use. The same technique adapts easily to bowls or small pitchers by varying glaze thickness to control drip length and coverage. In a kitchen this style stands out on shelves because the color shifts change appearance under different lighting. For a simpler version try two glazes on test tiles first to observe how they interact before applying to finished pieces.
Radial Streak Glazing on a Small Bowl
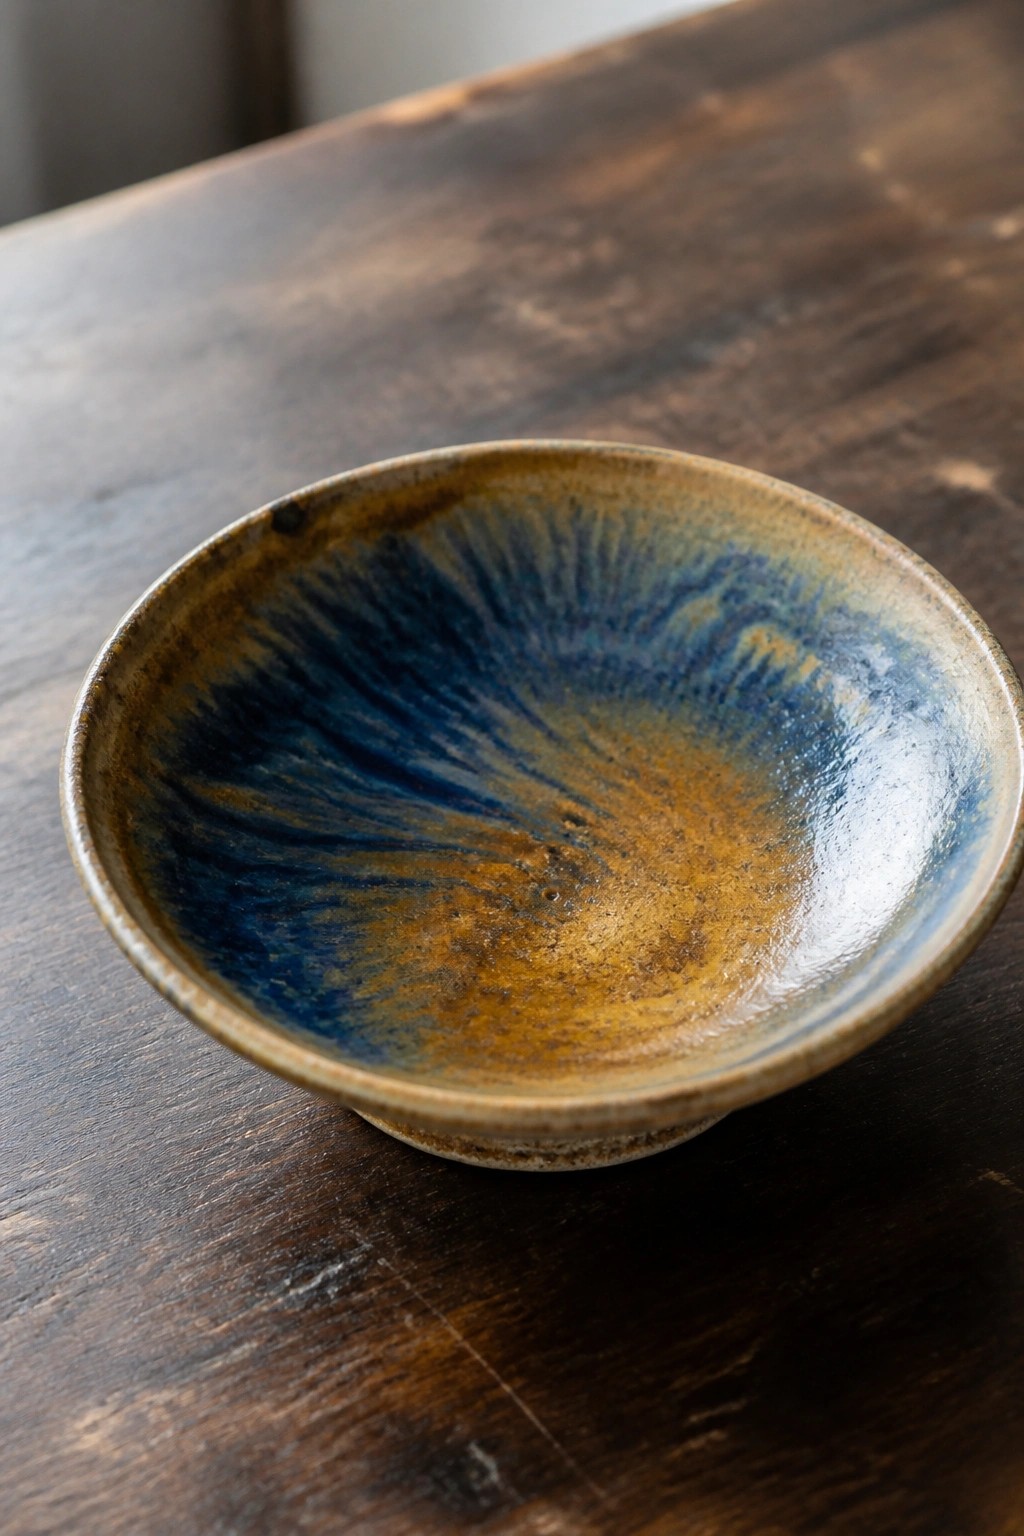
A small ceramic bowl uses layered glazes that radiate outward from the center to form streaked bands of blue and amber. The application creates visible movement as the colors blend and separate during firing. This method relies on the bowl’s curved surface to guide the glaze flow and produce the feathered edges.
What makes this idea useful is how the same radial layering can be tested on plates or shallow trays by changing where the first glaze is applied. The compact size lets you experiment with multiple color combinations without using much material. In a kitchen this shape works well for sauces or snacks and the pattern remains visible even when the bowl sits among other dishes.
Radiating Brushstroke Glaze on a Shallow Bowl
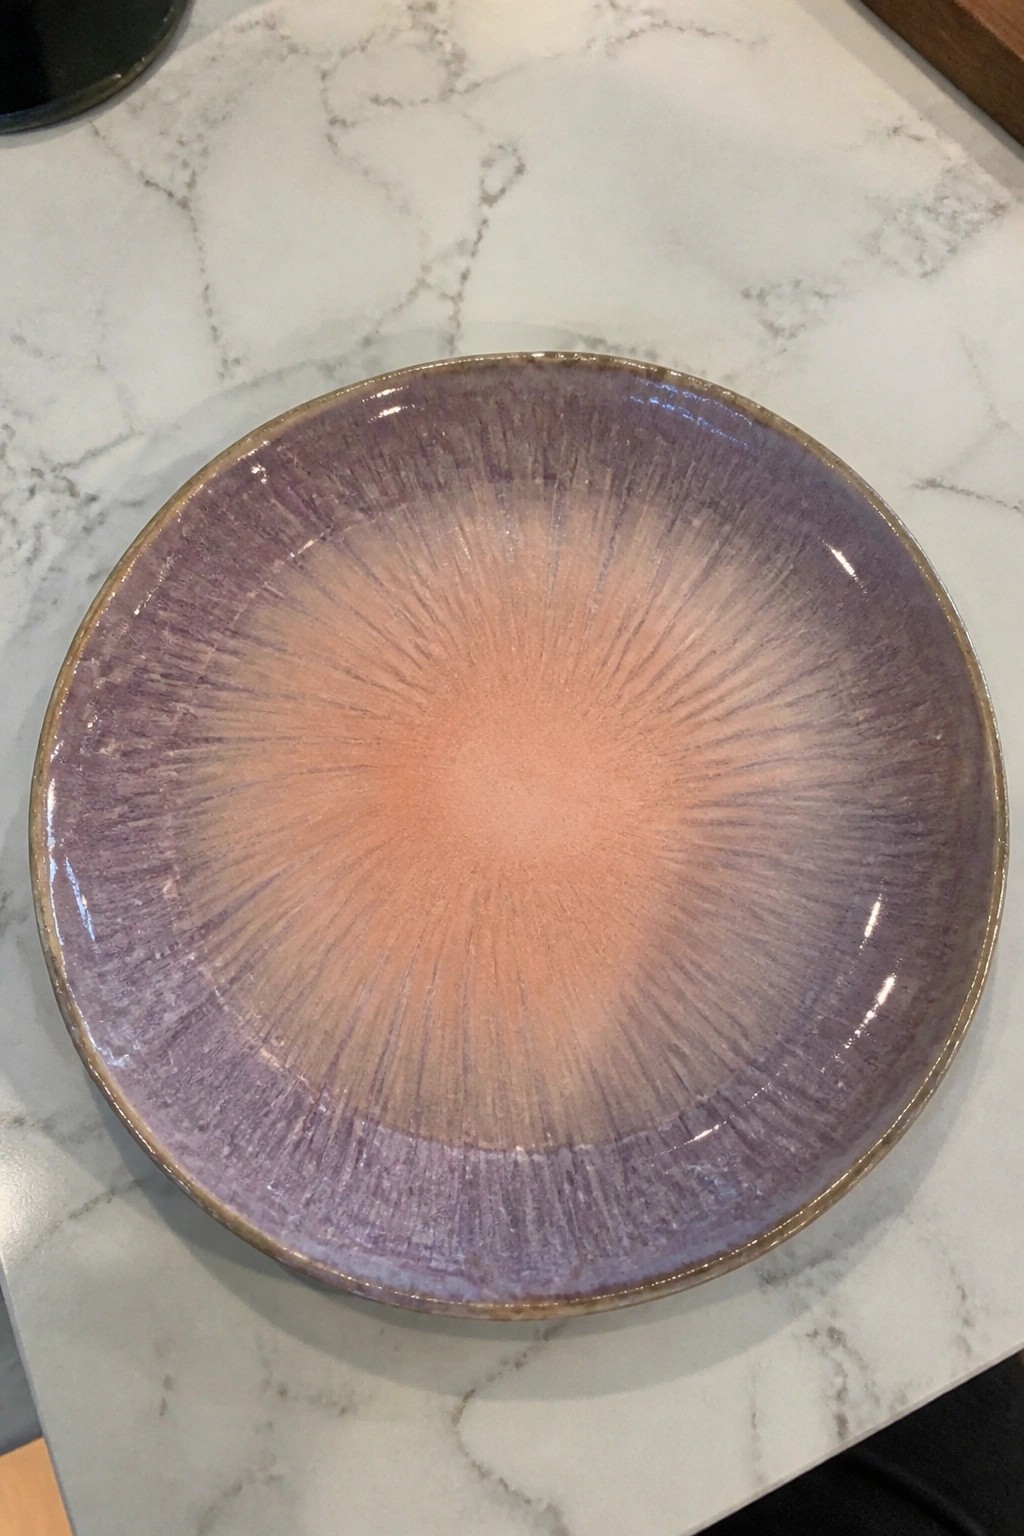
A shallow serving bowl finished with a radial glaze application. Purple glaze covers the outer area while a warmer peach tone fills the center, both applied in visible outward strokes that fan across the surface. The pattern creates movement through the way the colors meet and the lines draw the eye inward or outward depending on the angle.
What makes this idea useful is how the simple radial layout adds depth and direction with just two glazes. A piece like this works especially well as a fruit bowl or side dish on a table where the open shape shows off the full pattern. You could rework the same stroke direction on dinner plates or a low tray by changing the starting point of the brush and keeping the color shift subtle. The approach stands out in photos because the lines give clear structure without extra carving or decals.
Layered Glazes for Streaky Color Movement on a Tray
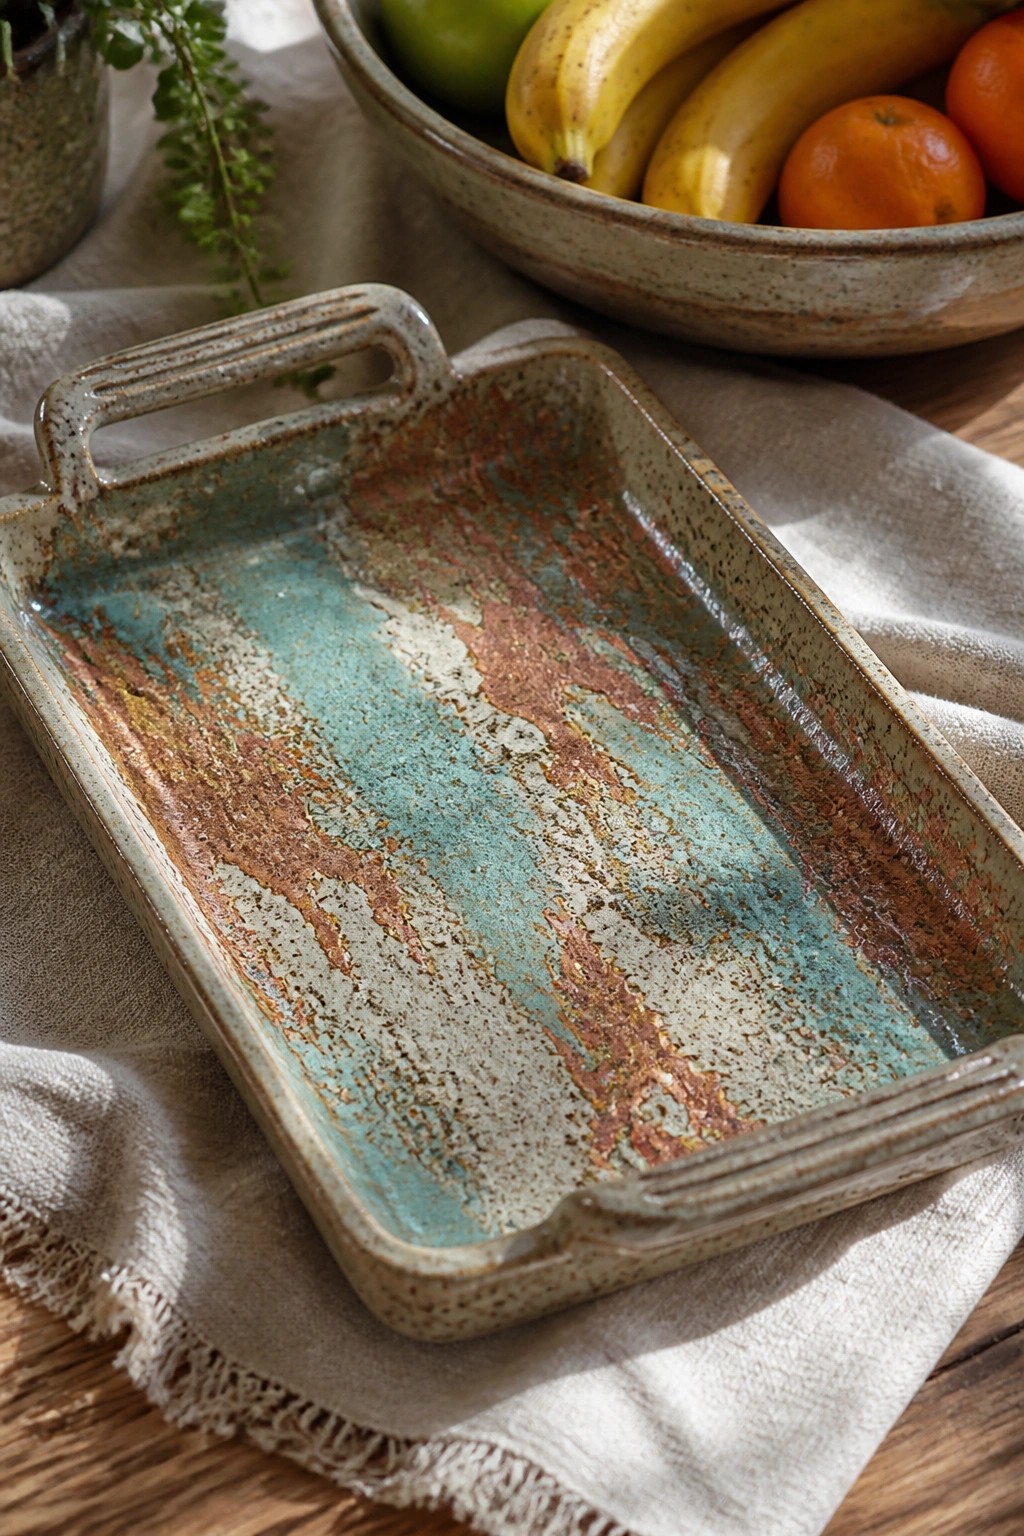
A rectangular ceramic tray with side handles uses multiple overlapping glazes in turquoise, rust brown, and off-white. The glazes interact on the flat surface to create irregular streaks and soft transitions rather than solid blocks of color. This layering approach suits trays because the wide, open shape lets the glaze movement read clearly from edge to edge. The result is a functional piece that still shows visible depth from the glaze build-up.
What makes this idea useful is how easily the same layering can be adapted to smaller trays or shallow dishes for jewelry or keys. The muted palette works in kitchens or dining areas without clashing with other dishes. You could swap one glaze for a brighter or darker version to change the overall temperature while keeping the streaky pattern intact. The handled form also gives a clear template for testing new glaze combos without needing a new shape.
Layered Dripping Glazes on a Whale Planter
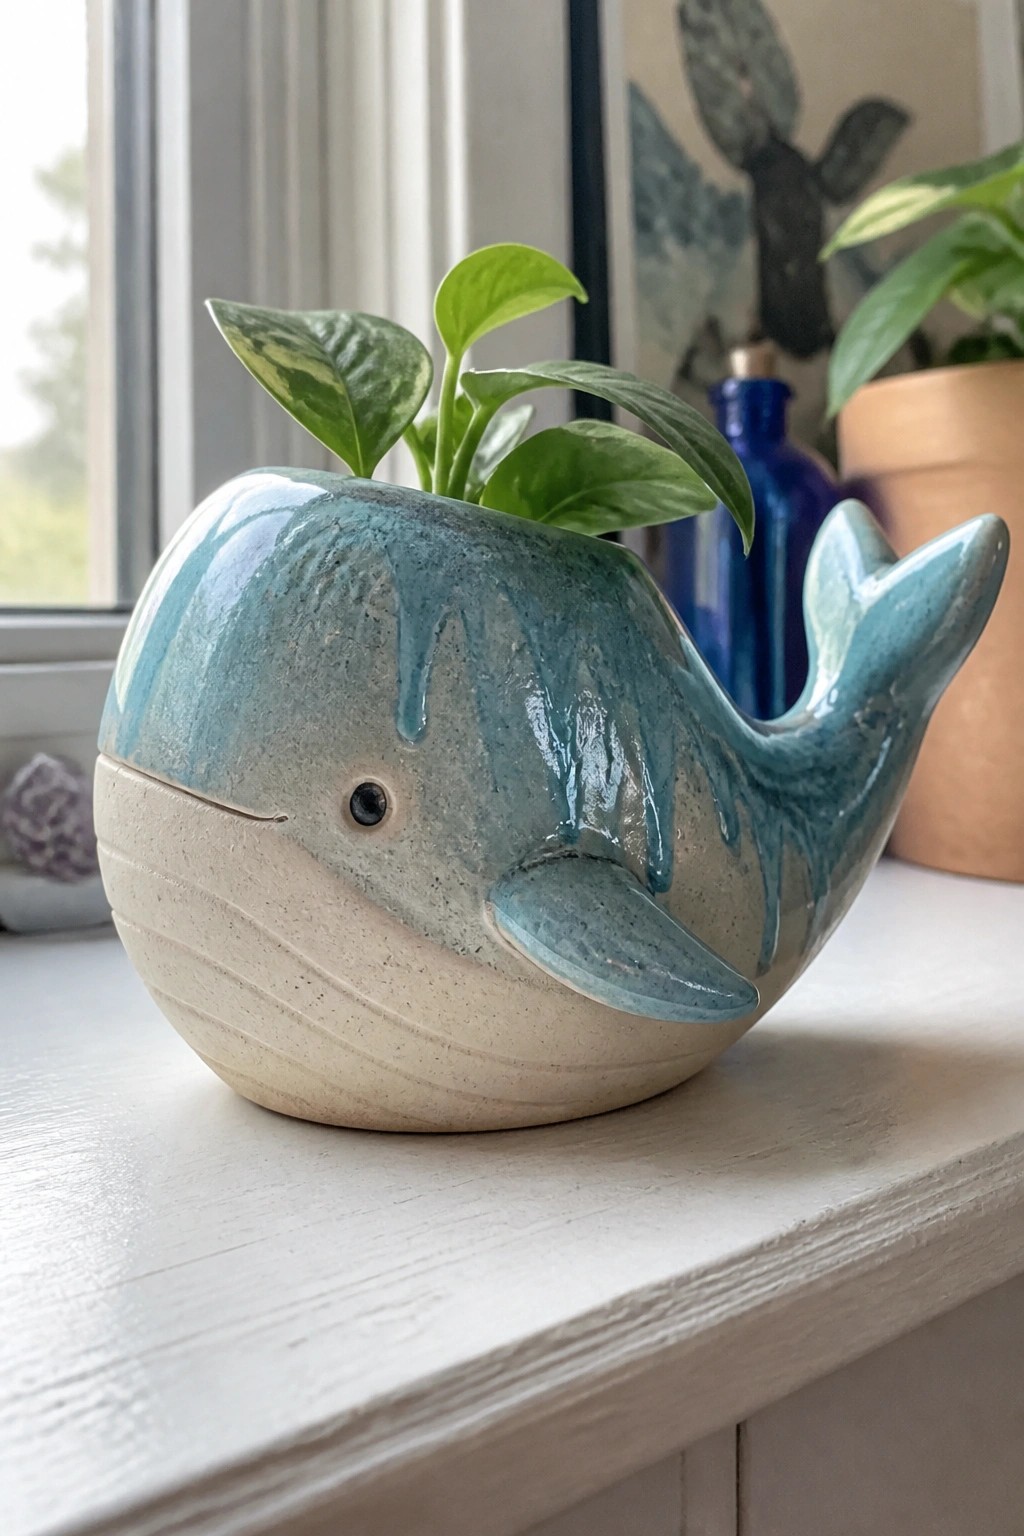
A whale-shaped ceramic planter combines a sculpted sea animal form with a simple two-tone glaze application. The lower half stays a matte off-white while a turquoise blue glaze covers the top and runs downward in uneven drips. The fins and tail are modeled directly into the clay so the shape reads clearly from the side. This approach works as a decorative planter that uses glaze movement to suggest water without extra carving or painting.
What makes this idea useful is how the compact size fits on a narrow windowsill or shelf. You could apply the same dripping glaze method to other rounded forms like fish or turtles using the same two colors. The technique draws the eye along the curves of the shape, so it works well even on a plain clay body. For plant styling, this kind of planter gives a clear focal point without competing with the leaves.
Faceted Vase With Layered Crackle Glaze
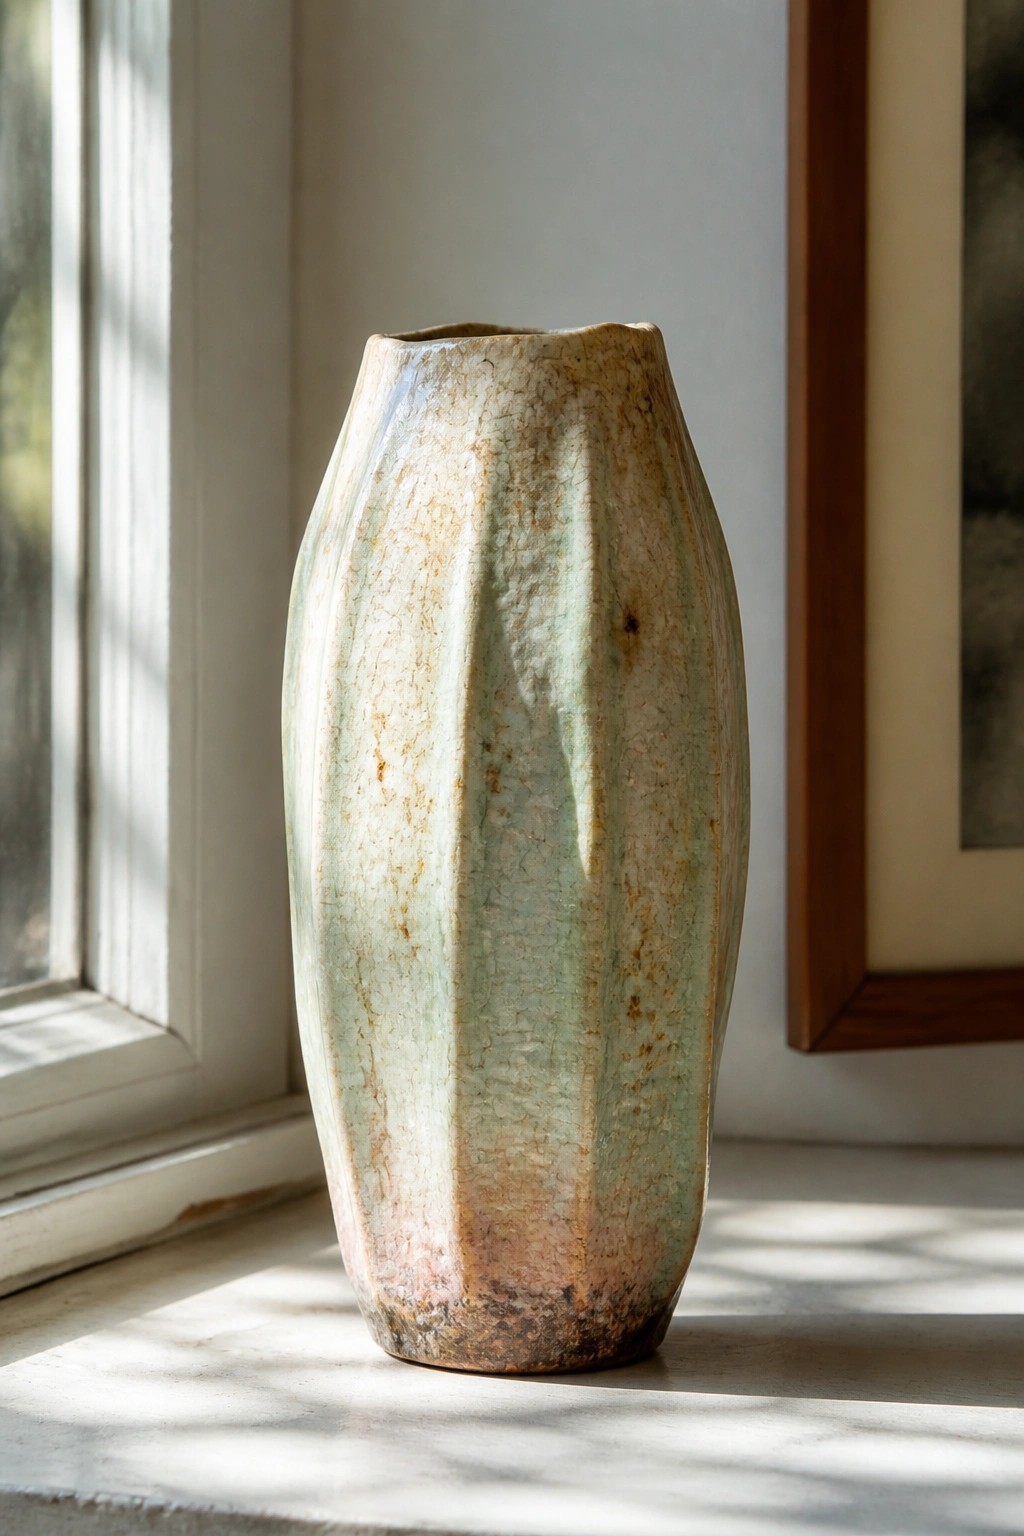
A tall faceted vase gives layered glazes room to show shifts in color and texture across each plane. Start with a base glaze in one tone, then apply a second layer that cracks during firing to expose the color below in fine lines. The result is a surface that moves from cool green into warmer beige and brown without added patterns or carving.
The shape does a lot of the work here because the flat sides break up the glaze into distinct sections. You can adapt the same layering to a shorter cylinder or a set of mugs if you want to test how the crackle behaves on different forms. This kind of piece works especially well as a standalone decor object on a shelf or table where light can hit the angles.
Speckled Glaze Layers on a Spoon Rest
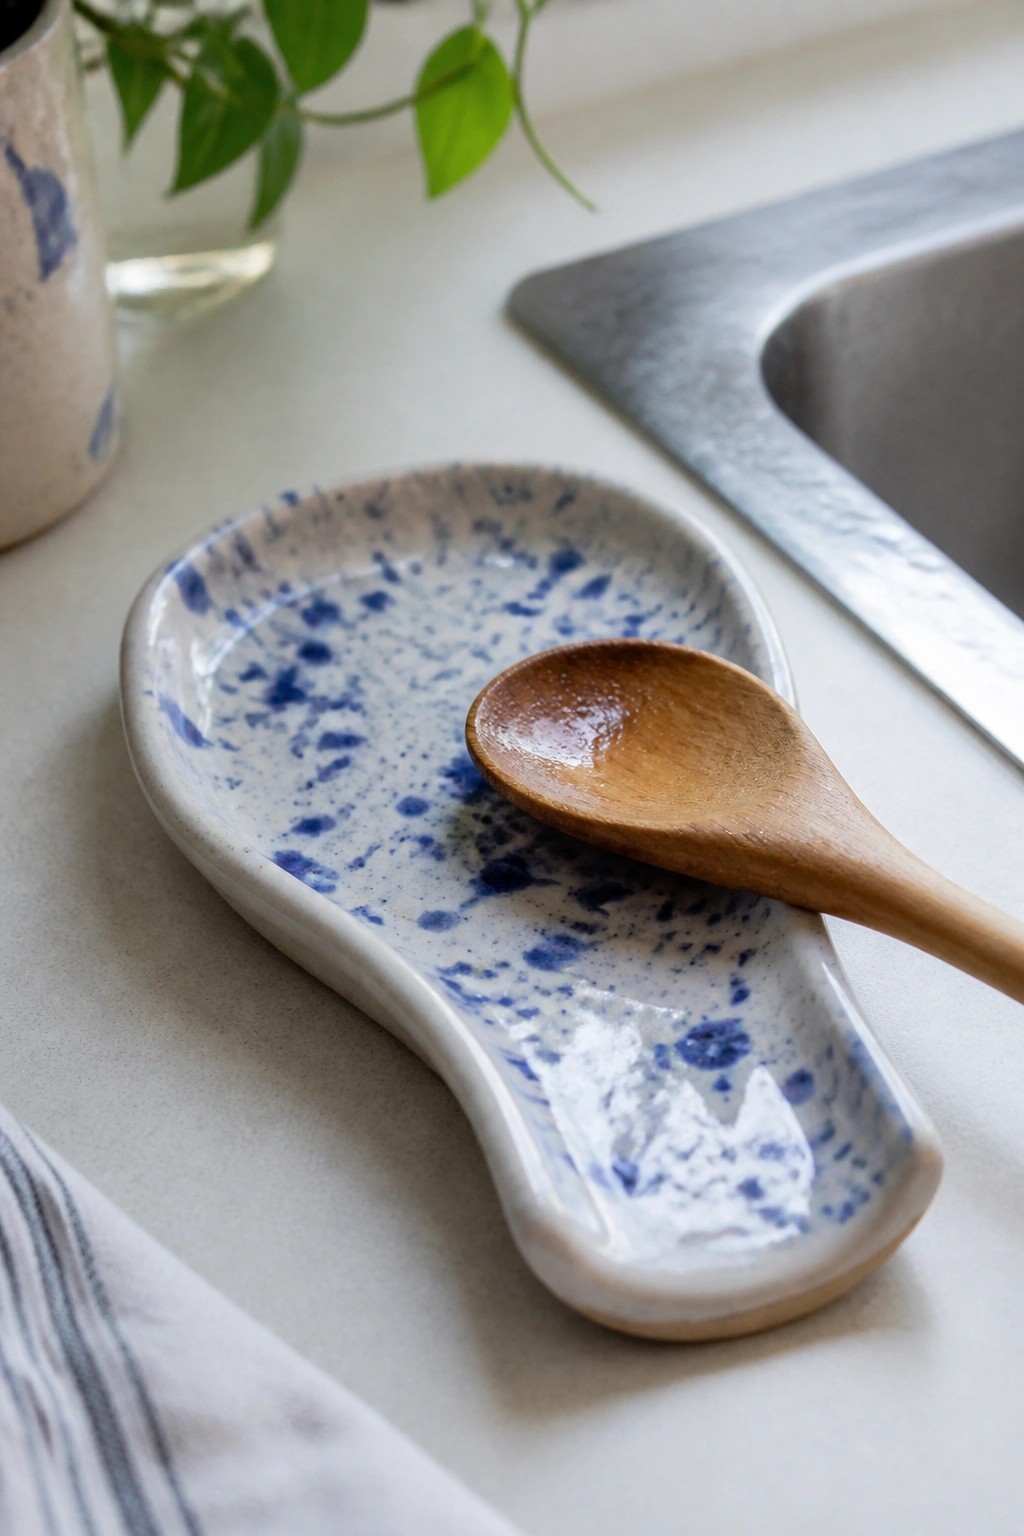
A low, elongated clay tray works as a spoon rest by holding the utensil above the counter surface. The design uses a white base glaze covered with a second blue layer applied in scattered dabs, creating a mottled pattern with visible white patches where the layers interact. The irregular oval shape keeps the piece stable while giving enough length for a standard wooden spoon to rest across one end. This kind of glaze layering fits small kitchen pieces where a simple surface needs added depth without a full repeat pattern.
What makes this idea useful is how the same two-glaze approach can be scaled down for ring dishes or scaled up for a butter dish. The speckle density is easy to adjust by changing how much the second glaze overlaps the base, so you can make it lighter or heavier on future pieces. In a kitchen, this shape keeps counters clean during prep and pairs well with everyday dishware. You could repeat the layering on a set of matching small trays to create a coordinated look without needing new glaze recipes.
Layered Crackle Glaze on a Small Ring Dish
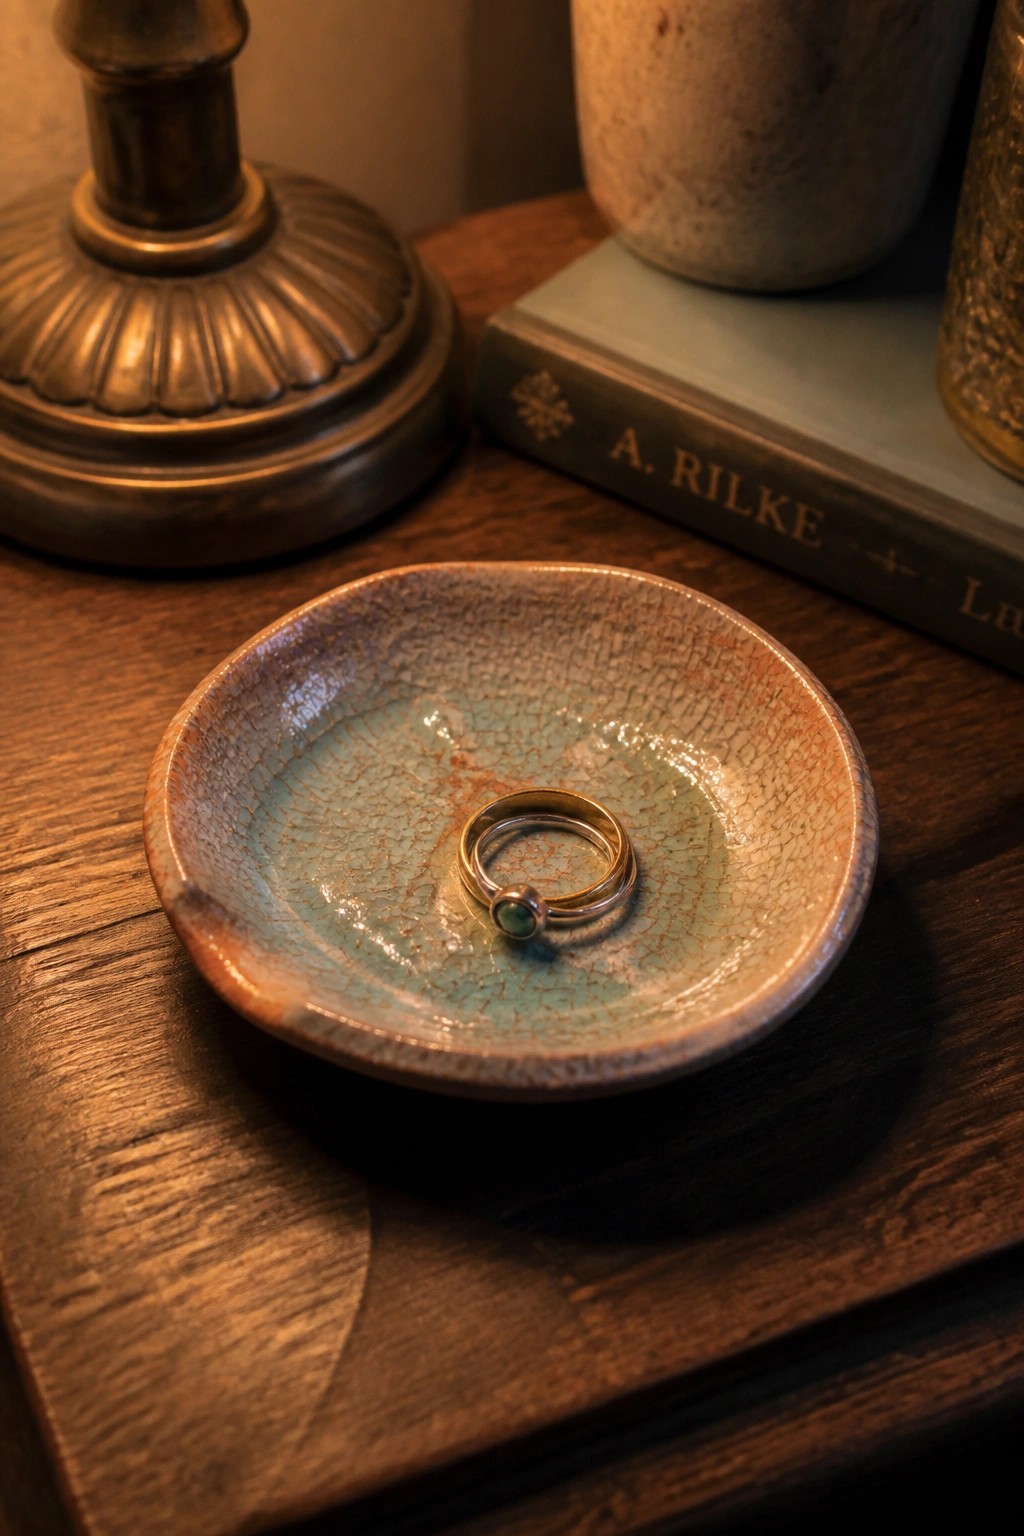
A small ring dish made from clay takes well to layered glazes that produce a crackled surface. One glaze in turquoise forms the base while a second layer breaks into fine lines and shifts toward warm browns near the rim. The result is a simple shallow form that shows color movement and texture through the glaze interaction alone.
What makes this idea useful is how the compact size keeps attention on the glaze layers without needing added decoration. You can repeat the same two-glaze approach on other flat shapes like soap dishes or small trays. The crackle effect stands out in photos for Pinterest because it catches light differently across the surface. For an easy change, try a cooler base glaze under the same top layer to shift the color balance.
Dripping Glaze on Compact Candle Holders
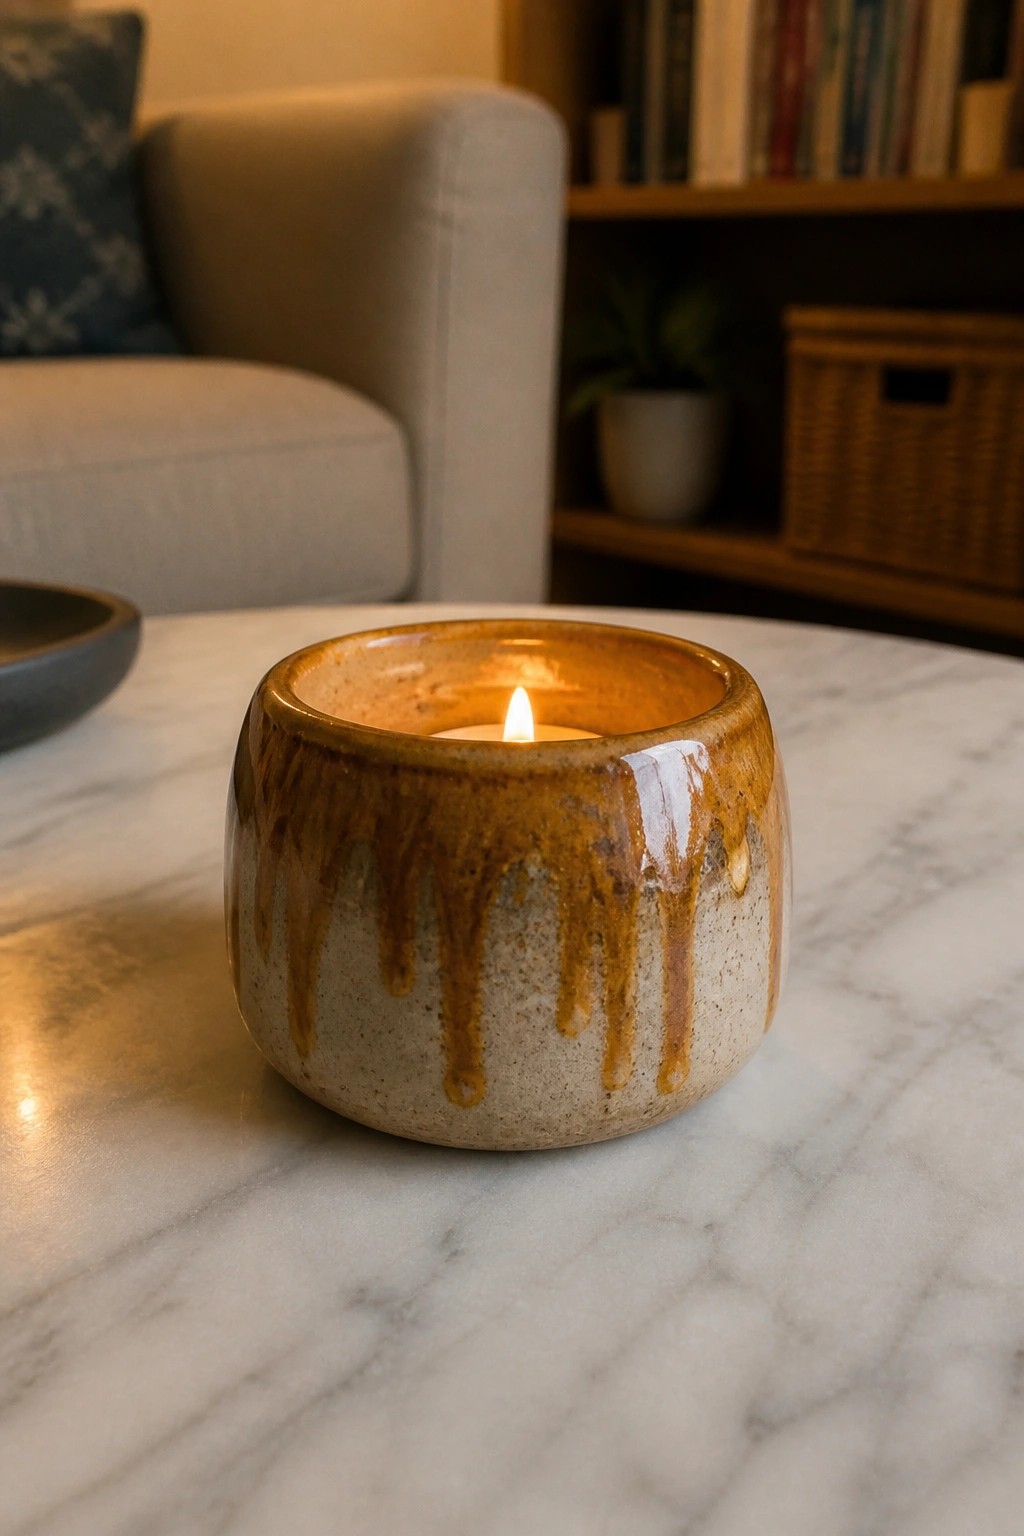
A small ceramic candle holder uses a two-tone glaze layering where a lighter base coat receives a flowing amber-brown top layer that runs downward in thick, uneven drips. The rounded, low shape lets the glaze travel across the surface while the textured clay body catches some of the color and creates contrast between matte and glossy areas. This approach keeps the focus on simple form and glaze movement rather than added decoration.
What makes this idea useful is how the drip pattern adds visual interest with minimal extra steps once the glazes are chosen. The small size makes it easy to fire several at once and group them on a table or shelf without taking much space. You could rework the same layering on a slightly wider bowl shape or limit the drips to the upper half for a cleaner lower edge. The result photographs clearly for sharing because the glaze contrast shows up well in natural light.
Layered Glaze Over Textured Spines on a Small Hedgehog Figurine
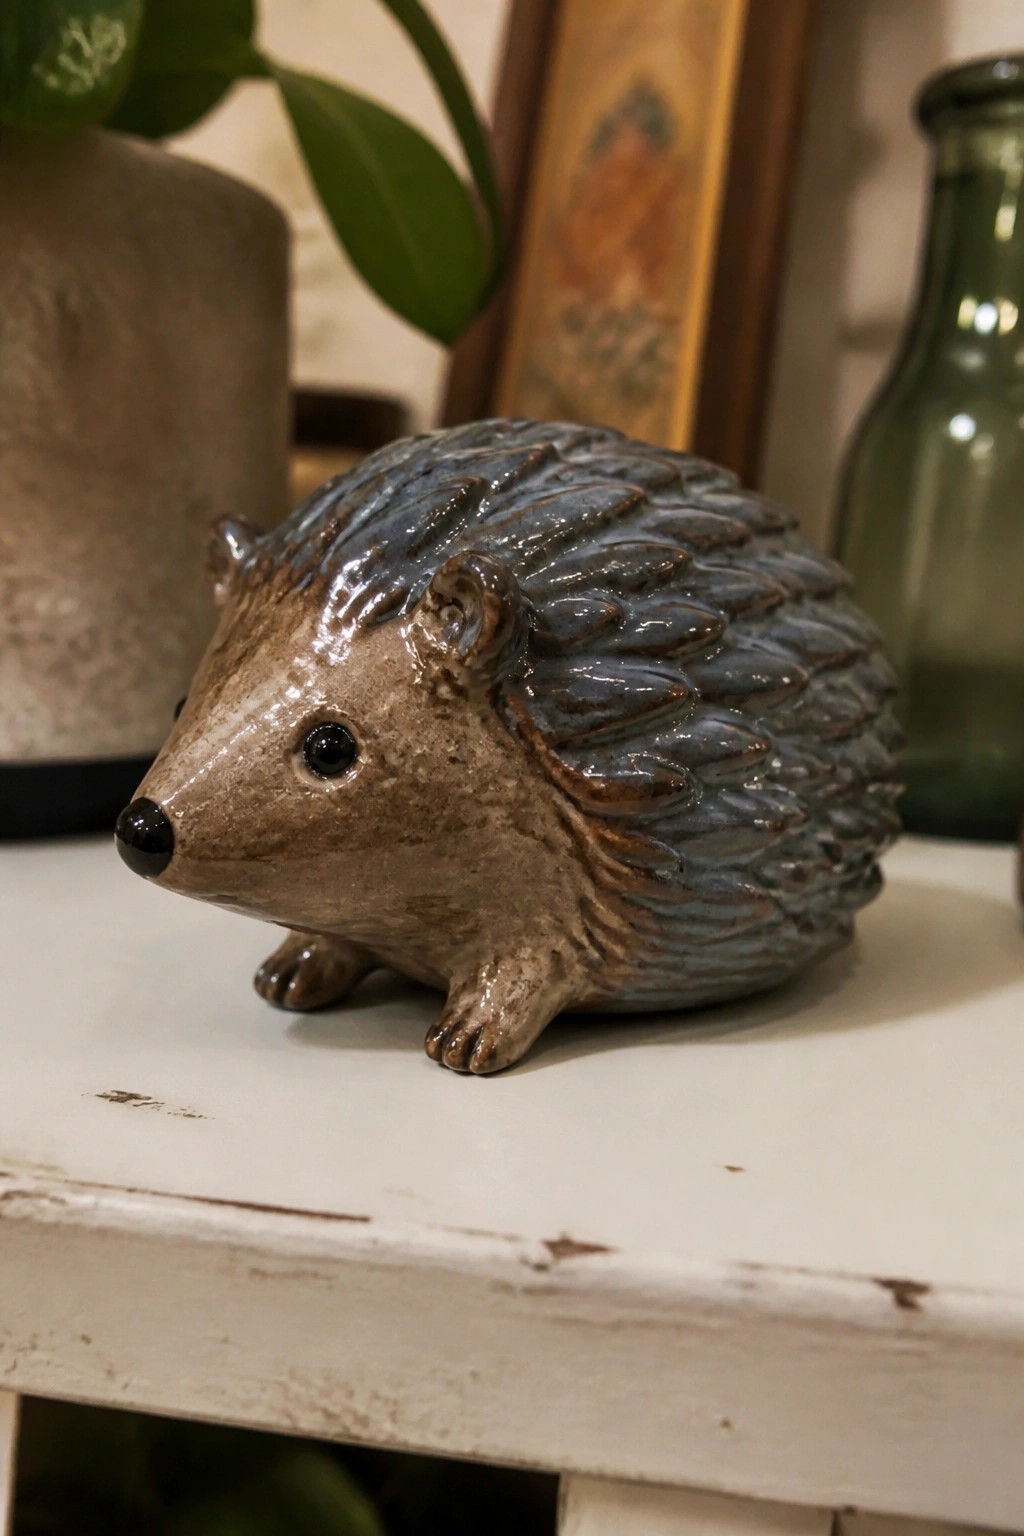
A small ceramic hedgehog uses a brown base glaze across the body and face while a blue-gray glaze is brushed over the raised spines to produce subtle color shifts. The sculpted spine texture holds the top glaze unevenly, creating movement and depth without additional carving or painting. This approach suits simple animal figurines where the form itself guides how the glazes interact.
The shape does a lot of the work here because the compact body and raised details make layering straightforward even on a small scale. A piece like this works especially well as shelf or mantel decor and can be adapted to other animals such as owls or rabbits by keeping the same two-glaze method. You could swap the blue-gray for a matte green or warm rust to match different room colors while keeping the project quick to finish.
Glaze Pooling in a Carved Botanical Tile
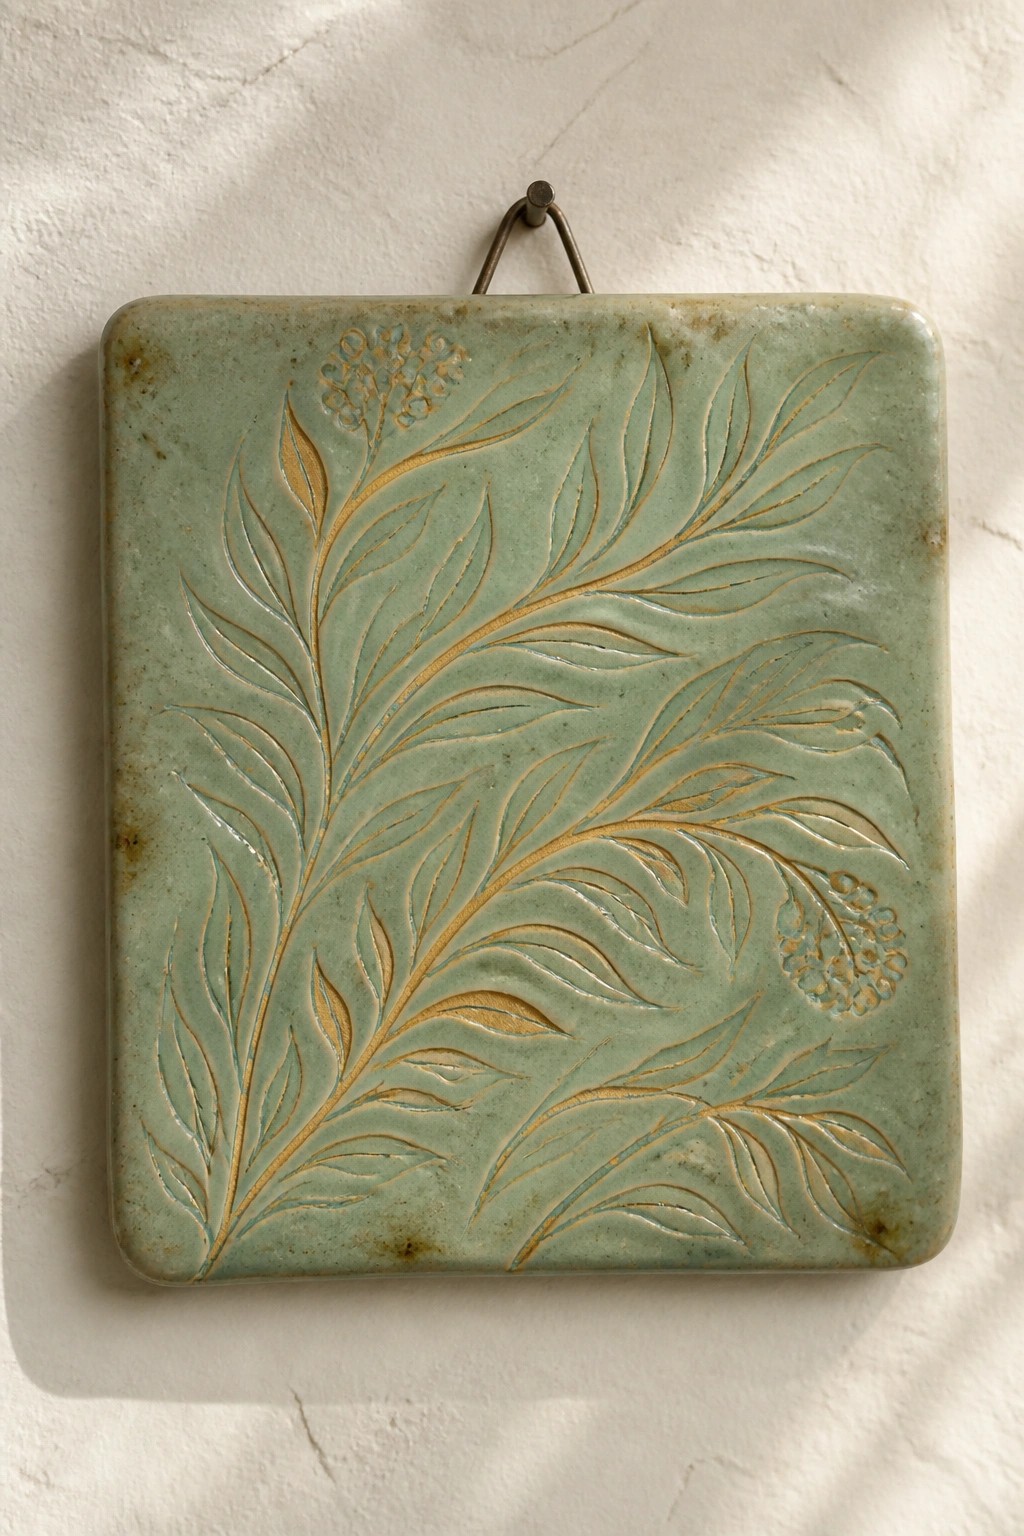
A square ceramic tile serves as the base for this idea. The surface holds a raised botanical pattern of leaves, stems, and small flower clusters that create channels for the glaze. A single light green glaze covers the tile and settles into the recessed lines, producing a warmer tone where the layer thickens and a cooler tone on the raised areas.
This approach works especially well for wall decor because the tile stays flat and easy to hang. You could repeat the same carving style on a rectangular tray or a set of smaller tiles for a backsplash. The relief itself controls where the glaze darkens, so minor differences in application still produce a consistent result. A piece like this stands out in a collection of simple tiles because the pattern reads clearly from a distance.
Pooling Glaze Layers Inside a Divided Condiment Dish

A divided stoneware dish gives you two connected compartments that keep separate ingredients like salts or spices from mixing. The exterior stays a plain matte gray while the interior gets layered teal glaze that pools thicker along the curves and thins near the rims. This produces visible shifts in color and gloss without needing complicated application. The compact shape keeps the focus on how the glaze behaves in a small, functional form.
What makes this idea useful is that the divided layout turns a glaze experiment into something you can actually use on a countertop. You can scale the same layering to a longer tray or swap the shape for single ramekins if you prefer separate pieces. The neutral outside lets the interior color changes stand out clearly, which helps the finished piece blend into a kitchen without extra decoration. The small size also makes it quick to test new glaze combinations and still end up with a practical result.
Layered Blue and Brown Glazes on a Lidded Storage Jar
A lidded ceramic jar shows how overlapping glazes in blue, brown, and cream can produce streaked color shifts and depth across a rounded surface. The form stays simple so the glaze movement becomes the focus, with the lid knob picking up the same tones for a unified look. This works as a kitchen storage piece where the finish adds interest without extra carving or texture.
What makes this idea useful is that the same glaze layering can be tested on smaller test tiles first to control how much the colors run. The rounded shape adapts easily to different sizes for canisters or small lidded bowls. In a kitchen this kind of jar keeps dry goods visible while the glaze effect draws attention on a shelf or counter. You could swap the blue tones for greens or keep the palette tight to two colors for faster results on a matching set.
Horizontal Streak Layers on a Covered Butter Dish
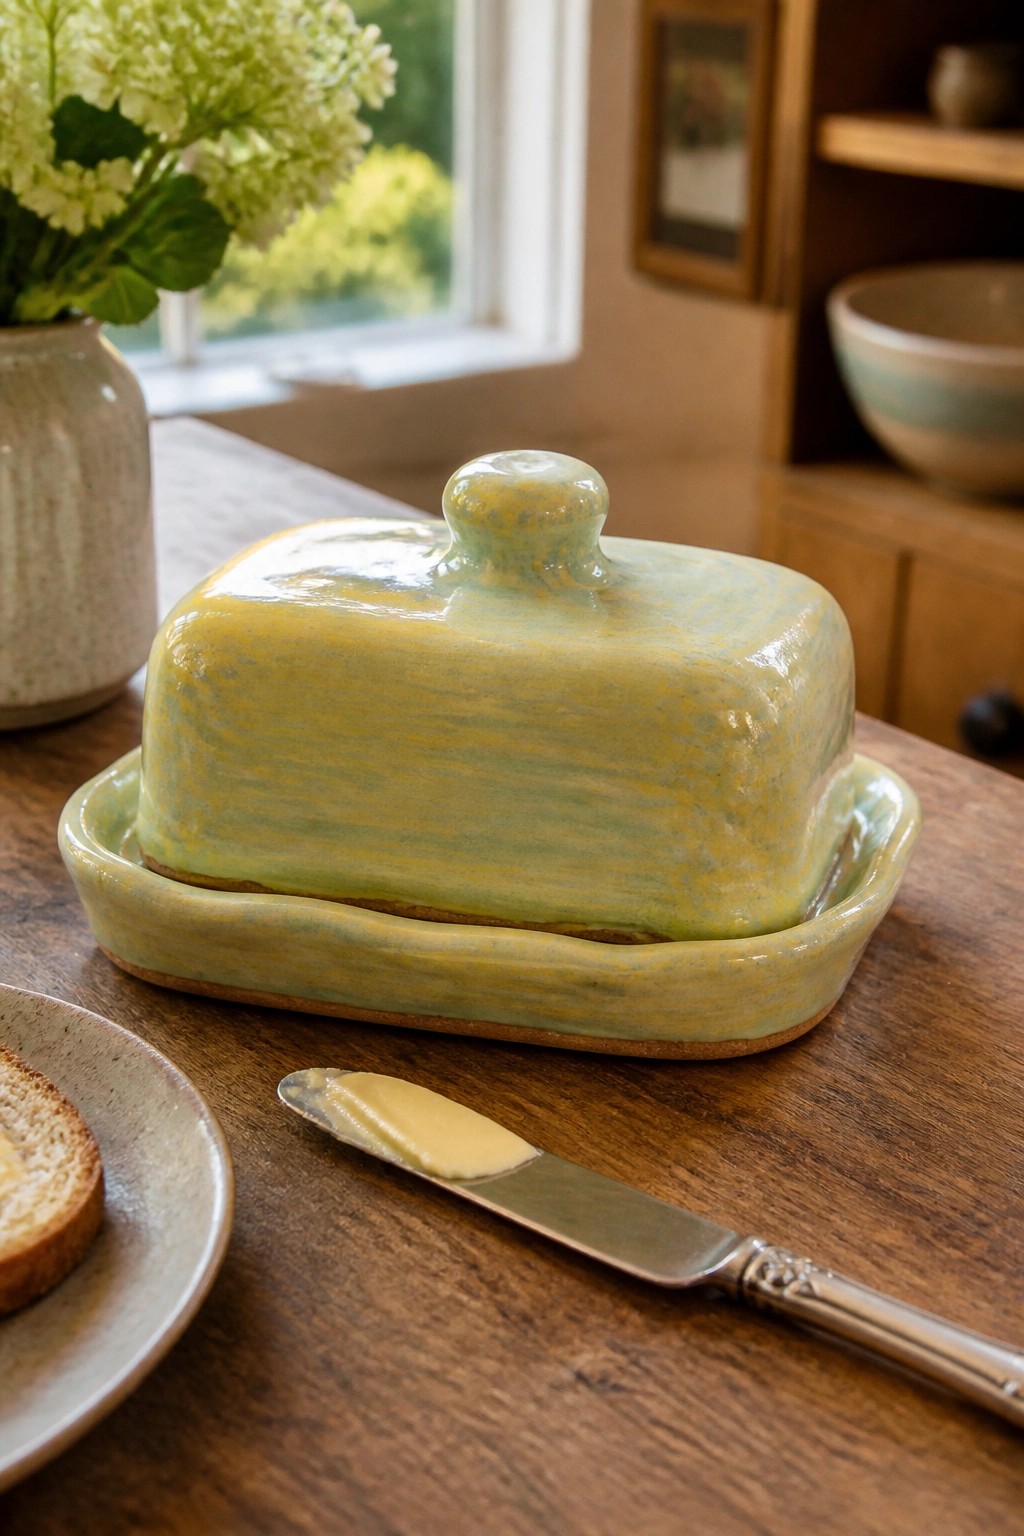
A rectangular ceramic butter dish with a fitted lid uses overlapping glaze layers to create horizontal streaks of yellow and green. The base glaze is applied first, followed by a second layer brushed or dripped across the surface so the colors blend unevenly during firing. This produces visible movement and subtle shifts where one glaze breaks over the other, especially along the curved lid and tray edges. The result is a simple kitchen piece that shows how basic layering can add depth without needing intricate patterns or multiple firings.
The shape does a lot of the work here because the flat lid surface lets the streaks run cleanly and stay readable. You could adapt the same layering approach to a sugar bowl, small tray, or lidded jar by keeping the colors close in tone so the shifts stay soft. In a kitchen this kind of piece works well for everyday use while still looking intentional on open shelving. The idea is easy to scale down for test tiles first so you can see how your specific glazes interact before committing to a full form.
Swirling Glaze Layers Around a Yarn Bowl Notch
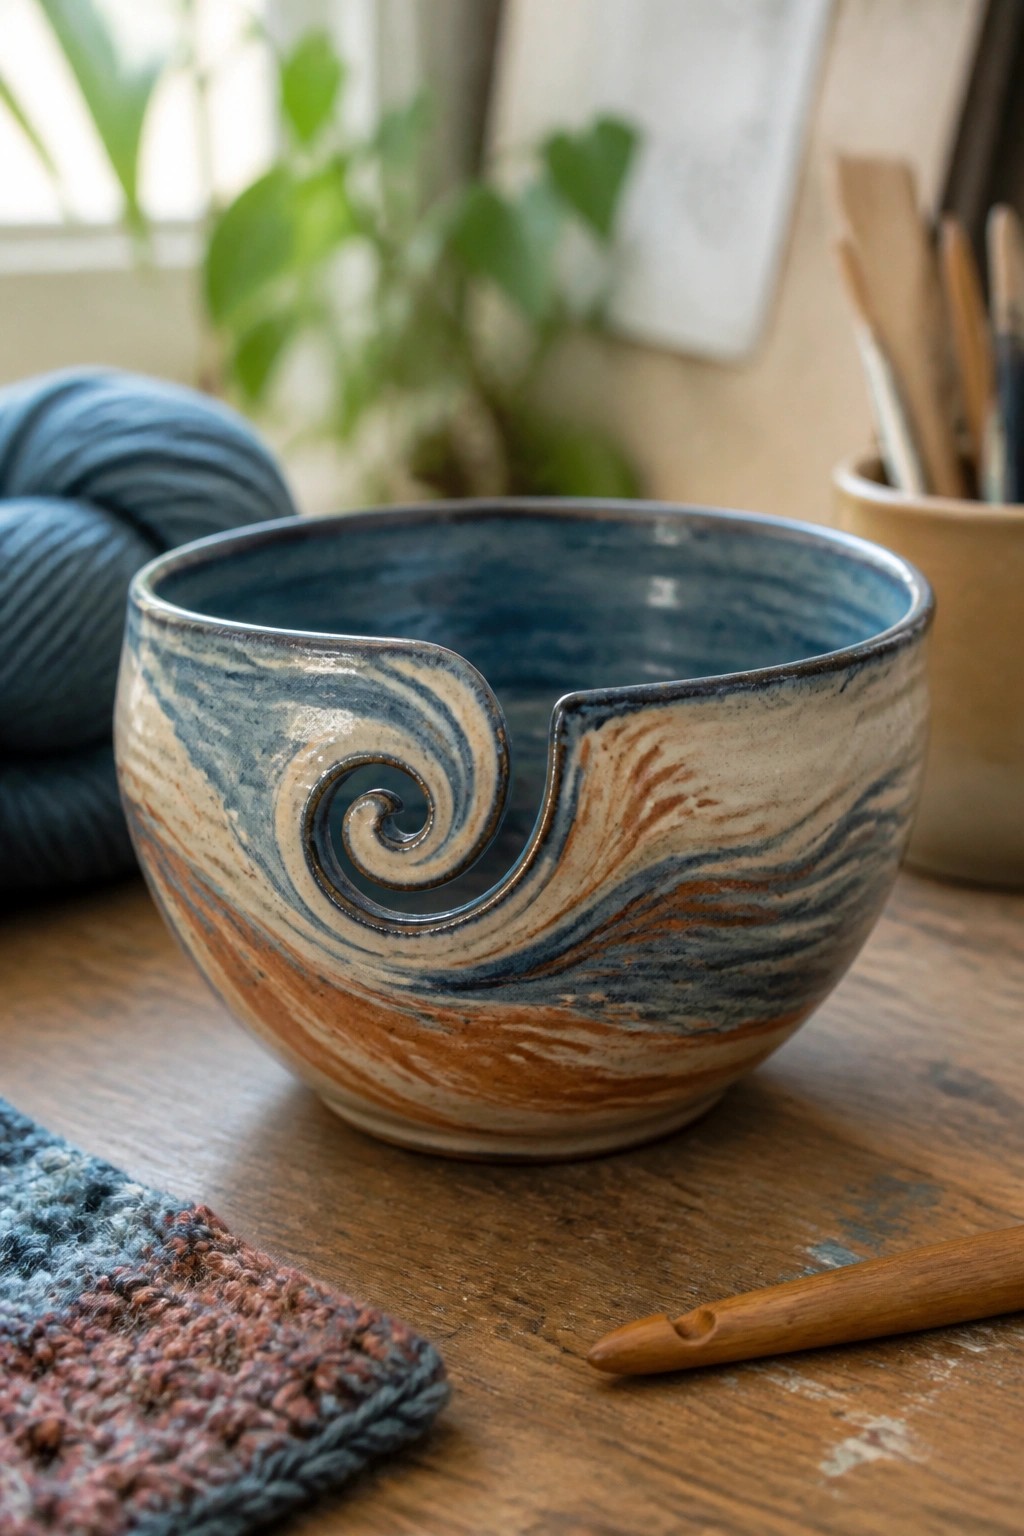
A yarn bowl uses overlapping glaze layers in blue, brown, and cream to create a continuous spiral that flows around the rim notch. The rounded bowl form lets the glazes pool and shift where the surface curves inward, producing visible depth without extra carving. This fits the category of a functional craft accessory that still shows off glaze movement on a practical scale.
The shape does a lot of the work here because the notch gives the spiral a clear starting point that draws the eye around the rim. You can adapt the same layering to a smaller desktop bowl or a lidded jar by keeping the color sequence but skipping the notch entirely. In a craft space this kind of piece keeps yarn tidy while the surface pattern stays interesting from any angle, and the idea translates easily to other rounded forms like mugs or small trays.
Vertical Glaze Drips on a Simple Cylinder
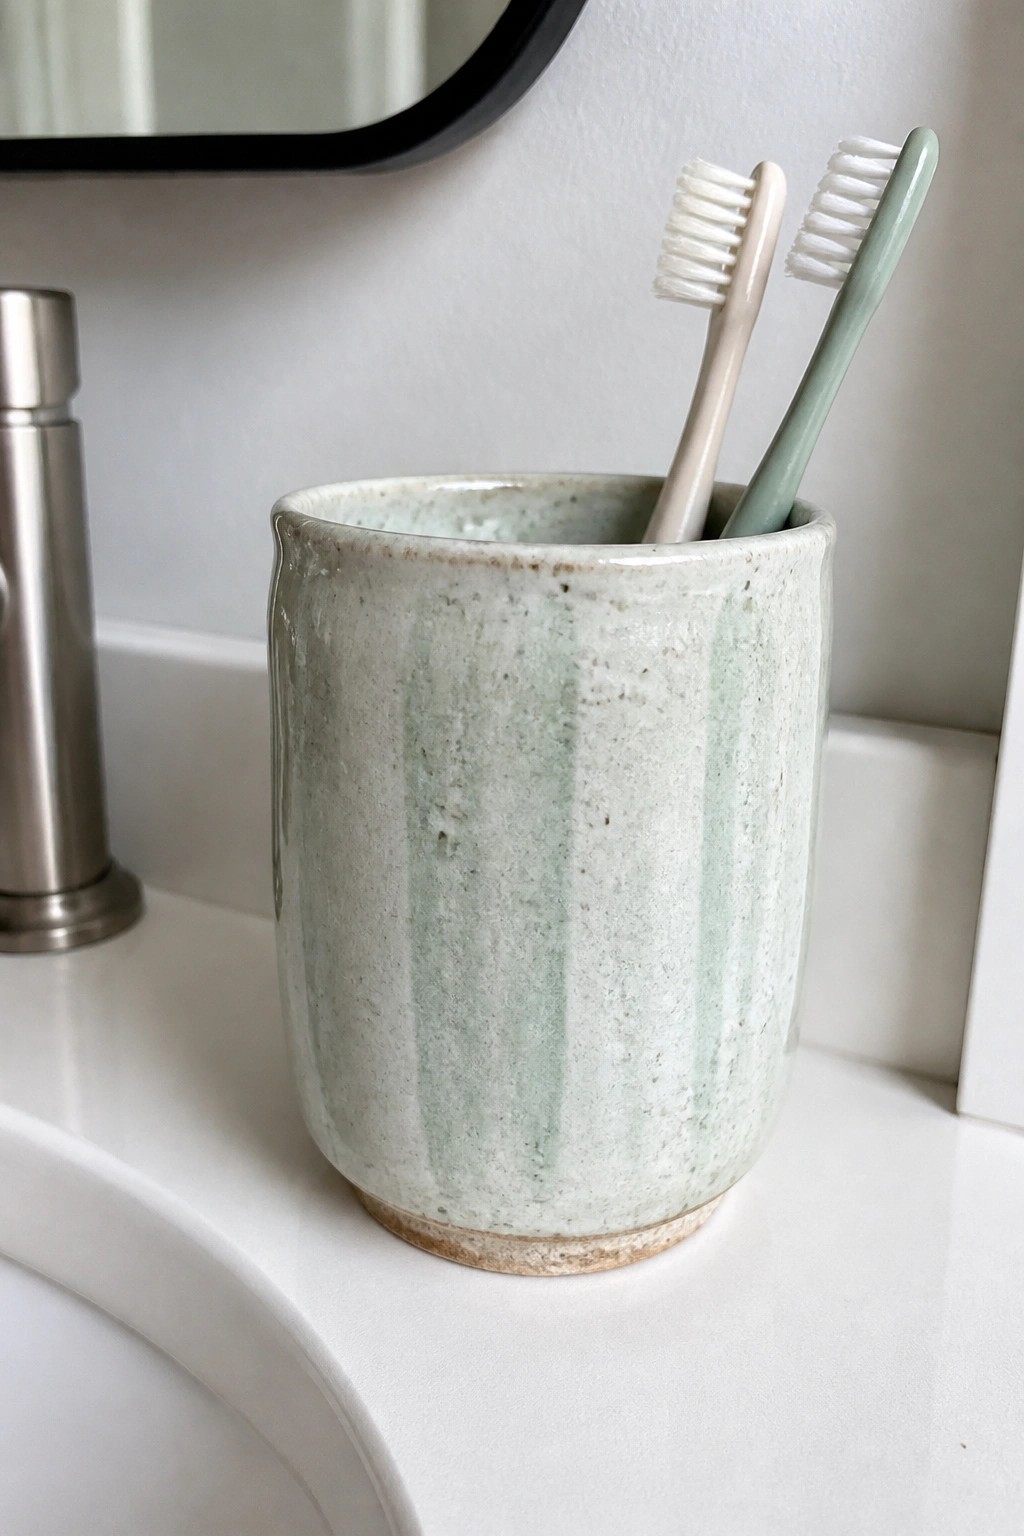
A small cylindrical holder shows how layering two glazes can produce soft vertical movement. The light speckled base stays mostly visible while a second pale green layer is applied so it runs downward in uneven streaks. This leaves the surface with subtle color shifts and faint texture that changes depending on the angle of light. The same approach works on any basic thrown or hand-built cylinder meant for daily use.
What makes this idea useful is how the drips happen naturally once the second glaze is applied, so you do not need precise brushwork. The shape stays practical as a toothbrush holder or small cup while the vertical lines keep it from looking flat. You could repeat the layering on a taller vase or shorten it into a desk pencil cup and still get the same quiet color variation. The small size also makes it easy to test the same glaze combo on test tiles first.
Layer Iridescent Pinks Across Shell Ridges for Color Shifts
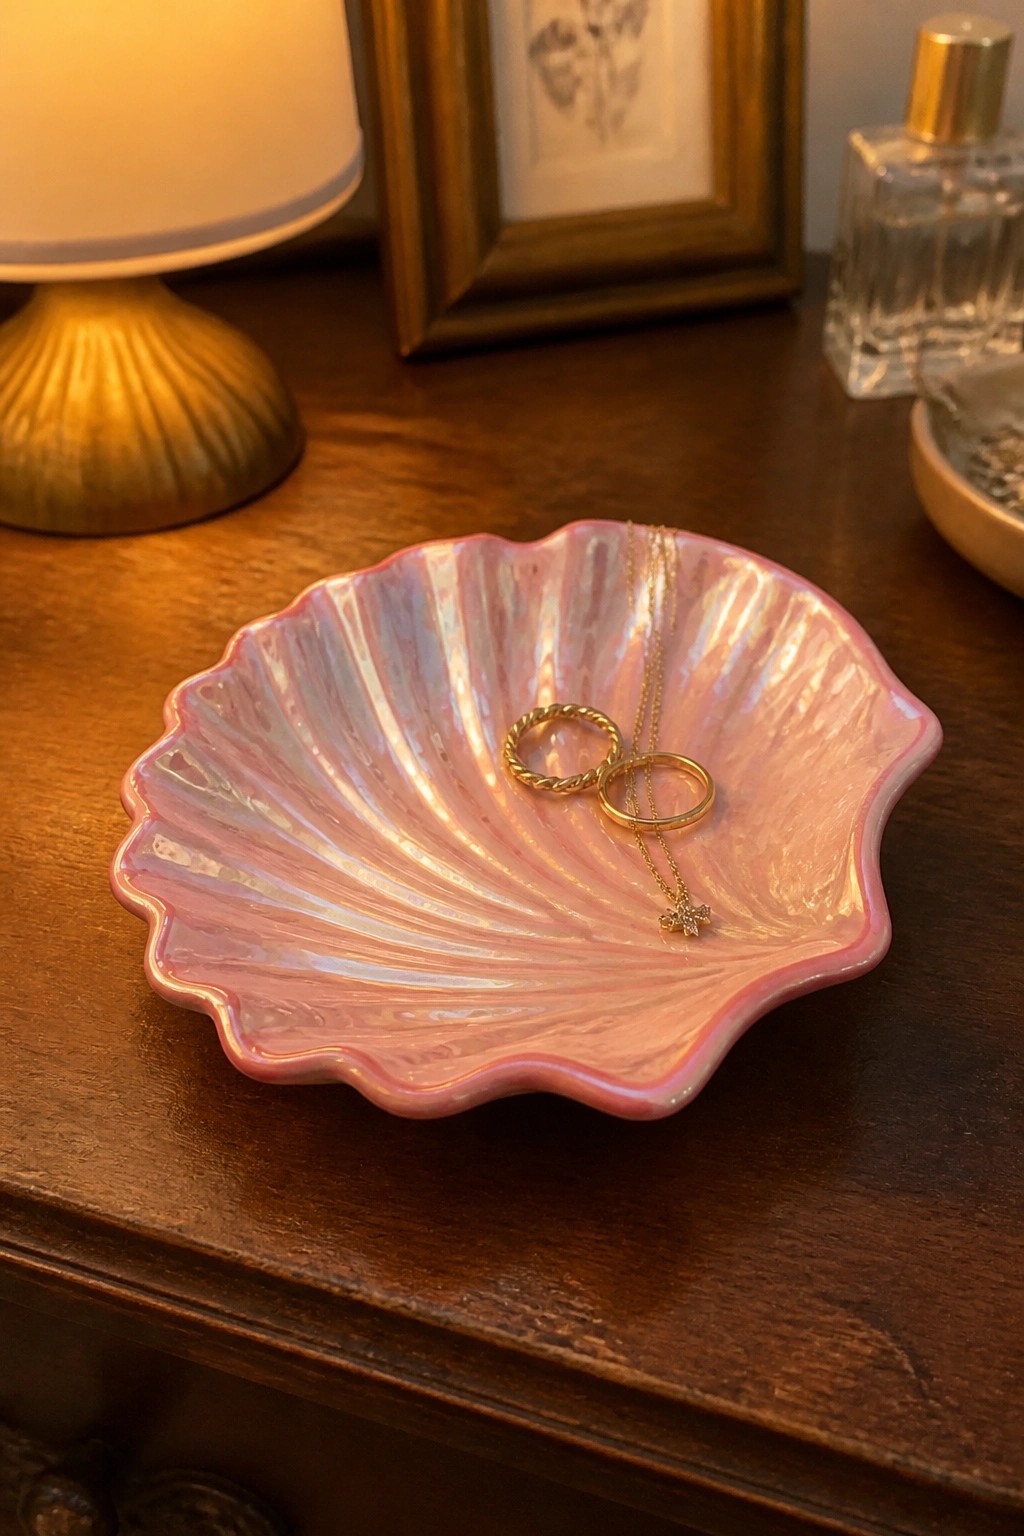
A small shell-shaped ceramic dish works well for this glaze layering approach. The form has raised ridges that guide the flow of multiple pink and pearl glazes, letting them overlap and catch light differently along each curve. The result is a glossy surface with visible depth and subtle shifts from soft rose to silvery highlights without needing extra carving or texture tools. This fits the ring dish or trinket tray category, where the compact size keeps the focus on how the glazes interact.
The shape does a lot of the work here by channeling the glaze into natural lines that emphasize movement. A piece like this works especially well as a vanity or nightstand holder for small jewelry. You could adapt the same layering on a simpler oval tray or a set of coasters if you want to test the glazes on a flatter surface first. The small scale also makes it easy to try different base colors underneath the iridescent layers to see how the shifts change.
Layered Dark and Teal Glazes on a Narrow Incense Holder
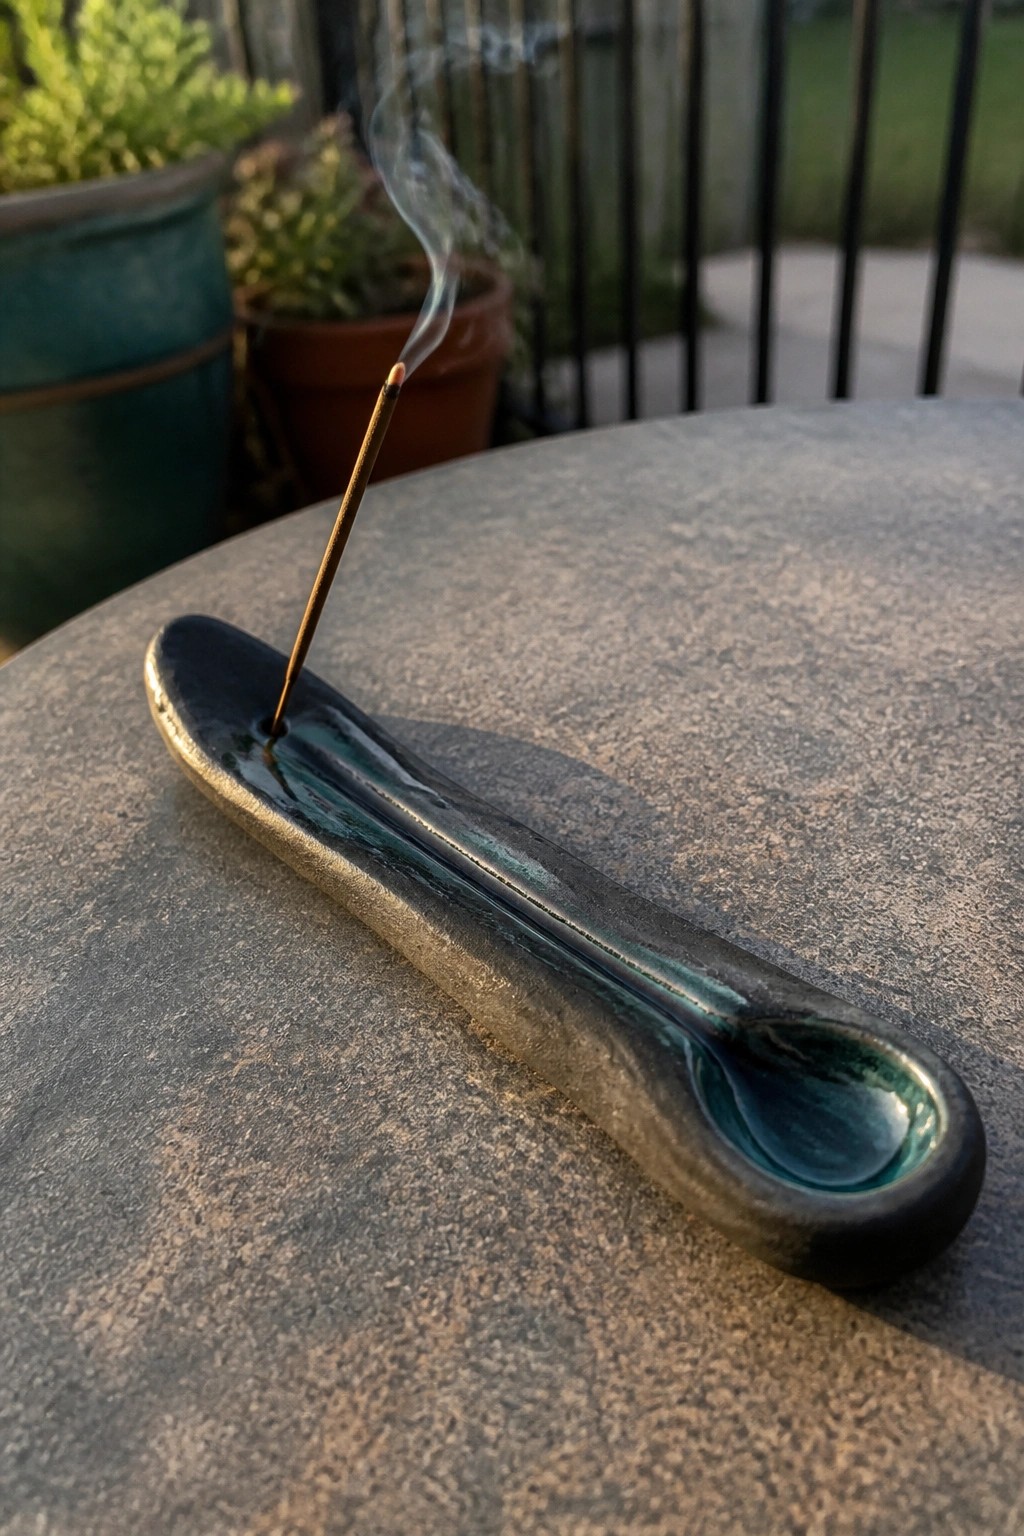
An elongated ceramic incense holder uses a simple linear form with a drilled hole near one end and a rounded ash bowl at the other. A dark base glaze is applied first, followed by a teal layer that pools unevenly in the center channel and bowl. This creates visible depth and small color shifts where the top glaze thins or gathers, keeping the surface active without added patterns or texture.
What makes this idea useful is how the layering works on a low, horizontal shape that fits easily on a desk or windowsill. The same approach could be simplified for a ring dish or small soap rest by letting the teal break through only in the recessed areas while keeping the base dark. In photos the color shifts give the piece more presence than a single solid glaze would, which helps it perform well as a quick project for selling or sharing.
Streaky Horizontal Glaze Layers on a Fluted Bowl
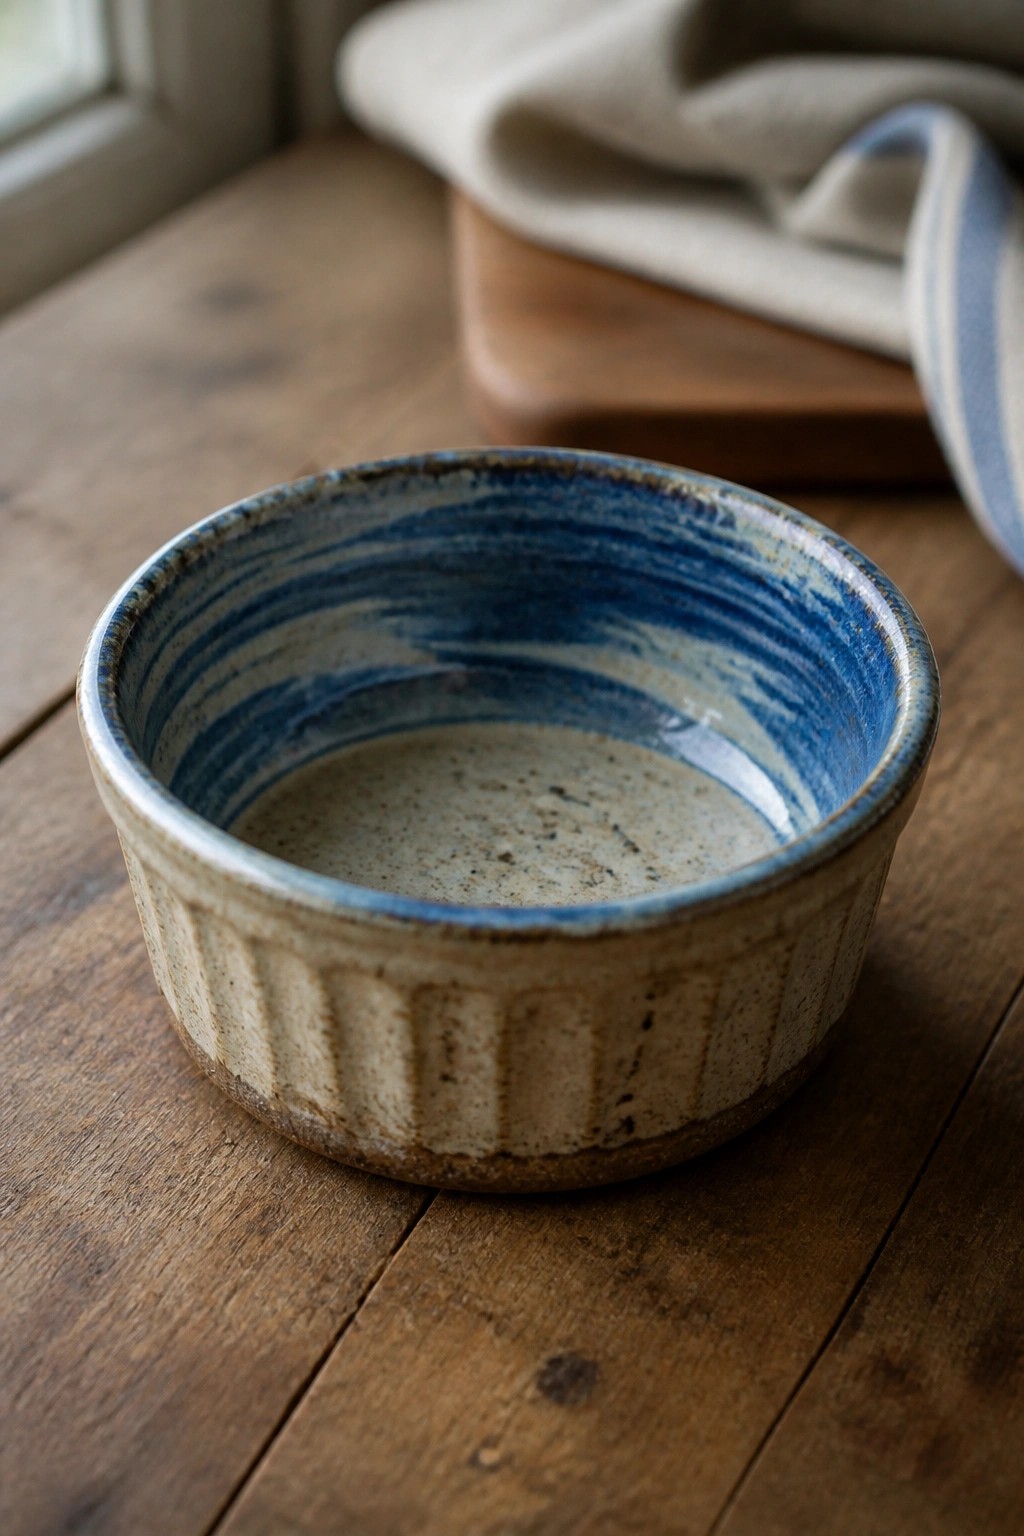
A small ramekin-style bowl uses multiple passes of blue glaze over a lighter base to form horizontal streaks across the interior. The layering creates visible shifts where the blue thins or pools, giving the surface movement that follows the curve of the bowl. The exterior keeps a simple fluted texture in a neutral tone so the focus stays on the interior glaze effect.
What makes this idea useful is how the streaky application works on any compact round form without needing precise lines. The same layering can be tried on a taller cup or a wider dessert bowl by changing how far the brush reaches with each pass. In a kitchen this kind of piece doubles as a prep dish or individual serving bowl while the glaze pattern keeps it from looking plain. The small size also makes it easy to test new glaze combinations before scaling the technique up.
Layered Earth Glazes on a Tall Vase
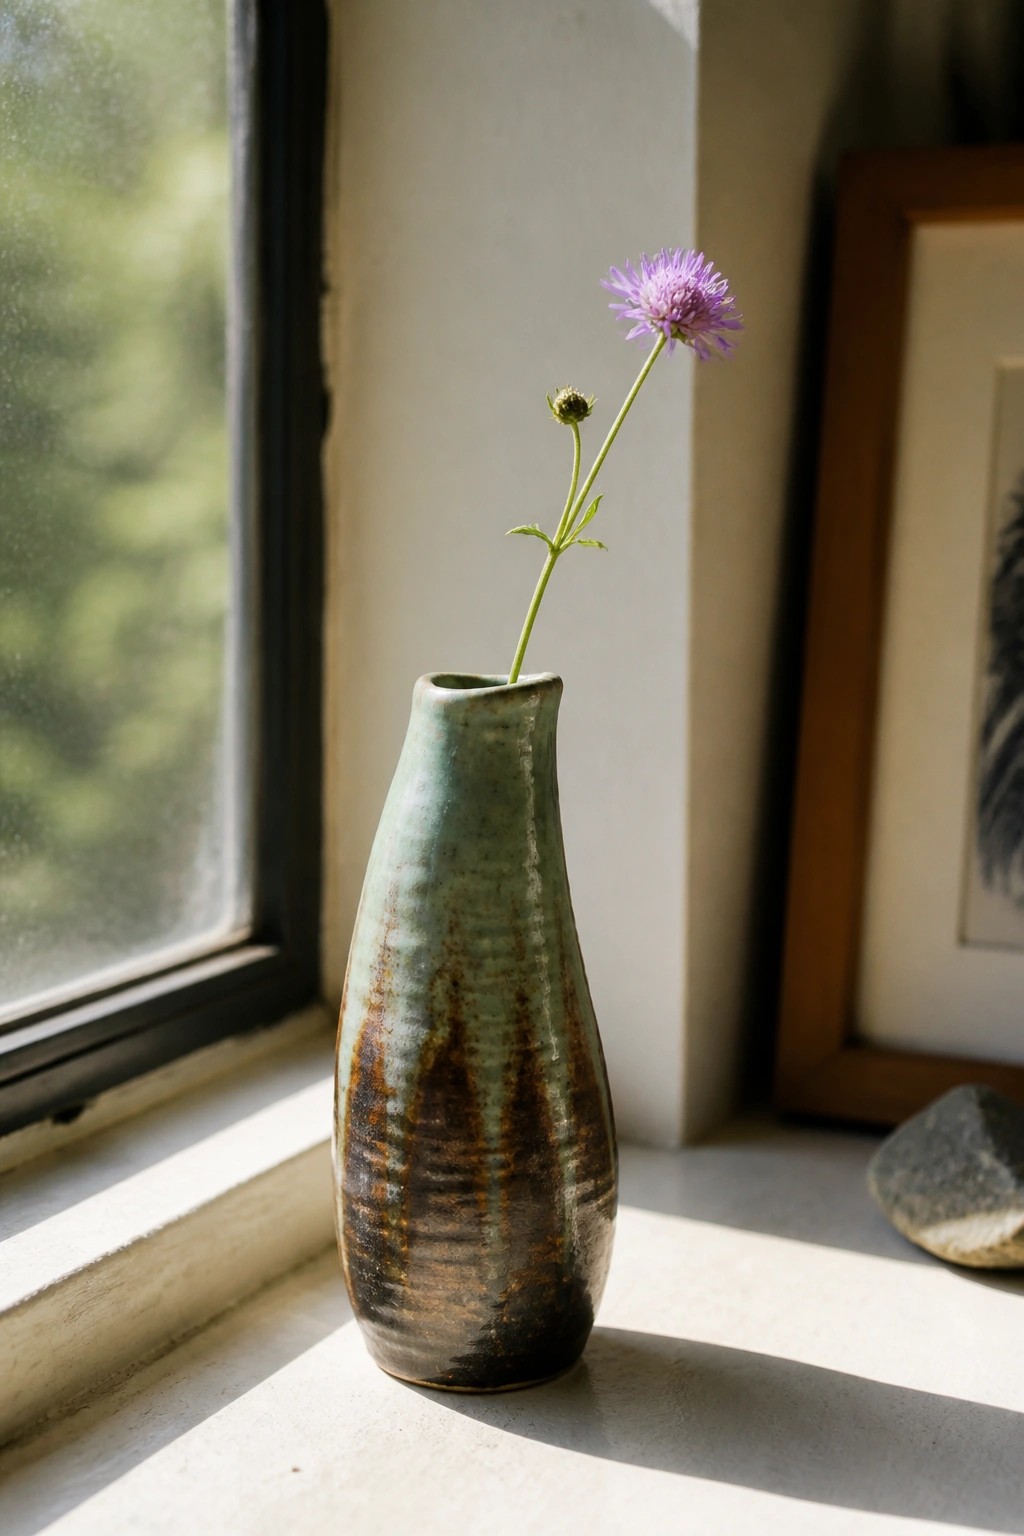
A tall, narrow vase works well for this glaze layering approach because the vertical surface lets overlapping coats of green and brown glaze run and break in visible streaks. The multiple layers create depth through subtle shifts where one color shows through another, especially along the curves of the form. Keeping the shape simple lets the glaze variation carry the interest without added texture or carving.
What makes this idea useful is how the same layering sequence can be tested on other tall or medium shapes like pitchers or bottle forms. The streaking effect stands out more on smoother surfaces, so you can try it on different clay bodies to control how much the colors separate during firing. This kind of vase works well for single stems or small arrangements on a shelf or table where the light hits the sides.
Layered Green Crackle Over Leaf Impressions on a Soap Dish
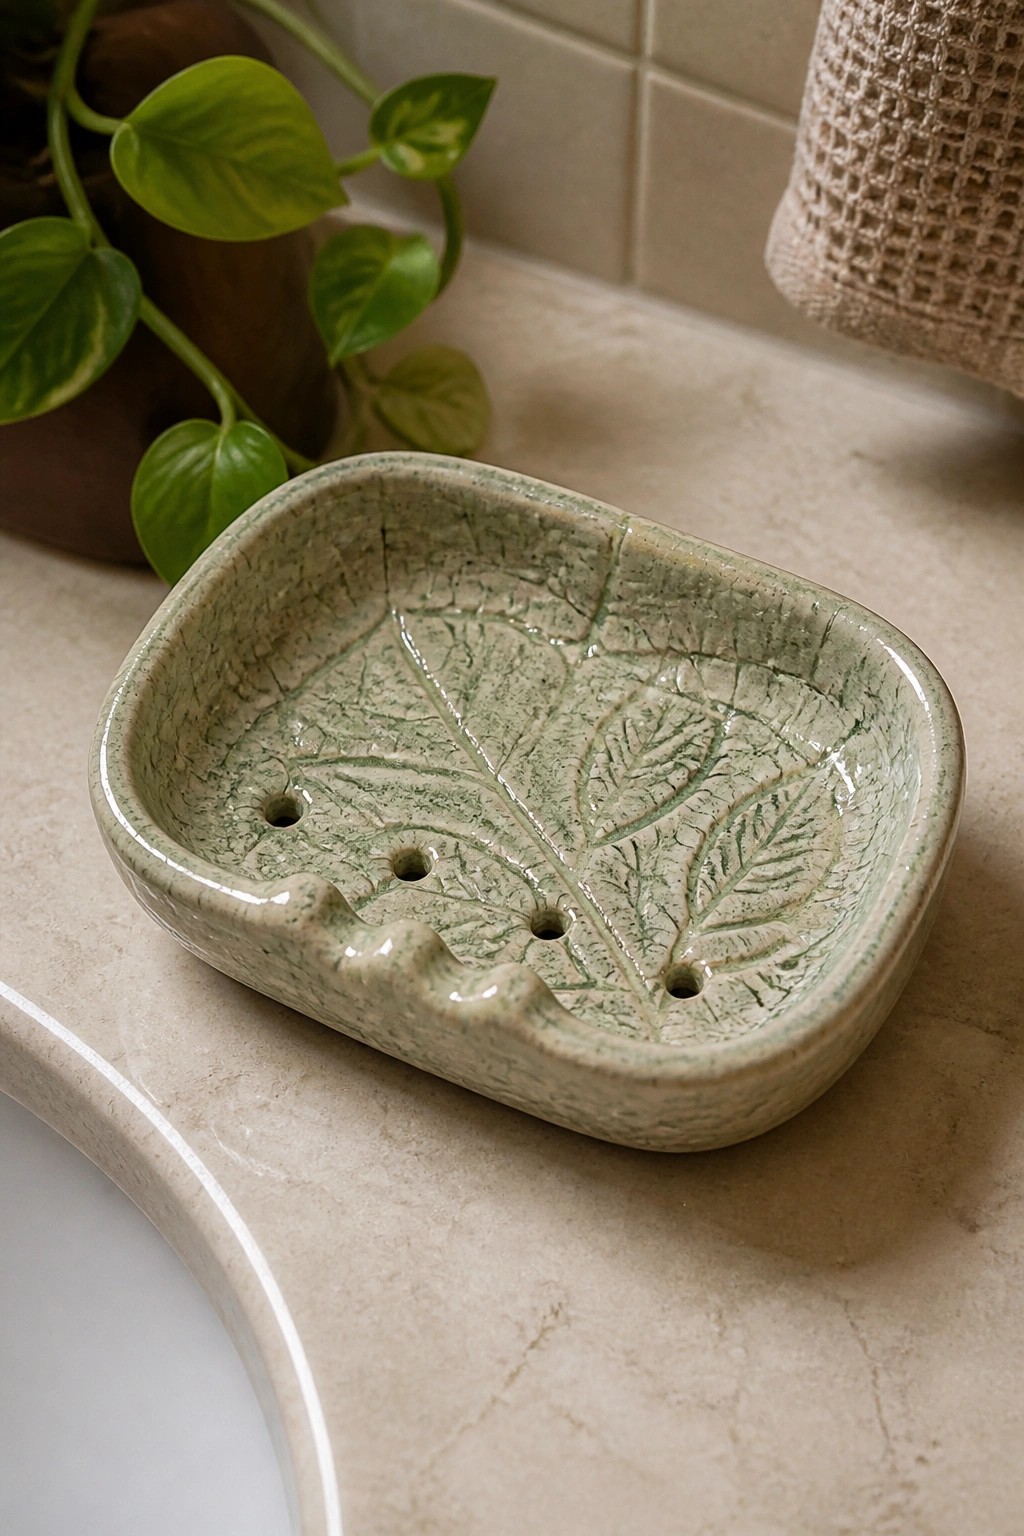
A small rectangular soap dish works well for this approach because the impressed leaf veins give the layered glazes a ready-made surface to catch and vary. Multiple green glazes applied in thin coats create the crackle pattern and subtle shifts from lighter to deeper tones, while the four drainage holes keep the piece functional. The result is a bathroom item that uses glaze layering for both texture and color movement without needing extra carving or painting.
What makes this idea useful is how the leaf texture guides the glaze behavior so the layers separate naturally along the veins. The same layering sequence could be repeated on a larger tray or a simple planter to carry the effect across a set. In a bathroom the compact size and drainage make it practical, and the glaze shifts keep it from looking flat next to tile or stone. You could simplify it by using just two greens on a plain slab if you want to test the layering first.
Frequently Asked Questions
1. What types of glazes work best for building subtle color shifts through layering? Start with translucent base glazes in neutral tones and add thin layers of colored variants that share similar firing ranges. This approach lets underlying hues peek through while creating gentle transitions. Test small combinations on tiles first to observe how each layer alters the final appearance after firing.
2. How many layers are typically needed to add depth without making a piece look muddy? Two to four carefully applied layers often deliver the right balance. Begin with an even base coat, then use directional strokes or sponges for subsequent layers to introduce movement and dimension. Allow full drying between coats and keep each one thin to preserve clarity in the finished surface.
3. How can I test layering ideas before applying them to finished work? Prepare several test tiles from the same clay body you plan to use. Apply the glaze sequences in small sections on each tile, labeling every layer. Fire them alongside your main pieces so the results accurately reflect how depth and color shifts develop under your specific kiln conditions.
4. What tools help control movement when layering glazes on curved surfaces? Soft brushes, slip trailers, and sponges allow precise placement and blending. Hold the piece at different angles while applying to guide drips or streaks naturally. Practice on scrap forms first to develop techniques that encourage flow in desired directions without pooling.
5. How do I avoid common problems like bubbling when combining multiple glaze layers? Apply each coat thinly and ensure complete drying before the next application. Avoid overloading any area with excessive thickness, and select glazes known to be compatible. If bubbling occurs during firing, reduce the ramp speed in the final stages to let gases escape gradually.

Pottery Path is my cozy corner of the internet where I share clay ideas, pottery inspiration, and simple projects you can recreate at home. I love exploring everything from air dry clay to handbuilt pottery to cute minis that brighten your day. My goal is to make clay crafting feel easy, fun, and welcoming for anyone who wants to try it.
You will find beginner friendly tutorials, creative pottery painting ideas, and lots of warm inspiration for slow and happy crafting. If you enjoy hands on creativity, this space will feel like home.