
I have tried quite a few glazes while learning pottery and found some simple mixes that made it easier to see results without too much guesswork.
These ideas center on basic ways to play with color and see how different finishes behave on a piece.
I also paid attention to how the glaze moves during firing since that affects the final look in ways I did not expect at first.
Most of them use common materials and do not require extra equipment beyond what I already had in my small setup.
They helped me build confidence step by step rather than aiming for anything too polished right away.
Two-Tone Drip Glaze on a Thrown Mug
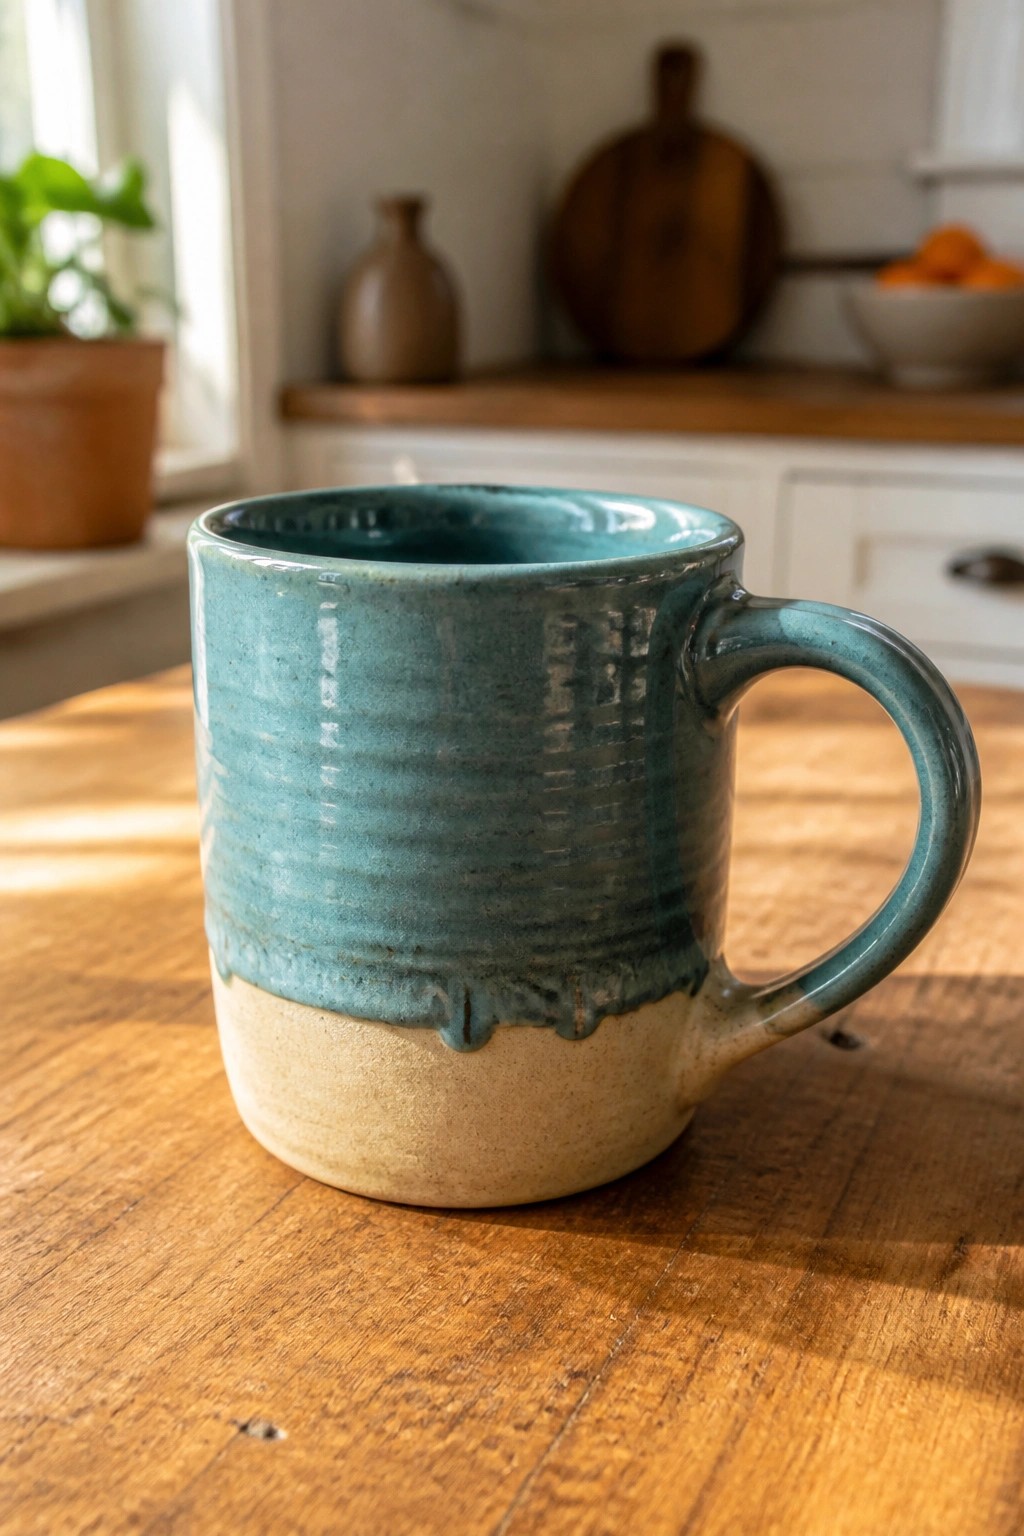
A wheel-thrown mug uses a light base glaze covered by a turquoise glaze that flows and drips during firing. The horizontal ridges from throwing remain visible under the glaze and give the surface extra texture. This approach keeps the form basic while letting the glaze interaction create the main visual interest through color contrast and movement.
What makes this idea useful is how the drip effect demonstrates glaze flow without needing extra tools or complex application. The same layering works on small bowls or planters by swapping the top color to fit different rooms or color schemes. Keeping the mug shape plain lets beginners focus on testing how two glazes behave together instead of adding carved details.
Gradient Blue to Pink Glaze on a Shallow Bowl
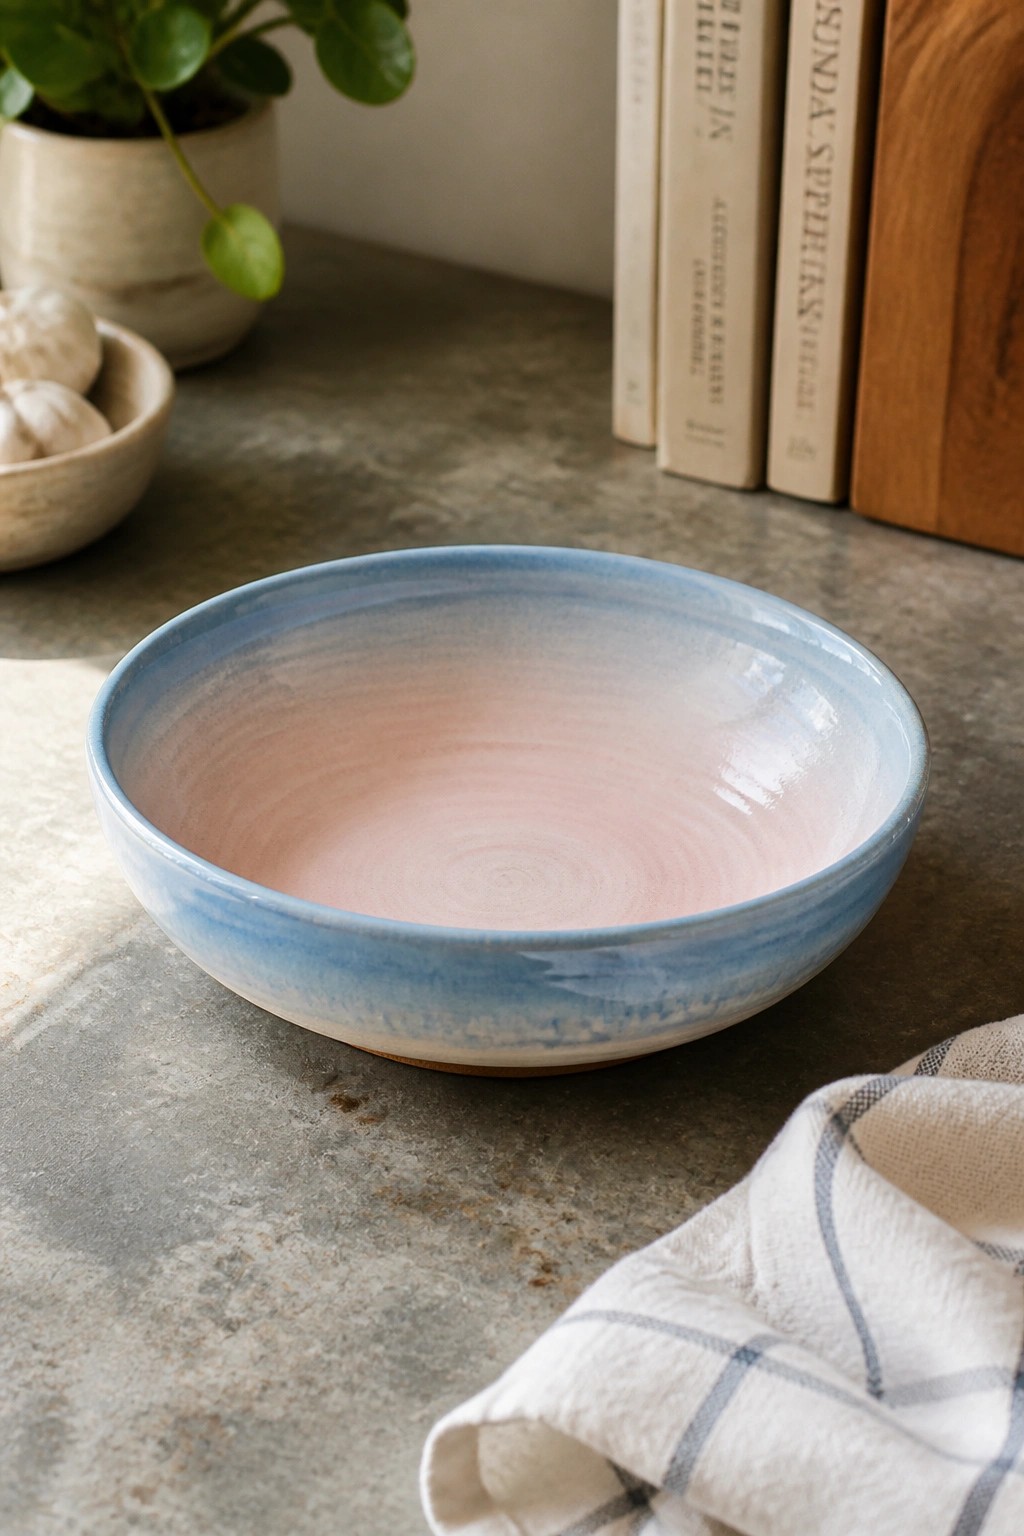
A wide shallow bowl shows a simple glaze idea where a blue tone on the rim fades into a warm pink across the interior surface. The gradual shift between the two colors comes from letting the glazes interact as they settle, which creates a soft blended band instead of a hard line. This approach keeps the focus on how color and flow work together on a basic form.
What makes this idea useful is how the gradient works on any open shape without extra carving or stamping. You could repeat the same two glazes on a set of smaller plates or swap the pink for another color that matches your dishes. The shallow bowl shape fits easily on a table for snacks or fruit, and the color transition gives it enough interest to stand out in a beginner glaze test.
Speckled Glaze on a Hedgehog Planter
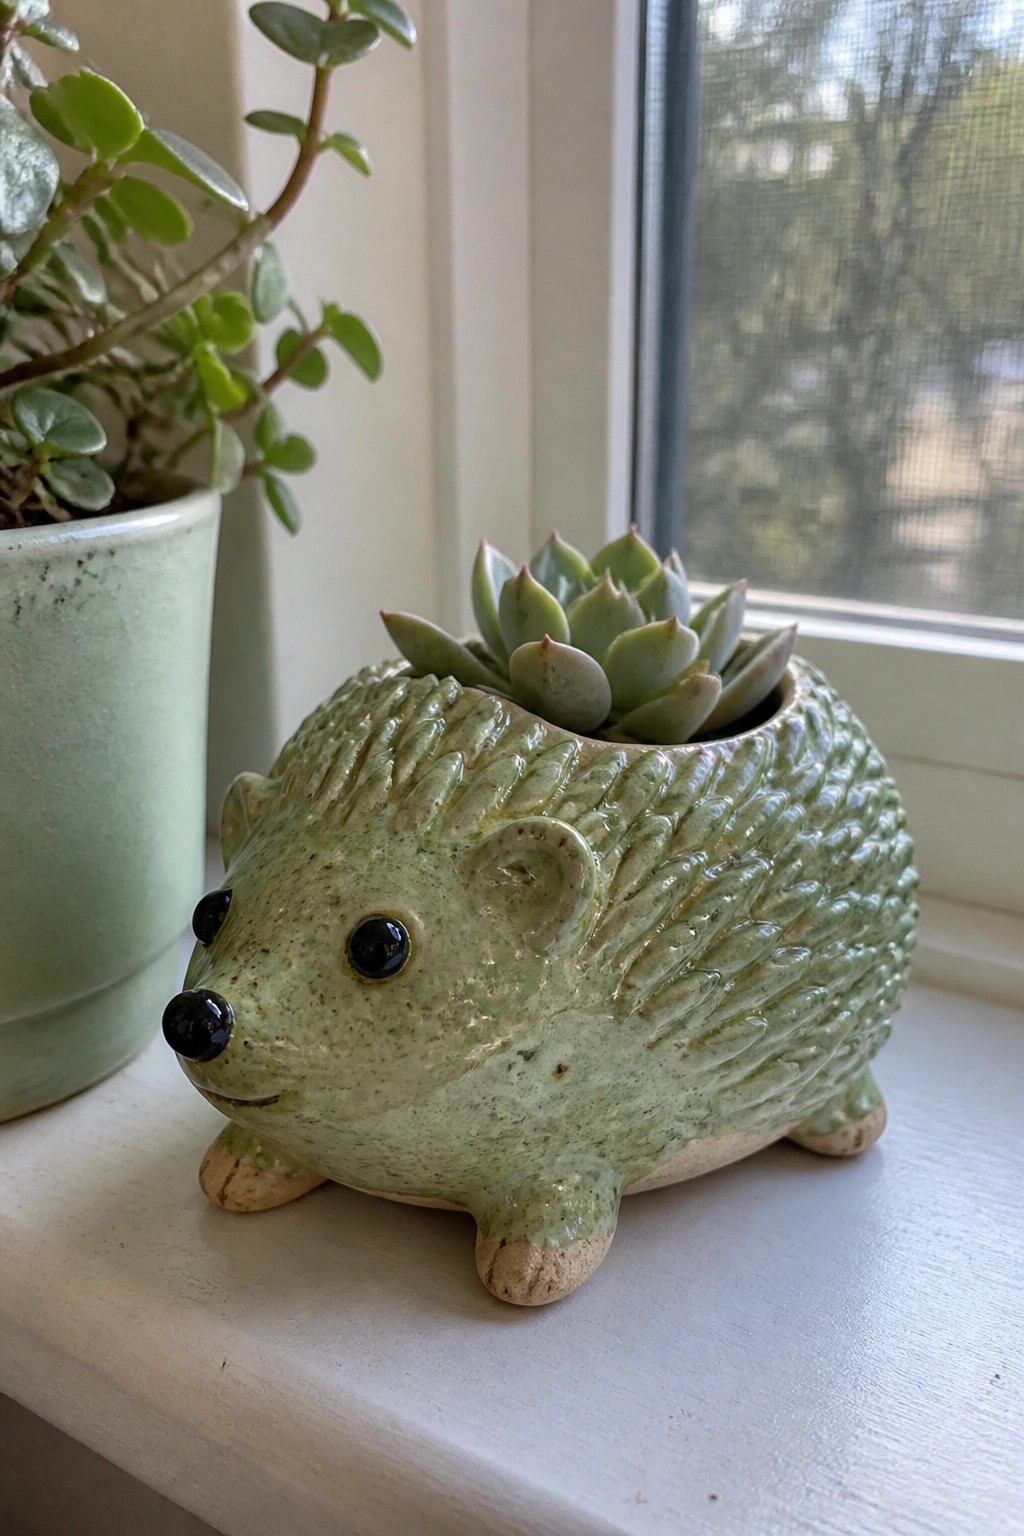
A small ceramic planter shaped like a hedgehog uses a single speckled green glaze to cover the sculpted spines, face, and body. The glaze pools slightly in the textured areas, creating subtle variation that emphasizes the raised details without extra layers or colors. This approach keeps the project in the planter category while showing how a basic glaze can work on an irregular, three-dimensional form.
What makes this idea useful is how the speckled finish handles the raised spines without running off the edges. The compact shape fits on a narrow shelf or windowsill for a single succulent, and the same glaze could be tested on a simpler cylinder or oval tray to focus on flow before adding sculpting. For gifts, the form gives a clear starting point that still leaves room to adjust the glaze thickness or add a second color on the feet or ears.
Painted Daisy Border on a Wide Plate
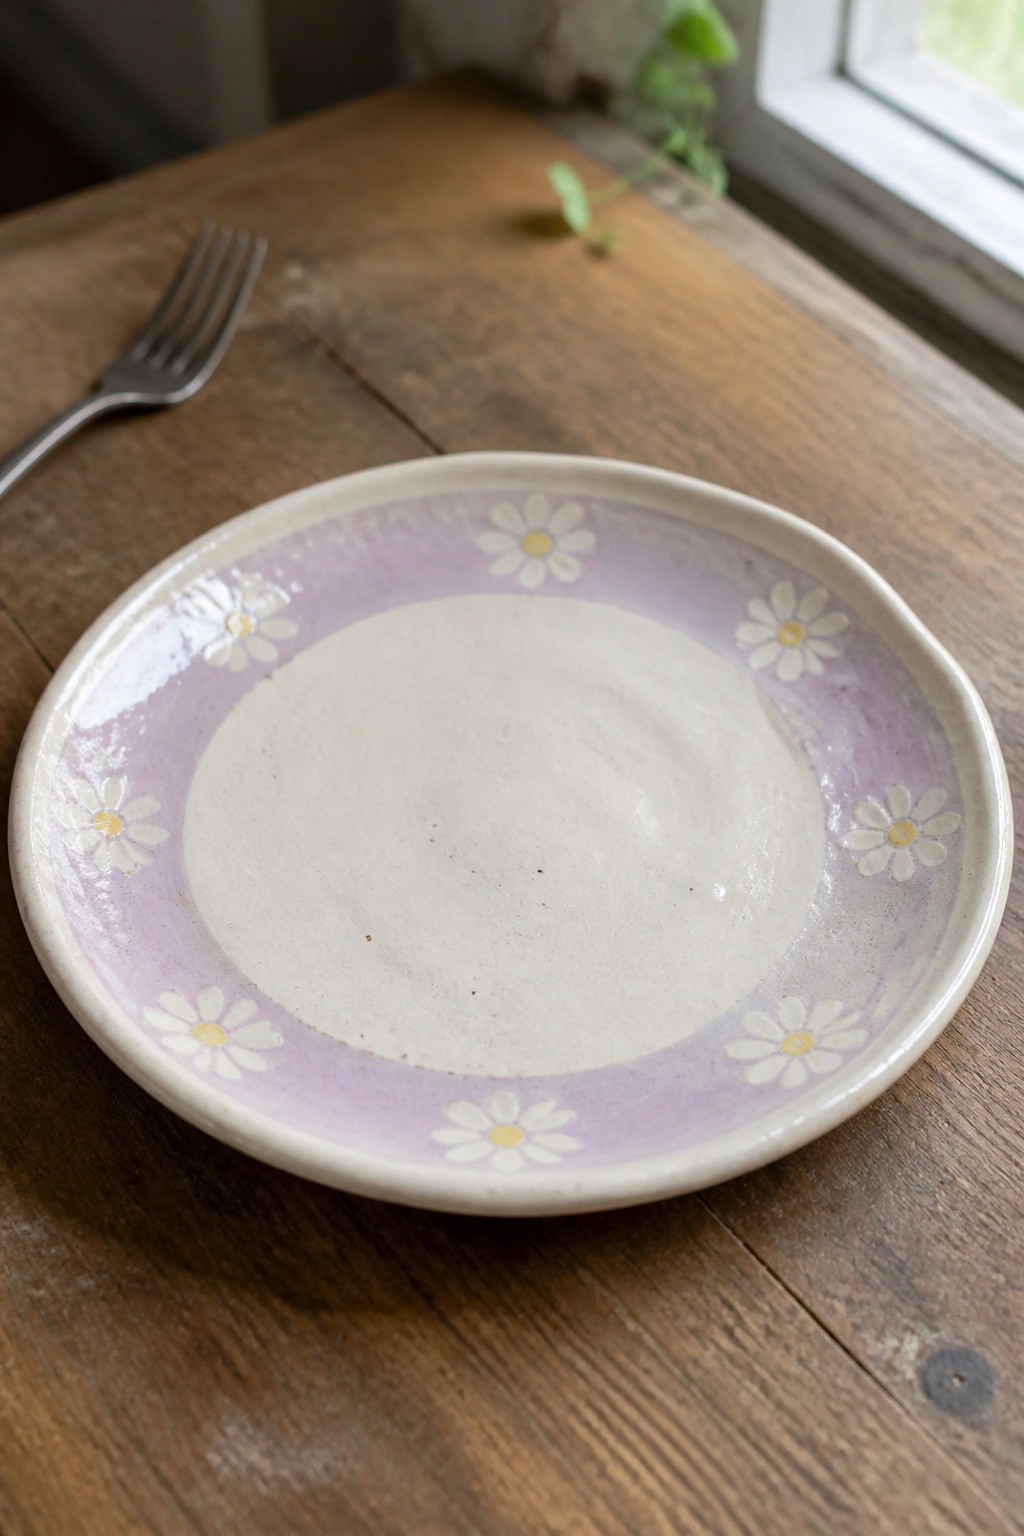
A wide ceramic plate gains a clean, finished look from a narrow purple band painted around the inner rim. Small white daisies with yellow centers repeat along that band, spaced evenly by hand so the pattern follows the curve without crowding. The center stays plain and light so food or small items remain the focus while the border supplies the decoration. This layout suits plates because the motif stays contained to one area and requires only basic brushwork to repeat.
What makes this idea useful is how the band format works on plates, bowls, or shallow trays without needing full-surface painting. You can swap the daisy for other simple flowers or shorten the band to just two-thirds of the rim for a quicker version. The same approach pairs well with a matching set of smaller dishes for a table setting that still reads as handmade. On Pinterest the high contrast between the purple band and white flowers helps the image read clearly even at small sizes.
Dripping Brown Glaze on a Small Cup
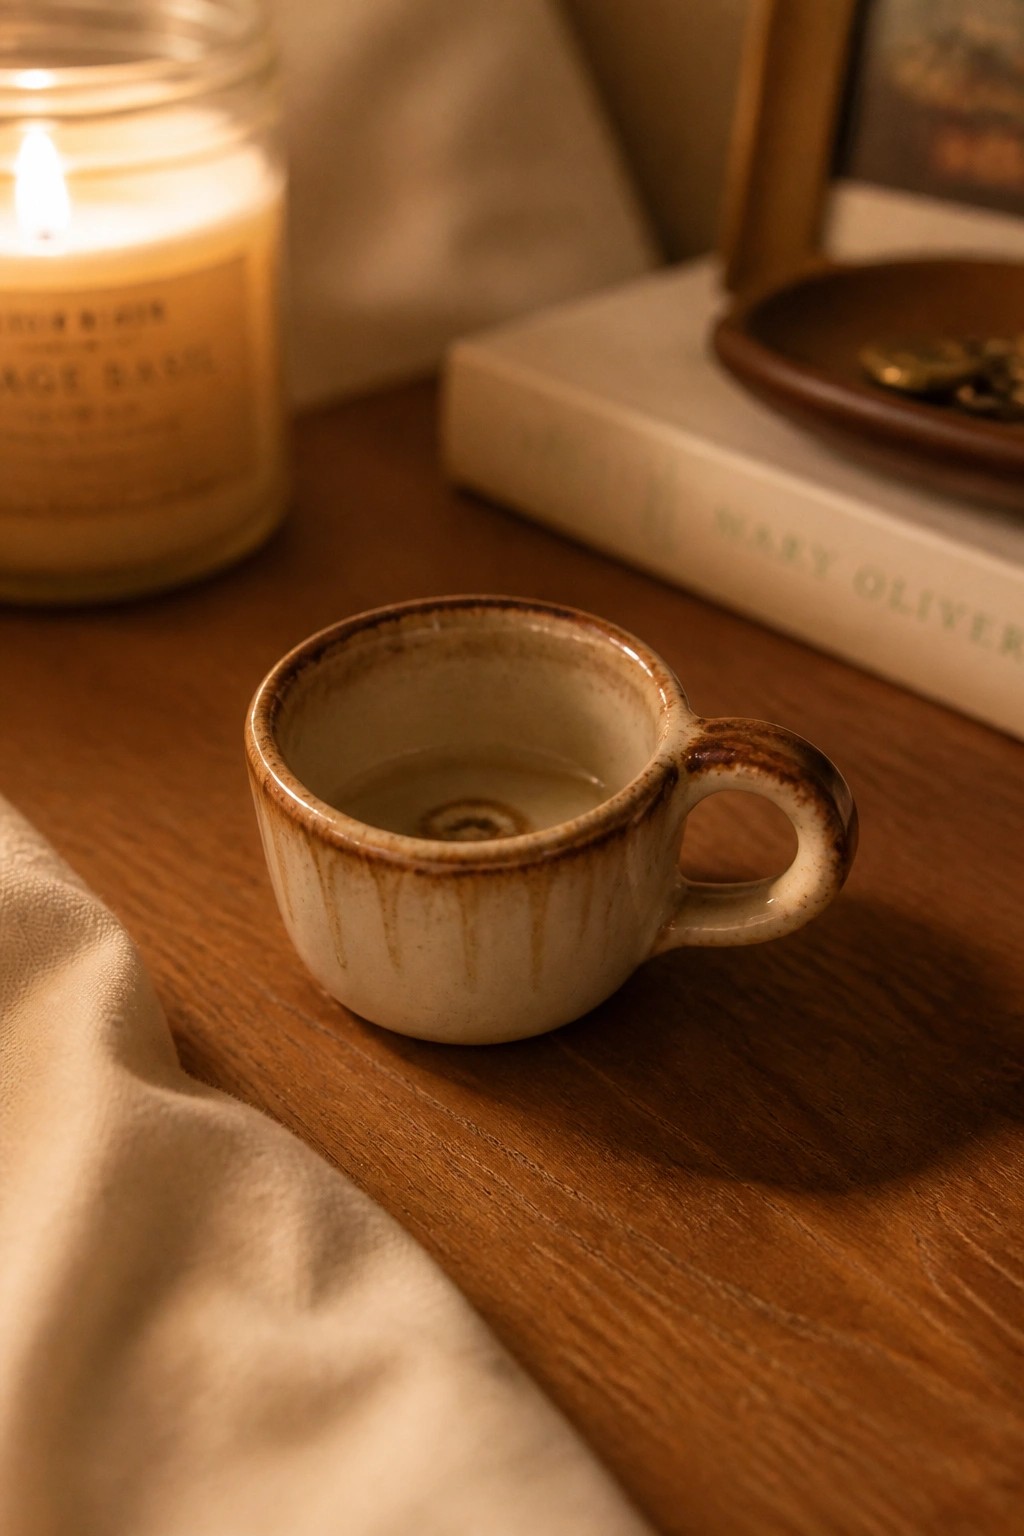
A small handled cup uses a white base glaze with a brown layer applied near the rim so it runs downward in short, uneven drips. The flowing lines follow the curve of the form and stop before reaching the base, keeping the lower half clean. This glaze idea works on compact pieces because the drip pattern stays visible without extra carving or added texture.
What makes this idea useful is how the drip effect turns a basic cup shape into something that stands out on a shelf or desk without extra tools. You could try the same rim-to-body drip on a set of small bowls or switch the brown to another color that flows at a similar temperature. For a gift, the small size makes it easy to repeat in a matching pair while the glaze flow gives each one slight variation.
Striped Glaze on an Oval Dish
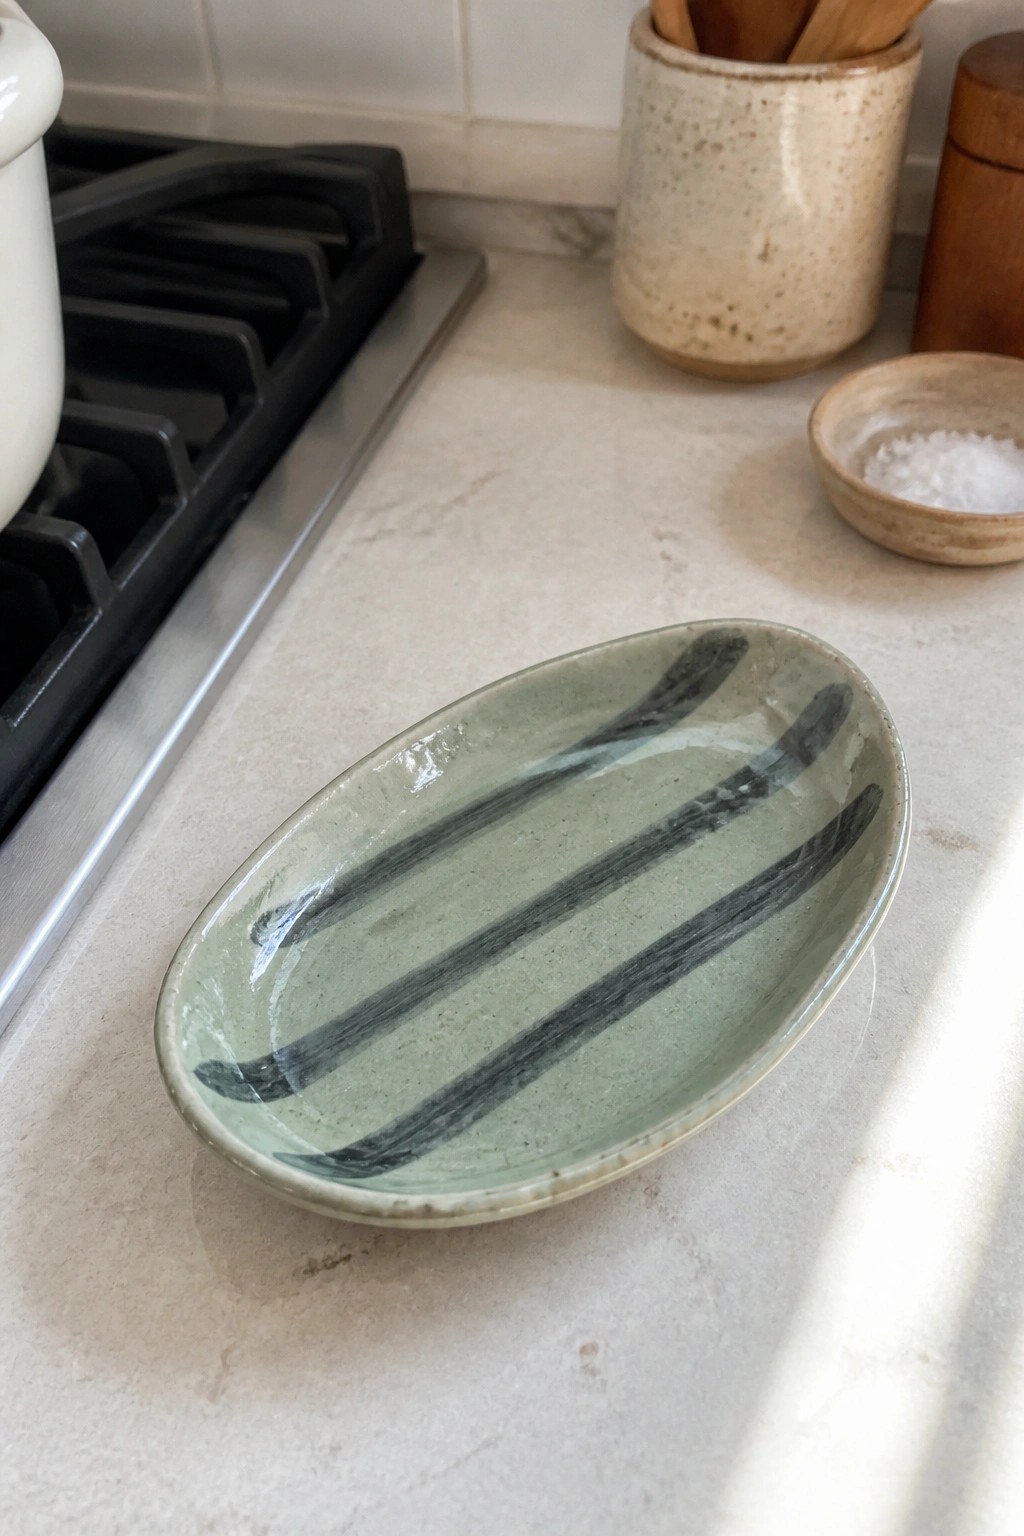
An oval ceramic dish uses a soft green glaze as the base and adds dark gray stripes applied with a brush in loose, overlapping strokes. The oval form keeps the lines contained and balanced while still showing the natural variation in the brushwork. This approach works as a small kitchen tray or spoon rest where the contrast between the muted background and the bold stripes gives the piece its main visual interest.
What makes this idea useful is how the oval shape organizes the stripes without requiring perfect spacing or straight lines. You could repeat the same pattern on a rectangular butter dish or scale it down for a set of small condiment bowls. In a kitchen, the dish keeps utensils or salt within reach while the simple stripe motif stays easy to adapt with different base colors. The small size also makes it a quick test piece when trying out new glaze combinations.
Leaf-Shaped Ceramic Ring Dish
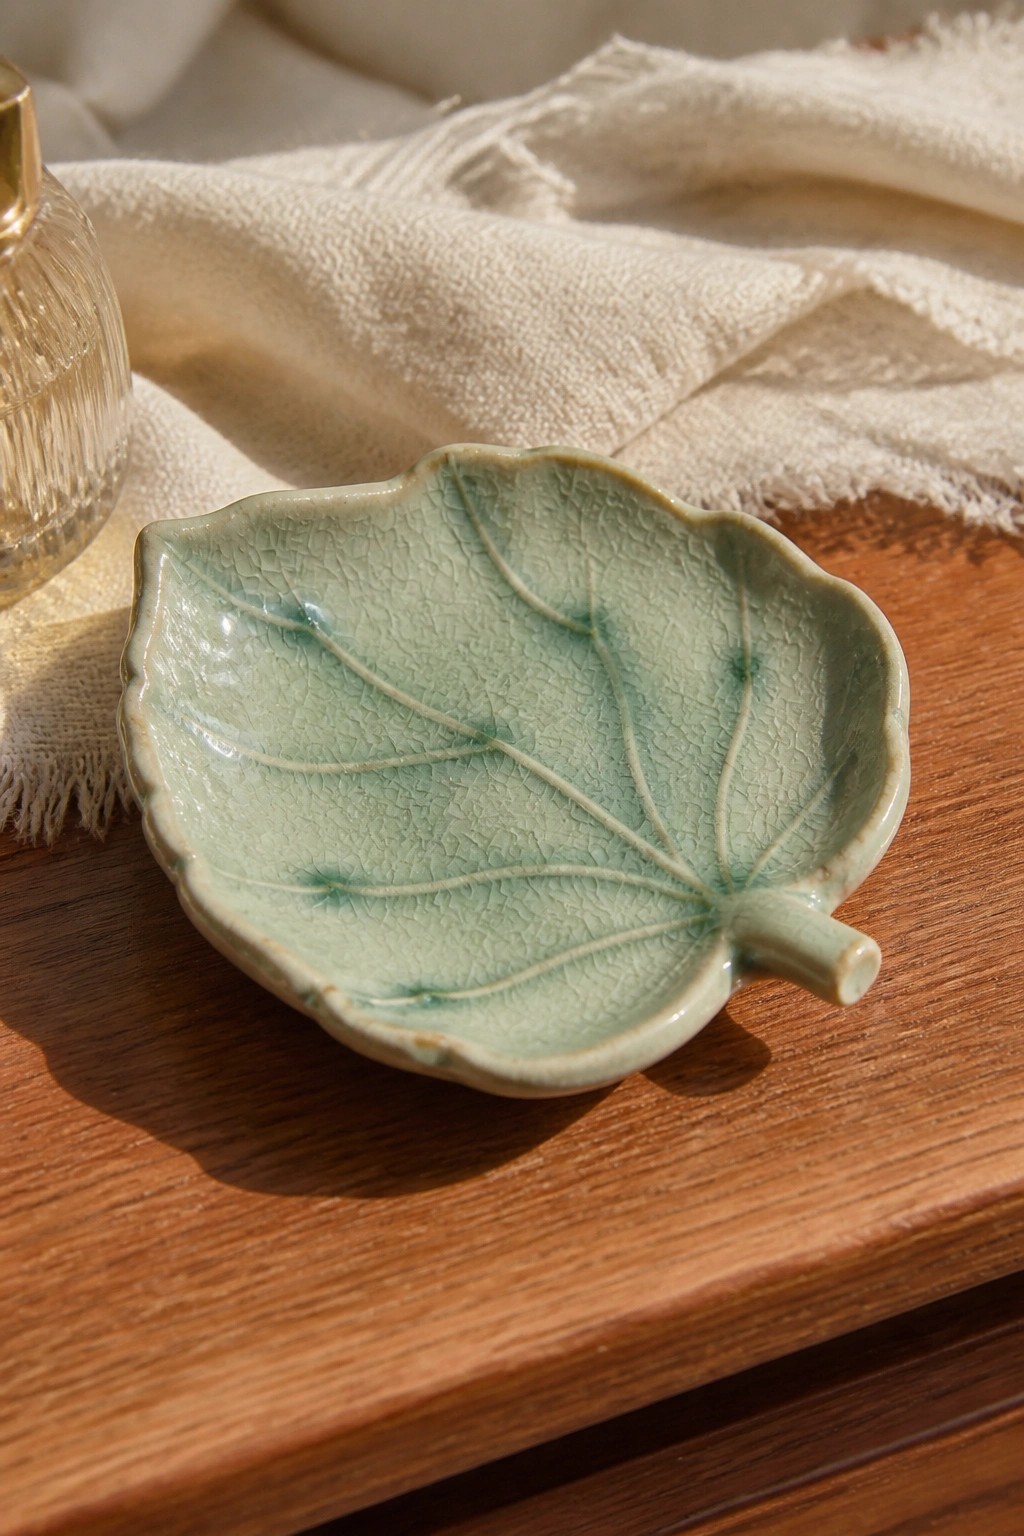
A leaf-shaped ceramic dish works well as a small ring holder or catch-all tray. The sculpted veins create natural division across the surface while the stem forms a short handle at one end. A soft green crackle glaze covers the piece and gives the clay a subtle aged texture without covering the details. This approach keeps the project focused on a simple organic form that stays functional at a small scale.
What makes this idea useful is how the leaf shape fits neatly on a nightstand or bathroom counter for jewelry or keys. You could adapt the same outline into a soap rest by widening the center or swap the glaze color to match other pieces in a set. The small size also makes it easy to repeat in different finishes for gifts or to test new glaze effects on one basic mold.
Vertical Glaze Blocks to Study Flow and Color
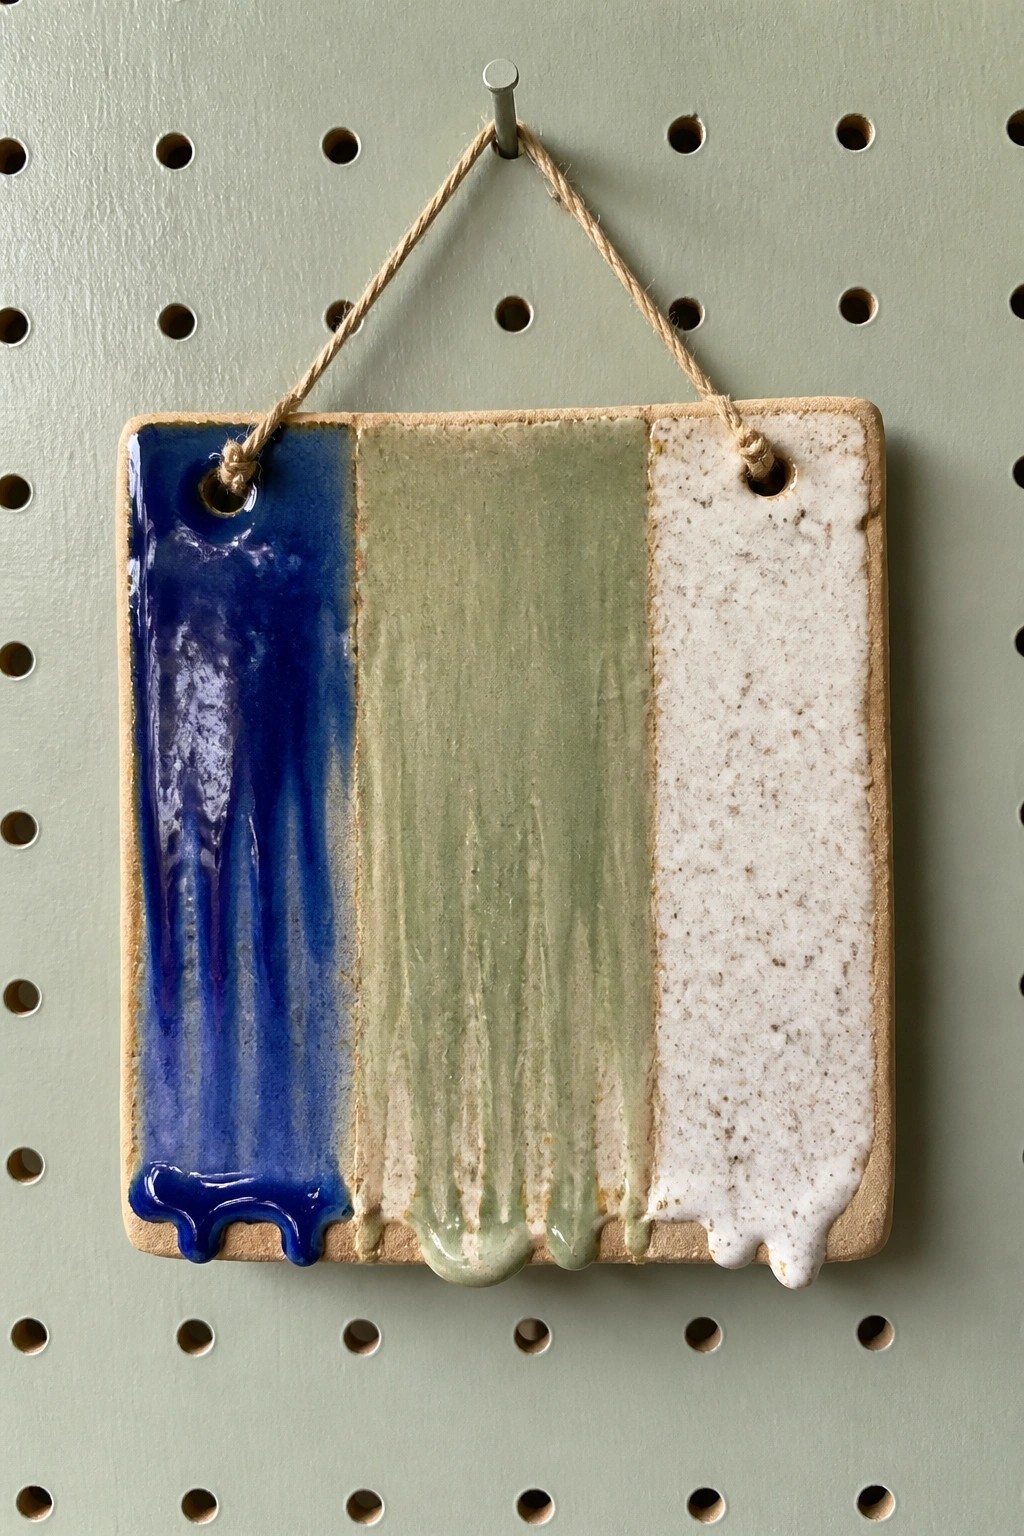
A flat rectangular tile with three vertical sections of different glazes lets you compare how each one melts and moves during the same firing. The blue glaze on the left runs more freely and creates deeper pooling at the bottom edge, while the center green shows moderate flow and the right section stays mostly stable with only slight dripping. This layout works as both a practical test piece and a finished decor item once a hanging hole is added before the bisque fire.
What makes this idea useful is that it packs three glaze tests onto one small object so you can judge color, texture, and movement side by side. The same approach adapts easily to other shapes such as small trays or coasters if you want functional pieces instead of test tiles. For beginners tracking glaze recipes, keeping a few of these blocks on hand gives quick reference without extra kiln space.
Dripping Blue Glaze on a Divided Salt Dish
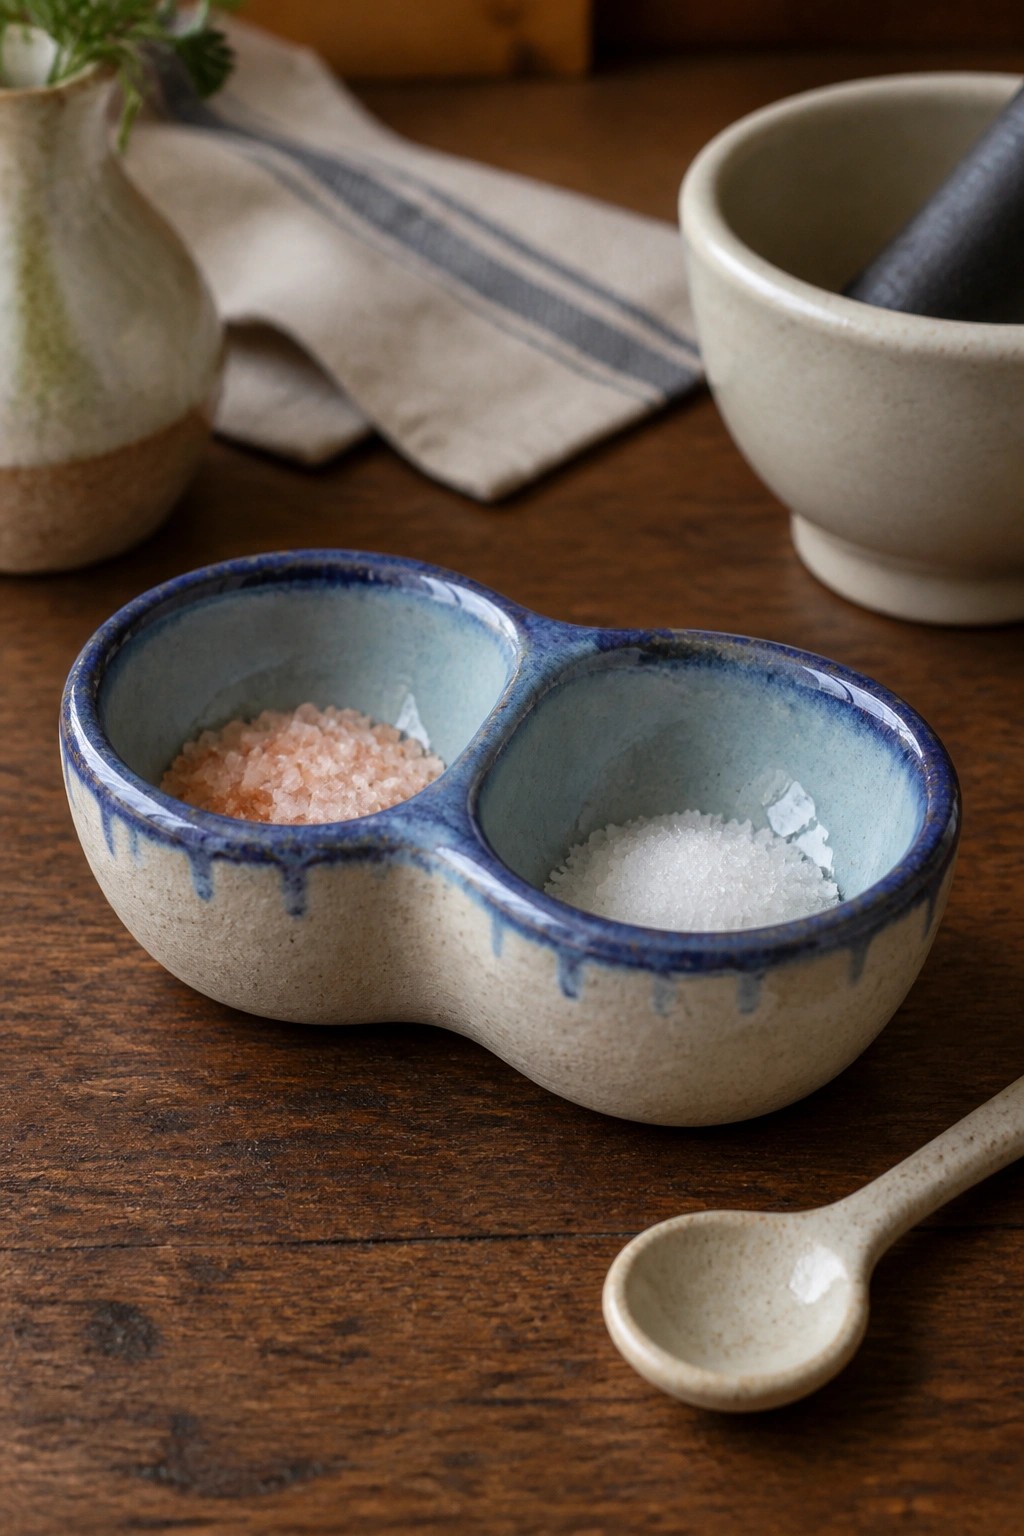
A small double-compartment dish formed from speckled clay uses a blue glaze applied along the rim so it runs downward in short drips. The two bowls stay separate, making it easy to keep different salts or seasonings from mixing. The matte beige surface next to the glossy blue creates clear contrast that shows how simple rim glazing can add movement and color.
This shape fits on a kitchen counter or table for daily use without taking much space. You could repeat the same drip method on single bowls or a row of small dishes to test how glaze flows on different curves. The divided layout also works for holding spices while cooking or for serving small condiments at meals.
Speckled Splatter Glaze on a Small Serving Bowl
A small ceramic bowl finished with an irregular blue and green speckled glaze gives the surface an active, dotted pattern that contrasts against the light base. The spots vary in size and intensity, showing how the glaze moves and blends during firing without requiring precise brushwork. This glaze treatment fits a simple kitchen bowl meant for dips or small servings, where the finish becomes the main feature.
The shape does a lot of the work here because the compact, rounded form keeps the speckle pattern easy to read at tabletop scale. You can adapt the same splatter method to plates or shallow trays by spacing the color dots farther apart so they do not crowd the larger surface. In a kitchen, this kind of bowl stands out for everyday use with bread or appetizers since the glaze colors stay bright against food. The technique also transfers to mugs if you reduce the amount of speckle so the handle area stays cleaner.
Speckled Blue Glaze on a Bird Figurine
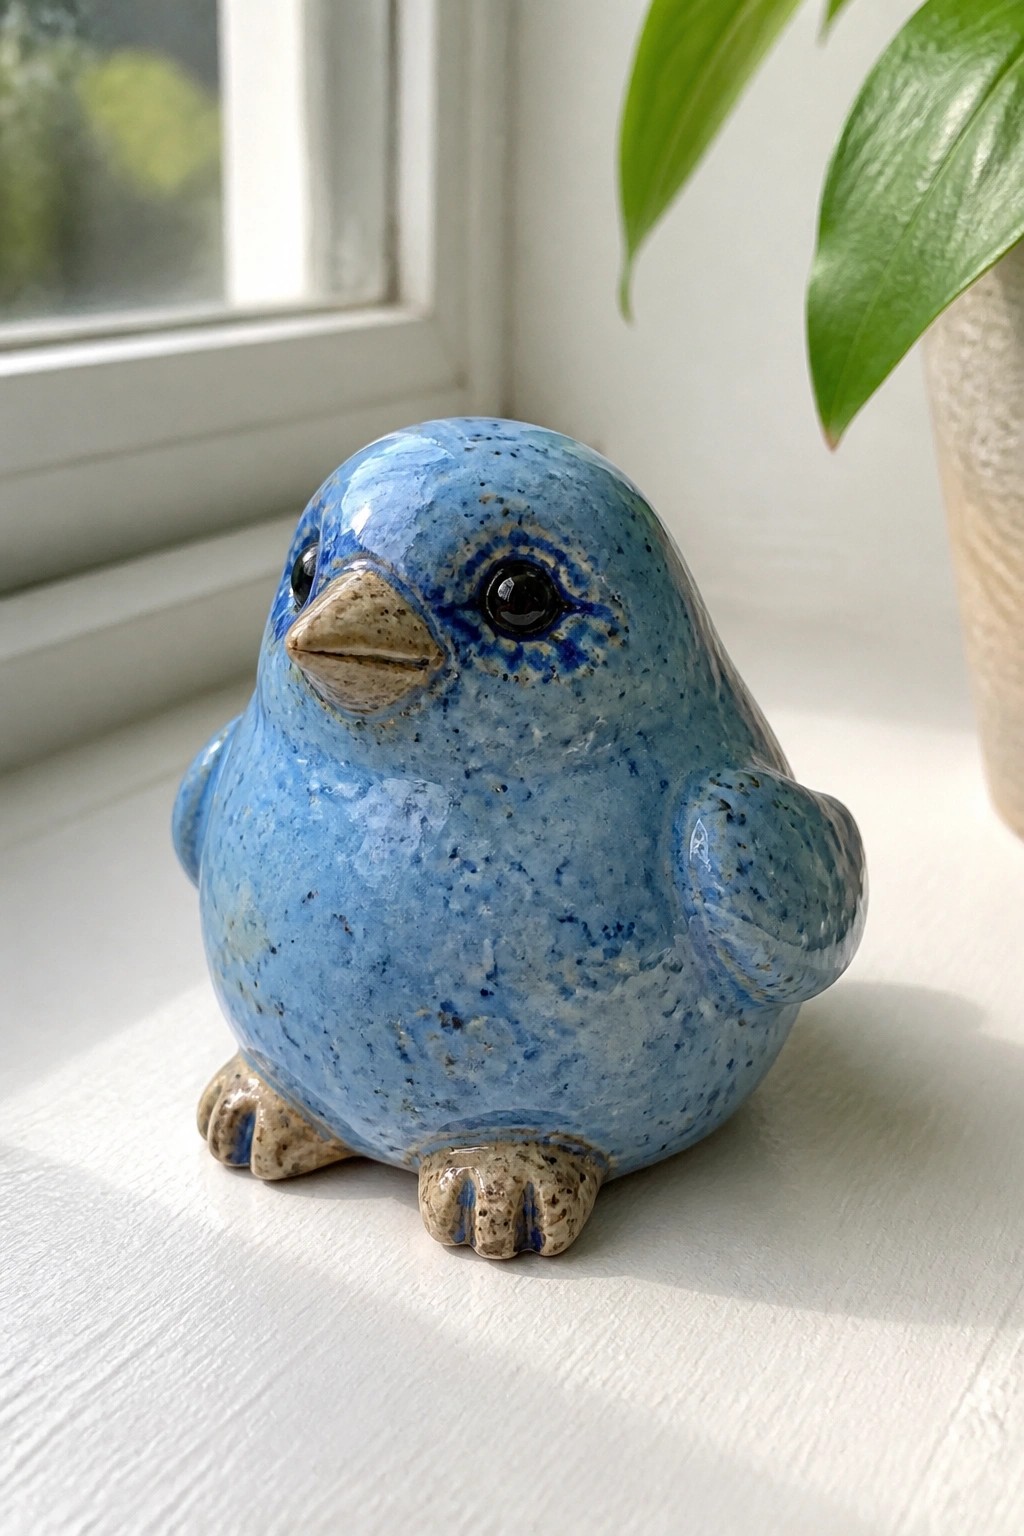
A compact bird figurine gives a clear surface for testing how a variegated blue glaze behaves on curves and edges. The speckled finish spreads evenly across the rounded body while the beak and feet stay lighter, creating natural contrast without extra painting. This keeps the project focused on glaze flow and color variation rather than detailed surface work.
The small scale makes the piece easy to fit on a shelf or windowsill where a larger object would not work. You could reuse the same glaze on other basic animal shapes or try it on a small dish to compare results. The rounded form also leaves room to adjust the bird’s posture slightly if you want to make a few variations in one batch.
Impressed Heart on a Two-Tone Glazed Tray
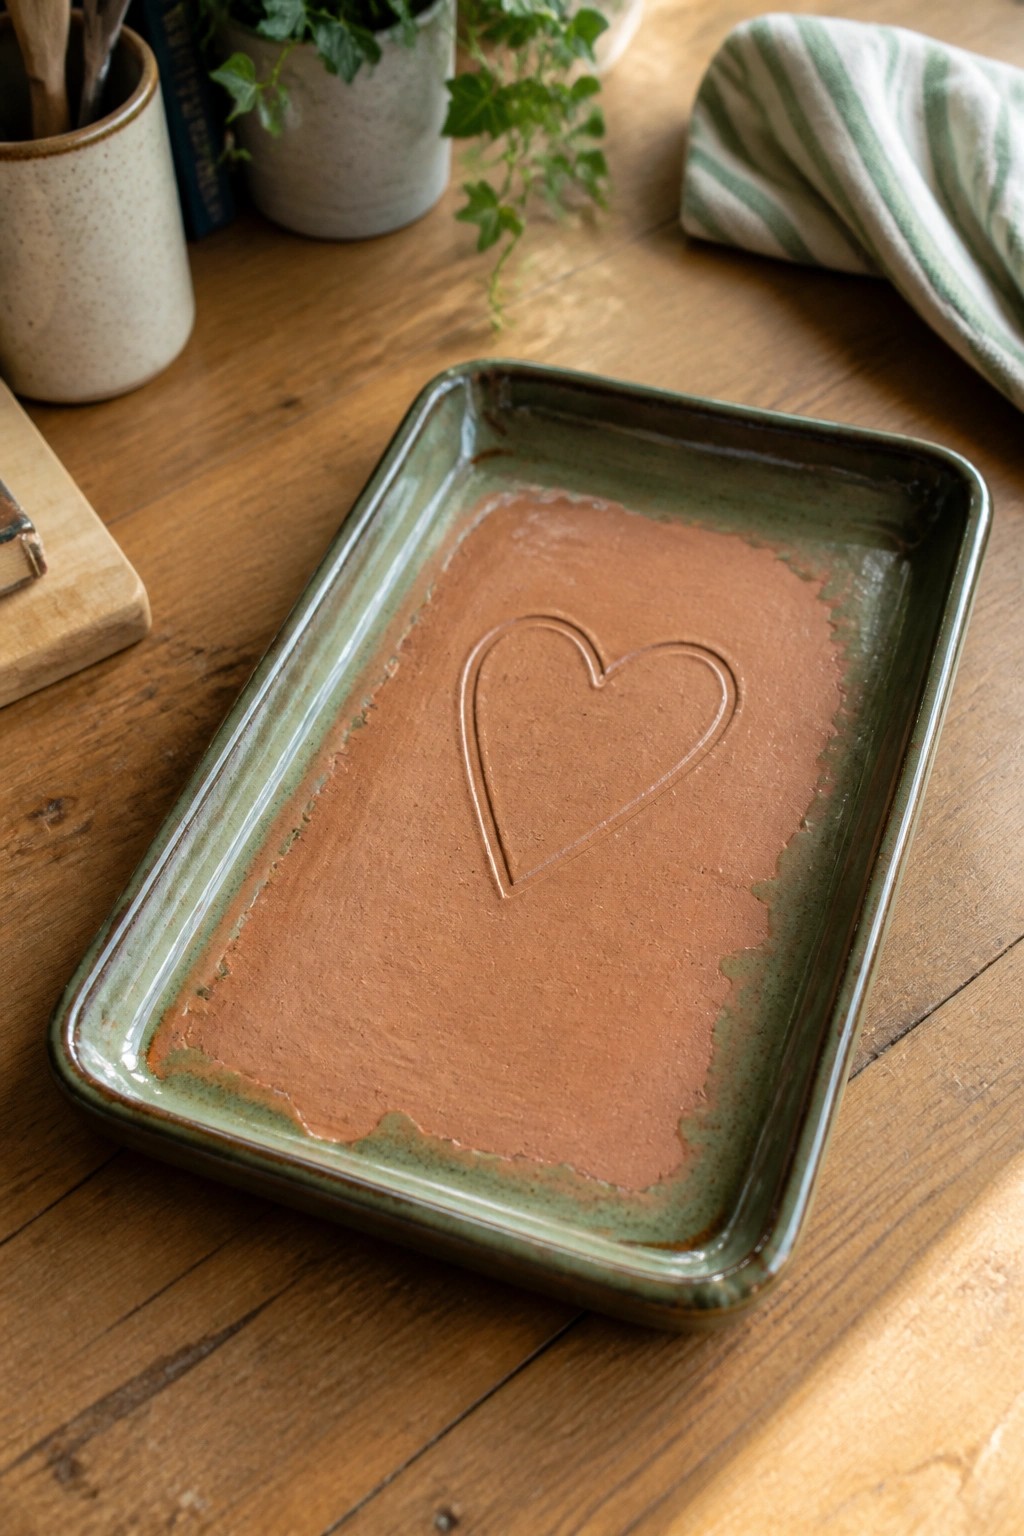
A rectangular tray uses two contrasting glazes to make an impressed heart stand out on the surface. The rim receives a green glaze while the center gets a warm reddish brown, so the heart shape created by the impression reads clearly through the color difference. This approach keeps the design simple by letting the clay form and the glaze pairing do the work instead of adding painted details.
What makes this idea useful is how the flat tray shape works for holding jewelry, catching keys, or serving small snacks without taking up much space. You can change the impressed motif to a leaf, initial, or geometric stamp and test other glaze combinations to see how the colors separate or run. The size also makes it easy to try the same idea on a smaller ring dish or a longer version for utensils.
Speckled Glaze on a Compact Toothbrush Holder
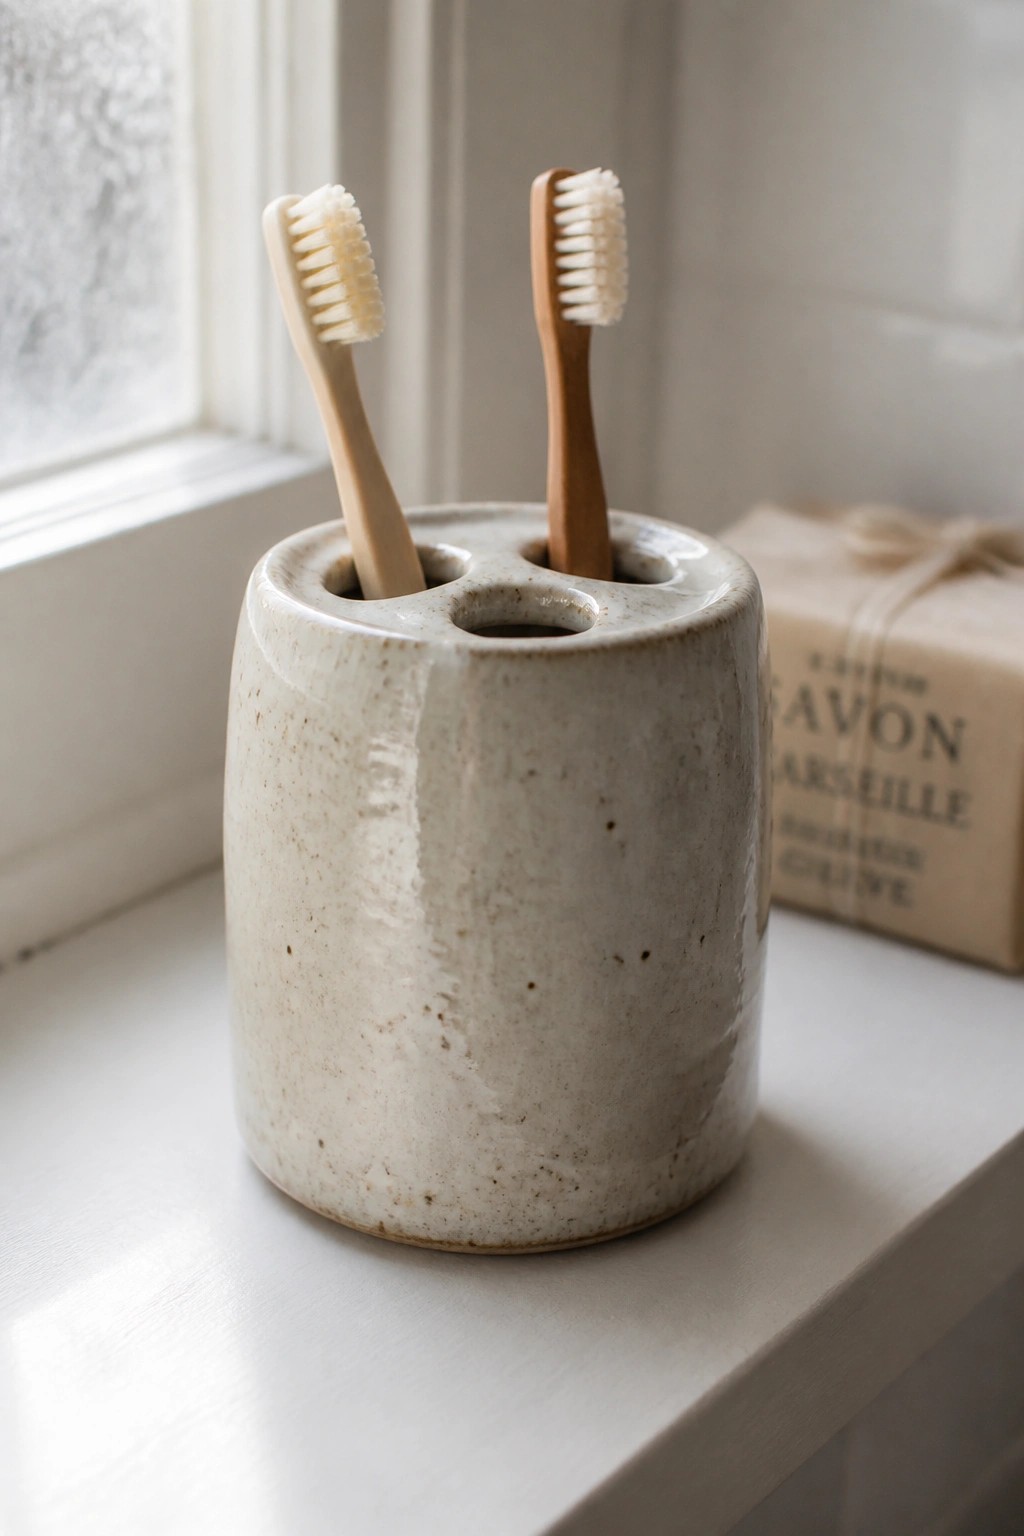
A simple cylindrical ceramic holder finished with a light speckled glaze makes an effective toothbrush caddy. The glaze sits in a creamy off-white tone with scattered dark flecks that add subtle texture across the surface. Three openings cut into the flat top allow multiple brushes to stand upright while the rounded body stays small enough for a bathroom counter. This approach uses one glaze to create a functional bathroom item without extra decoration.
What makes this idea useful is how the speckled effect works on a basic form that beginners can throw or hand-build. You could apply the same glaze to a soap dish or small tumbler by adjusting the top details instead of drilling holes. In a bathroom setting the neutral finish pairs with most towels and tiles while the size keeps clutter low. The pattern also gives beginners a chance to test how a single glaze moves and settles around edges and openings.
Ceramic Sponge Holder with Drainage Notch
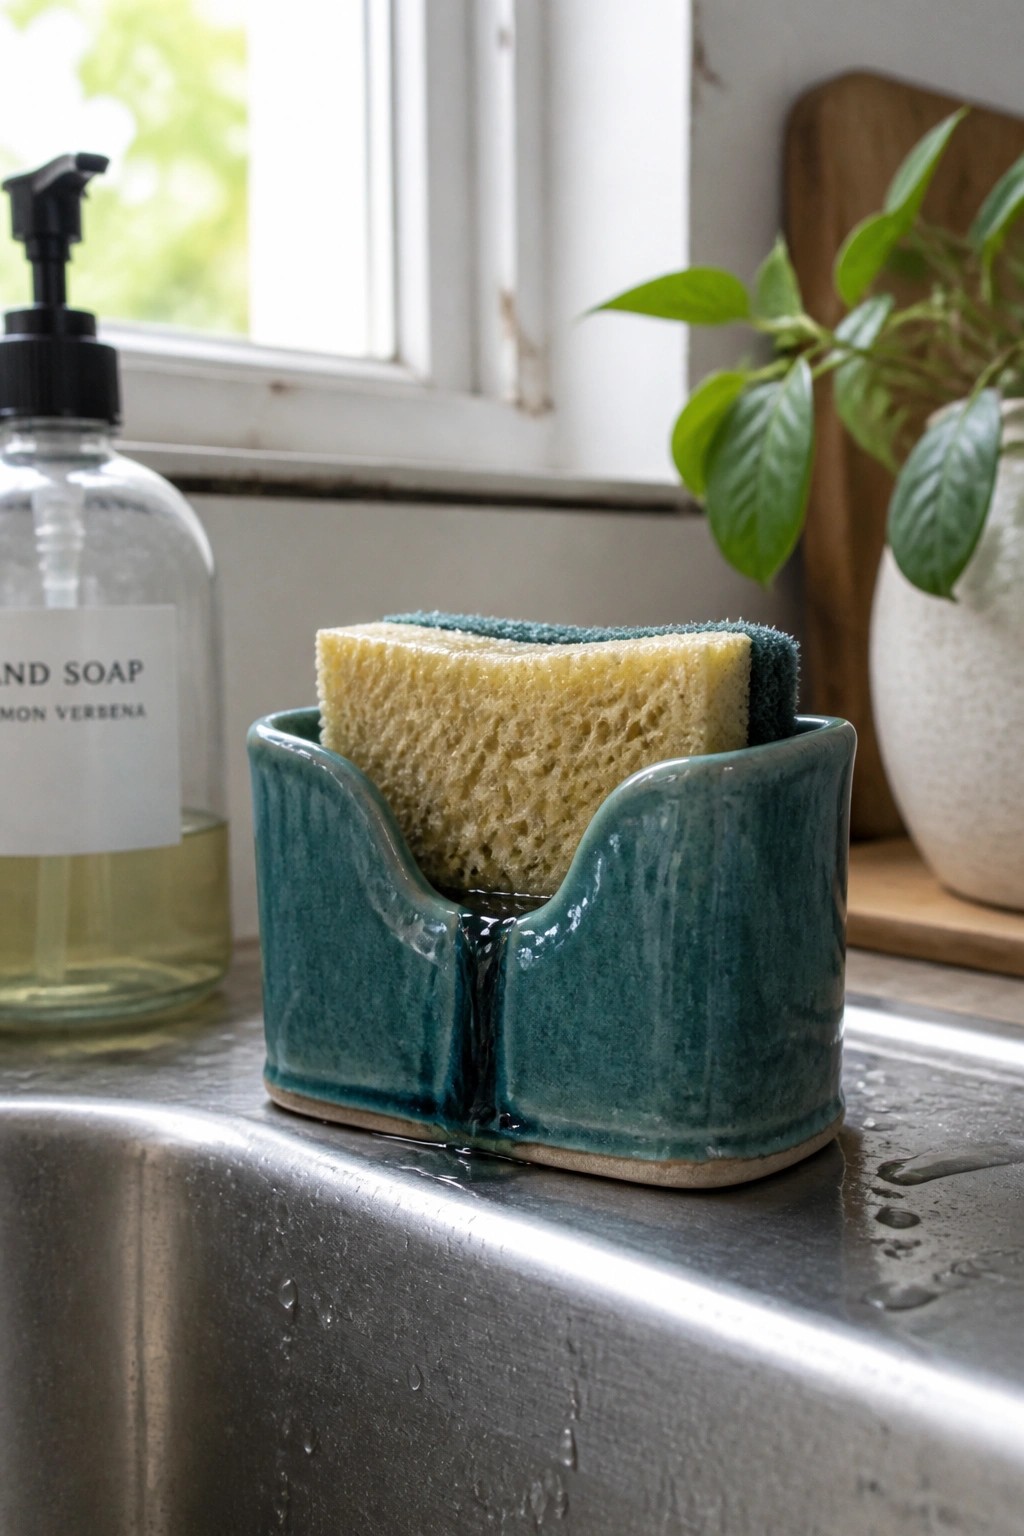
A ceramic sponge holder with a wide curved body and a front drainage notch keeps a standard kitchen sponge elevated above the sink while letting water run straight through. The glossy teal glaze covers the exterior surfaces and creates a smooth finish that resists moisture and wipes clean quickly. This kitchen piece uses a simple slab or pinched form with a cutout detail that turns a basic holder into a more functional sink accessory.
What makes this idea useful is how the notch solves the problem of a soggy sponge without needing extra pieces or trays. You could adapt the same shape for scrub pads or smaller dish brushes by adjusting the width of the opening. In a kitchen, the compact size fits neatly along the sink edge and pairs easily with soap dispensers or other glazed dishware. The solid color also gives you room to test how a single glaze behaves on a curved surface before trying multi-color combinations.
Two Tone Drip Glaze on a Small Pitcher
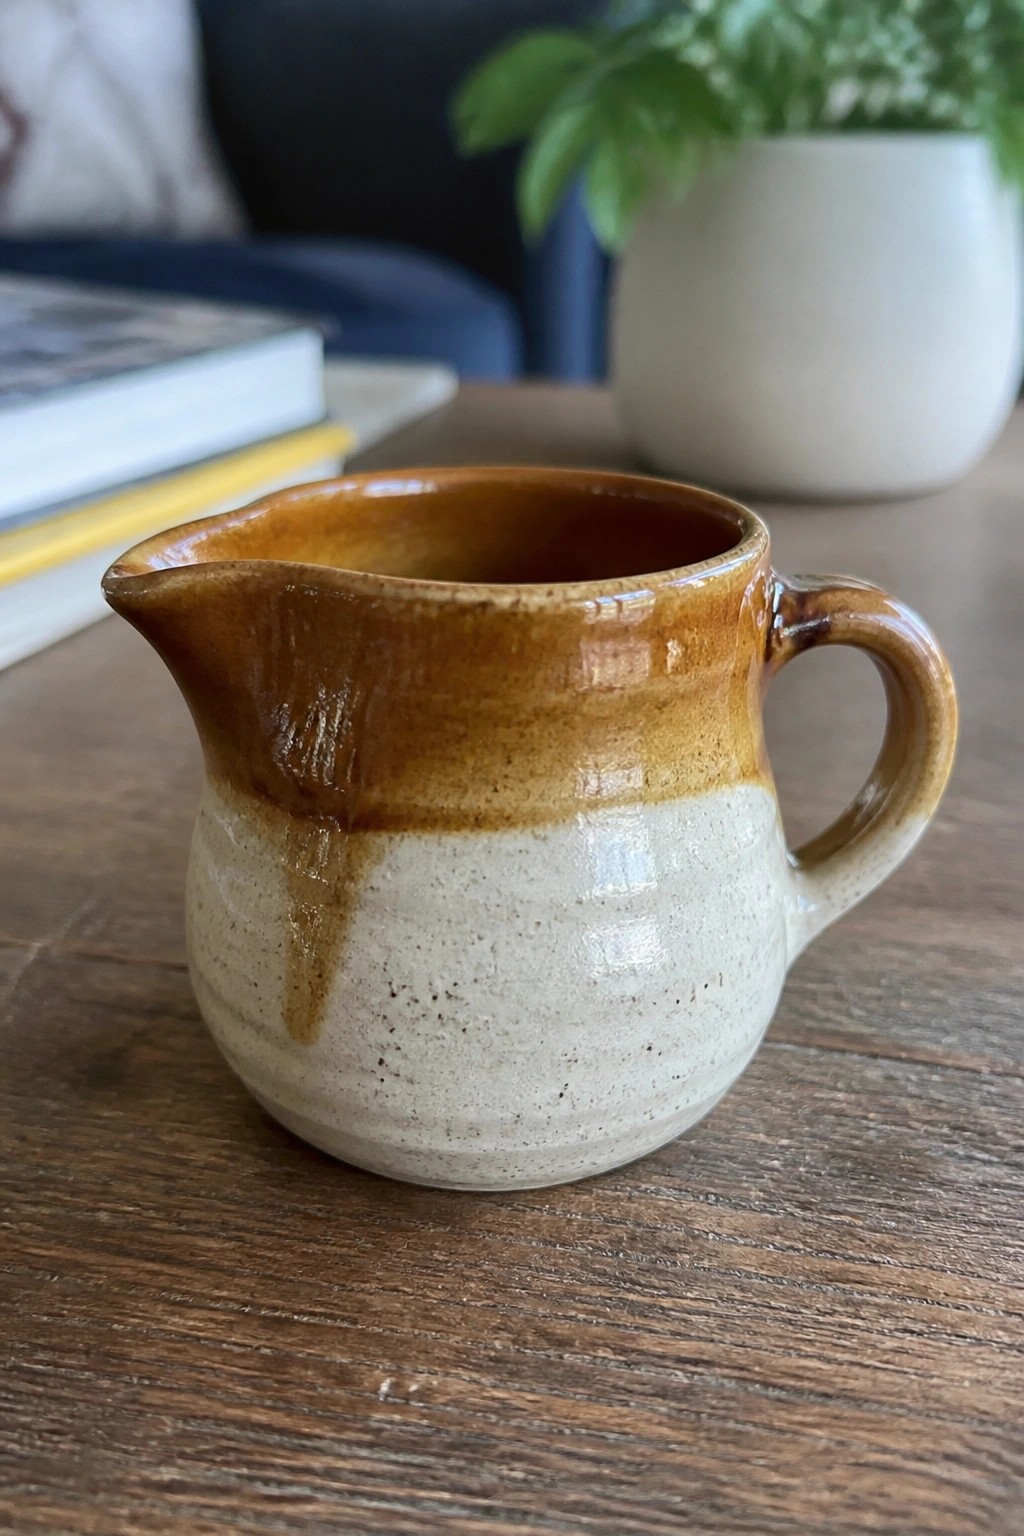
A small ceramic pitcher or creamer takes on a clean look with a simple two-tone glaze application. The upper half gets a brown glaze that runs downward during firing, creating soft vertical drips into the speckled cream layer below. This approach keeps the focus on how the glazes interact on a rounded form rather than added surface details. The spout and handle remain practical while the color shift gives the piece its main visual interest.
What makes this idea useful is how the same layering method works on other small kitchen items like a sugar bowl or mini jug. The compact size lets you test different glaze thicknesses to adjust how far the drips travel. In everyday use the pitcher handles cream, milk, or sauces without taking up much space. You could rework the idea by switching the brown to a different shade or letting the lower glaze cover more of the body for a subtler transition.
Streaky Lavender Glaze on a Rounded Bud Vase
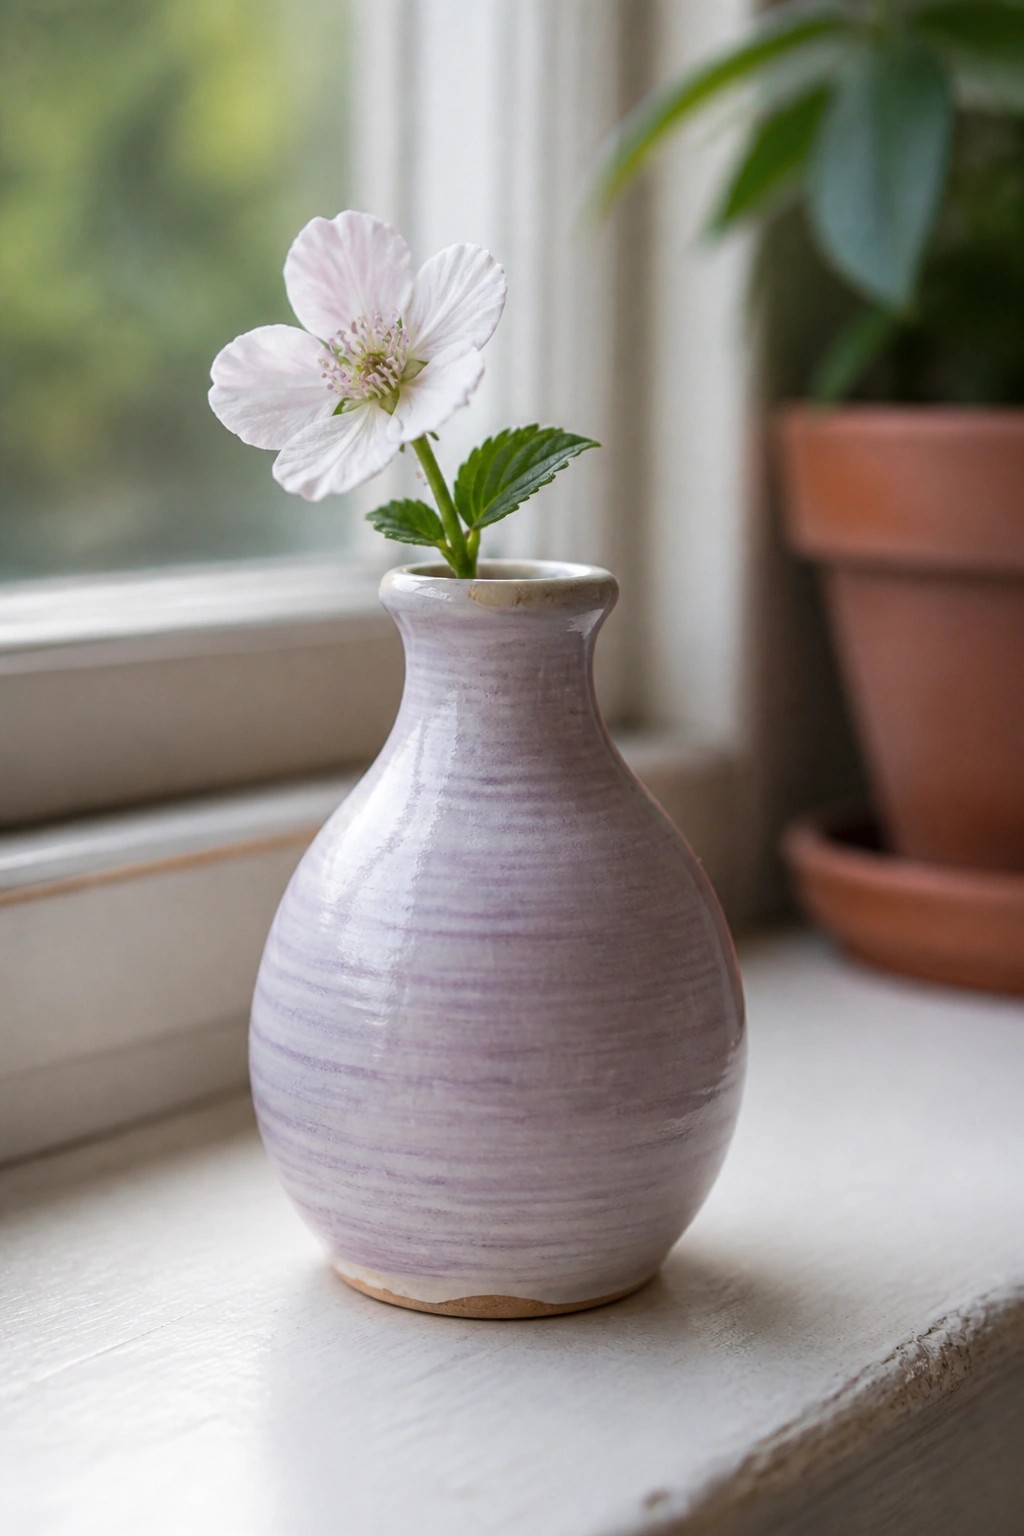
A small ceramic bud vase with a rounded body and narrow neck gives beginners a clear surface to see how two glazes interact. The soft lavender base combined with white creates horizontal streaks that show natural flow and subtle color shifts without needing complex application techniques. This compact shape keeps the glaze as the main feature while still functioning as a holder for single stems or cuttings.
What makes this idea useful is how the streaky finish can be tested first on small tiles before committing to a full piece. The same glaze layering works on slightly taller forms or a set of three vases for a windowsill grouping. For plant styling, the light color and simple shape let flowers or greenery stand out without competing for attention.
Nesting Bowls for Glaze Color Testing
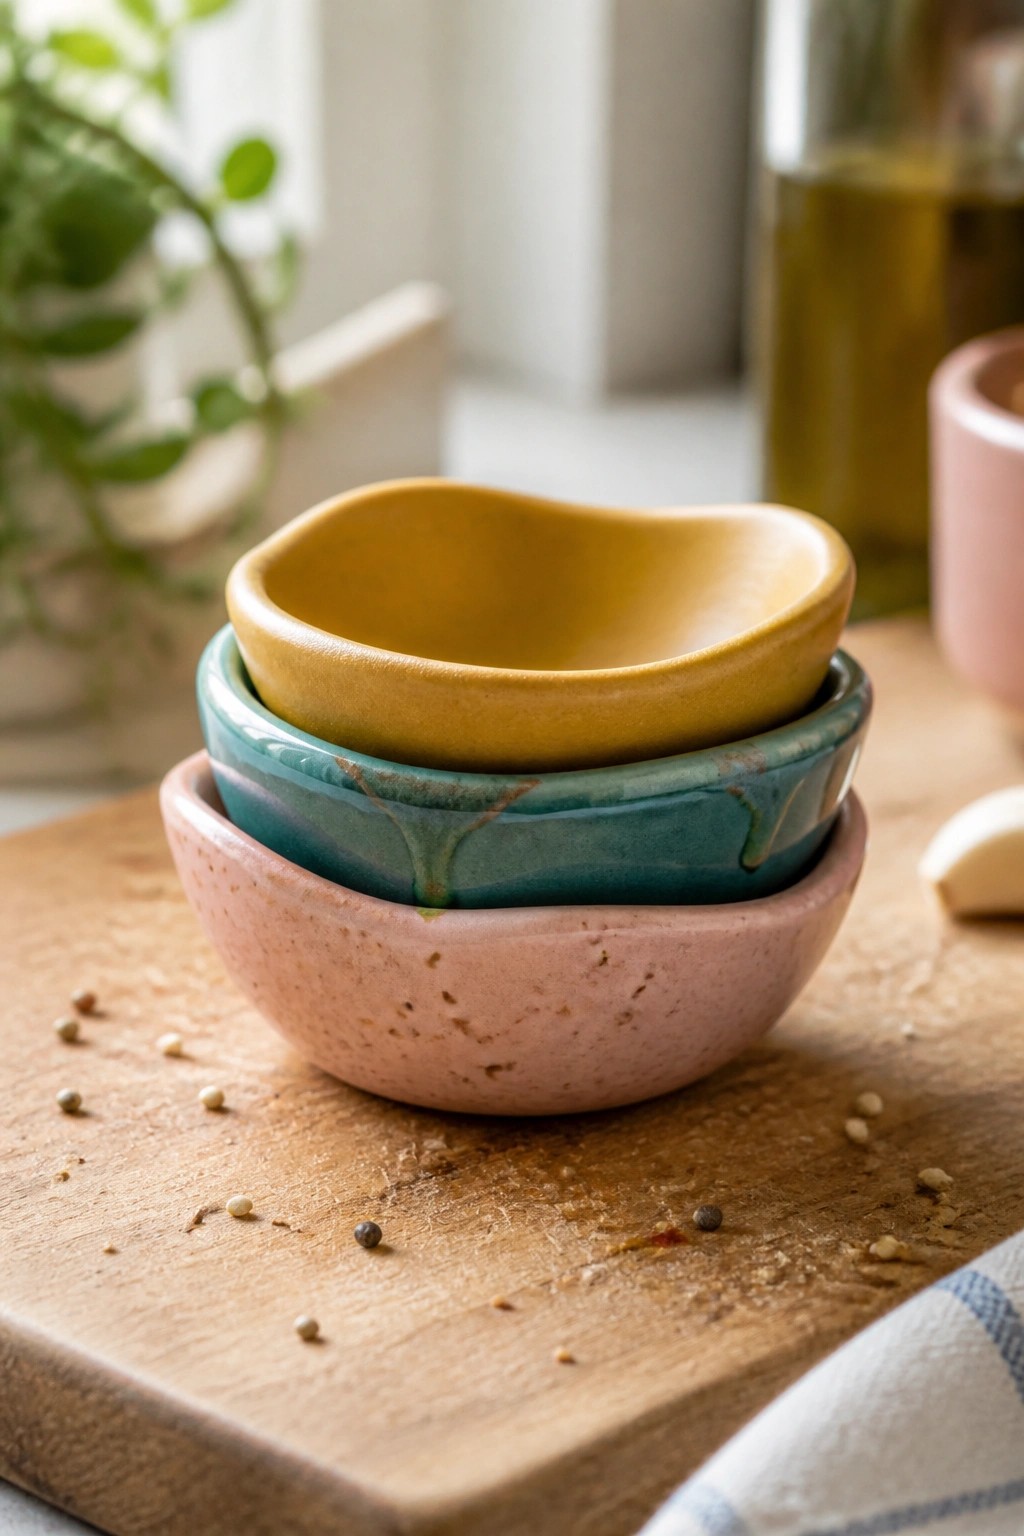
Small nesting bowls let beginners compare glaze colors, finishes, and flow on the same simple form. The bottom bowl shows a speckled matte pink glaze, the middle uses a glossy teal that reveals some dripping and movement, and the top bowl holds a solid mustard yellow. The irregular shapes keep attention on how each glaze settles and interacts. These pieces work as dip bowls or spice holders in the kitchen.
What makes this idea useful is that the small scale lets you fire multiple glaze tests at once without using much clay. You can swap the color order on the next batch or try the same glazes on slightly different shapes to see how the results change. The stacked look also photographs well for sharing results. For a gift, make a set of three or four and tie them with twine.
Mushroom-Shaped Ceramic Tealight Holder

A small mushroom-shaped ceramic piece works as a tealight holder by forming a domed cap with a recessed top and a short stem base. The glossy red glaze covers the cap while the stem stays in a matte white clay finish, creating a clear two-tone contrast that emphasizes the rounded form. This type of candle piece stays compact and sits flat on any surface without extra hardware.
What makes this idea useful is the small scale, which lets you make several in one firing session for gifts or scattered decor. You could rework the same shape into a tiny ring dish or incense holder by adjusting the cap depth. The two-tone glaze keeps the steps basic while still producing a recognizable object that photographs clearly for sharing. In a kitchen or entryway, this form takes up little room but stands out because of its simple silhouette.
Frequently Asked Questions
What basic tools and materials do beginners need to experiment with these glaze ideas effectively?
Start with a few core supplies like measuring spoons, mixing containers, a spray bottle for water, and test tiles made from your clay body. Use commercially prepared glazes or simple recipes with ingredients such as feldspar, silica, and colorants like iron oxide or copper carbonate. Always work in a well-ventilated area and wear gloves to keep things safe while learning color mixing and flow properties.
How can I control glaze flow to avoid runs on vertical pottery surfaces?
Apply glazes in even, thin coats using a brush or dip method, and let each layer dry fully before adding more. Test flow by firing sample pieces at a slight angle to observe behavior. Adjust by adding thickening agents like bentonite if the mixture runs too much, or thin it slightly with water for smoother movement that enhances the desired finish.
What are reliable ways to achieve vibrant colors without overcomplicating the process?
Begin with oxides or stains added in small percentages to a base clear glaze, such as 1 to 3 percent for subtle tones or up to 5 percent for stronger hues. Fire test tiles at your kiln’s target temperature to see true results, and layer a transparent overcoat to boost depth. Keep records of each mix so you can repeat successful color combinations easily.
Which finishes work best when first learning how glazes interact during firing?
Matte finishes tend to be more forgiving for beginners since they mask small application flaws while still showing flow patterns. Start by applying a matte base and then adding a glossy accent in limited areas to study contrast. This approach helps you understand how different surfaces affect color visibility and movement without needing advanced skills.
How should I prepare pieces and test ideas to ensure good results with color, finish, and flow?
Clean bisque ware thoroughly to remove dust, then apply glazes in controlled sections on test tiles first. Fire these samples alongside your main work to preview outcomes. Note details like application thickness and kiln position, which directly influence how colors develop, finishes set, and flow creates patterns.

Pottery Path is my cozy corner of the internet where I share clay ideas, pottery inspiration, and simple projects you can recreate at home. I love exploring everything from air dry clay to handbuilt pottery to cute minis that brighten your day. My goal is to make clay crafting feel easy, fun, and welcoming for anyone who wants to try it.
You will find beginner friendly tutorials, creative pottery painting ideas, and lots of warm inspiration for slow and happy crafting. If you enjoy hands on creativity, this space will feel like home.