Ever found yourself tangled up in a mess of broken strings while trying to tackle those unruly branches in your garden? Frustrating, right? But fear not, because in this article, you’ll discover the simple steps to restring your pole pruner like a pro. Say goodbye to those knotty situations and hello to smooth pruning sessions!
Understanding Pole Pruners
When it comes to pole pruners, they are essential tools for maintaining your garden’s trees and shrubs without having to climb up a ladder. These pruners consist of a long pole with a cutting blade or saw at the end, allowing you to reach high branches safely. If you encounter broken strings while using a pole pruner, understanding how these tools work can help you restring them effectively.
Key Components
- Pole: The main body of the pole pruner that extends to reach high branches.
- Cutting Blade or Saw: Attached to the end of the pole for trimming branches.
- String Mechanism: Enables you to control the cutting blade remotely.
How They Work
- Pulling: When you pull the string, it triggers the cutting blade or saw to make a precise cut.
- Releasing: Releasing the string will retract the blade, ready for the next cut.
String Replacement
To restring a pole pruner:
- Locate the String: Identify where the string is attached to the pole and cutting blade.
- Remove Old String: Carefully detach the old, broken string from the mechanism.
- Measure and Cut New String: Cut a length of the appropriate string to replace the old one.
- Attach New String: Securely tie the new string to the designated points on the pole and cutting blade.
- Test the Mechanism: Pull and release the string to ensure the blade moves smoothly.
- Regular Inspection: Check the strings for wear and tear before each use.
- Lubrication: Apply lubricant to the moving parts to keep the mechanism working smoothly.
- Proper Storage: Store your pole pruner in a dry place to prevent rust and damage.
Tools Required
To restring your pole pruner effectively, you’ll need a few essential tools. Here’s what you should have on hand:
- New String: Make sure you have the correct type of string recommended for your specific pole pruner model.
- Scissors or Wire Cutters: These will be handy for cutting the old string and trimming the new one to the appropriate length.
- Screwdriver: You may need this tool to access and work on certain parts of the pole pruner.
- Safety Gloves: Protect your hands while working with the sharp edges of the pruner and any moving parts.
- Owner’s Manual: Refer to the manual for your pole pruner model for specific instructions and guidelines.
Having these tools ready will ensure a smooth restringing process for your pole pruner.
Removing the Old String
To begin restringing your pole pruner, you first need to remove the old string. Here’s how you can do it effectively:
- Locate the Starting Point: Find where the old string is anchored on the pruner.
- Unwind the Old String: Carefully unwind the old string from the pruner’s spool.
- Inspect for Tangles: Check for any tangles or knots in the old string as you unwind it.
- Cut and Remove: Using a pair of scissors or wire cutters, cut the old string and remove it from the pruner completely.
- Dispose of the Old String: Make sure to safely dispose of the old string to avoid any accidents.
- Clean the Pruner: Before moving on, you may want to clean any dirt or debris that accumulated where the old string was located.
Remember, taking the time to properly remove the old string will set you up for success when restringing your pole pruner with a new one.
Stringing the Pole Pruner
Stringing the pole pruner is a crucial step in the process to ensure smooth operation. Here are the steps to guide you effectively:
- Locate the anchor hole: Find the small hole where the string protrudes. This is where you’ll start the stringing process.
- Thread the new string: Feed the new string through the anchor hole, ensuring it’s secure.
- Wind the string: Rotate the spool in the direction shown on the tool until the string is taut.
- Distribute the string: Pull the string out of the anchor hole, making sure it’s evenly distributed on the spool.
- Secure the string: Lock the end of the string in place according to your pruner’s instructions.
Following these steps will help you effectively string your pole pruner for optimal performance.
| Important Note |
|---|
| Proper stringing is key to ensuring the pole pruner operates safely and efficiently. |
Recommended Products

High-quality PR-20 Tree Pruner rope: Measuring 20 feet long, this product is a sturdy tree pruner rope that is compatible with Jameson Fiskars pruners.
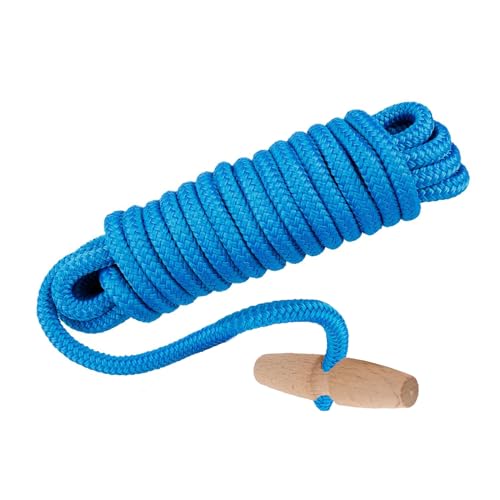
PR-20 Tree Pruner Rope Replacement, for Jameson Fiscar Big Mouth Manual Pole Saw & Tree Pruner,20 feet long with a 5/16 inch diameter(with Wooden Handle)
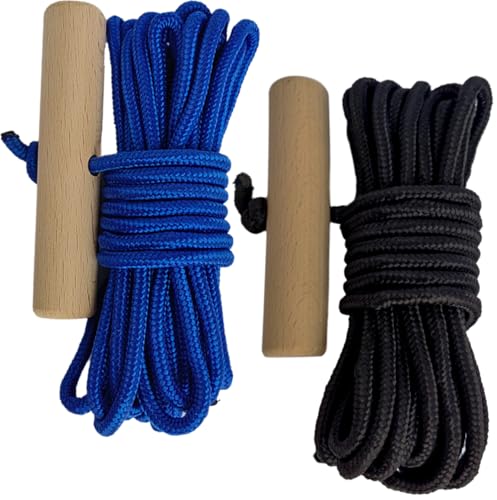
【Practical Tree Pruner Rope】This tree pruner cord replacement for Jameson Fiskars Big Mouth Manual Pole Saw and Tree Pruner is a versatile must-have tool that ensures smooth operation when pruning trees.
Testing the Restringing
When restringing your pole pruner, it’s crucial to test the string tension before fully engaging in trimming tasks. Here’s how you can ensure a successful restring:
- Press the Trigger: Start by pressing the trigger to activate the pruner. If the string rotates properly without tangling or coming loose, you’re on the right track.
- Monitor Rotation: Observe the rotation of the string carefully. It should unwind smoothly without any jerking movements or irregularities.
- Check Stability: Ensure that the string remains secure and doesn’t slip out of place during operation. This stability is vital for safe and efficient pruning.
- Listen for Sounds: Pay attention to any unusual sounds during operation. Unusual noises could indicate issues with the restringing that need to be addressed promptly.
- Regular Inspection: Make it a habit to routinely inspect the string tension and overall condition of the restringing to prevent unexpected malfunctions while working.
- Seek Assistance: If you encounter persistent issues or uncertainties with the restringing process, don’t hesitate to seek guidance from the pruner’s manual or a professional for further assistance.
Keep these testing steps in mind to ensure that your restringing efforts result in a well-functioning pole pruner ready for your trimming tasks.
Conclusion
That’s it! Testing the restringing of your pole pruner is key to ensuring it works smoothly. Remember to check the string tension, monitor its rotation, and listen for any unusual sounds. Regular inspections will help maintain your pruner’s efficiency. If you ever feel unsure, refer to the manual or consult a professional. By following these simple testing steps, you’ll have a well-functioning pole pruner ready for all your trimming needs. Happy pruning!
Frequently Asked Questions
Why is testing the restringing of a pole pruner important?
Testing the restringing of a pole pruner is crucial to ensure proper functionality. By checking the string tension, monitoring rotation, stability, and listening for unusual sounds, users can guarantee effective trimming tasks.
How can I test the restringing of a pole pruner?
To test the restringing of a pole pruner, activate the pruner to check string tension, monitor rotation, and ensure stability. Listen for any unusual sounds during operation and conduct regular inspections for optimal performance.
What should I do if I encounter any issues while testing the restringing of my pole pruner?
If you encounter any issues during the testing process, refer to the pruner’s manual for guidance or seek assistance from a professional to address and resolve any concerns promptly.
I’ve always been drawn to trees.As a kid, I spent most of my free time outside, climbing, exploring, and trying to figure out the names of the trees around me.That early curiosity eventually led me to study arboriculture and horticulture at Michigan State.Later, I completed a degree in forestry at the University of Michigan.
I’ve been working in tree care and education ever since.These days, I enjoy helping people learn more about the trees in their own backyards.How they grow, how to care for them, and why they matter.You don’t need to be an expert to appreciate trees.A little curiosity goes a long way.