
I have been making coil pots for a few years and I still like finding new ways to use the technique.
My latest experiments gave me some ideas that worked well for building different forms.
I wanted to share them here because they helped me practice without needing a lot of fancy tools.
Some of these are quick to try while others need more time to shape and dry.
They all started from basic coils but ended up looking a bit more interesting than my usual pieces.
Ridge-Build Coil Vase

A coil-built vase uses stacked rings of clay to create both height and a repeating horizontal texture. The coils stay visible rather than being smoothed away, so each ridge traps glaze and produces shifts in color and sheen from top to bottom. The result is a tall, narrow vessel that reads as both structure and surface pattern.
The shape does a lot of the work here because the narrow waist and wider base give the piece stability while the stacked coils add visual weight without extra decoration. You can build it in shorter sections if full height feels tricky, then adjust coil thickness to change how much the glaze pools. This style works well as a single-stem holder or a standalone windowsill piece, and the same coil-and-glaze approach scales down easily for smaller bud vases or desk cups. Different glaze combinations on the ridges give you a quick way to refresh the look for new color schemes.
Coil-Built Pitcher with Twisted Handle

A coil-built pitcher starts with stacked ropes of clay that form both the body and a thick twisted handle. The visible horizontal ridges from the coils create a textured surface that holds glaze unevenly, giving the piece depth without added carving. Applying a light glaze on the upper half and a blue glaze on the lower half highlights the coil lines and creates a simple color break. This style works as a kitchen pitcher for serving drinks or as a decorative vessel on a counter.
What makes this idea useful is that the coil texture supplies surface interest so you can spend time on the handle shape instead of surface decoration. The pitcher size fits well for everyday table use or as a plant holder if you skip the pour spout. You could scale the same coil method down for a small creamer or up for a taller vase by changing the number of coils and the handle thickness. The two-tone glaze approach carries over easily to other color combinations if you want to match different room colors.
Coiled Bowl with Painted Botanical Motifs
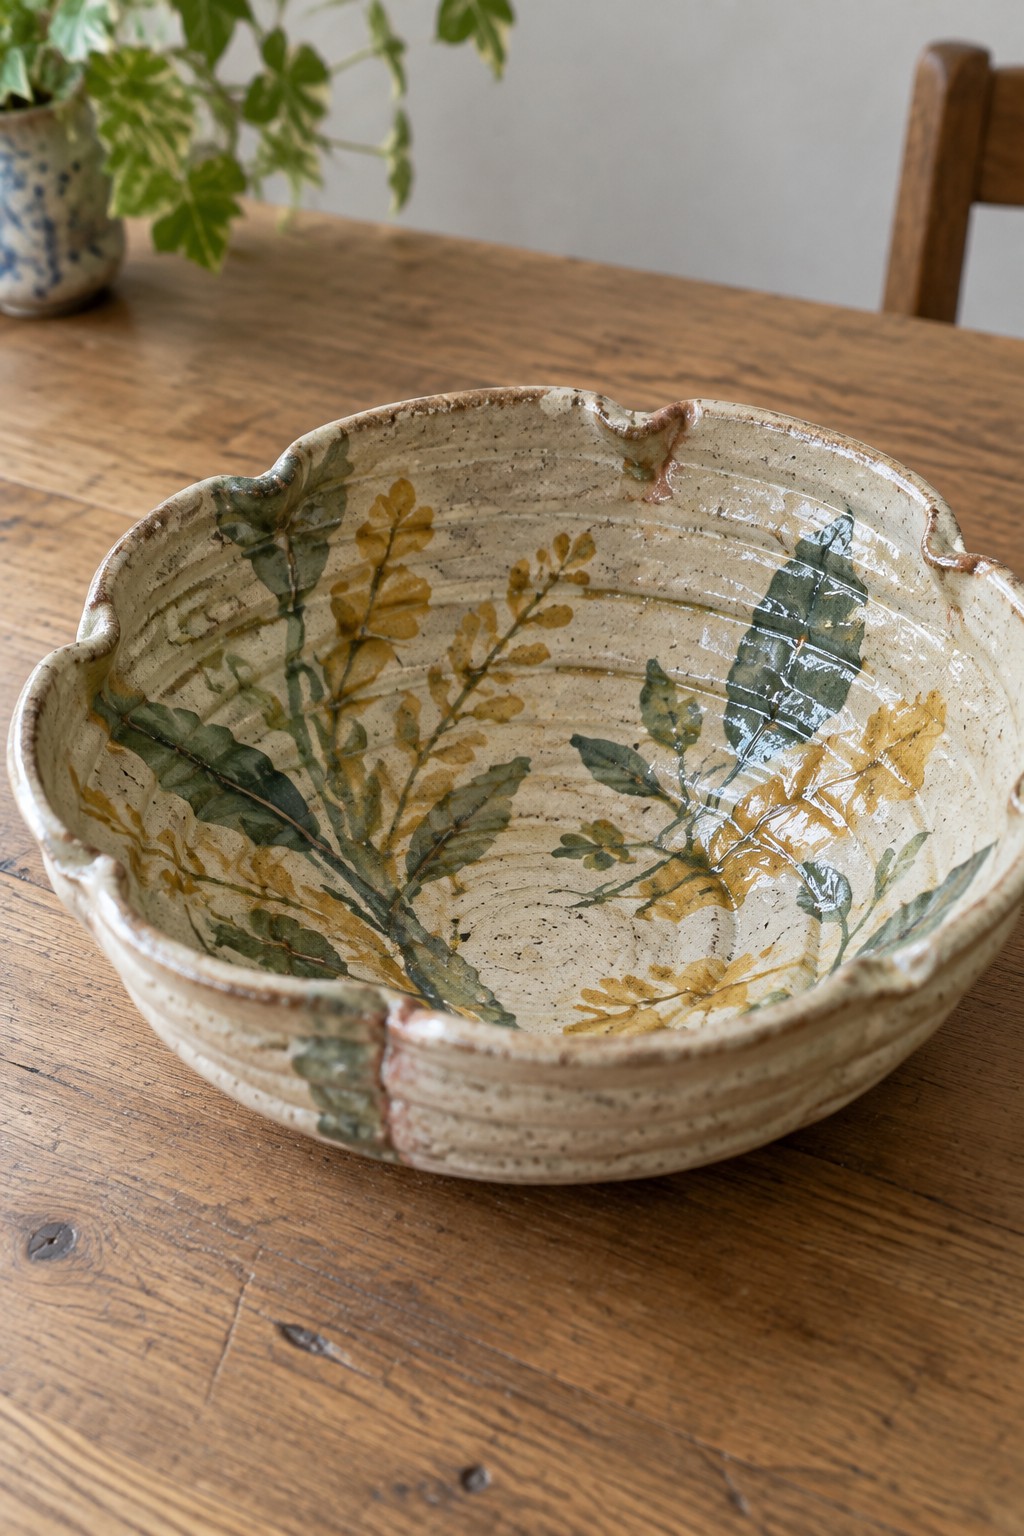
A coil-built bowl with a wavy rim gives you a wide interior surface for loose plant painting. The maker added clusters of leaves and stems in green, yellow, and brown tones across the light clay, letting some of the horizontal coil ridges remain visible. This keeps the form simple while the painted foliage becomes the main feature. The result is a shallow bowl suited for serving or display where the handmade coils and freehand painting work together.
The painted detail helps this stand out because the same motif can be changed to different plants or simplified to just a few stems. You could apply the idea to a smaller bowl for desk use or stretch it across a larger platter. In a kitchen or on an open shelf, the natural colors sit comfortably with wooden surfaces and plants. For a gift, this shape works well because the painting can be personalized without needing complex carving or glazing techniques.
Coiled Planter with Drip Glaze Bands

This planter is built from a basic rounded form with added coils that create raised horizontal bands around the sides. The coils are spaced to form vertical channels where a light green glaze is applied so it runs and pools naturally down the surface. Small pinched feet lift the base and keep the drip pattern from touching the table. The terracotta clay provides a matte background that makes the glossy glaze stand out without any additional painting.
What makes this idea useful is that the coils do the work of guiding the glaze into clean vertical lines. You can scale the same pattern down for a set of smaller succulent pots or widen the spacing for a taller floor planter. The drip effect is easy to recreate with any glaze that moves during firing, and the feet keep the piece practical on furniture. This approach stands out on Pinterest because the texture reads clearly even in small thumbnails.
Coiled Handle Smiley Face Mug

A mug built around a segmented coil handle gives you an easy way to add texture without extra tools. The handle starts as a simple rolled coil that gets pinched into rounded sections while still soft, then attached to a standard mug body. The front carries a quick underglaze face made from two oval eyes, small round cheeks, and a curved smile, all applied before the final glaze. Speckled clay with a light glossy surface keeps the piece looking casual and functional.
What makes this idea useful is that the coil handle can be shortened or lengthened to fit different cup sizes or even adapted into a small pitcher. The painted face takes almost no time once you have the underglaze colors mixed and works on any light clay body, so you can swap it for stars, lines, or initials without changing the form. This shape sits well on a desk or kitchen shelf and still feels sturdy enough for daily use. You could also drop the face entirely and keep just the ridged handle for a cleaner look that still reads as handmade.
Concentric Coil Wall Disc with Patterned Rings

This coil pottery project creates a flat circular disc built from successive rings of clay that radiate outward from a small center spiral. Each ring carries its own impressed texture of dots, lines, or zigzags, and the surface carries a smooth glaze gradient that moves from peach through yellow-green into blue and purple. The finished piece functions as wall decor and hangs from two holes threaded with cord. The ring-by-ring construction makes it easy to add texture and color shifts without needing complex forms or attachments.
What makes this idea useful is that the flat disc shape requires only basic coil joining and lets you test multiple textures and glaze colors on one object. You can scale the same layout down for smaller trivets or up for larger wall pieces, and the gradient works well if you want to blend leftover glazes. The two-hole hanging method keeps it simple to display on any wall. For a variation, swap the outer ring textures for plain coils and add a single carved motif in the center instead.
Spiral-Notched Yarn Bowl

A yarn bowl shaped from clay includes a wide, rounded form with a spiral notch cut into one side. The notch guides yarn out of the bowl while the rest of the ball stays contained during knitting or crochet work. The deep teal glaze and brown rim create contrast that highlights the spiral detail without extra decoration. The textured surface on the outside adds grip so the bowl stays put on a table.
What makes this idea useful is how the notch solves a common problem of yarn rolling away. You can adapt the same bowl shape for different crafts by changing the notch size or skipping it entirely to make a plain storage bowl. In a craft space or living room, the compact form keeps supplies organized without taking much room. The design also translates easily to a small desktop catch-all or a holder for charging cables if you adjust the opening.
Leaf-Shaped Ring Dish
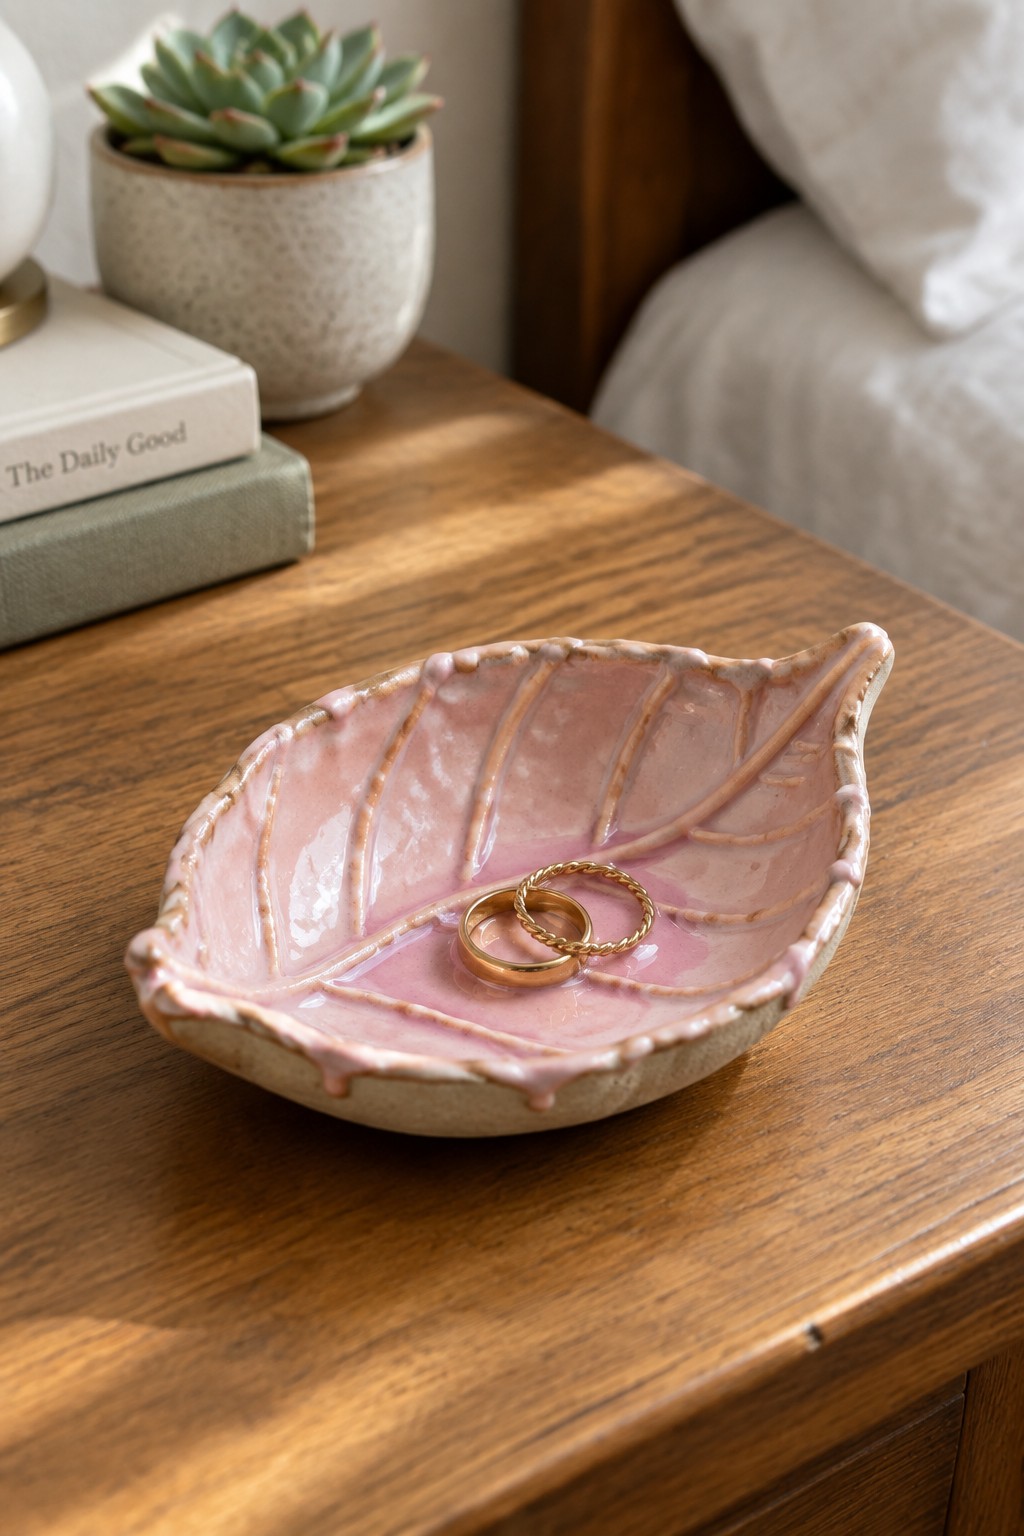
A coiled leaf dish forms a small, shallow tray that works as a ring holder or jewelry catch-all. The leaf shape comes from flattening coils into an oval then pinching or carving vein lines across the surface. A glossy pink glaze with brown pooling along the edges and veins gives the piece clear definition and a finished look without extra decoration.
The small scale makes this easy to adapt into a soap dish, tea bag rest, or desk tray for paper clips. You can swap the glaze color or try a different leaf outline to match a room’s palette or make a matching set for multiple uses. In a bedroom this shape keeps rings visible and contained without needing much surface space.
Wavy Ceramic Spoon Rest

A spoon rest formed from clay gives you a stable place to rest cooking spoons without marking up the stovetop or counter. The elongated curved shape supports both the handle and the bowl of the spoon while the incised lines create subtle texture that shows through the running brown glaze. This kitchen item keeps utensils handy during cooking and catches drips along its length.
The extended form makes it practical for daily use because it handles full-size spoons without tipping. You could shorten the shape for smaller utensils or switch the glaze colors to match your existing dishes. The carved surface details also translate easily to other kitchen pieces like a small tray or a set of matching salt and pepper holders.
Coil Built Multi Opening Holder

This coil built holder is a tall cylinder formed by stacking and smoothing coils to create a series of horizontal ridges around the body. Four small openings on top are lined with a contrasting blue glaze while the rest of the piece uses a speckled beige glaze. The form works as a bathroom item that keeps multiple small tools or brushes separated and upright. The visible coil lines give the surface texture and break up the height so the shape feels balanced rather than plain.
What makes this idea useful is how the same stacked coil method can be adjusted for fewer or more openings depending on what you need to store. A piece like this works especially well on a bathroom counter or near a sink where daily items need to stay organized. You could rework the idea into a desk pen holder by changing the glaze to a single solid color or shorten the height to make a smaller ring dish version. The clear coil texture also gives beginners a simple way to practice even joins while still producing something functional.
Coiled Cat Planter

A coil-built planter with a sculpted cat head creates a functional plant holder that doubles as a simple animal figure. The pot body is formed by stacking coils into even ridges that give the piece both structure and texture. The cat head sits directly on top, with basic painted features for the eyes, nose, whiskers, and cheeks that define the shape without extra carving. This idea combines a standard planter form with a hand-sculpted topper to add a recognizable animal element.
The coil ridges make the construction straightforward while still producing a finished surface that holds up visually next to other pots. You can change the head to a different animal or adjust the coil spacing to alter the height and proportion. Painted details on the face let you customize the look quickly with underglaze or acrylic after firing. This shape works especially well for small trailing plants where the vines can drape over the coiled sides.
Split Glaze Ridge Bowls
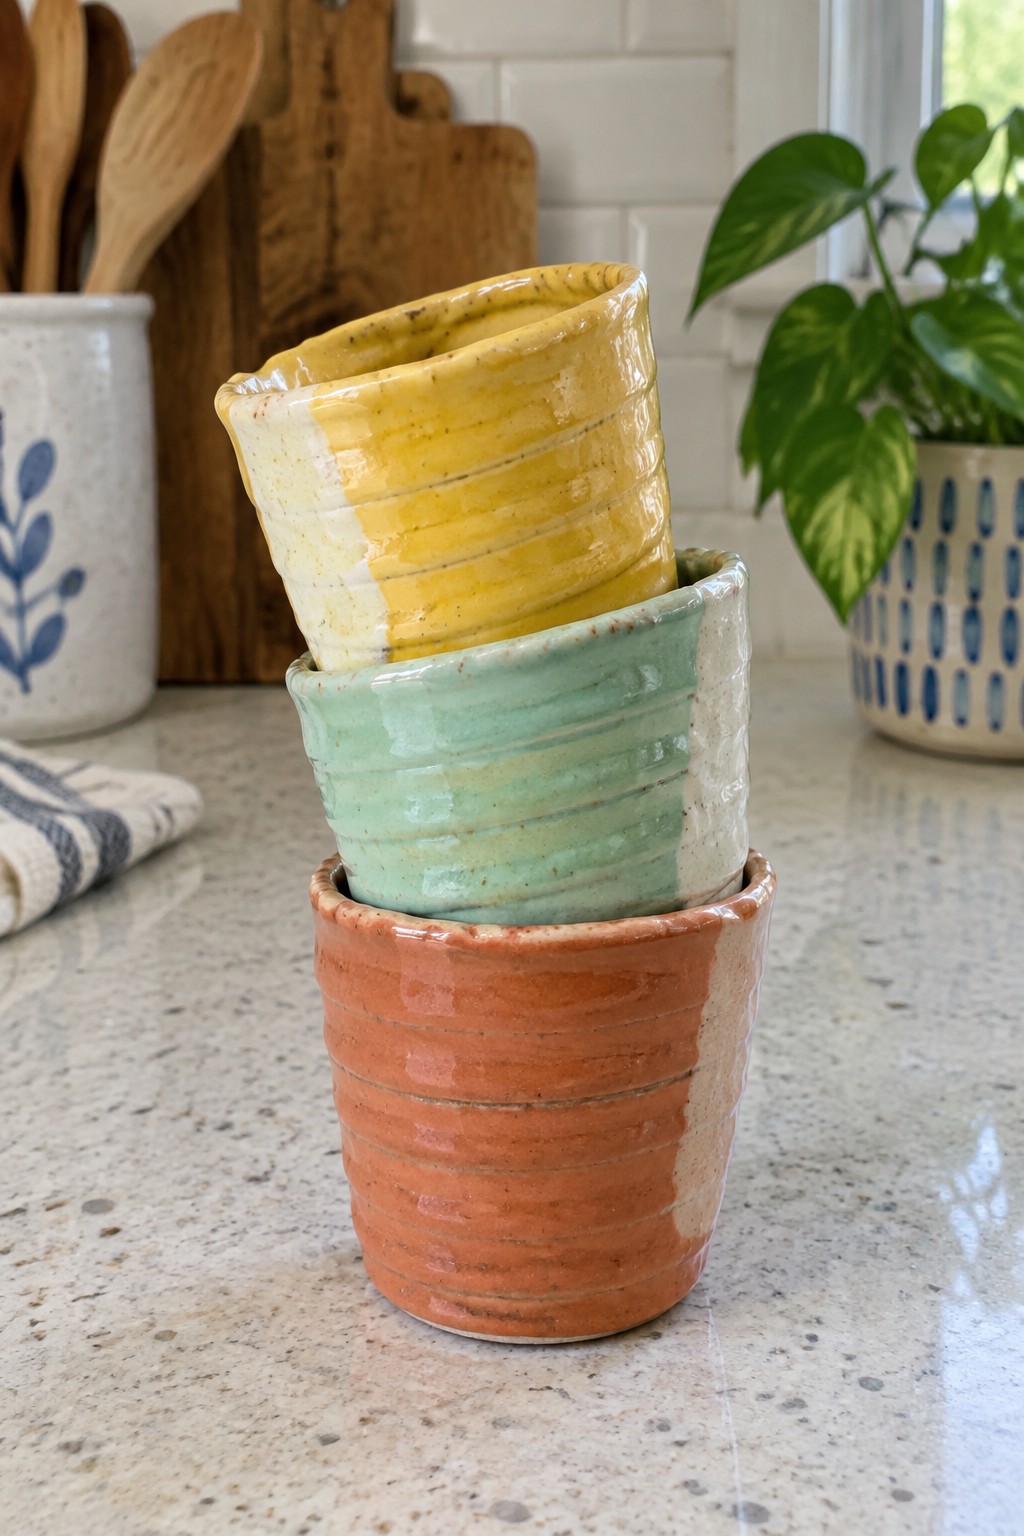
Make a set of small nesting bowls by adding horizontal ridges to the exterior walls during forming. Apply glaze to roughly half of each bowl so the speckled clay body remains visible on the other side. The three bowls stack together easily and use color changes to keep the set visually distinct while sharing the same ridged surface.
The shape does a lot of the work here because the ridges give each bowl grip and the split glaze creates contrast without extra decoration. These bowls work well on open kitchen shelves or as small prep bowls since they take up little space when stacked. You can adapt the same ridge and half-glaze idea to taller cylinders or wider plates by keeping the same two-tone placement.
Stacked Coil Candle Holder with Perforated Walls

A candle holder formed from stacked clay coils creates a short cylinder with visible ridges and open gaps between each layer. Small holes punched through the coils let light from a tea light escape in scattered points across the surface. The glaze mixes muted greens and browns with a lighter crackled rim that catches extra light when the candle is lit. This method turns simple coil building into a working light diffuser without needing additional tools or attachments.
What makes this idea useful is how easily the coil height and hole placement can be changed to suit different tea light sizes or room needs. You can space the holes closer together for more light or leave sections solid for a heavier look. A piece like this works especially well on a nightstand or desk where you want low ambient light. The same stacking approach can be shortened into a small ring dish or widened into a larger votive holder by adjusting the base diameter.
Rectangular Ceramic Tray with Beaded Rim

A rectangular ceramic tray with a raised beaded border gives you a stable, contained surface for serving food. The green speckled glaze on the rim creates a clear visual frame while the lighter center keeps attention on whatever you place inside. This shape works well as a kitchen tray because the edges help hold items in place during carrying.
What makes this idea useful is how the beaded detail adds grip and structure without extra hardware. You could scale the same rim treatment down for a smaller cheese board or switch the glaze color to match different kitchen styles. In a kitchen, this kind of piece keeps toast, fruit, and pastries organized on the table and can move straight into the dishwasher afterward.
Coiled Bowl with Painted Blue Interior

A coil-built bowl gives you visible horizontal ridges on the outside that add texture without extra tools. The interior uses a wide blue rim and simple brushwork of repeating leaf shapes to create contrast against the natural clay. This keeps the form straightforward while letting the painted pattern emphasize the bowl’s round shape and depth.
What makes this idea useful is how easily the brushwork adapts to other colors or motifs if you want a matching set. The medium size works well as a chip bowl, small salad server, or kitchen catch-all. You could rework the same coil base into a wider platter or shorten the walls for a shallow ring dish while keeping the painted rim detail.
Joined Double Salt Cellars

A double salt cellar built by joining two small clay cylinders creates a single piece that holds both salt and pepper in one compact form. Horizontal ridges wrap around each cylinder while a small circular indent sits on the lower half of each bowl. One side uses a blue glaze and the other a yellow glaze so the two sections stay easy to tell apart. This kitchen item keeps the focus on simple function with a clear color split and textured surface.
What makes this idea useful is the connected shape that stops separate dishes from sliding around on a table. The small scale works well for everyday kitchen use or as a gift that fits on most counters. You could adapt the same joined form by changing the glaze colors, adding a third section, or turning it into a double dip server. The ribbed texture also gives a better grip when moving the piece from cabinet to table.
Spiral Coil Tall Vase

A tall narrow vase formed from coils twisted around the body produces a raised spiral texture that catches light and adds movement to the surface. The tapered shape and mottled green glaze keep the focus on the coil work rather than on added decoration or color patterns. This project sits in the vase category but uses the construction method itself as the main visual element, making it suitable for single stems or small bunches.
The shape does a lot of the work here because the vertical twist guides the eye and lets a single flower read clearly without competing elements. You could scale the same twisting coil method down to shorter bud vases or widen the base slightly for a more stable desk version. In a bright window spot the raised coils pick up highlights, so the piece works well as a simple seasonal accent that does not require much space. For a gift, the same form could be finished in a different glaze color to match a recipient’s kitchen or living room palette.
Coiled Utensil Holder with Cutout Bands

A coil-built cylindrical holder organizes kitchen utensils while serving as a functional countertop piece. Stacked bands of leaf-shaped cutouts create a repeating openwork pattern that adds texture without extra surface decoration. The speckled beige glaze keeps the focus on the form and cutouts rather than bright color.
The tall shape holds a full set of spoons, spatulas, and whisks upright in one spot. You can change the coil diameter at the base to turn the same stacked-band idea into a shorter planter or a wider desk organizer. Cutting simpler oval or diamond shapes instead of detailed leaves reduces carving time while preserving the layered effect. This style stands out in kitchen photos because the negative space gives it visual weight without needing extra glaze layers.
Ridged Ceramic Soap Dish

A round ceramic soap dish with parallel ridges across the base keeps a bar of soap elevated so water drains away instead of pooling. The green glaze and brown rim give the piece a finished look while the short feet underneath add extra airflow. This turns a simple tray into a dedicated holder that works on any sink or shower ledge. The compact size fits standard bar soaps without wasting counter space.
What makes this idea useful is how the built-in ridges solve a common problem without extra parts. You can adapt the same footed shape for a sponge holder or small scrub pad tray by widening the grooves slightly. Swap the glaze color to match bathroom tiles or kitchen counters, or add a matte finish on the ridges for better grip. The design stays practical for daily use and translates easily to other small wet-area items.
Mushroom Incense Holder

A ceramic mushroom incense holder uses a domed cap with a central hole for stick incense and a small attached dish at the base for cone incense. The cap is built with layered rings finished in a reddish-brown glaze and dotted with white spots, while the stem carries a speckled surface with simple painted flowers and scattered dots. This form keeps both incense types contained while the graphic spots and motifs give the piece clear visual definition against the clay body.
What makes this idea useful is the dual function built into one compact shape. The small scale fits easily on a shelf or desk without taking much space, and the same mushroom form could be reworked into a tiny planter or candle holder by changing the top opening. You could simplify the dots into a single color or swap the flowers for geometric lines to match different rooms. The painted details also translate well to photos, which helps the project stand out when shared online.
Coiled Hanging Planter with Rope Loops

A hanging planter built from stacked clay coils creates a ribbed surface that holds glaze in the recessed lines. Three small looped handles near the rim let thick rope pass through for suspension while keeping the pot balanced. The glaze mixes a reddish brown base with turquoise that pools along the coils for added contrast.
The coil texture does a lot of the work here by giving the surface interest without added carving. A piece like this works especially well as a window display for trailing plants. You could simplify the loops into simple holes or swap the glaze colors to fit a different room. For a gift this shape stands out because the hanging method stays straightforward while the texture adds detail.
Coiled Teapot with Ribbed Texture

A coil-built teapot uses stacked coils to create both the body and the lid, leaving visible horizontal ridges that catch glaze. The earthy green and brown glaze pools in the grooves while leaving higher areas lighter, which emphasizes the handmade construction. The lid knob is formed from a small coiled spiral that matches the body texture. This approach turns a basic functional object into a clear example of coil pottery used for a kitchen item.
What makes this idea useful is how the coil ridges do most of the visual work without extra carving. You can adapt the same stacking and glazing method to make matching mugs or a creamer to go with the teapot. The shape sits well on a kitchen counter or table and still functions for actual use. For a simpler version, try the same coil technique on a shorter, wider planter or a small pitcher where the ridges will show through a single glaze color.
Frequently Asked Questions
What basic supplies do I need to try the coil pottery ideas in the article?
Start with a good supply of clay suited to hand building, such as stoneware or earthenware that has some grog for strength. You will also want a work surface like canvas or wood, a set of wooden or plastic ribs for smoothing, a needle tool for scoring, slip for joining, and basic measuring tools like a ruler or calipers. Keep a spray bottle of water handy to prevent drying and have access to a kiln or firing service for the final step.
How can I keep my coil pieces from cracking as they dry?
Build in even layers and score plus slip every join thoroughly before adding the next coil. Cover the work with plastic between sessions to slow drying and avoid direct heat or drafts. Once the piece reaches leather hard, turn it regularly and allow it to dry slowly over several days. If cracks appear, repair them immediately with slip and small coils before they widen.
Which ideas from the list work best for someone moving past beginner level?
Look for projects that combine coils with added elements like handles, lids, or textured surfaces. Ideas that involve taller forms or irregular shapes push your control of wall thickness and balance. Start with one that includes a simple base and then add decorative coils on top so you practice both structure and creativity at once.
What steps should I follow to finish and fire coil pottery safely?
Let the piece dry completely to bone dry before any bisque firing. Apply underglazes or slips for color if desired, then bisque fire to the clay’s recommended temperature. After the first firing, add glaze in thin even coats and fire again at the proper glaze temperature. Always check your kiln manual and use proper ventilation during firing.
How do I adapt the 22 ideas if I only have a small workspace or limited clay?
Scale down the designs by reducing coil thickness and overall height while keeping the same shapes. Work on a small board that can be moved easily and cover pieces with damp cloths when not in use. Focus on one or two projects at a time and use reclaimed clay scraps for practice coils so you do not waste material.

Pottery Path is my cozy corner of the internet where I share clay ideas, pottery inspiration, and simple projects you can recreate at home. I love exploring everything from air dry clay to handbuilt pottery to cute minis that brighten your day. My goal is to make clay crafting feel easy, fun, and welcoming for anyone who wants to try it.
You will find beginner friendly tutorials, creative pottery painting ideas, and lots of warm inspiration for slow and happy crafting. If you enjoy hands on creativity, this space will feel like home.