
I’ve tried making a few coil projects with air dry clay at home and found it easier than I expected for someone without much pottery experience.
It works well if you want to build basic shapes like bowls or trays without special tools or a kiln.
Most of these ideas came from things I tested myself on weekends when I had a bit of free time.
They don’t require perfect technique and the clay is forgiving if your coils aren’t all the same size.
I gathered 23 of the ones that turned out reliably for beginners like me.
Coiled Mug with Two-Tone Rim

A coil-built mug starts with ropes of clay stacked and smoothed just enough to hold the shape while leaving the horizontal ridges visible. The upper section gets a solid color while the rest stays speckled and light, creating a simple block of contrast at the rim. This approach gives you a functional drinking vessel that still shows the coil lines clearly instead of hiding them under heavy smoothing.
What makes this idea useful is that the ridges add grip without extra tools or stamps. You can change the rim color or height to make espresso cups, larger soup mugs, or even small vases using the same coil method. In a kitchen, the two-tone finish helps the mug stand out on a shelf next to plain stoneware. For gifts, swap the rim color to match different kitchen palettes or try a second band of color lower on the body.
Lemon Painted Coil Bowl
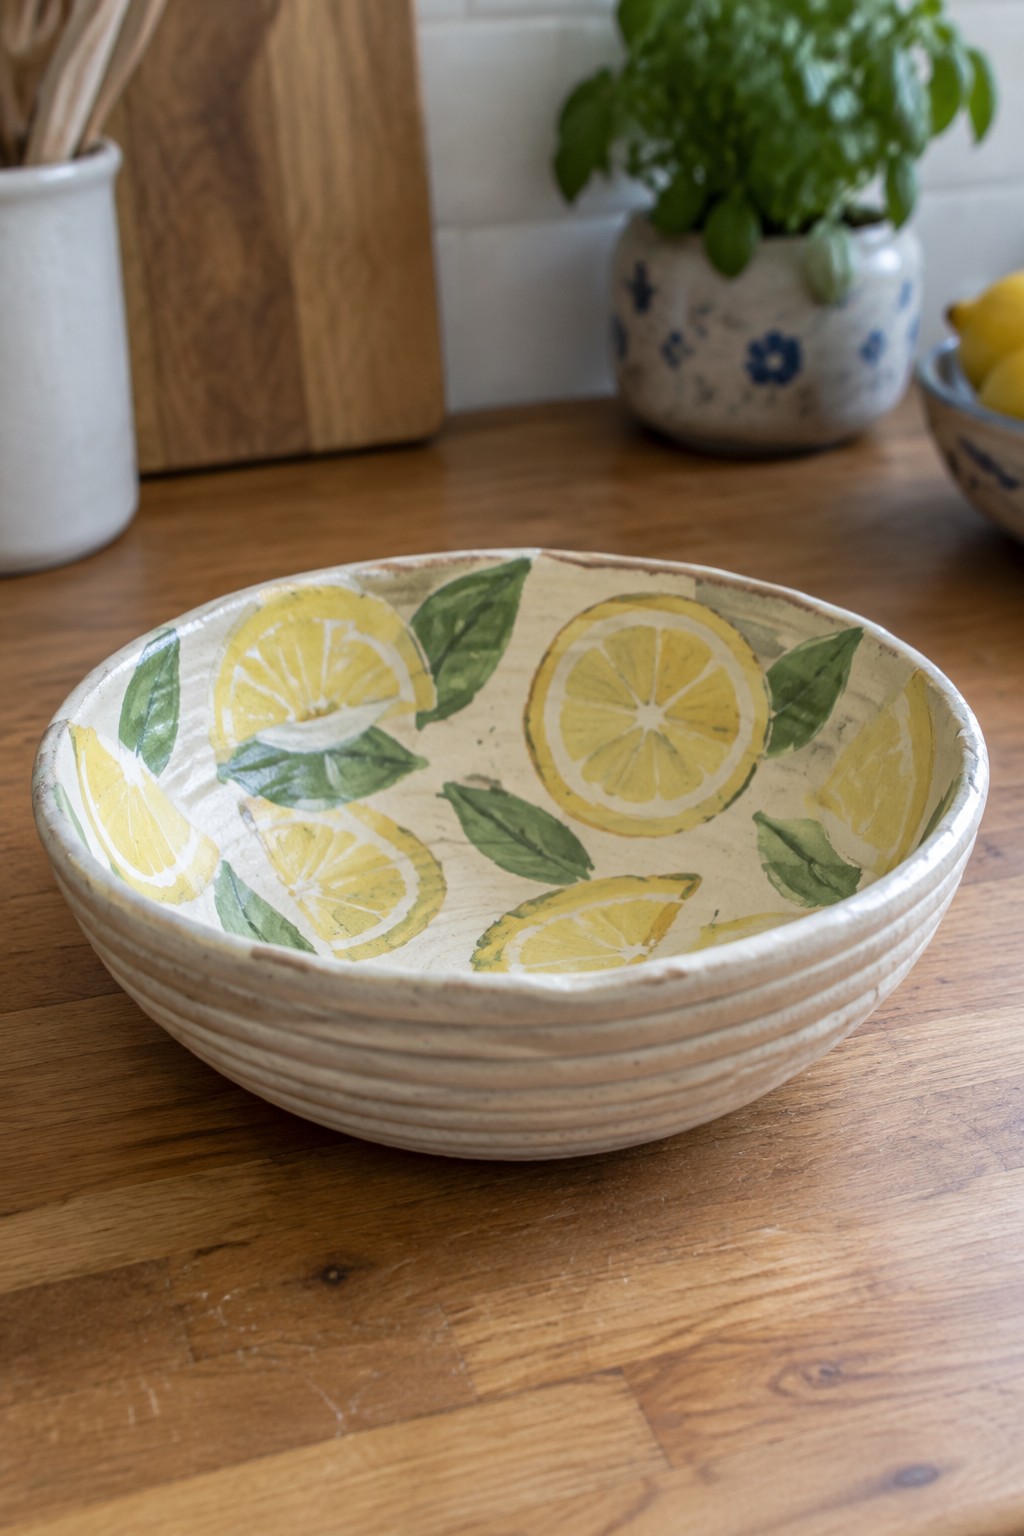
A wide, shallow bowl built from coils gives you a simple form that works well for serving or display. The outside keeps the ridged texture from the coils while the inside offers a smooth surface for painting yellow lemon slices and green leaves over a light base. This approach keeps the project beginner-friendly since the coils define the shape and the painted citrus motif adds the main visual interest without complex carving or glazing.
What makes this idea useful is how easily the lemon design can be swapped for other fruits or leaves depending on the season or kitchen colors. The shape works especially well on a countertop for holding produce or as a small serving piece. You could adapt the same coil method and painting style to make matching smaller bowls or a low tray using the same motif.
Cat-Shaped Coil Planter
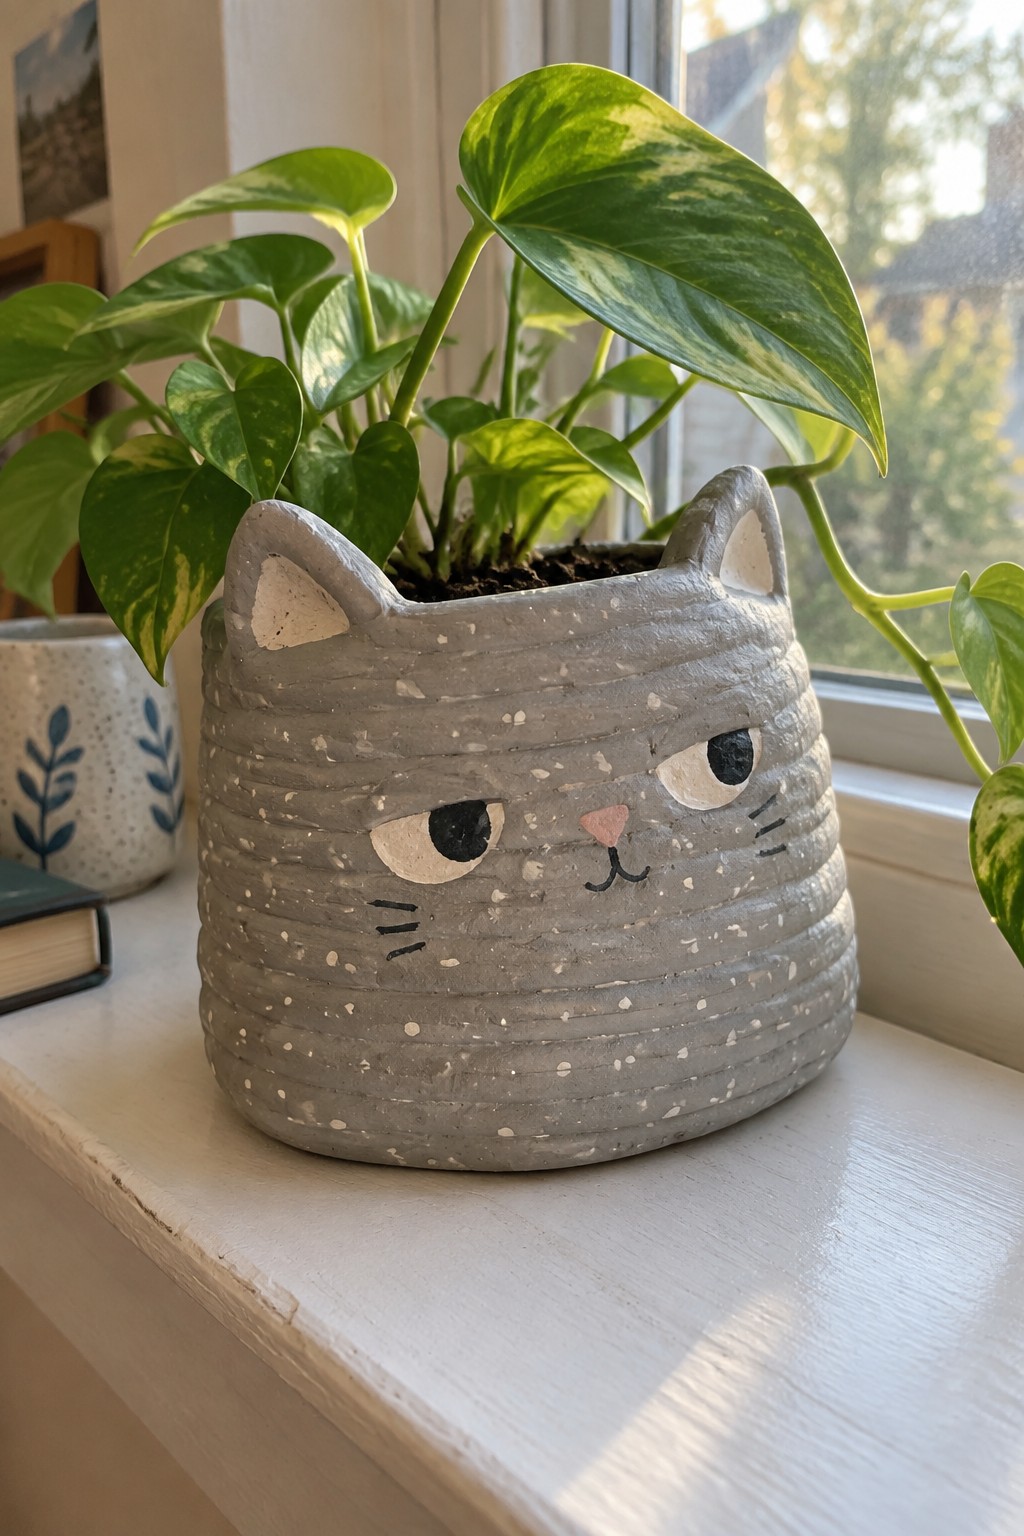
A coiled clay planter built as a cat head turns a simple pot into a themed holder for small houseplants. The form comes from stacking and smoothing coils into a rounded body, with separate pieces added for the ears and a painted face using basic shapes for eyes, nose, and whiskers. The speckled gray finish and horizontal ridges give it a handmade texture that still reads clearly as a cat without needing complex sculpting.
The shape works especially well on a windowsill or narrow shelf where a trailing plant can spill over the rim. You can adapt the same coil method to other animal faces or change the paint colors to match different rooms, and the compact size keeps clay use low while still giving the plant room to grow. For a gift, the face details make it easy to customize without changing the overall construction.
Stacked Coil Rectangular Tray
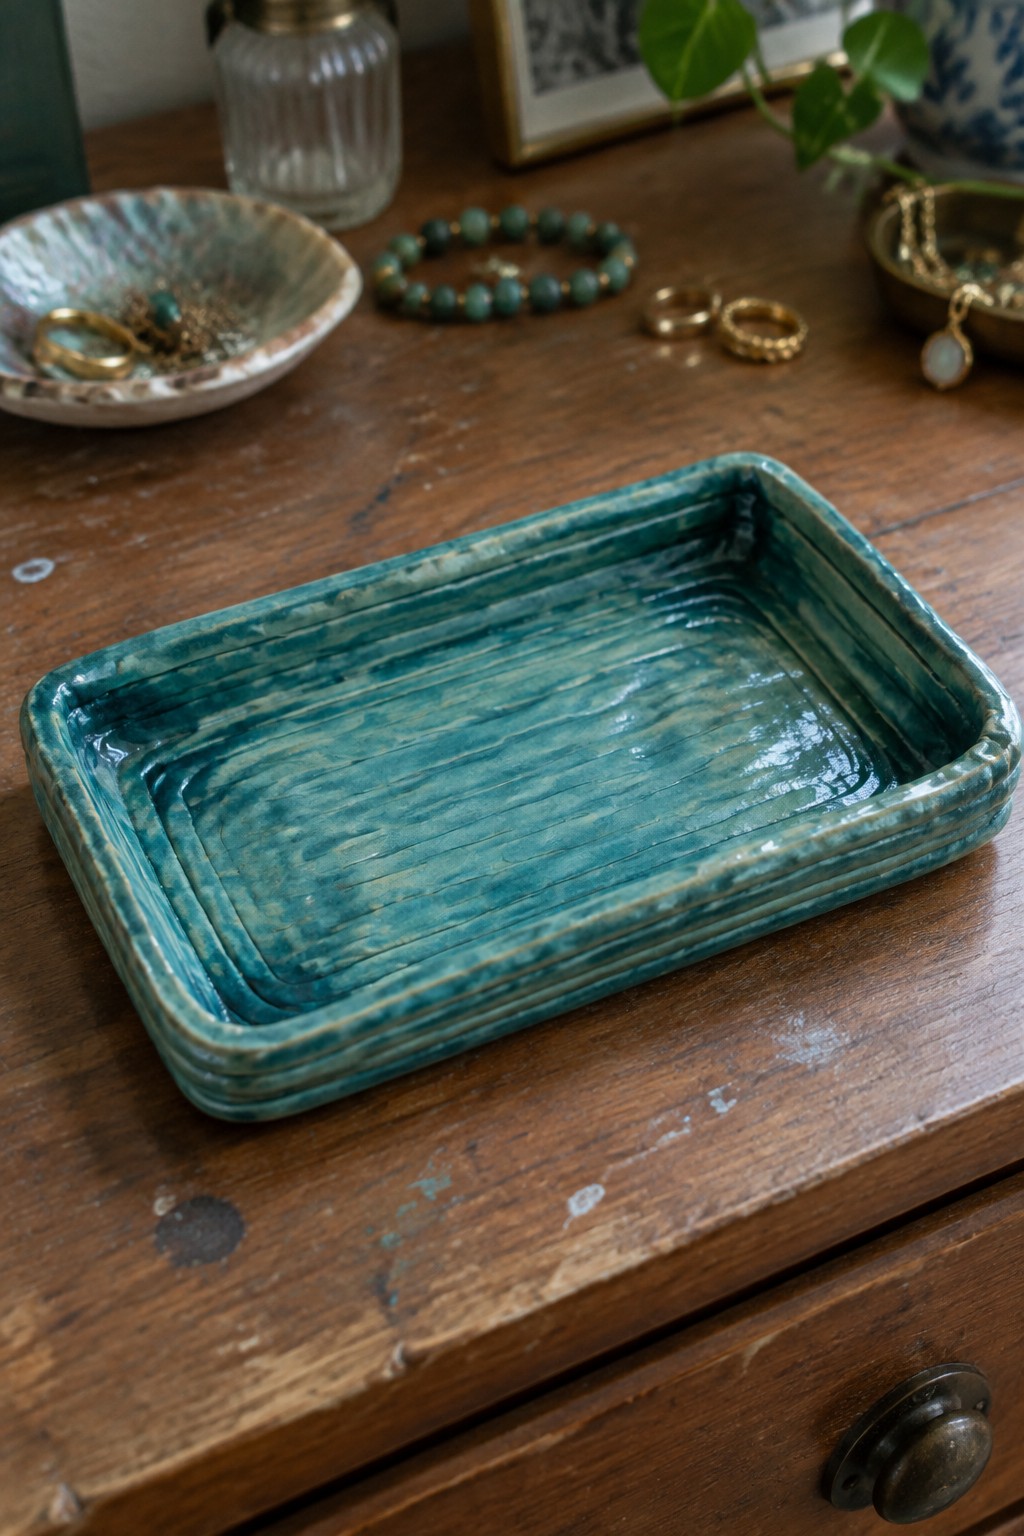
A rectangular tray formed from stacked coils creates a shallow dish with raised layered sides and a textured base. The coils are left visible along the rim to form a stepped edge while the interior shows horizontal ridges that catch light and glaze. A mottled teal glaze covers the surface and settles into the handmade lines. This project belongs in the tray category and works as a small organizer for jewelry or daily items.
The compact rectangle shape is simple to build on a flat surface and needs no special tools beyond basic rolling. You can change the coil thickness or add an extra layer to make deeper sides for keys or loose change. The same stacking method scales easily to a longer version for a bathroom counter or a smaller square for rings. Texture pressed into the base before glazing gives the finished piece clear handmade lines that photograph well for project shares.
Coiled Clay Bird Figurine

A coiled bird figurine uses stacked rings of air dry clay to form the body, with the ridges left visible for texture. Separate pieces for the wings, tail, beak, and feet are attached before the whole shape is painted in a light blue base with scattered dots in darker blue and beige. The small scale keeps the project manageable while still producing a clear animal form. This method fits the decor figurine category and works well for makers who want to practice coiling without building a functional vessel.
What makes this idea useful is that the coils themselves create the rounded body shape with almost no extra carving. You can swap the color palette or dot pattern to match different rooms or try the same coil base for other simple animals like owls or ducks. A piece this size fits easily on a shelf, desk, or windowsill and makes a quick handmade gift. The same construction can be scaled down further or left unpainted for a more natural clay finish if you want to test the technique first.
Coiled Ring Dish With Glazed Center

A coiled ring dish starts with air dry clay rolled into even ropes that are stacked and joined to build a shallow, slightly flared bowl shape. The interior receives a soft pink glaze that pools in the center, while the rim and exterior stay in the natural clay tone to highlight the coil lines. This creates a clear contrast between the smooth glossy well and the textured, matte outer surface. The finished piece stays small enough to sit on a nightstand or vanity without taking up space.
What makes this idea useful is how the coil ridges give the dish built-in texture and visual interest with almost no extra decoration. You can scale the same shape down for a tiny trinket holder or widen it slightly for a soap rest in a bathroom. Changing the glaze color inside keeps the project flexible for different rooms while the natural clay rim stays simple. For a first-time maker the method stays straightforward since the coils do most of the forming work.
Leaf-Shaped Spoon Rest

A leaf-shaped dish made from air dry clay gives you a simple spoon rest that fits right on the counter next to the stove. The form is created by shaping coils into a long, pointed leaf outline, then flattening and smoothing the center to make a shallow well. Vein lines pressed into the surface add clear leaf detail without extra tools. A single green glaze keeps the piece easy to clean and ties the shape together.
The small scale works well for holding one or two utensils while cooking. You can adapt the same outline to make a slightly wider version for a salt dish or a shorter one for a ring holder. Coil building lets you control the rim height and keep the base thin, so the finished piece stays light and stable on the counter. This shape shows up clearly in photos, which helps it stand out if you share the project online.
Coiled Clay Tealight Holder

A coiled clay candle holder builds a compact bowl shape by stacking and smoothing ropes of clay into even horizontal ridges. The form stays low and rounded so it safely contains a small flame while the visible coil lines add surface texture. A simple drip glaze in warm yellow and brown tones runs down the ridges to create contrast without extra decoration. This keeps the project focused on basic coiling and a single glaze application.
The shape does a lot of the work here because the rounded walls and thick base already give it stability on any flat surface. You can make the same holder in different diameters to fit tealights or small votives and change the glaze colors to match your space. The coil texture also translates well to an unglazed finish or a matte paint wash if you want a quicker version. For a gift this size packs easily and works as a desk accent or shelf piece without taking up much room.
Coiled Sun Disc Wall Hanging
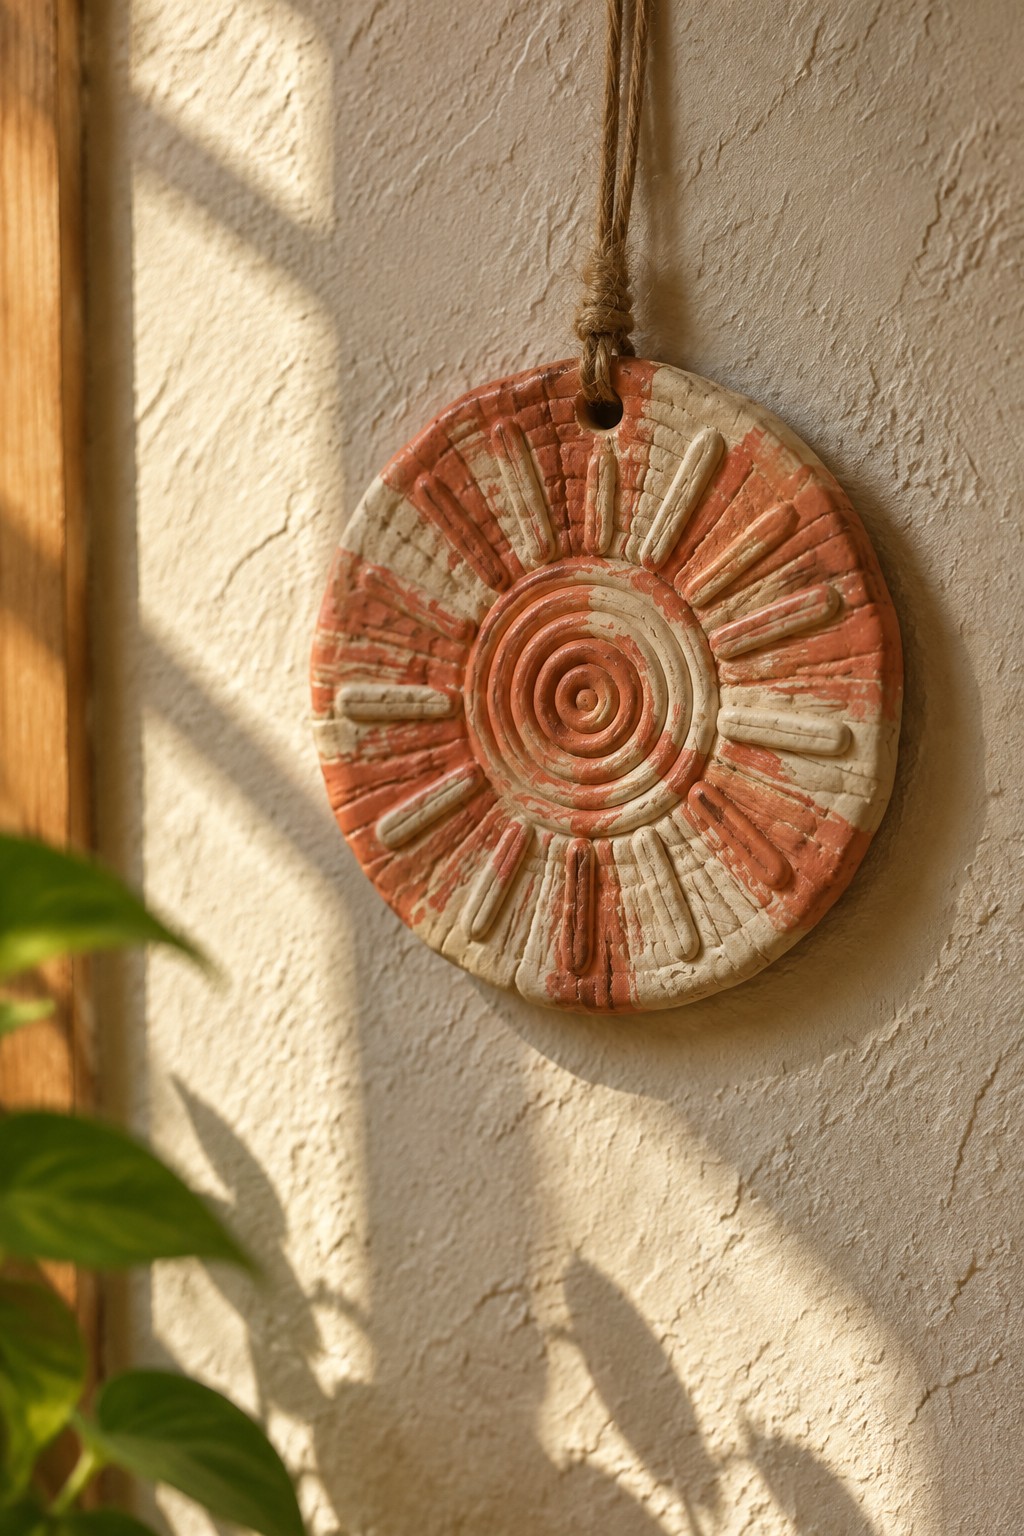
This project forms a flat circular disc from air dry clay using a central spiral coil surrounded by short radiating bars that create a sun motif. The piece is painted in two contrasting colors with the raised clay left partially exposed to emphasize the texture. A hole at the top allows it to hang from cord or twine as a simple wall ornament.
What makes this idea useful is how the flat disc shape works for small decorative accents without taking up shelf space. You could repeat the same coil pattern on a larger scale to make a trivet or skip the hanging hole and turn it into a fridge magnet set. The two-tone paint treatment keeps the focus on the sculpted details and requires no special glazing equipment. For gifts, the motif adapts easily to different color combinations while staying quick to form.
Double Bowl Salt Cellar Made with Coils

A double bowl salt cellar built from air dry clay uses two rounded wells joined side by side by a thick coil connection. The join gives the piece stability while creating a natural handle for moving it around the counter. This layout keeps two seasonings or salts separate but together in one small object, which fits the kitchen item category well. The simple coil construction and soft green glaze let the functional shape stand out without added surface detail.
What makes this idea useful is how the connected form solves the problem of needing two small dishes without taking up extra space. You can adjust the bowl depth or widen the join to turn the same basic plan into a double dip server for snacks. The scale works for everyday table use or as smaller pinch bowls for baking ingredients. For a gift, something like this stands out because it looks finished but requires only basic coiling and smoothing techniques.
Coiled Flower Ring Dish

A ring dish built from air dry clay coils takes the form of a simple five-petal flower. The base is formed by spiraling coils into a shallow well, then extra coils are added and shaped outward to create the petal rim. A marbled purple and white finish with small gold dots covers the surface and highlights the coil lines without covering them completely. This approach keeps the project in the small tray or ring dish category while using the coil structure itself as the main decoration.
The shape does a lot of the work here because the petals give the dish clear edges that keep rings and chains from sliding off. You can change the color mix or try a different number of petals to match other room colors or to make a matching set for earrings. The small scale also means the piece uses little clay and fits easily on a dresser or nightstand without taking up space. For a first coil project, this version shows how the same technique can move from a plain tray to something more distinct with only a few extra shaping steps.
Sectioned Coil Holder for Toothbrushes

A coil-built cylinder with two interior walls creates a simple three-compartment holder that works well as a bathroom toothbrush caddy. The horizontal ridges left by the coils give the surface texture without extra tools, and a single band of colored slip or underglaze near the rim adds a clean accent. The form stays compact so it fits on narrow ledges while the divided sections keep brushes separate and upright.
What makes this idea useful is that the same divided shape can be resized or recolored for other small items like makeup brushes or desk pens. You could leave the rim plain, try a different band color, or make only two compartments if you want a quicker build. This kind of holder takes up little space on a sink or windowsill and uses a modest amount of clay, so it is easy to repeat as a gift or to match different bathroom colors.
Clay Hand Sponge Holder

This project is a hand-sculpted clay sponge holder made to sit on the edge of a sink and grip a dish sponge. The cupped fingers wrap around the sponge to hold it upright while allowing water to drain. The simple brown finish and rounded forms keep the piece looking like a functional kitchen tool rather than pure decoration. It fits the holder category and turns a basic need into something you can shape by hand.
What makes this idea useful is that the finger placement can be adjusted to fit thicker or thinner sponges without any extra parts. In a kitchen, this kind of piece keeps the sponge off wet counters and in one spot so it is easy to grab. You could shorten the fingers to make a version for scrub brushes or add a small ledge at the back for extra stability. The same hand form also works scaled down as a holder for small cleaning tools or even makeup sponges in a bathroom.
Coiled Yarn Bowl with Rim Notch for Feeding Yarn

A yarn bowl formed from stacked coils of air dry clay creates a practical holder that keeps a ball of yarn contained while you knit or crochet. The rounded shape sits low and stable, and a simple notch cut into the rim lets the strand pull out smoothly without rolling away or tangling. The visible coil lines give the surface texture and help the bowl feel finished without extra decoration. This idea sits in the holder category and stays small enough to rest on a couch arm or side table.
The notch shape does most of the functional work here so you only need to focus on keeping your coils level and the rim even. A piece like this works especially well as a quick gift for anyone who works with yarn regularly. You could make the same form smaller for thread or embroidery floss, or add a second notch if you often work with two colors at once. The speckled finish can be copied on air dry clay with a light wash of diluted paint over a base coat, skipping any need for real glaze.
Marbled Blue Creamer Pitcher

A small ceramic pitcher works well as a creamer or milk server when shaped with a simple spout and handle. The blue and white marbled glaze creates soft horizontal streaks that cover the entire surface and give the piece a fluid, handmade look. This style fits the kitchen item category because the compact size stays practical for table use while the glaze pattern provides enough detail on its own.
What makes this idea useful is how the marbled glaze technique can be repeated in other colors without changing the shape. A piece like this works especially well in a kitchen for daily coffee or tea setups, and the same form could be made slightly taller to hold flowers or turned into a small sauce jug. The compact scale keeps the project quick while still producing something functional that stands out in photos.
Painted Coil Napkin Rings

Coiled clay rings painted with stripes or dots create simple napkin rings for the table. The maker rolls out thin coils, stacks them into circles, and lets the clay dry before adding the painted patterns in soft colors. This keeps the form basic while the surface designs give each ring its own look. The finished rings stay compact enough to wrap around a folded napkin without crowding the plate.
What makes this idea useful is how quickly you can make a full set in colors that match your dishes or linens. The painted detail helps this stand out on the table without any fancy shaping. You could rework the same coil base into larger versions for bracelets or smaller ones to hold place cards. In a dining space these rings handle daily use or dinner parties while staying easy to store when not needed.
Coiled Clay Egg Cups

Egg cups built from air-dry clay coils produce a compact kitchen holder sized exactly for a single soft-boiled egg. The coils stack into a slightly tapered cylinder with visible ridges that give the surface grip and visual interest, while the wider base coil keeps the cup steady on a plate. A simple colored glaze or paint finish seals the clay and lets the handmade texture remain visible.
What makes this idea useful is how the same coil count and base shape can be repeated to make a matching set without extra tools. The small scale works especially well as a beginner project that still produces something functional for daily use or weekend brunch. You could shorten the walls to create ring dishes or lengthen them slightly for spice cellars while keeping the same stacking method.
Tapered Coil Vase for Single Stems

A tall, narrow vase formed from stacked coils of air dry clay makes a straightforward project for holding one or two flower stems. The shape tapers gently from a wider base up to a small opening, which keeps the piece stable while letting the flower take center stage. Horizontal ridges from the coiling process give the surface light texture without any added tools or decoration. This approach stays in the vase category and works as a simple decor object that needs only basic shaping and smoothing.
What makes this idea useful is how the slim profile fits on crowded windowsills or narrow shelves where rounder pieces take up too much space. You can adjust the coil height or base width to match whatever flowers you have on hand, or shorten the whole form into a smaller bud vase for a desk. The plain clay color blends with most rooms, so the piece serves as a quiet accent next to books or other plants. The same coiling method can be reworked into a slightly wider version for a small bathroom holder or a set of matching pieces in different heights.
Coiled Clay Cone Ring Holders
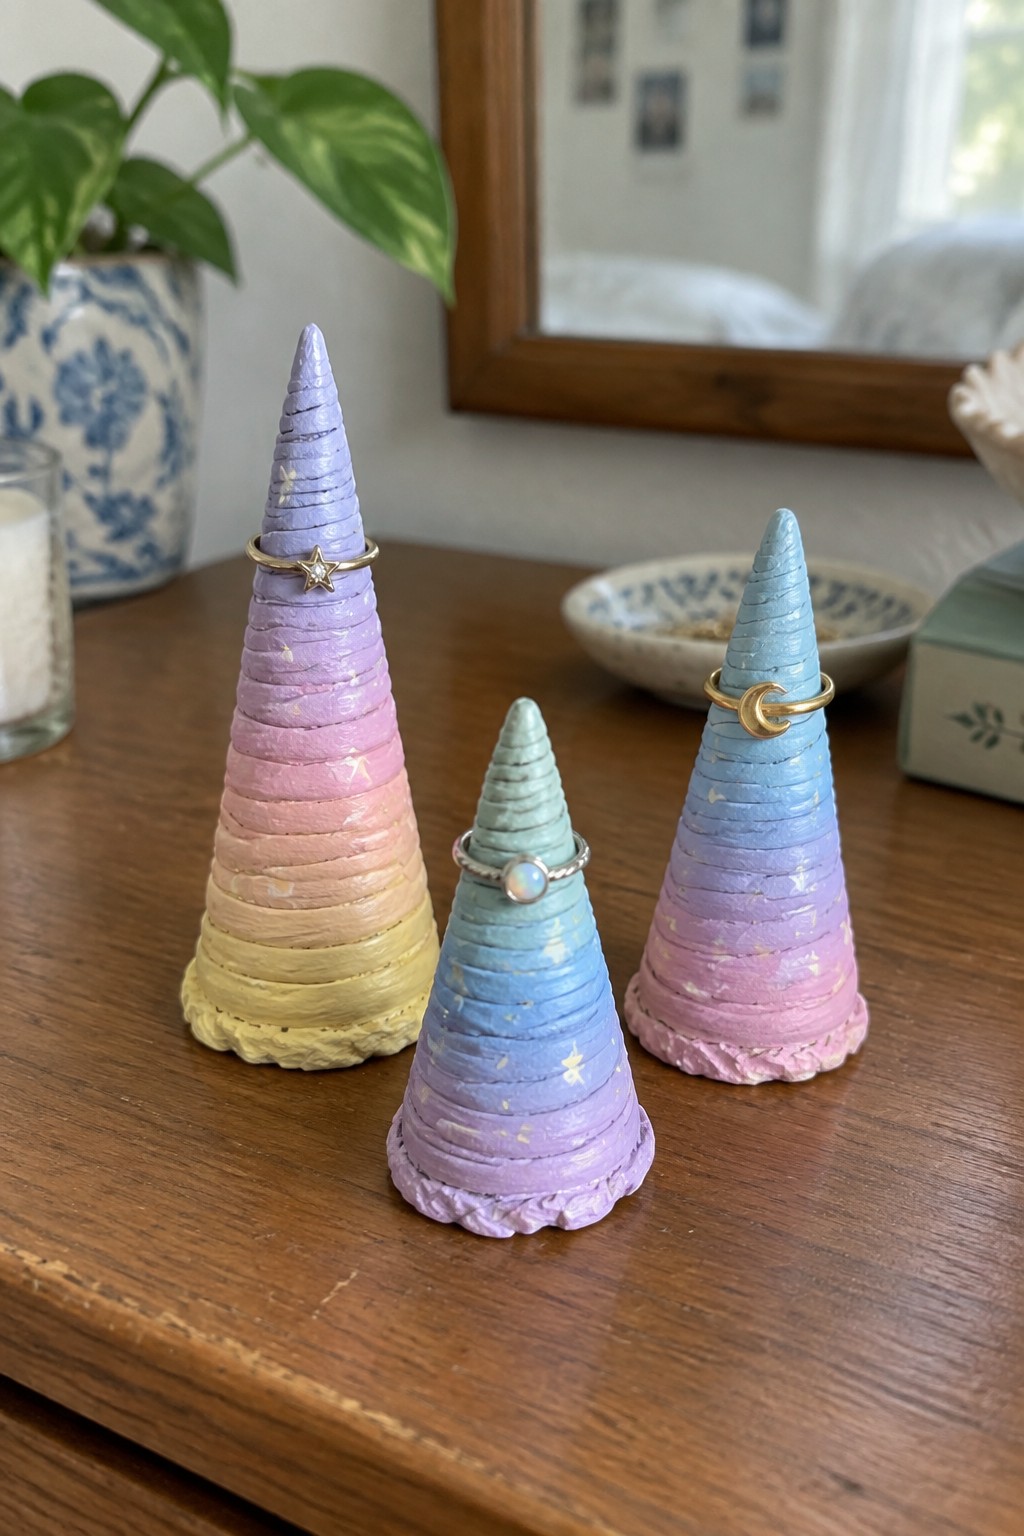
These ring holders are formed by stacking and smoothing coils of air dry clay into tapered cones, then finished with soft gradient paint that shifts through purple, pink, blue, and yellow. Gold speckles brushed over the surface catch the light without covering the coil texture underneath. The narrow top and wider base keep the shape stable for holding rings, and the small overall size makes them easy to place on a dresser or nightstand.
What makes this idea useful is how simple the coil method is to repeat in different heights or widths depending on how many rings you need to store. You can swap the rainbow gradient for solid colors or leave sections unpainted to show the clay. For a gift, something like this fits in a small box and works on any surface without taking up much room. The same cone shape can be adapted into a taller version for necklaces or a shorter one for a desk tray.
Mini Coil Planters with Painted Faces

These small planters are built from air dry clay using basic coil construction, then shaped into rounded or slightly tapered forms before drying. After the clay hardens, simple faces are painted directly onto the surface using acrylics or underglazes, with eyes, mouths, and blush marks added in a few quick strokes. The matte or lightly glazed finishes keep the handmade texture visible while letting the painted details stand out against the clay body. This approach turns a standard small planter into a character piece without needing complex sculpting tools.
What makes this idea useful is that the rounded coil shape gives you a stable base for small succulents while leaving plenty of surface area for the face design. You can scale the same coil method down for tiny desk versions or up slightly for larger windowsill planters. The painted faces work well as a quick personalization step that still looks intentional even if the coils are a little uneven. For gifts, the same base form can be finished with different expressions or left plain and just glazed if you want a faster version without the extra painting.
Ridge Textured Coil Pencil Cup

A coil built cylinder makes a practical desk pencil cup that stands upright without tipping. The stacked coils create even horizontal ridges that give the surface texture and help hide small uneven spots during building. A narrow metallic band adds contrast against the dark clay and keeps the overall look simple. This shape works as basic storage for pens, markers, or small tools.
The shape does a lot of the work here because the tall narrow form fits on crowded desks without using much room. You could leave off the metallic line or change its color to match different room setups. For a first project the size stays manageable and the same coil method scales easily into a shorter cup for paper clips or a wider one for brushes. This kind of holder shows up well in photos because the ridges catch light and the form stays clean.
Coiled Clay Soap Dish with Drainage Bars
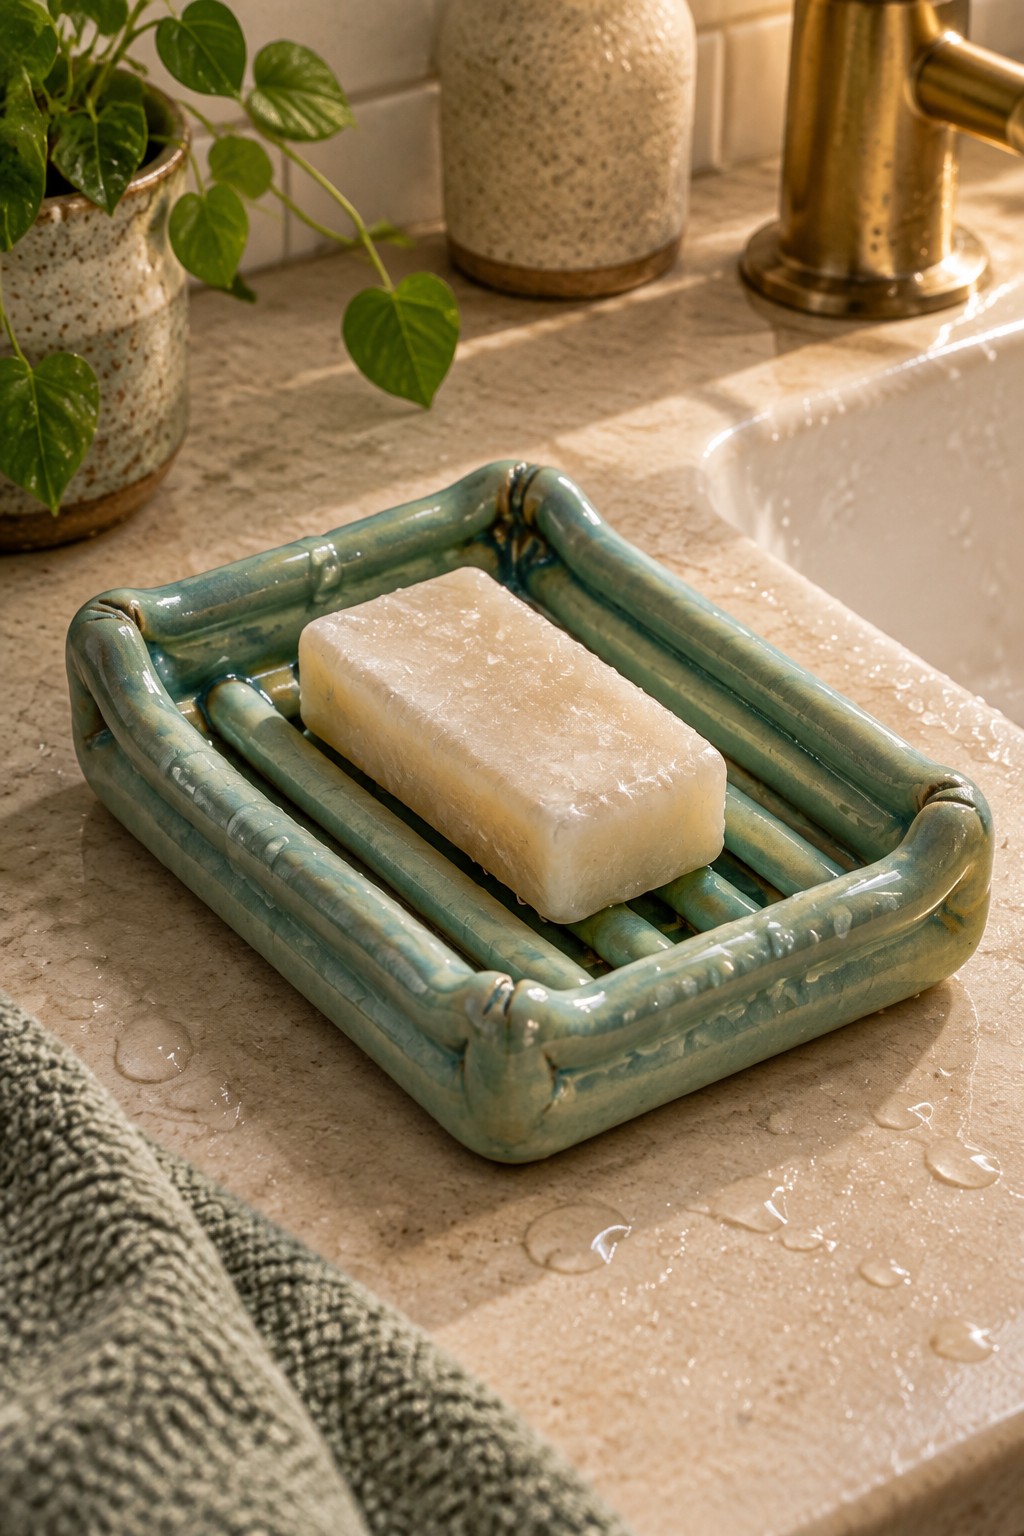
A soap dish built from air dry clay coils creates a raised rectangular tray that keeps bar soap dry between uses. The maker forms the outer frame with thicker coils and lays thinner ones across the bottom as slats so water drains through. A glossy teal glaze covers the entire piece and highlights the rounded coil shapes that mimic bamboo. This style of bathroom item stays simple to construct while giving the finished object clear function and structure.
The shape does a lot of the work here because the built-in slats solve the common problem of soap sitting in water. You can adapt the same coil layout to make a longer version for a double sink or shrink it into a small holder for jewelry. The bamboo-style joints add detail without extra tools, and the glaze color can be swapped for whatever matches your tiles or towels. For a first coil project this gives you practice with both framing and spacing in one piece that actually gets used every day.
Wall-Mounted Clay Key Dish

A small coiled bowl with a hole near the rim turns into a wall-mounted key holder that keeps entryway clutter off surfaces. The shallow shape and textured coils give the piece enough depth to hold keys and small items while the orange interior with a light rim creates simple contrast. This project stays in the holder category and works with air dry clay since no firing is required.
What makes this idea useful is how the basic bowl shape solves a daily problem without taking up counter space. You can adjust the size for a tighter entryway or change the rim color to match different wall tones. The same coil method adapts to a desk tray or small bathroom dish by leaving off the hole and adding a flat base instead. The bright interior color helps the finished piece photograph clearly for sharing.
Frequently Asked Questions
What supplies are essential for starting air dry clay coil projects as a beginner? Basic white or terracotta air dry clay works well along with a rolling pin for flattening slabs, a craft knife for cutting, and water or slip for joining pieces. Keep a damp cloth nearby to prevent the clay from drying out too quickly during construction and have acrylic paints and a sealant ready for finishing.
How can I join coils securely so they do not separate after drying? Score the edges of each coil lightly with a tool and apply a thin layer of slip made from clay mixed with water before pressing them together. Work in small sections and let each layer firm up for 10 to 15 minutes before adding the next to build strength without sagging.
What is the typical drying time for completed coil projects? Most small to medium projects need 24 to 48 hours in a dry room with good airflow though thicker pieces may require up to a week. Test readiness by tapping the surface which should sound hollow and feel completely hard before painting or handling.
How do I prevent cracks from forming in my coil creations? Roll coils to an even thickness and avoid overworking the clay which can trap air. Cover finished projects loosely with plastic wrap for the first few hours to slow drying and mist lightly with water if edges start to feel dry too soon.
Can the projects be painted and sealed for everyday use? Yes once fully dry sand any rough spots with fine grit paper then apply two coats of acrylic paint followed by a water based varnish or mod podge. This adds color and protects the surface from moisture while keeping the projects durable for display or light use.

Pottery Path is my cozy corner of the internet where I share clay ideas, pottery inspiration, and simple projects you can recreate at home. I love exploring everything from air dry clay to handbuilt pottery to cute minis that brighten your day. My goal is to make clay crafting feel easy, fun, and welcoming for anyone who wants to try it.
You will find beginner friendly tutorials, creative pottery painting ideas, and lots of warm inspiration for slow and happy crafting. If you enjoy hands on creativity, this space will feel like home.