
I have been playing around with pottery for a while now and textures have become one of my favorite parts to experiment with.
They make the pieces feel more interesting without needing fancy techniques.
For beginners it can be a good way to add some depth to your work right from the start.
I put together some ideas that use simple tools and materials you probably already have around.
These are all things I have tried myself and they turned out pretty well.
Ridged Mug with Horizontal Grooves

A ceramic mug built with evenly spaced horizontal ridges around the body gives a simple way to create tactile texture on a functional object. The grooves catch light and glaze variations, which makes the surface look more detailed without extra carving or stamps. This idea fits the mug category well because the ridges also improve grip while keeping the overall form straightforward to throw or hand-build.
The shape does a lot of the work here since the standard mug size already suits daily use for coffee or tea. You can adapt the spacing of the ridges to match whatever tool you have on hand, or scale the same pattern down for smaller cups. In a kitchen setting this kind of piece works as both a practical vessel and a subtle decor item, and the clear texture makes it easy to photograph for sharing.
Lobed Ring Dish with Divided Sections
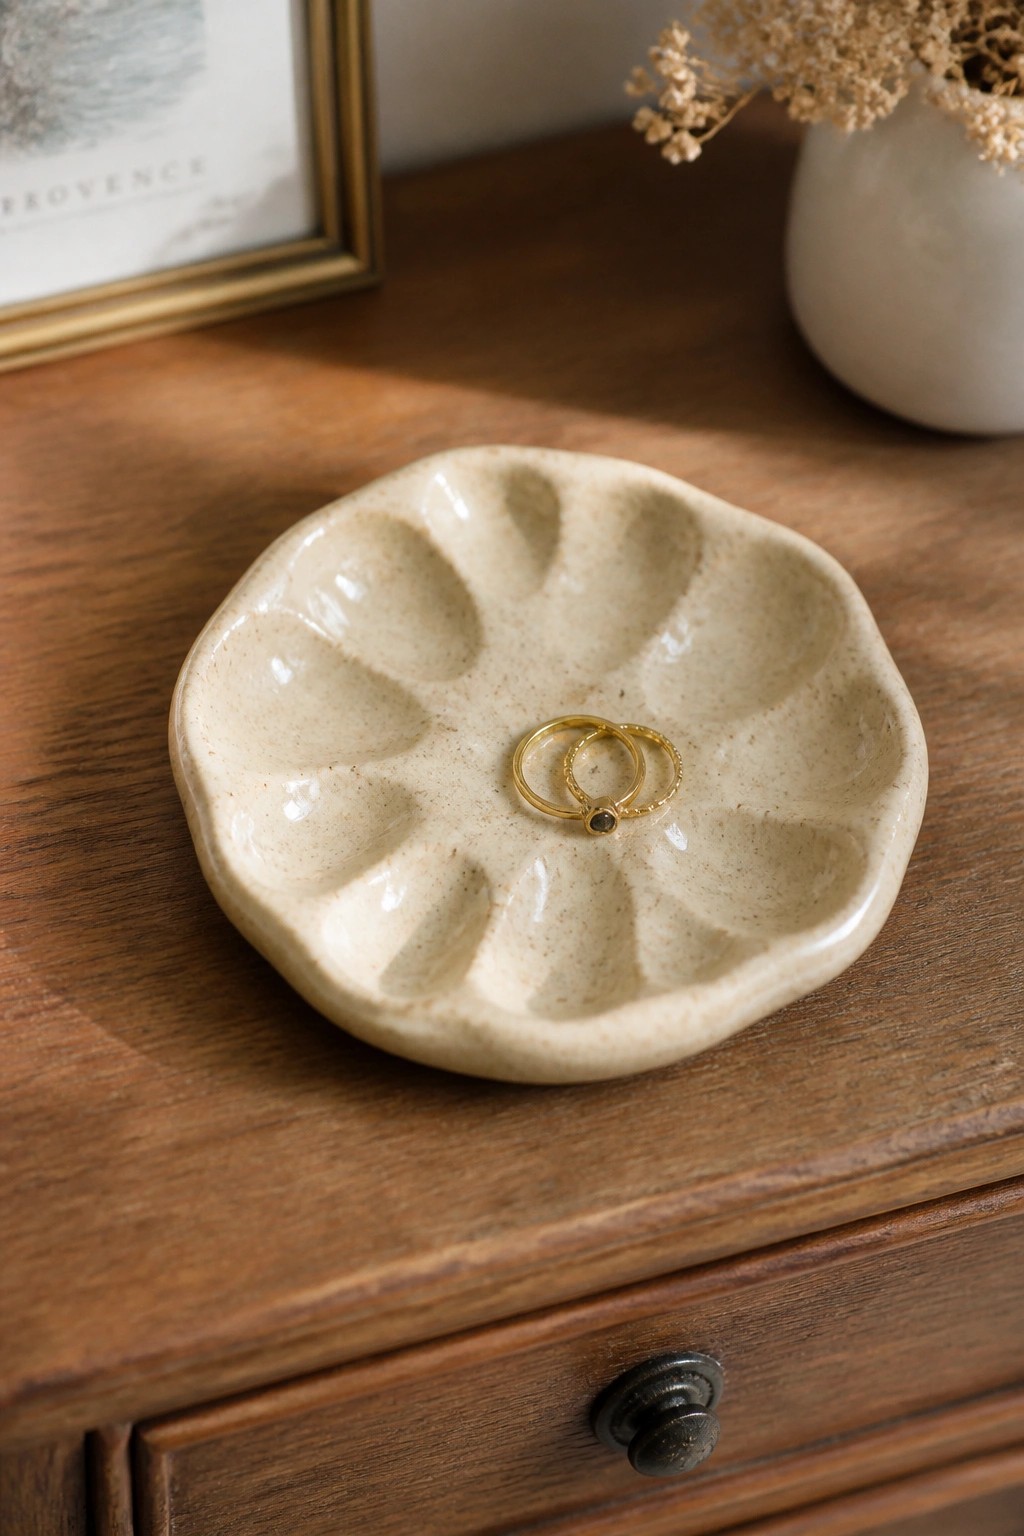
A small ceramic ring dish formed with multiple scalloped lobes creates separate compartments that keep rings from touching. The raised ridges between each section add a built-in tactile element while the shallow center keeps everything visible and easy to grab. A light speckled glaze over the uneven surface highlights the handmade texture without hiding the shape details.
What makes this idea useful is how the same lobed form can be made smaller for earrings or widened slightly for a soap dish. The divided layout prevents items from sliding around, and the compact size fits on a nightstand or dresser without taking much space. You could simplify it to fewer sections or try a matte glaze for extra grip if you want to adapt it for bathroom use.
Embossed Leaf Planter

A simple cylinder form gains interest when leaves are pressed into the clay to create raised relief across the surface. The overlapping leaves catch the glaze in brown and green tones, making the veins and edges stand out without any added paint. This turns a basic planter shape into a piece that works for small houseplants while adding texture that can be felt as well as seen.
What makes this idea useful is how easily the same leaf pressing technique can be scaled down for a mug or repeated around a larger vase. The round shape fits tight spaces like windowsills or shelves and still leaves room for soil and drainage. You could start with just three or four leaves near the top if you want a simpler version, or press the leaves deeper before glazing to change how much the texture shows through.
Textured Spoon Rest with Stamped Circles

A spoon rest shaped from clay gives you a practical kitchen piece when you press repeating circular stamps into the wet surface. The elongated, slightly curved form keeps utensils from touching the counter while the raised motifs create a clear tactile surface. A pale speckled glaze settles into the recessed areas and leaves the raised parts lighter, so the pattern stays visible. This approach works as a simple kitchen item that adds texture without needing complex carving skills.
What makes this idea useful is how easily the stamping method transfers to other small objects like butter dishes or soap trays. The narrow shape takes up little counter space yet still holds multiple utensils during cooking. You could change the stamp design to lines or dots for a different look or scale the form up slightly into a narrow tray for napkins. In a kitchen this kind of piece stays out of the way while giving you a dedicated spot that keeps counters cleaner.
Dimpled Texture on a Shallow Blue Bowl
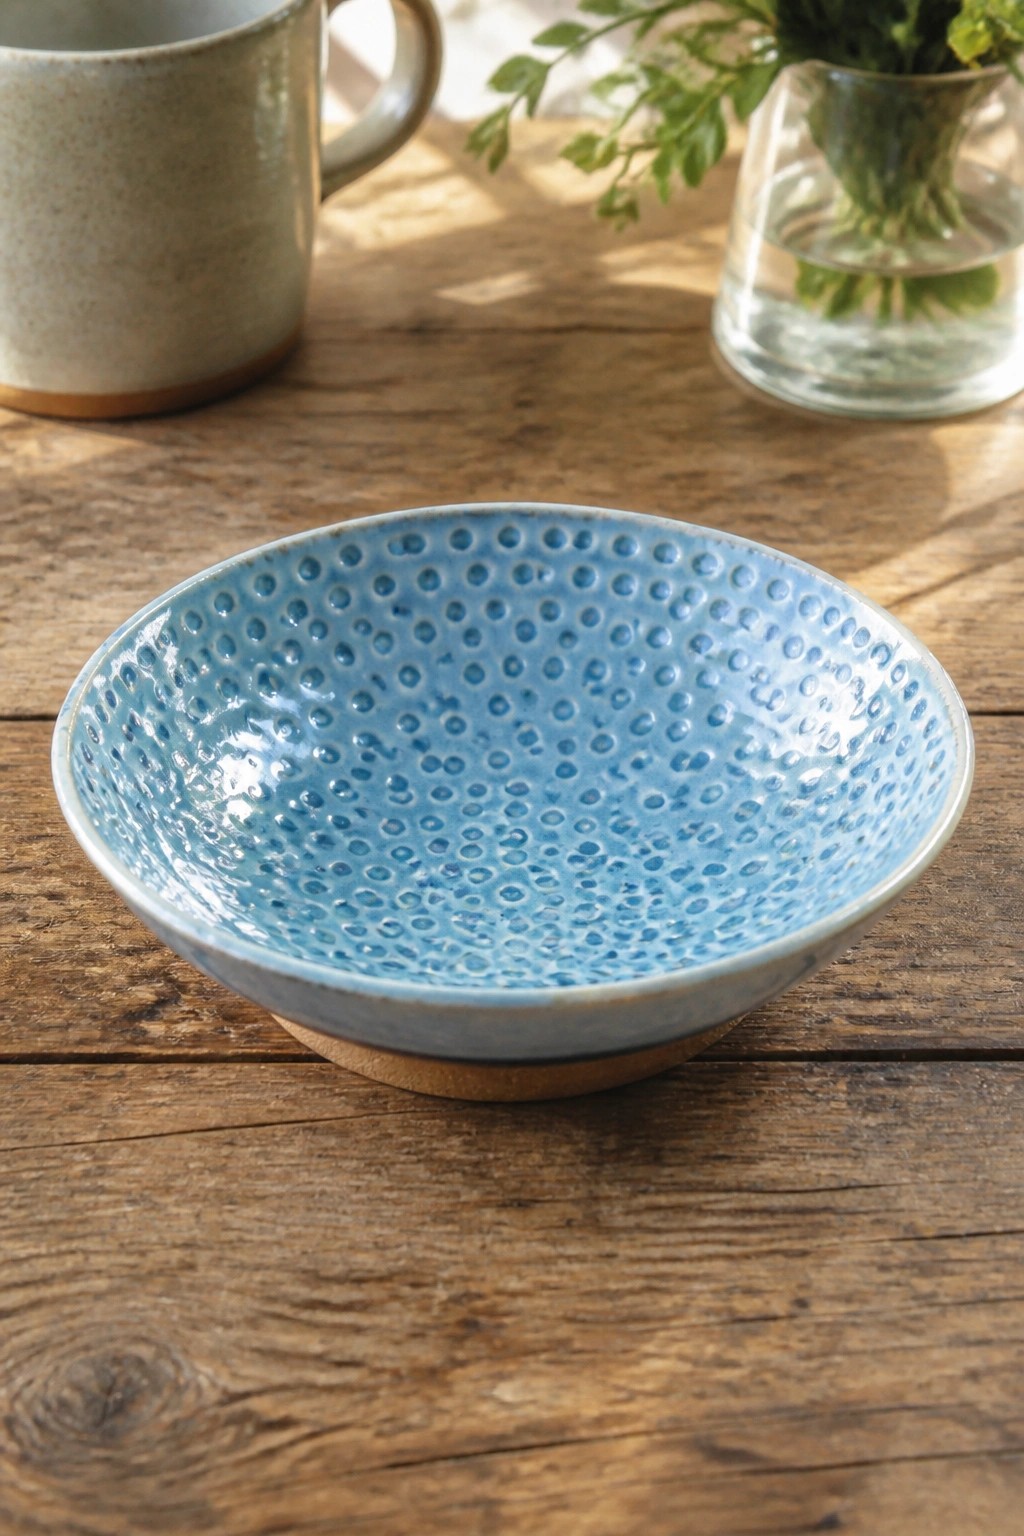
A shallow bowl with small, evenly spaced dimples pressed across the full interior creates a consistent tactile surface. The blue glaze settles into the recesses between the dots, giving the bowl a speckled appearance while the rim and foot stay smoother. This approach turns a basic bowl shape into a functional piece that works for snacks, jewelry, or small tabletop storage.
What makes this idea useful is how the dimple pattern can be added with a simple tool on wet clay before any glaze goes on. The compact size makes it easy to adapt into a set of matching dishes or to enlarge slightly for a side plate. In a kitchen or entryway the texture helps the bowl stand out on its own without extra decoration, and the same pressing method transfers directly to other round forms like trays or small planters.
Etched Floral Oval Plaque

An oval clay plaque with two holes drilled near the top works well as a simple wall hanging. The maker carved or stamped line drawings of flowers and stems directly into the surface before glazing, letting the lighter clay show through a dark matte finish. This approach keeps the piece flat and smooth while adding a clear botanical pattern that reads well from a distance.
The shape does a lot of the work here because the oval form frames the design neatly without needing a frame or border. You could scale the same idea down to a smaller rectangle for a desk tile or repeat the etching on a set of tiles for a bathroom accent. The carved lines stay durable and easy to clean, so the piece holds up better than painted versions when hung in a kitchen or entryway.
Ridge-Textured Flower Tea Light Holder

A small ceramic bowl shaped with overlapping petal edges makes an effective tea light holder. The surface carries vertical ridges pressed into each petal before firing, creating a tactile pattern that catches light along the curves. An earthy brown glaze highlights the ridges without covering them completely. This fits the candle piece category and stays compact enough to form from a single ball of clay.
The shape does a lot of the work here because the petal outline already defines the form and the ridges add texture in one step. You can adapt the same pressing technique to make ring dishes or small soap rests by flattening the base slightly. In a bathroom or on a nightstand this size keeps the piece from taking over the surface while still giving a clear handmade detail. For Pinterest, the combination of simple form and visible ridges photographs cleanly against wood or linen backgrounds.
Dimpled Oval Tray with Scalloped Rim

An oval tray built with a scalloped rim and a center packed with small raised dots gives a clear tactile contrast between the smooth edge and the bumpy interior. The yellow glaze sits evenly over the texture so the dots catch light and create visual depth without extra decoration. This project fits the tray category and works well as a small catchall or serving piece where the surface itself becomes the main detail.
The shape does a lot of the work here because the oval stays compact on a table or shelf while still offering enough surface area for the texture to show. You could repeat the same dimple pattern on a round plate or a square dish by pressing a simple tool into the clay before the final firing. For a gift this size is easy to customize with a different glaze color while keeping the rim and texture intact.
Ridged Salt Cellar Bowl

A small ceramic bowl formed with horizontal ridges around the exterior creates a simple tactile surface that works well as a salt cellar or spice holder. The ridges are spaced evenly to catch light and give the hand something to grip when pinching salt. A light speckled glaze covers both the inside and outside, keeping the focus on the texture rather than color. This shape stays compact enough to sit beside a stove or cutting board without taking up much space.
The shape does a lot of the work here because the ridges add interest while the small size keeps the project fast to complete. You could repeat the same ridging on slightly taller forms to hold peppercorns or herbs, or scale it up for a butter dish. In a kitchen this kind of piece stays practical because it is easy to reach and refill. The ridged detail also photographs clearly, which helps the idea show up well when shared online.
Ribbed Ceramic Toothbrush Holder

A small cylindrical cup with evenly spaced vertical ridges works well as a toothbrush holder. The fluted texture gives the surface tactile interest while the soft green glaze covers most of the form and leaves a narrow band of exposed clay at the base. This shape stays simple to form on the wheel or with a slab and fits easily into a bathroom setting.
What makes this idea useful is that the ridges add grip and pattern in one step without needing stamps or carving tools. The same ribbed form can be made taller for a kitchen utensil crock or shortened into a small planter. Changing the glaze to a matte finish or a different color keeps the core idea while shifting the look for new spaces.
Carved Wave Yarn Bowl

A yarn bowl formed from clay includes a wide rounded shape with a spiral notch cut into the rim to hold and feed yarn as it unwinds. The surface carries repeating wavy ridges that add both grip and visual movement around the outside. This combination turns a basic bowl into a working tool that stays functional while showing clear handmade texture.
What makes this idea useful is how the notch solves a common knitting problem without extra hardware. The wavy pattern could be scaled down for a smaller ring dish or repeated on a larger planter base. For a gift, this shape works well because it serves a clear purpose yet fits easily on a side table or craft shelf.
Ribbed Sponge Rest Tray

A small rectangular ceramic tray with evenly spaced ridges running across the base creates a dedicated sponge holder for kitchen use. The glossy teal glaze covers the surface while the raised lines keep the sponge elevated for better airflow and drainage. This project fits the category of functional kitchen pottery where the texture serves a clear purpose instead of pure decoration.
The shape does a lot of the work here by fitting neatly beside a sink without crowding the counter. You could rework the same ridged base into a soap dish or a small brush rest by changing the overall size and glaze color. In a kitchen this kind of piece keeps surfaces drier and stands out in photos because the texture reads clearly even in simple shots.
Speckled Peach Trinket Dish

A small peach-shaped ceramic dish makes a practical ring holder or trinket tray. The form uses a rounded, slightly indented bowl with a short stem detail pinched at one end. The pink glaze carries a rough, speckled surface that creates a tactile finish across the entire piece. This approach works as a simple fruit-inspired holder that stays functional while showing off texture.
What makes this idea useful is the compact size that fits on a dresser or bathroom counter without taking much space. You could rework the same shape and speckled glaze into a soap dish or a small catch-all for earrings. The stem detail gives a clear focal point without requiring complex sculpting. A piece like this photographs well for Pinterest because the fruit form and texture read clearly even in a flat lay.
Incised Lines for Fur Texture on a Sitting Fox

A small clay fox figurine makes an effective decor object when you shape a simple seated animal form and add surface texture by carving short, repeated lines into the body to suggest fur. The design stays visually clear through a limited color palette of terracotta orange with white accents on the chest and tail tip, plus a few painted facial details. This approach keeps the focus on the tactile carved texture rather than complex sculpting or glazing.
What makes this idea useful is how the compact size lets you perch the finished piece on a plant pot rim or shelf edge without needing extra display space. You can adapt the same carved texture and seated pose to other small animals like squirrels or hedgehogs for a matching set. The straightforward form also works as a starting point for testing different surface patterns before moving on to larger pieces.
Dotted Band Creamer

A small ceramic creamer pitcher gives beginners a straightforward way to add texture through repeated rows of raised dots. The light green glaze sits evenly over the rounded form and lets the dots cast soft shadows that define each band. A short spout and simple pulled handle keep the shape functional for pouring while the dots stay the main design feature. This approach fits the kitchen item category and works on any wheel-thrown or hand-built round body.
What makes this idea useful is the way the dots are spaced in clear horizontal lines, so you can repeat the pattern with a simple tool or stamp on future pieces. A piece like this works especially well as a milk pitcher at the table or a small holder for kitchen utensils. The small scale makes this easy to adapt into a sugar bowl by leaving off the spout or into a tiny vase by stretching the neck. For a gift, something like this stands out on a shelf because the texture reads clearly even from a distance.
Leaf Impressed Coasters

These round ceramic coasters use actual fern and leaf fronds pressed into soft clay to create raised, tactile surface patterns. The pieces are finished with matte glazes in muted tones like sage green, dusty pink, and speckled gray, leaving the edges unglazed for a raw clay look. The flat disk shape keeps the focus on the impressed details while making the coasters practical for daily use.
What makes this idea useful is how easily the same pressing technique works with different leaves or ferns to vary the pattern without changing the form. A set in mixed glazes adds visual interest on a coffee table or desk while protecting surfaces from drink rings. You can scale the disks larger to make small trays or simplify the process by using one leaf type across a whole batch for a matching set. This approach stands out for beginners because it relies on found natural materials rather than complex carving.
Frequently Asked Questions
What basic tools and materials do beginners need to create textured pottery with tactile surfaces?
Start with air-dry clay or polymer clay if you lack access to a kiln since these options allow easy experimentation at home. Gather simple household items like sponges, forks, leaves, fabric scraps, and rubber stamps to imprint textures without buying specialized equipment. Add basic supplies such as a rolling pin for flattening clay, water for smoothing edges, and plastic wrap to prevent drying during work. These affordable items help you achieve varied tactile effects while building confidence through low-cost trials.
How can I avoid cracks when adding deep textures to beginner pottery projects?
Work with clay that has consistent moisture levels and avoid overworking the surface since excessive pressure leads to weak spots. Apply textures gradually in stages allowing the piece to firm up slightly between impressions to maintain structural integrity. Cover finished pieces loosely with plastic for slow even drying over several days which reduces stress on the textured areas. If using a kiln later fire at appropriate low temperatures first to further minimize cracking risks.
Which household items work best for creating safe and effective tactile surfaces on pottery?
Choose items with interesting patterns such as textured fabrics, bubble wrap, or natural objects like pinecones and shells that press cleanly into soft clay without leaving harmful residues. Test any item on a small clay sample first to ensure it does not stick or tear the surface and always wash tools thoroughly before use. Avoid sharp metals that could cut your hands or the clay and opt for rounded edges on items like keys or buttons for gentle impressions that feel pleasant to touch.
How does adding texture influence the glazing or finishing steps for pottery pieces?
Textures can trap glaze in crevices creating beautiful depth and contrast after firing so apply glaze thinly with a brush or sponge to control buildup in indented areas. Test glazes on sample textured tiles beforehand since rough surfaces may absorb more liquid and alter the final color intensity. For air-dry clay use acrylic paints or sealants instead and rub them gently into textures with a cloth to highlight raised and recessed parts without clogging details.
What common mistakes should beginners avoid when trying tactile pottery ideas?
Do not apply textures to overly wet or dry clay as both states cause distortion or crumbling during the process. Limit the depth of impressions on thin pieces to prevent weakening the overall structure and always support the clay from behind while pressing. Skip rushing the drying phase since uneven moisture leads to warped results and instead rotate pieces periodically for balanced airflow.

Pottery Path is my cozy corner of the internet where I share clay ideas, pottery inspiration, and simple projects you can recreate at home. I love exploring everything from air dry clay to handbuilt pottery to cute minis that brighten your day. My goal is to make clay crafting feel easy, fun, and welcoming for anyone who wants to try it.
You will find beginner friendly tutorials, creative pottery painting ideas, and lots of warm inspiration for slow and happy crafting. If you enjoy hands on creativity, this space will feel like home.