Step 1: Gather Necessary Tools and Equipment
When replacing the sprocket on your Stihl H131 pole saw, you’ll need to ensure you have the right tools and equipment before getting started. Here’s what you’ll need:
- Tools and Equipment
| Tools and Equipment | Description |
|---|---|
| Replacement Sprocket | The new sprocket for your Stihl H131 pole saw. |
| Screwdriver | To help with disassembly and reassembly. |
| Socket Wrench | For securely fastening the sprocket. |
| Work Gloves | To protect your hands during the process. |
Once you’ve gathered these essential tools and equipment, you’ll be ready to proceed with replacing the sprocket on your Stihl H131 pole saw.
Recommended Products
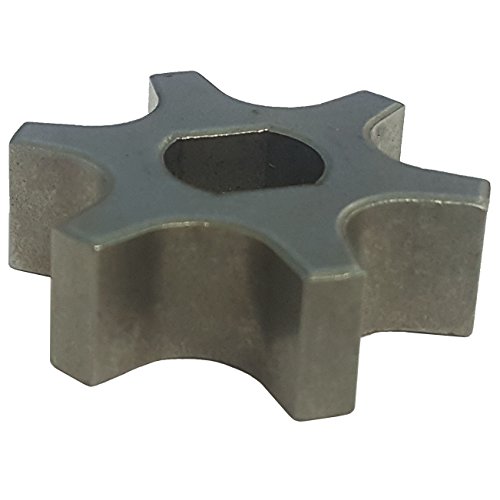
Replaces the following Brands OEM: Stihl 1206 642 1301, 4138 642 1250, 0000 640 2002

Compatible Models: Size:3/8" 6T, Pole sprocket fit for Stihl HT73 HT75 KM90 HT100 KM130 HT131 HT250 pole saws, replace 4138-642-1250 1206-642-1301 0000-640-2002 4138 642 1250, please confirm your saw model before purchasing

Compatible With: For Stihl: HT75 HT100 HT101 HT101 HT131
Step 2: Disconnect the Power Source
When tackling the task of replacing the sprocket on your Stihl H131 pole saw, ensuring your safety is key. To begin, disconnect the power source from the pole saw. This step involves:
-
Locating the power switch:
- Turn off the pole saw by locating the power switch and setting it to the “off” position. Ensure it’s completely powered down before proceeding.
-
Unplugging the power cord:
- If your pole saw is corded, unplug it from the power source to prevent any accidental startup while working on the sprocket replacement.
- For cordless models, remove the battery pack to eliminate the risk of the pole saw starting up unexpectedly.
Prioritizing safety by disconnecting the power source will help you proceed with the sprocket replacement on your Stihl H131 pole saw smoothly.
Step 3: Remove the Cover and Bar
When it comes to replacing the sprocket on your Stihl H131 pole saw, taking off the cover and bar is the next crucial step. Follow these straightforward instructions to proceed smoothly:
- Locate the screws: Look for the screws securing the cover and bar in place.
- Use the appropriate tool: Depending on the type of screws, grab the suitable screwdriver or tool to remove them.
- Carefully detach the cover: Once the screws are undone, gently detach the cover from the saw.
- Remove the bar: After removing the cover, slide out the bar by gently pulling it away from the saw.
- Inspect for any damage: While you have the cover and bar off, take a moment to inspect them for any signs of wear or damage.
Remember, safety always comes first, so ensure the saw is turned off and any power source is disconnected before you begin this step. This practice will minimize any potential risks and help you perform the sprocket replacement effectively.
Step 4: Loosen and Remove the Sprocket
It’s time to loosen and remove the sprocket on your Stihl H131 pole saw. Here’s how you can do it:
- Step 1: Locate the sprocket cover near the end of the bar.
- Step 2: Unscrew the bolts or screws securing the cover in place.
- Step 3: Pull off the cover gently and set it aside.
- Step 4: You’ll now see the sprocket attached to the end of the bar.
- Step 5: Depending on the model, you may need a specialized tool to remove the sprocket safely.
- Step 6: Carefully detach the sprocket from the bar, ensuring not to damage any surrounding components.
- Step 7: Inspect the sprocket for any signs of wear or damage that may require replacement.
- Step 8: Clean the area around the sprocket to remove any debris or sawdust accumulation.
- Step 9: Keep the removed sprocket in a safe place to avoid misplacement.
By following these steps, you’ll successfully loosen and remove the sprocket from your Stihl H131 pole saw, bringing you one step closer to completing the sprocket replacement process.
Recommended Products

41386421250 Chain pole saw sprocket for Stihl HT73, HT75, HT100, KM90, KM130, HT250, HT131 chainsaw.

Replacement Compatibility & Fit: This gear head pole saw gearbox directly replaces part numbers 4182 200 0070 and 4138 205 0008. This gearbox is designed to fit Stihl models including HT73, HT75, HT100, HT130, HT131, HT250, KM110, KM130, KM90, FS85. Verify OEM specifications and pipe size (3/8" Pitch 6 Tooth; 25.4 mm diameter, 5.2 mm square inner shaft) for compatibility. *Note: Not compatible with 1/4" chains.*

Replace Part Number: 1206-642-1301, 0000-640-2002, 4138-642-1250
Step 5: Install the New Sprocket
When installing the new sprocket on your Stihl H131 pole saw, ensure you have the correct replacement part before beginning. Here are the steps to guide you through the installation process:
- Slide the new sprocket onto the bar, matching the positioning with the drive cog.
- Reattach the sprocket cover and secure it with the bolts you removed earlier.
- Tighten the bolts securely but avoid over-tightening to prevent damage.
- Check that the sprocket moves smoothly along the bar before use.
| Important Information |
|---|
| Double-check the replacement sprocket compatibility before installation. |
| Securely fasten the sprocket cover with the bolts to ensure safety. |
Stay focused and meticulous during this step to guarantee a successful sprocket replacement for your Stihl H131 pole saw.
Recommended Products
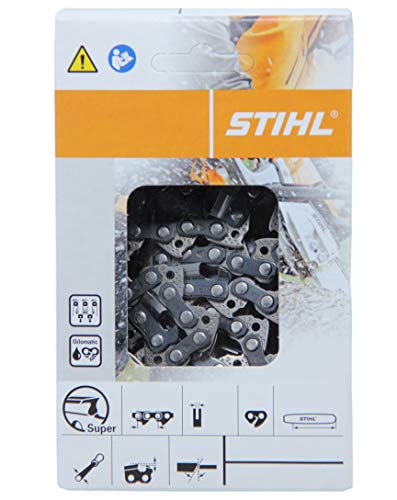
Genuine OEM Stihl Chain


[FITS STIHL POLE SAWS] 3 pack of 12 inch pole saw chains fits HT 75, HT100, HT101, HT130, HT131 and more - Scroll down for full fitment list.
Conclusion
That’s it! You’ve now reached the final step in replacing the sprocket on your Stihl H131 pole saw. By following the instructions outlined in this guide, you’ve successfully installed the new sprocket onto the bar. Remember to double-check compatibility, securely fasten the cover, and ensure smooth movement along the bar. With these steps completed, you’re all set to tackle your next project with confidence. Happy sawing!
Frequently Asked Questions
What is Step 5 of the sprocket replacement process for a Stihl H131 pole saw?
Step 5 involves installing the new sprocket onto the bar of the Stihl H131 pole saw.
How can I ensure I have the correct replacement part for the sprocket?
Double-check the specifications and model compatibility to ensure you have the correct replacement sprocket for the Stihl H131 pole saw.
What should I do after sliding the new sprocket onto the bar?
Reattach the sprocket cover securely after sliding the new sprocket onto the bar.
What is important to check after completing the sprocket installation?
Check for smooth movement along the bar to ensure the sprocket is properly installed for optimal performance.
I’ve always been drawn to trees.As a kid, I spent most of my free time outside, climbing, exploring, and trying to figure out the names of the trees around me.That early curiosity eventually led me to study arboriculture and horticulture at Michigan State.Later, I completed a degree in forestry at the University of Michigan.
I’ve been working in tree care and education ever since.These days, I enjoy helping people learn more about the trees in their own backyards.How they grow, how to care for them, and why they matter.You don’t need to be an expert to appreciate trees.A little curiosity goes a long way.