Ever struggled with an anvil pruner that just won’t cooperate? You’re not alone. Picture this: you’re all set to tackle your overgrown garden when your trusty pruner starts acting up, making the task ten times harder. Frustrating, right? But fret not, because in this article, you’ll discover the secrets to adjusting your anvil pruner like a pro.
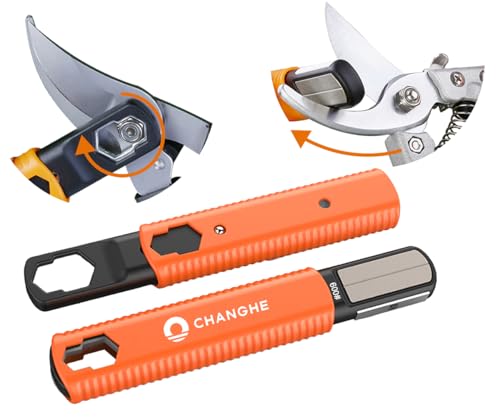
Understanding the Parts of an Anvil Pruner
When adjusting your anvil pruner, it’s essential to grasp the key components that make up this garden tool. Here’s a breakdown of the parts you should be familiar with:
- Blade: The sharp cutting edge of the pruner responsible for making clean cuts on branches.
- Anvil: The flat surface against which the blade presses during a cut, providing support and stability.
- Spring: The component that helps the pruner to open after each cut, readying it for the next.
- Lock: A mechanism to keep the pruner closed when not in use, ensuring safety during storage.
Understanding how these parts work together is crucial for adjusting your anvil pruner effectively.
Signs that Your Anvil Pruner Needs Adjustment
If you’re unsure whether your anvil pruner requires adjustment, here are some signs to watch out for:
- Blade alignment issues, leading to uneven cuts.
- Difficulty closing the pruner fully.
- Loose spring tension affecting the cutting action.
- Uneven anvil contact with the blade.
- Jammed or sticky lock mechanism.
When you notice these indicators, it’s time to fine-tune your anvil pruner for optimal performance.
Tools Required for Adjusting an Anvil Pruner
To properly adjust your anvil pruner, you’ll need a few essential tools. Here’s what you’ll need:
- Screwdriver: Helps with adjusting screws and components.
- Sharpening Stone: Useful for sharpening the blade if needed.
- Oil: Lubricates moving parts for smooth operation.
- Cloth: Wipe down the pruner and keep it clean.
- Adjustable Wrench: Aids in tightening or loosening nuts and bolts.
Having these tools handy will make the adjustment process easier for you.
Step-by-Step Guide to Adjusting an Anvil Pruner
Adjusting an anvil pruner can help ensure optimal performance for your gardening tasks. Here’s a simple guide to help you adjust it effectively:
- Step 1: Inspect the blade alignment. Make sure the cutting blade is against the anvil.
- Step 2: Unlock the pruner, ensuring the lock mechanism is not jammed.
- Step 3: Gently open and close the pruner to assess its current state.
- Step 4: If the blade needs sharpening, use a sharpening stone to achieve a clean, sharp edge.
- Step 5: Check the tension of the cutting blade. Adjust as needed using a screwdriver or an adjustable wrench.
By following these steps, you can maintain your anvil pruner in top condition for your gardening needs.
Recommended Products

VERSATILE – The most versatile sharpener in the market to sharpen and hone both single and double beveled blades including knife, mower blade, pruner, loppers, hedge shears, axe, machete, hatchet, scissors, edged tool, etc.
【5-In-1 Design】:This 5-in-1 garden tool sharpener has an HRC 85 tungsten carbide and 360# diamond abrasives for coarse sharpening, 600# diamond abrasives and 1000# ceramic is ideal for honing both single and double-bevelled blades including pocket knives, mower blades, garden pruner, loppers, hedge shears, axe, machete, hatchets, scissors, edged tools.

Durable tungsten carbide blade: This tungsten carbide sharpener is widely used for quickly sharpening or repairing damaged blades. It is particularly common in gardening, where it can be employed to hone nearly all types of garden tools.
Tips and Tricks for Maintaining a Well-Adjusted Anvil Pruner
To ensure your anvil pruner stays in top-notch condition, consider these useful tips and tricks:
- Regular Inspection: Check your anvil pruner frequently for any signs of wear, damage, or misalignment. Catching issues early can prevent them from worsening over time.
- Cleaning Routine: After each use, clean the pruner blades with a cloth to remove any sap, residue, or debris. Keeping them clean can prevent rust and ensure smooth cutting performance.
- Proper Storage: Store your anvil pruner in a dry place, away from moisture or direct sunlight. Consider using a blade cover or sheath to protect the blades from damage.
- Blade Sharpening: Regularly sharpen the blades of your pruner using a sharpening stone. Sharp blades make clean cuts, reducing strain on the tool and promoting healthy plant growth.
- Lubrication: Apply a few drops of oil to the blade pivot and locking mechanism to keep them moving smoothly. This simple step can extend the life of your pruner.
- Adjustment Checks: Periodically recheck the blade alignment and tension of your anvil pruner. If you notice any issues, follow the adjustment steps outlined in the previous section.
By incorporating these tips into your maintenance routine, you can keep your anvil pruner in optimal working condition for all your gardening needs.
Conclusion
Now that you’ve learned how to adjust your anvil pruner, you’re equipped to keep it in top shape for your gardening tasks. By recognizing the signs of adjustment needs, having the right tools on hand, and following the step-by-step guide provided, you can ensure your pruner works efficiently. Remember to incorporate maintenance tips like regular inspections, cleaning, proper storage, blade sharpening, lubrication, and adjustment checks to prolong the life of your tool. With these practices in place, your anvil pruner will be ready whenever you need it for smooth and precise cuts in your garden. Happy gardening!
Frequently Asked Questions
What are the signs that indicate an anvil pruner needs adjustment?
Common signs include misaligned blades and a stuck lock mechanism.
What tools are essential for adjusting an anvil pruner?
You will need a screwdriver, lubricant, cloth, and a sharpening tool.
How do I adjust an anvil pruner step-by-step?
- Loosen the pivot screw.
- Align the blade.
- Tighten the screw and test the pruner.
How can I maintain a well-adjusted anvil pruner?
Regularly inspect, clean, sharpen blades, lubricate, and check adjustments.
I’ve always been drawn to trees.
As a kid, I spent most of my free time outside, climbing, exploring, and trying to figure out the names of the trees around me.
That early curiosity eventually led me to study arboriculture and horticulture at Michigan State.
Later, I completed a degree in forestry at the University of Michigan.
I’ve been working in tree care and education ever since.
These days, I enjoy helping people learn more about the trees in their own backyards.
How they grow, how to care for them, and why they matter.
You don’t need to be an expert to appreciate trees.
A little curiosity goes a long way.