
I started working with coil pottery a few years ago and tall vessels have turned out to be the shapes I reach for most often.
Layering the coils as I build helps keep everything stable and gives the surface a bit of natural rhythm.
Over time I found myself trying different ways to make these pieces feel more sculptural without adding extra steps or tools.
Some of the ideas came from simple changes in how I stacked or finished the layers and others grew out of mistakes that ended up looking interesting.
Here are twenty of the ones that felt worth keeping around.
Ridge-Stacked Tall Vessel

A tall vessel formed from stacked coils produces even horizontal ridges that run the full length of the piece. The shape stays narrow at the neck and widens gently toward the base, letting the ridges create the main surface detail under a single soft green glaze. This method turns the coil-building process itself into the decoration rather than adding separate texture tools or carving.
What makes this idea useful is that the ridges add depth and shadow without extra steps or multiple glazes. The same stacked-coil structure can be widened into a floor planter or shortened for a desk vase while keeping the same surface pattern. Because the neck stays narrow, the form works for dried stems or stands alone on a shelf, and you can adjust the ridge spacing to make the piece look lighter or heavier depending on the room.
Stacked Coil Planter with Horizontal Ridges

A tall vessel built from stacked coils forms a layered planter that supports larger houseplants. Each coil is left visible so the ridges create strong horizontal lines, and a thin white wash is applied over the terracotta to emphasize the texture without hiding the clay. This approach works as a sculptural planter that stays functional while adding vertical interest to a corner or shelf.
What makes this idea useful is that the coil-stacking method lets you control height and width easily without a wheel. You could shorten the form into a medium vase or stretch it taller for floor plants by adding more rings. The same ridged surface also works in different colors if you swap the wash for a darker slip or leave the clay plain. In a living room or entryway this shape gives plants a solid base that feels more intentional than a standard pot.
Stacked Horizontal Coil Candle Holder

A tall vessel built from repeated horizontal coils forms a simple but striking candle holder. The coils create even ridges that run the full height of the piece and catch light along their edges. A deep red glossy glaze covers the entire surface and helps the rings stand out as distinct layers. The open top is sized to fit a standard votive or tea light without extra hardware.
What makes this idea useful is how the coil pattern does most of the visual work with very little added decoration. The same stacked-ring method can be shortened for a desk pencil cup or widened slightly to hold a small plant. Because the form is tall and narrow it fits on crowded counters or shelves where a wider piece would feel bulky. You could swap the solid glaze for a lighter matte finish if you want the ridges to read even more clearly in photos.
Tall Coil Vessel with a Single Horizontal Glaze Band
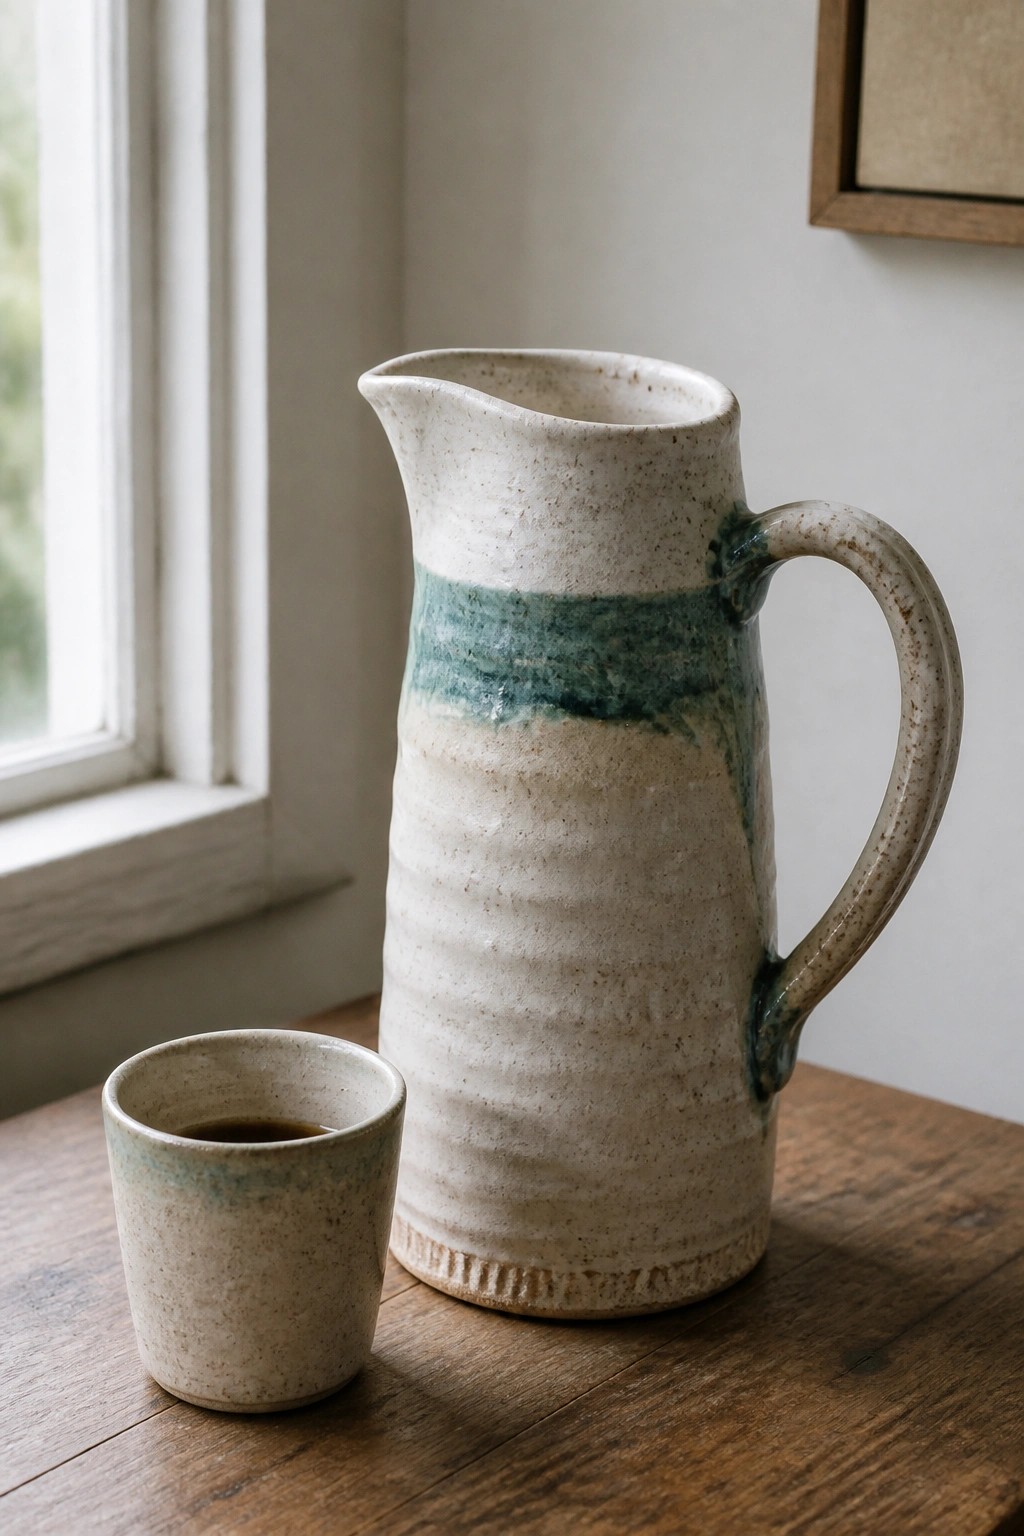
A tall pitcher built with coils gives you an even surface for placing one wide stripe of glaze around the middle section. The speckled clay body stays mostly exposed while the teal band breaks and runs slightly, creating a clear layered effect without extra carving or multiple colors. The ridged texture from the coils adds subtle lines that keep the form from looking flat. This keeps the focus on height and simple color placement rather than complex surface details.
What makes this idea useful is how the single band draws attention to the vessel’s vertical shape without extra steps. You could repeat the same stripe on a taller vase or shorten it for a jug by adjusting the band width. In a kitchen or on an open shelf the neutral base color blends with most settings while the accent color gives it definition. The approach also scales easily to a set of different heights if you want matching pieces with minor glaze changes.
Carrot Motifs on a Tall Coiled Cylinder
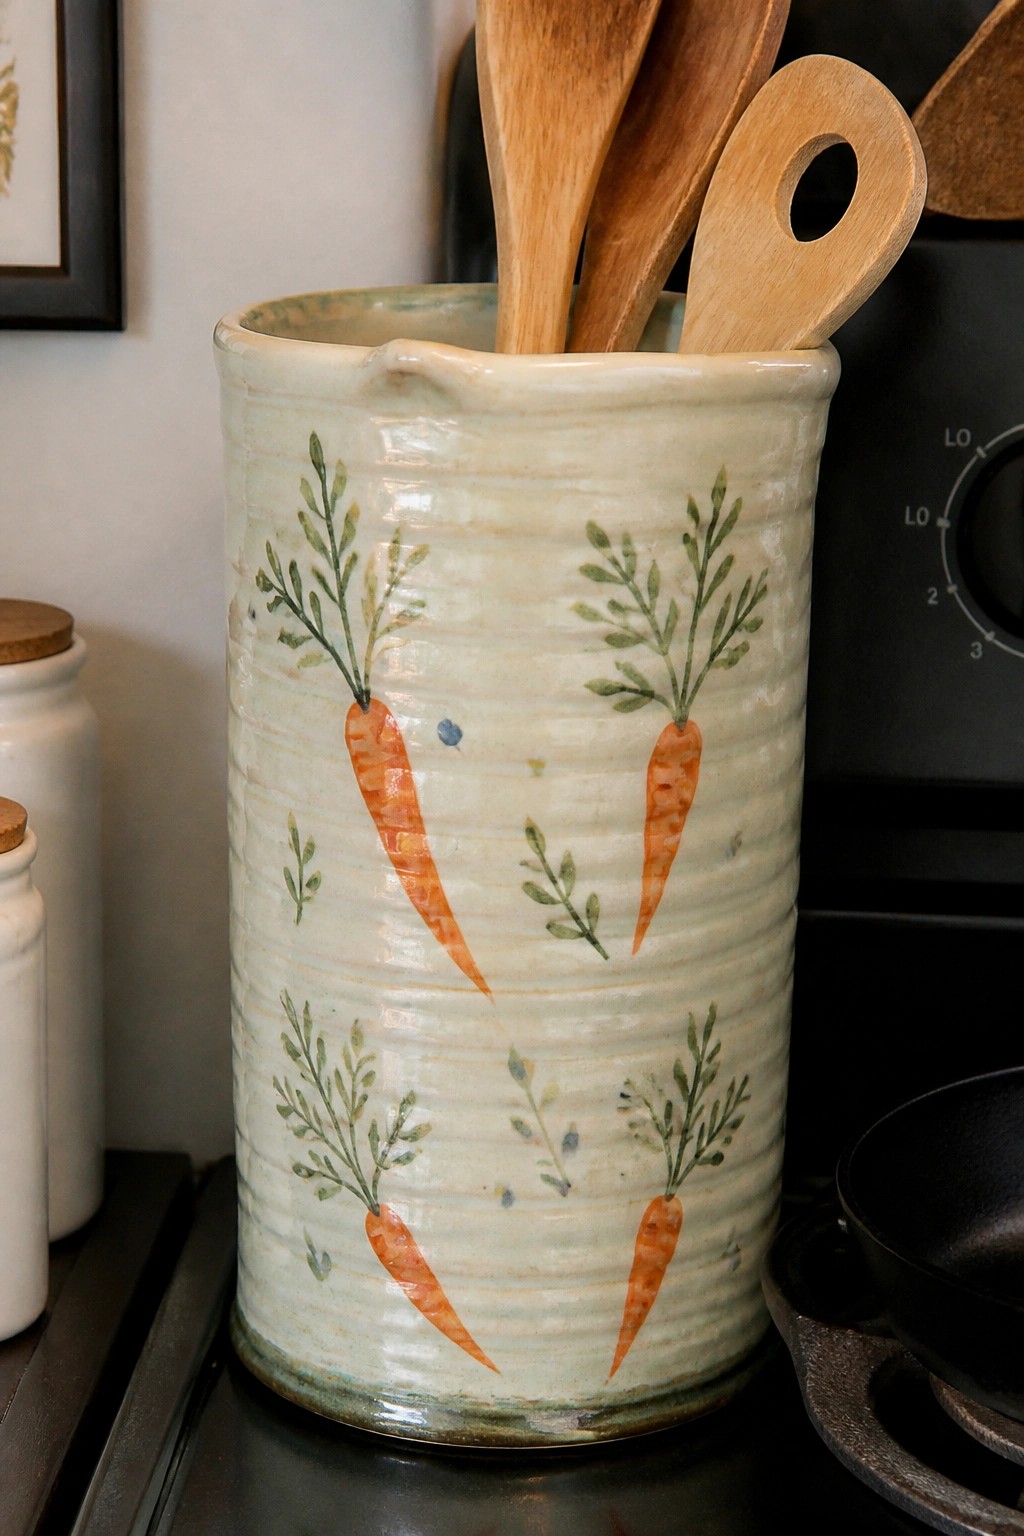
A tall cylindrical vessel built with coils makes a practical kitchen utensil holder. The horizontal ridges left from the construction add texture that shows through the pale green glaze. Orange carrots with simple green tops are painted around the body in a loose repeating pattern that uses the full height without feeling crowded.
What makes this idea useful is how the tall narrow shape keeps spoons and spatulas upright on a counter while taking up little space. The painted vegetables give the piece a clear kitchen theme that works well next to a stove or on open shelving. You could replace the carrots with other produce like radishes or herbs if you want to match a different color scheme. The same coil-built form could be widened slightly to hold cooking tools or narrowed for a matching vase.
Ribbed Coil Vases with Horizontal Texture Layers

These tall tapered vessels are built from stacked coils that leave clear horizontal ridges running down the form. The narrow shape widens slightly at the base before rising to a small opening, and each piece is finished in a single solid glaze color. The visible coil lines create surface interest through repetition rather than added carving or stamping. This fits the tall layered vessel category by keeping the construction simple while letting the build method itself supply the sculptural detail.
What makes this idea useful is how the ridges catch light differently depending on the glaze, so one build can look distinct across several colors. You could adapt the same coil spacing for a shorter version to hold makeup brushes or a wider base for dried stems on a console. The narrow neck keeps arrangements minimal, which works well for everyday surfaces where larger florals would feel crowded. Changing the height by just a few inches or switching to a matte glaze gives you quick variations without altering the core technique.
Coil-Built Toothbrush Holder with Drainage Hole
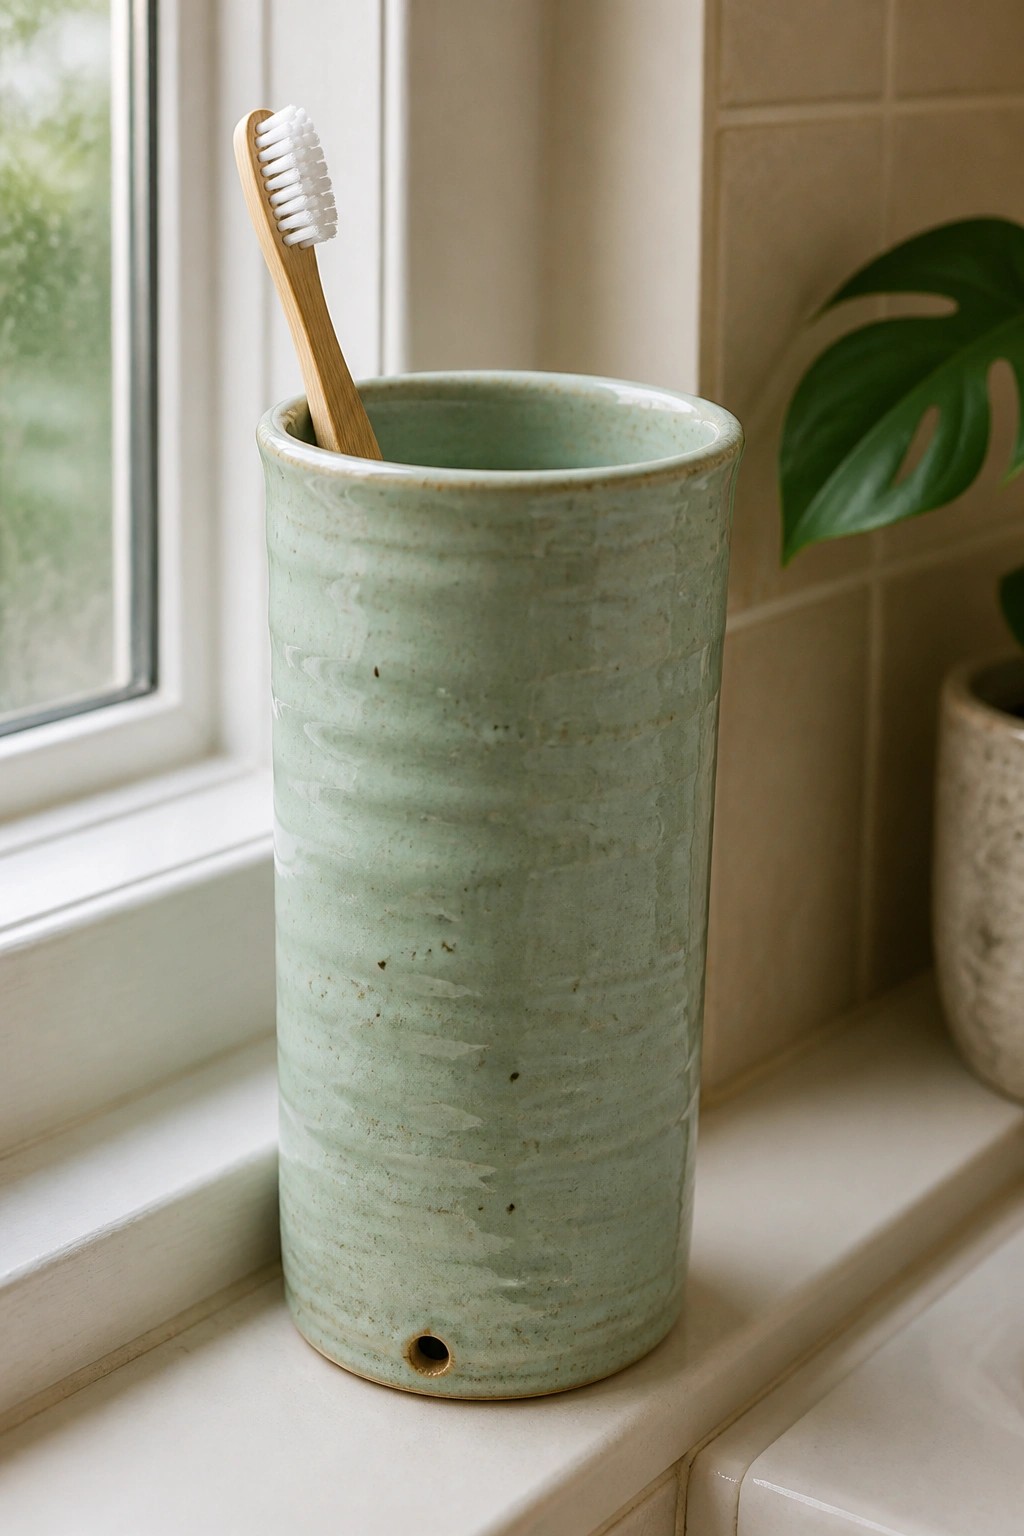
A tall narrow cylinder built from coils works well as a toothbrush holder when the form includes a small hole near the base. The light green glaze and horizontal ridges from the coils create a simple surface that still shows the handmade construction. This shape keeps the piece stable on a ledge while leaving room inside for multiple brushes to stand upright.
What makes this idea useful is the drainage hole that lets water escape instead of sitting at the bottom. The tall proportions fit narrow bathroom windowsills or counter edges where a shorter cup would take up too much space. You could rework the same vessel for a makeup brush holder by skipping the hole and using a matte glaze, or shorten the height slightly to make a desk organizer for pens.
Coiled Pitcher with Horizontal Ridges

A tall pitcher formed from stacked coils produces even horizontal ridges that run around the body and neck. The glossy brown glaze settles into the grooves to emphasize the layers while leaving the surface smooth for daily handling. A short spout, looped handle, and fitted stopper turn the vessel into a working oil or vinegar dispenser that still keeps the coil-built structure visible.
What makes this idea useful is how the ridges do the visual work without needing added decoration or carving. The same coil spacing and glaze can be used on a plain tall vase or a larger water jug. In a kitchen the shape holds just enough liquid for table use and the stopper keeps contents fresh. You can shorten the neck on the next version to make a simpler carafe or stretch the body taller for a decorative storage jar.
Ruffled Collar Built on a Tall Coiled Vessel

A tall vase formed from stacked coils creates the main body while the horizontal ridges left by the coils add built-in texture. The standout feature is the wide, layered collar at the neck, shaped from extra clay slabs or thick coils that are folded and pinched into overlapping waves. The matte turquoise glaze pools slightly in the ridges and softens the edges of the ruffle without hiding the construction marks. This approach fits the sculptural coil vessel category where the rim becomes the focal point instead of surface carving or added handles.
What makes this idea useful is how the coil ridges do the decorative work on the body so you only need to focus effort on the top. You can scale the ruffle down for a smaller vase or stretch the same collar shape onto a narrower neck for a different proportion. The finished piece works well as a standalone decor object on a console or shelf where the height and top detail catch the eye from across the room. For a simpler version, try building just the ribbed body first and test a smaller folded rim before committing to the full collar size.
Layered Coil Storage Jar with Exposed Clay Bands

A tall coil-built storage jar gains its structure from stacking consistent coils that leave visible horizontal ridges across the surface. Applying a deep green glaze over most of the form while leaving narrow bands of the clay body unglazed creates a simple striped pattern that highlights the construction method. The fitted lid with a short knob keeps the overall shape clean and balanced.
The shape does a lot of the work here because the tall cylinder gives you room to repeat the banded pattern without crowding. You could adapt the same coil layout and glazing approach to make a shorter canister set or a matching vase by changing only the height and rim details. In a kitchen this style of jar stores dry goods while fitting easily on open shelves where the texture shows up from a distance.
Swirling Lines Layered Over Tall Coil Forms

A tall cylindrical vessel built from coils carries wide, flowing spirals in soft blue, pink, and brown that wrap around the body in repeating curves. The pattern uses the full height to stretch and tighten, creating movement across the speckled clay surface without added texture or carving. This keeps the focus on the contrast between the bold lines and the simple upright shape, making it a clear example of surface design layered onto a basic tall vessel.
What makes this idea useful is how easily the spiral layout can be adjusted to fit different heights or diameters. The same curves could be tightened into tighter loops on a narrower jar or stretched longer on a pitcher. A piece like this works especially well as a desk cup or small vase because the vertical form gives the pattern room to develop without crowding. For Pinterest, the strong color contrast against the neutral background helps the vessel read clearly even in a small thumbnail.
Perforated Rim Vase for Mixed Stem Displays
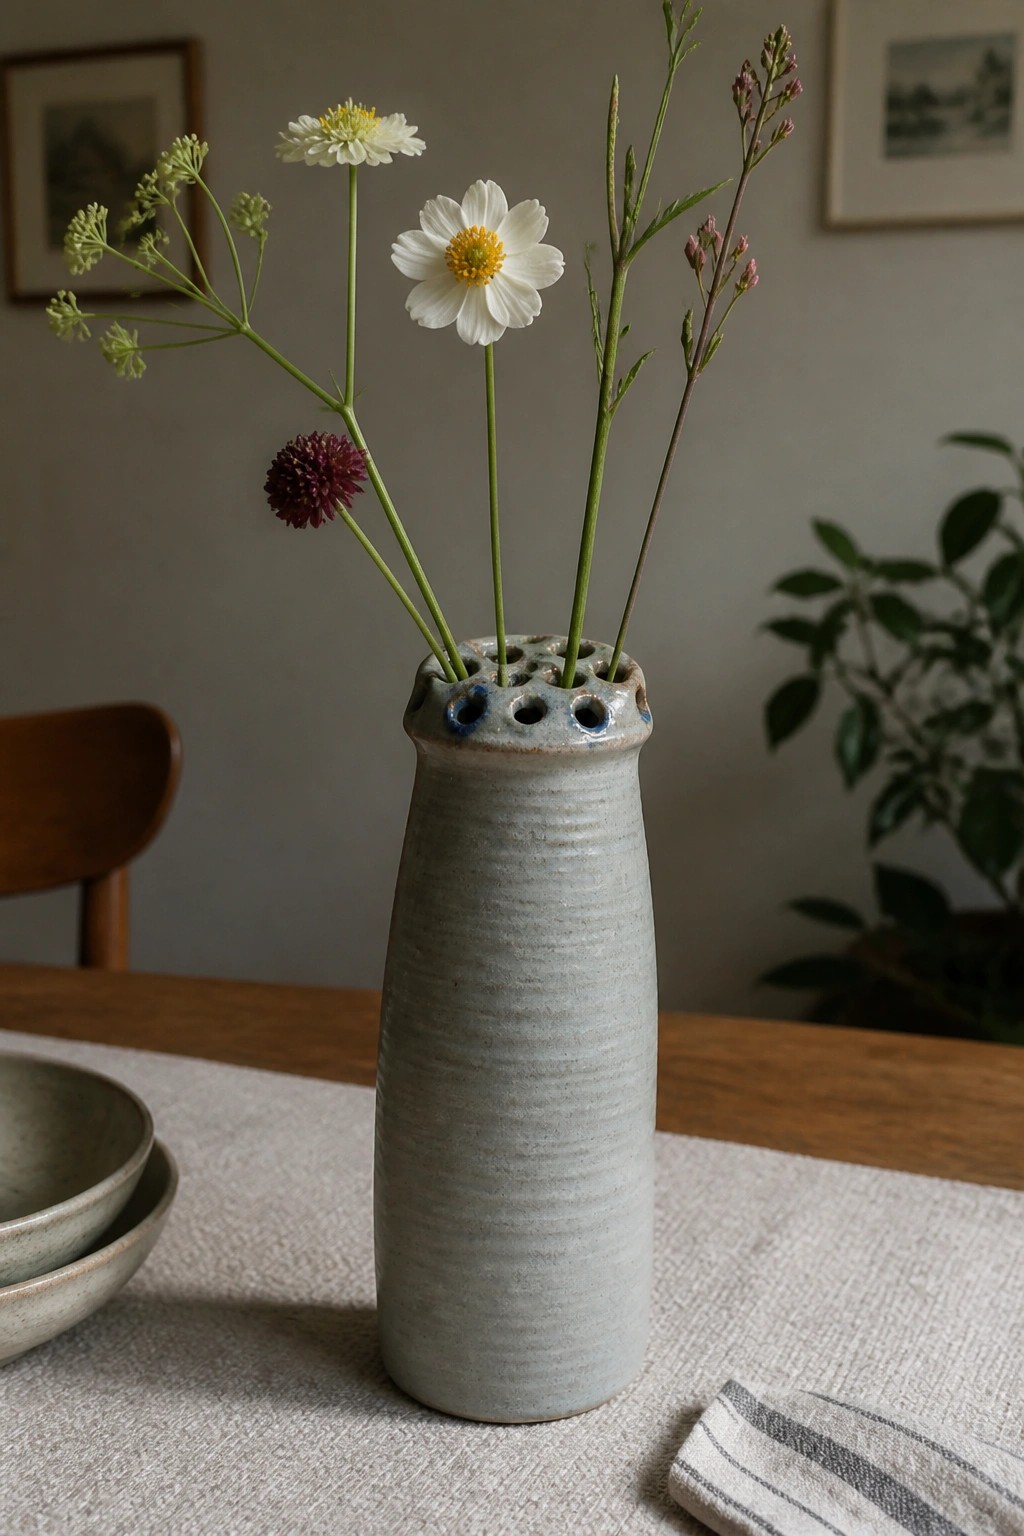
A tall, narrow vessel with a ring of small openings around the neck lets you drop individual stems into separate holes so they stay upright and spaced out. The horizontal ridges left from building the form add subtle texture, while the pale blue-gray glaze keeps the surface quiet enough that the flowers stay the focus. This setup works especially well for loose garden cuttings or single blooms rather than dense bouquets.
What makes this idea useful is that the holes act as a built-in flower frog, so you do not need extra mechanics inside the vase. You could repeat the same rim treatment on a shorter cylinder for a desk piece or widen the body slightly if you want room for more foliage at the base. The clean, functional detail photographs cleanly for Pinterest without needing props or styling tricks.
Wall-Hung Coil Planter with Vertical Stripe

This project is a tall, narrow wall planter built from coils and finished with a glossy reddish glaze and a single white vertical stripe. The coils create a ridged texture that runs the full length of the form, while the top includes a simple hanging tab with a hole for wall mounting. The shape stays slim enough to sit flat against a wall yet deep enough to hold a small plant with trailing vines. It works as a functional planter that also serves as sculptural wall decor.
What makes this idea useful is how the coil texture and narrow profile let you stack layers without the piece feeling bulky. You could adapt the same shape for a bathroom by shortening it slightly and using it to hold dried flowers or a small soap bottle. The white stripe breaks up the solid glaze color, so the same idea works well if you want to test simple color blocking on future pieces. For Pinterest, the combination of the hanging tab and visible coil ridges gives the project a clear handmade look that stands out from smooth wheel-thrown planters.
Giraffe Neck Coil Vessel

A tall coil-built vessel shaped like a giraffe neck and head makes a striking sculptural form. The stacked coils create horizontal ridges that run the full height, giving the piece clear texture and structure. The yellow glaze with irregular brown spots reinforces the giraffe pattern without needing extra painting. This approach turns a simple tall cylinder into a recognizable animal shape while keeping the vessel functional as a holder.
The shape does a lot of the work here because the narrow neck and wider base already echo a giraffe silhouette. You can adapt the same coil method to other long-necked animals or even abstract stacked forms. It works well as a dried-flower holder on a shelf or windowsill where height adds presence without taking much table space. For a simpler version, skip the head details and just vary the coil thickness or glaze pattern to keep the layered look.
Coiled Cylinder for Kitchen Pasta Storage
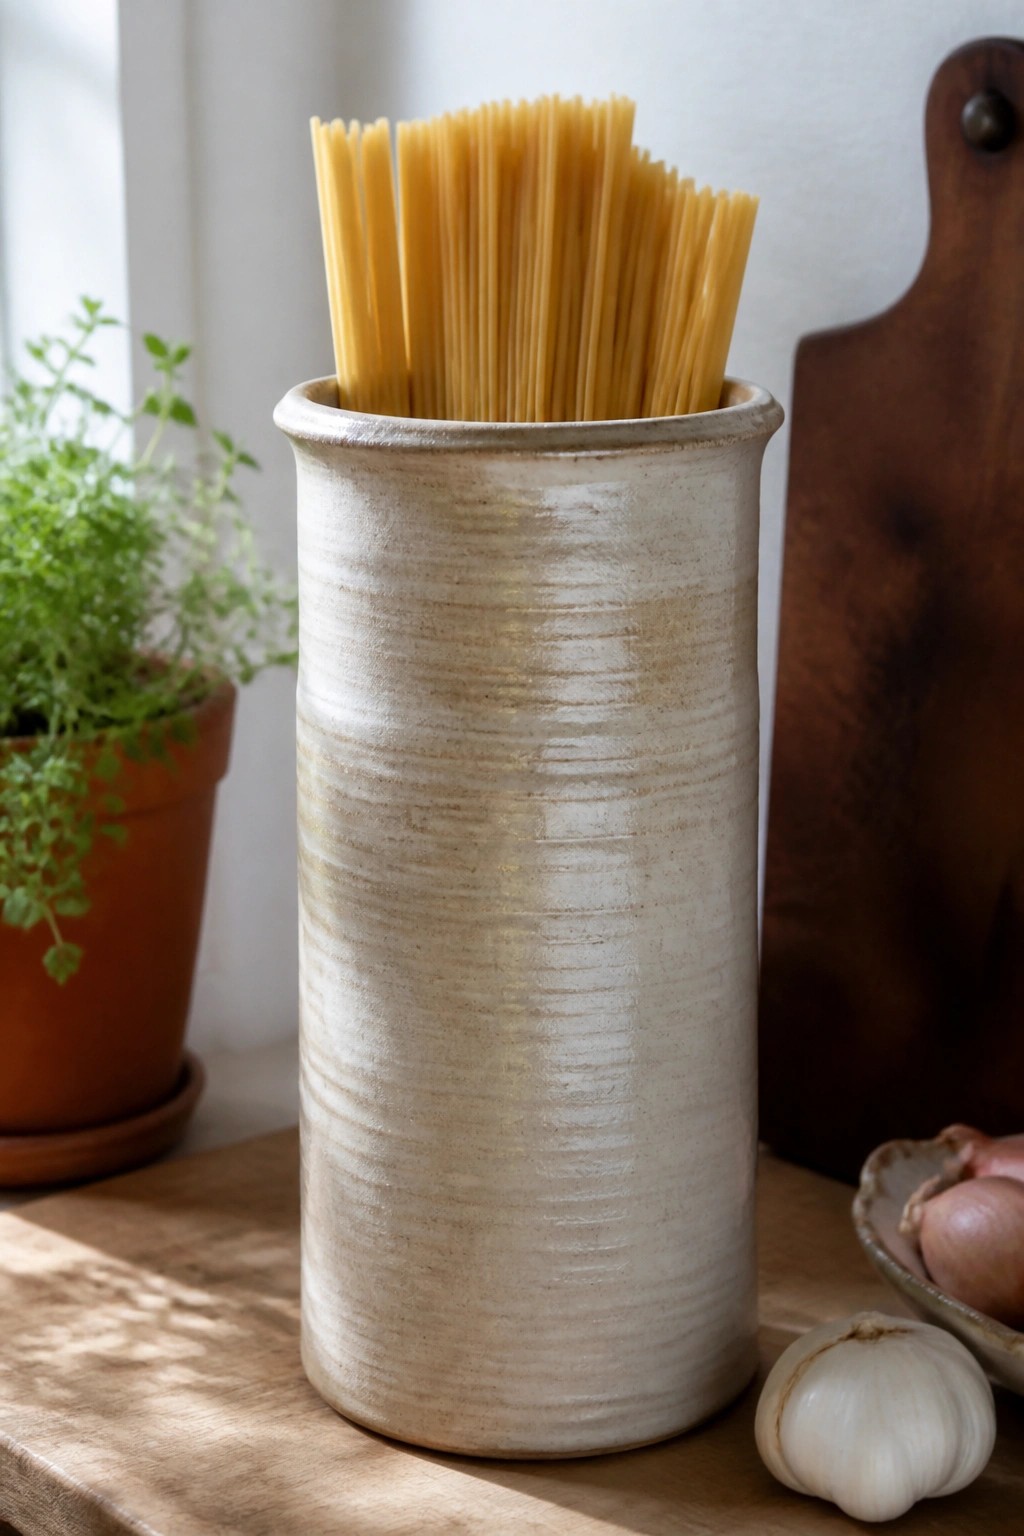
A tall cylindrical vessel formed from stacked coils creates a simple but effective holder for long dry pasta. The horizontal ridges from the coiling process remain visible on the surface, giving the piece texture and structure without extra carving or added details. This shape keeps spaghetti and similar noodles upright and contained on a counter while doubling as a functional kitchen object.
What makes this idea useful is how the same tall, narrow form can be adapted for other kitchen tools like wooden spoons or rolling pins. You can vary the width slightly during building to fit different items or leave the surface more or less smoothed depending on how much texture you want. The neutral clay tone and straightforward construction also make it easy to repeat in sets for a consistent look.
Tall Coiled Vase with Applied Branch Relief

A tall narrow vessel built from stacked coils forms the main body with consistent horizontal ridges that remain visible after firing. A separate clay branch with overlapping leaves and small buds is attached to the surface to create raised sculptural detail that contrasts with the ridged texture. The soft green glaze pools slightly in the recesses and along the coil lines, giving the relief a subtle two-tone effect. This approach combines basic coil construction with simple surface addition to produce a decorative vase.
What makes this idea useful is how the coil ridges already supply texture so the added branch does not need to cover the whole surface. The tall shape suits an entry table or shelf where vertical lines can stand out without taking up much width. You could rework the same relief technique on a shorter cylinder for a utensil holder or repeat smaller leaf clusters around a set of mugs. The branch motif can also be swapped for other simple forms like seed pods or abstract stems while keeping the same coil base.
Coil Built Match Holder with Vertical Texture Panel
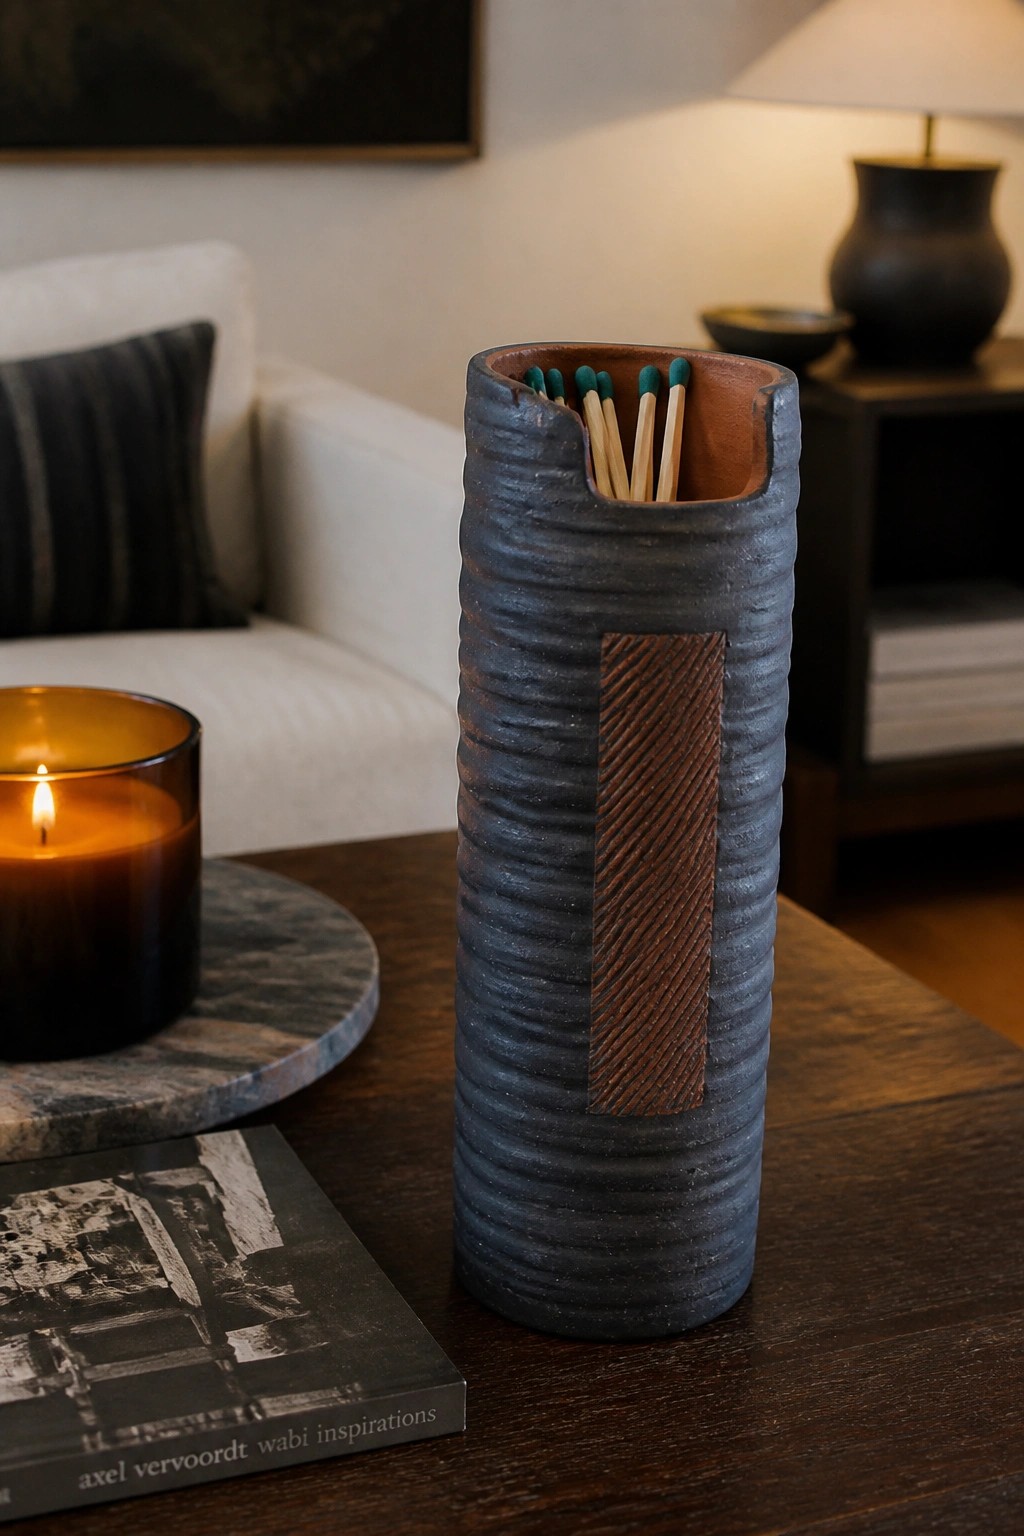
A tall cylindrical vessel formed from stacked coils produces a series of horizontal ridges that give the surface clear layered depth. Adding a vertical rectangular section scored with diagonal lines creates a strong contrast against the ridges while keeping the overall shape simple. The notched rim turns the vessel into a functional holder for matches or incense sticks without needing extra hardware.
What makes this idea useful is how the vertical panel can be swapped for a different pattern or a strip of contrasting clay to change the look quickly. The narrow tall shape fits well on a desk or shelf where it holds small items without crowding the surface. You could shorten the form for a smaller version or stretch the coils higher to make a candle holder that uses the same ridge-and-panel layout.
Coil-Built Caddy with Divided Storage Sections

A coil pottery caddy built with horizontal ridges creates three separate compartments in one piece. Two tall sections hold different types of flatware while a lower front slot keeps napkins stacked and easy to pull. Different colored glazes on each section make the divisions clear without needing extra labels or dividers.
The shape does a lot of the work here because the compartments sit at different heights, letting you reach spoons without moving the forks. This kind of piece works especially well on an outdoor table where space is limited and everything needs to stay in one spot. You could simplify the design by dropping the napkin slot and adding a fourth coil section for more utensils, or scale the whole thing down for a desk organizer that holds pens and notepads instead.
Hanging Planter Built from Stacked Coils

A tall tapered vessel formed entirely from coils creates a planter that hangs from a simple metal ring. The horizontal ridges left by the coils give the surface its main texture, while a flowing green glaze settles into the grooves and highlights the handmade layers. The narrow neck at the top makes it easy to suspend, and the wider base gives enough room for a small plant to root and trail outward.
What makes this idea useful is how the coil construction itself becomes the decoration, so you skip extra carving or stamping steps. The same shape works for a windowsill or porch corner where floor space is limited, and you can shorten the taper or widen the base if you want it to sit on a shelf instead. A piece like this stands out on Pinterest because the hanging format plus visible texture reads as sculptural without needing complex surface patterns.
Coil-Built Candle Holders with Stacked Rings

These candle holders are formed by stacking coils into a series of rounded rings that create a tall, segmented cylinder. The top rim is left wide enough for a standard taper candle, while the overall shape stays narrow enough to sit on a table without taking much space. A smooth gradient glaze in warm orange and beige tones settles into the grooves between rings, emphasizing the layered construction rather than hiding it. This keeps the focus on the coil-built structure as the main design element.
The shape does a lot of the work here because the repeated rings add visual height without needing extra surface decoration. You could adapt the same coil method to make shorter versions for tea lights or widen the base slightly for better balance on open shelving. In a living room or dining area, these pieces work well as a pair or grouped with simpler vessels to break up the line of a mantel or sideboard. The approach is easy to personalize by changing the glaze colors or varying the ring thickness on each one.
Frequently Asked Questions
What type of clay works best for building tall layered coil vessels? Stoneware or porcelain clays with high grog content are ideal because they provide the necessary strength and reduce shrinkage during drying and firing. Start with a medium to high fire clay body that has at least 20 percent grog to help the coils bond securely as you stack layers upward. Test small sample coils first to confirm the clay holds its shape without slumping.
How can I keep tall layered vessels stable while adding sculptural coils? Build in stages over several days so each layer firms up before adding the next. Use a supportive interior armature made from newspaper or foam that can be removed later, and score and slip every joint thoroughly. Keep the base wider than the top sections and compress the coils inward slightly as you build to create a balanced structure that resists tipping.
Which tools make it easier to create the 20 sculptural ideas shown? A basic set includes a wire cutter for slicing clay, wooden ribs for smoothing layers, a needle tool for scoring, and flexible plastic ribs for refining curves. Add a banding wheel to rotate the piece evenly while layering, and keep a spray bottle handy to maintain moisture so coils do not dry out before you finish the sculptural additions.
How do I add unique sculptural elements without weakening the layered form? Attach extra coils, flanges, or carved details only after the main vessel walls have stiffened to leather hard. Use slip generously and support heavier protrusions with temporary props until they set. Integrate textures by pressing stamps or carving into the coils while they are still soft, which keeps the overall height balanced and prevents cracks from forming later.
What firing schedule should I follow for large coil built vessels? Dry pieces slowly under plastic for at least two weeks to avoid stress cracks, then fire on a long bisque cycle that reaches cone 04 over eight to ten hours. For the glaze firing, use a slow ramp with holds at 1000 degrees Fahrenheit and 1800 degrees Fahrenheit to let moisture escape. Place the work on kiln stilts or a bed of sand to support the tall shape and prevent warping.

Pottery Path is my cozy corner of the internet where I share clay ideas, pottery inspiration, and simple projects you can recreate at home. I love exploring everything from air dry clay to handbuilt pottery to cute minis that brighten your day. My goal is to make clay crafting feel easy, fun, and welcoming for anyone who wants to try it.
You will find beginner friendly tutorials, creative pottery painting ideas, and lots of warm inspiration for slow and happy crafting. If you enjoy hands on creativity, this space will feel like home.