I have tried quite a few cone 10 glazes over the years.
Some of them create color breaks that add interest to my pottery.
I wanted to share the ones that stood out to me for their bold looks.
These ideas can give rich surfaces if you apply them right.
They are the kind of glazes I reach for when I want something a bit different.
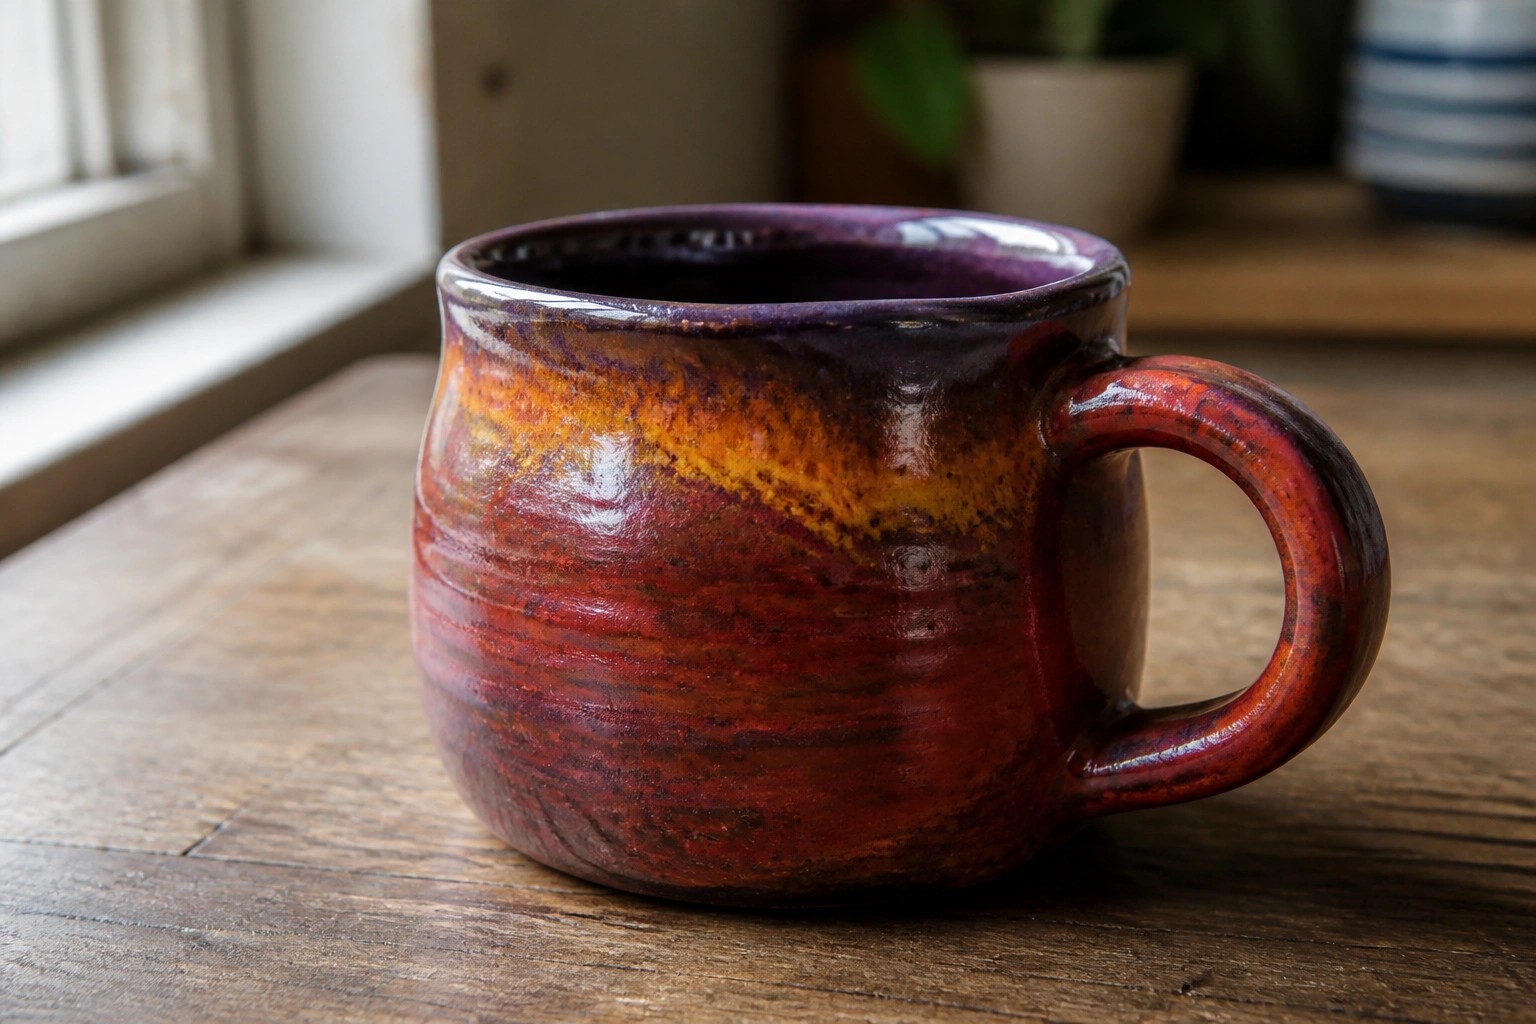
Layered Red Purple Cone 10 Glaze on a Stoneware Mug
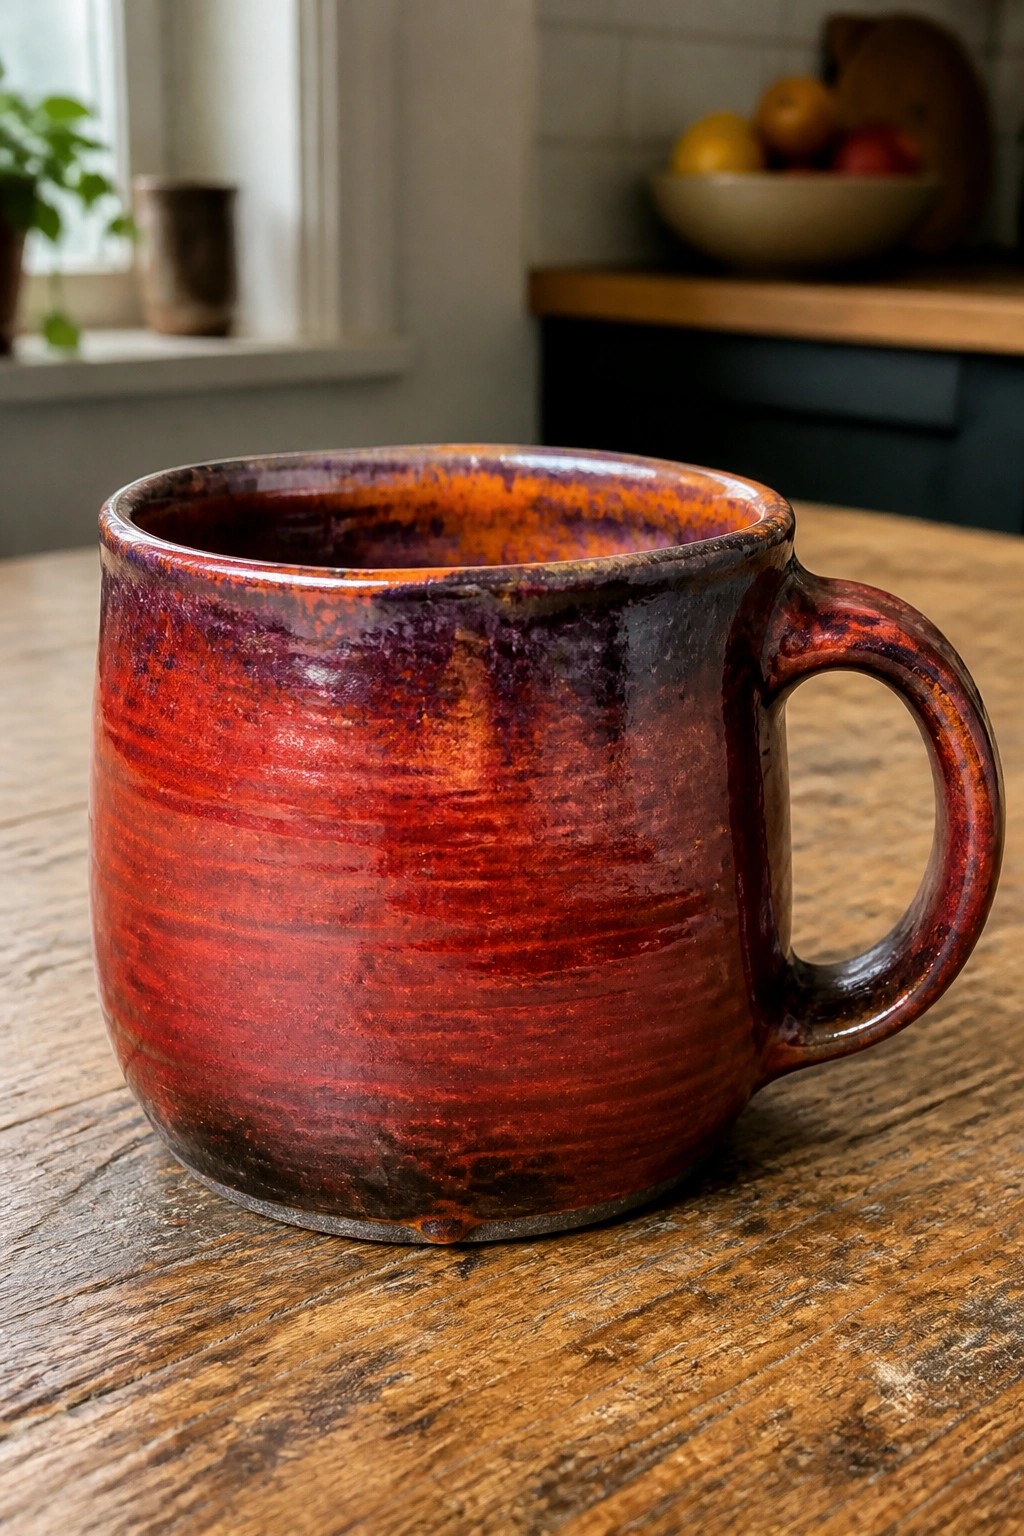
A wheel-thrown stoneware mug finished with a cone 10 glaze that moves from bright red-orange into deeper purple creates strong color breaks across the surface. The glaze follows the throwing ridges and pools unevenly, producing streaks and mottled areas that give the piece visual depth without added decoration. This works because the simple cylinder shape lets the glaze do the main work while the rim and handle pick up extra variation.
What makes this idea useful is that the same glaze can be tested on bowls or small pitchers to build a matching set. The high contrast between the red and purple tones helps the piece stand out in a kitchen cabinet or on a wooden table. You can rework the effect by brushing the glaze thinner on the lower half so the purple shows more at the top, or by trying it on a taller form where the streaks have more room to run.
Dramatic Pooling on a Wide Stoneware Bowl
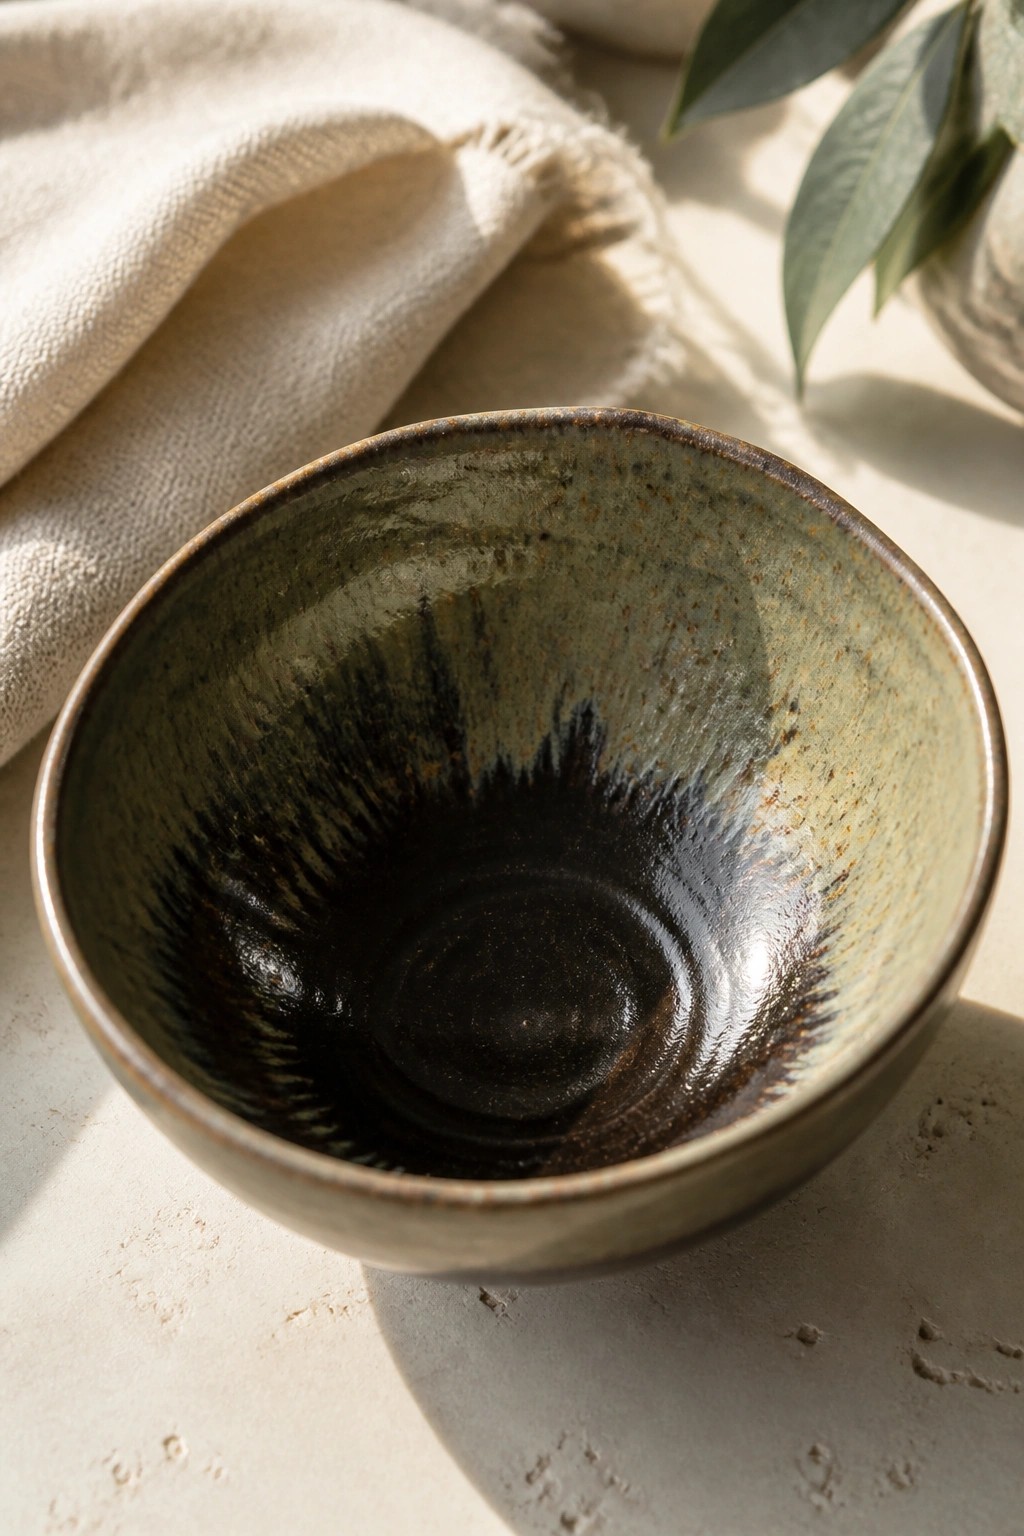
A wide stoneware bowl finished with a cone 10 glaze that breaks from greenish gray into dark brown and black. The glaze pools thickly in the center and thins toward the rim, letting the clay body show through in places. This works because the open shape gives the glaze room to move and settle during the high firing.
What makes this idea useful is how the simple form lets the glaze do all the visual work. You could apply the same glaze to a set of smaller bowls or a low platter and keep the same strong contrast. It photographs well for Pinterest because the dark center stands out against the lighter edges without any added carving or texture.
Combed Rim Plate with Flowing Cone 10 Glaze
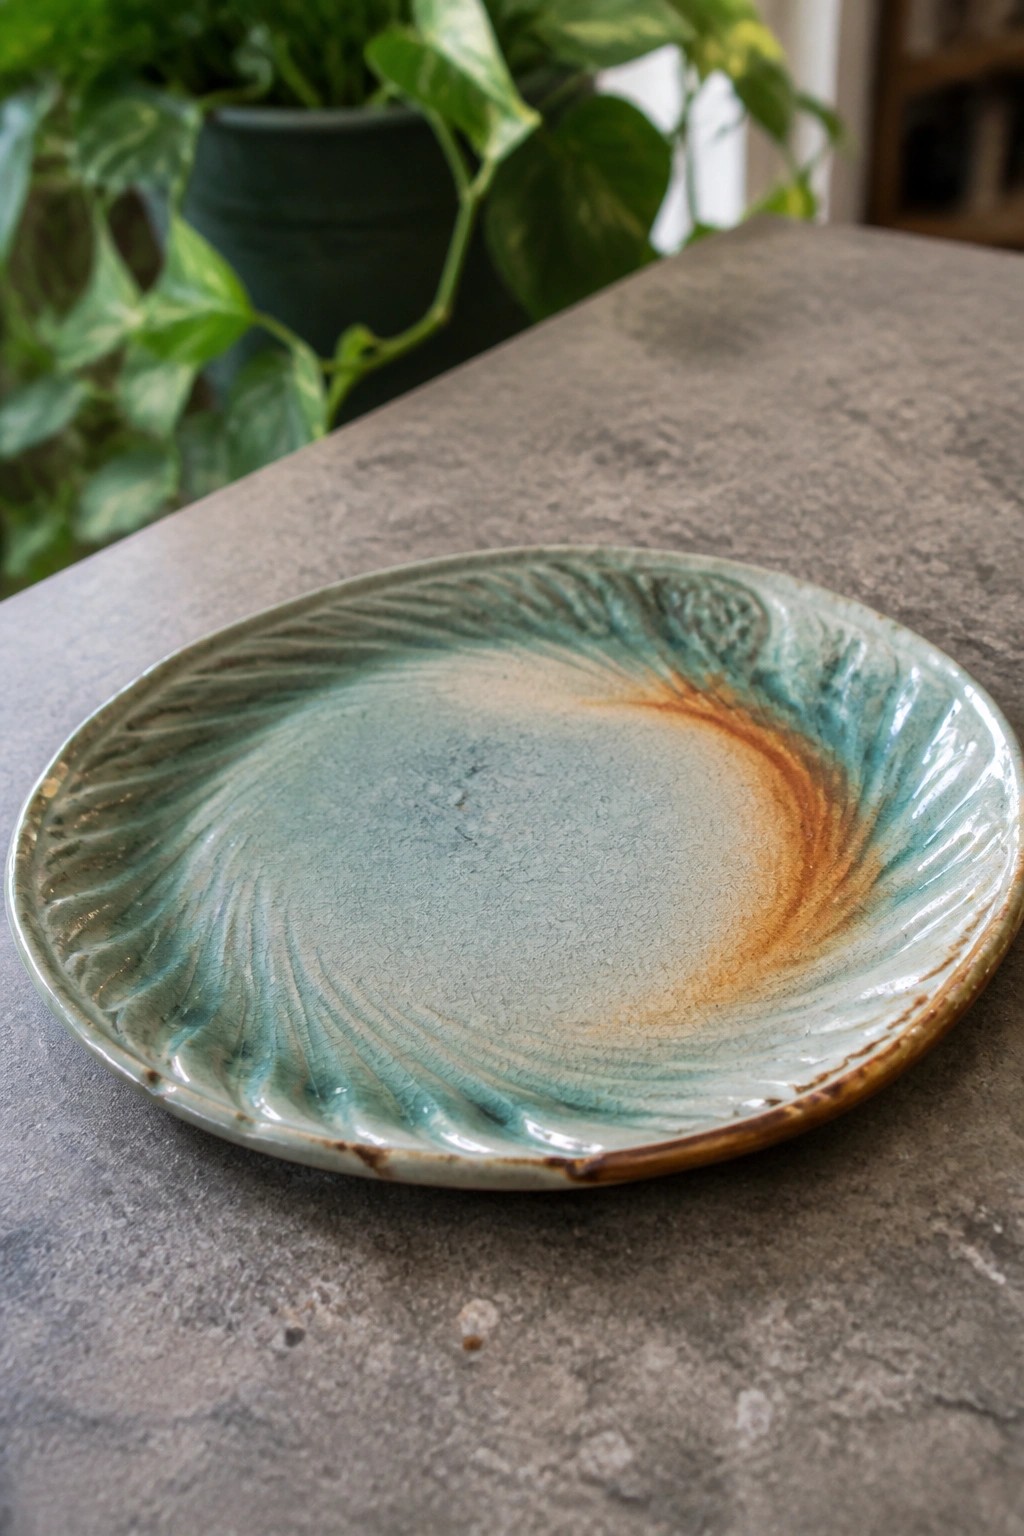
A shallow ceramic plate uses a combed rim treatment to create repeating ridges that catch and direct the glaze. The surface features a fluid blue-green glaze that breaks to warmer orange-brown tones where it thins across the center. This combination produces movement and color variation on a flat form while keeping the overall shape simple.
What makes this idea useful is how the combed edge gives the glaze a built-in structure to follow without extra carving. A piece like this works especially well as a serving plate or charger where the surface can be seen from above. You could repeat the same rim pattern on smaller dishes to build a matching set or apply it to the interior of a low bowl instead. The strong color shifts photograph clearly, which helps when posting finished work.
Cat Planter with Breaking Cone 10 Glaze
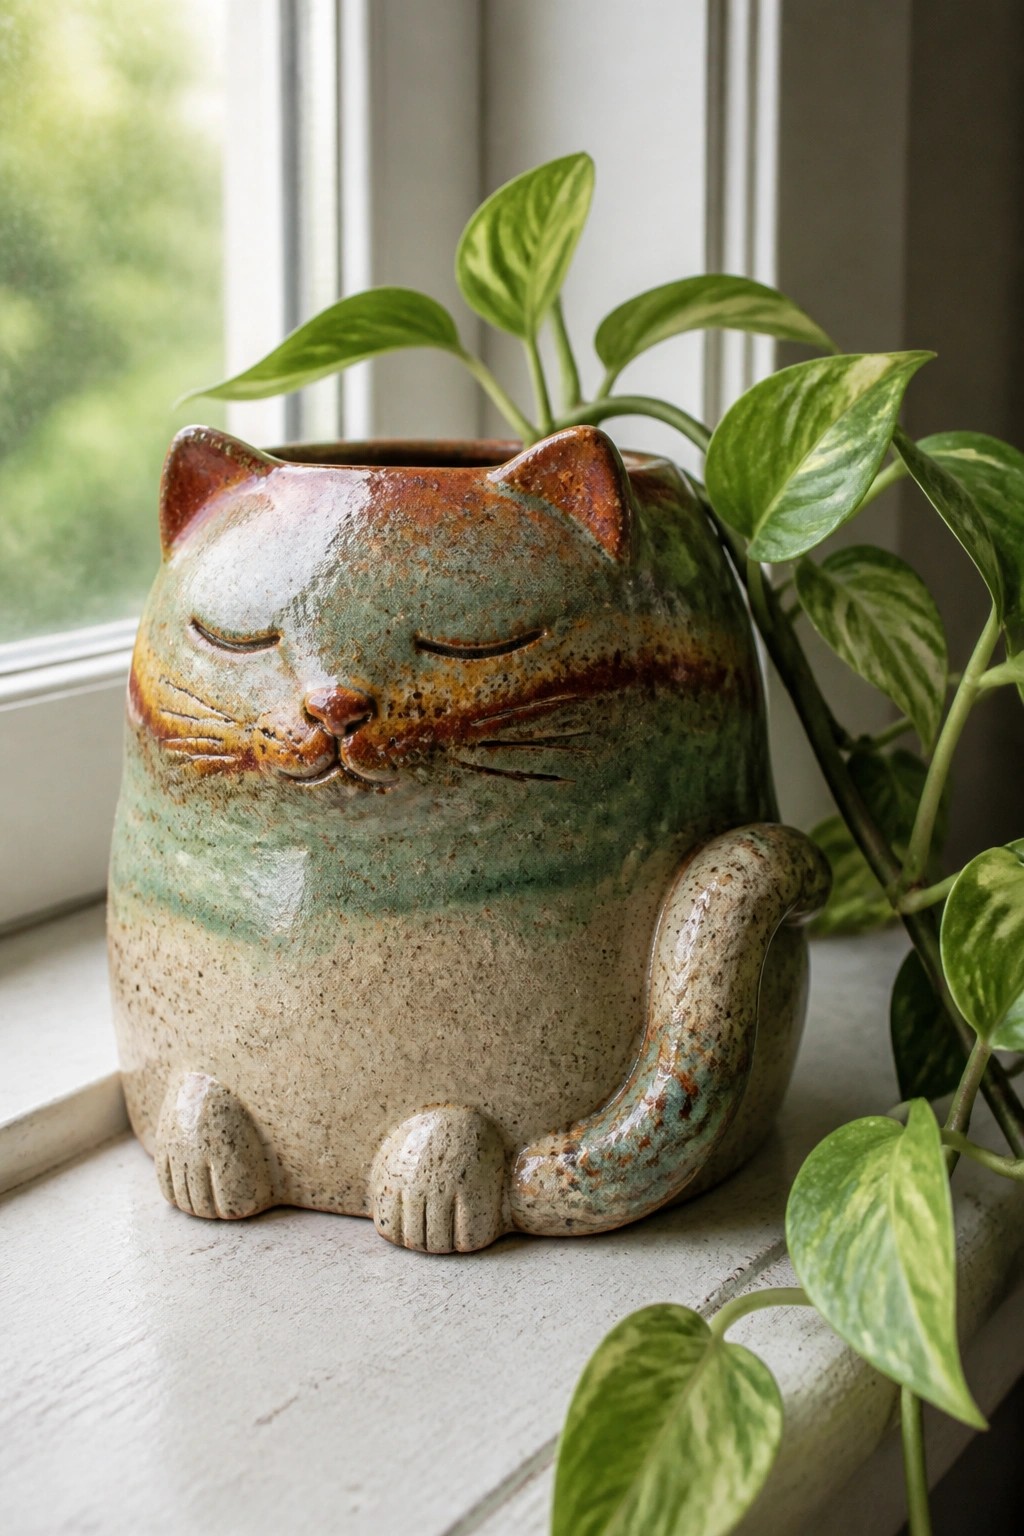
A cat-shaped ceramic planter combines a simple seated animal form with a Cone 10 glaze that breaks into shifting greens, browns, and creams across the curves and edges. The glaze pools deeper in the recessed areas around the eyes, whiskers, and tail while thinning over the raised surfaces to show lighter tones underneath. This approach turns the sculpted details into places where the glaze naturally creates contrast and movement without added painting or carving after the bisque stage.
The shape does a lot of the work here because the rounded body and protruding ears give the glaze multiple angles to run and separate during the high fire. You could adapt the same glaze layering to other animal forms or even a basic cylinder if you want the color breaks without the sculpting time. A piece like this fits well on a windowsill or shelf where it holds a small plant and catches light on the glossy surface. For a gift or quick project, the compact size means less clay and easier handling in the kiln while still delivering the dramatic surface effect.
Pooling Blue and Amber Glaze on a Rectangular Tray
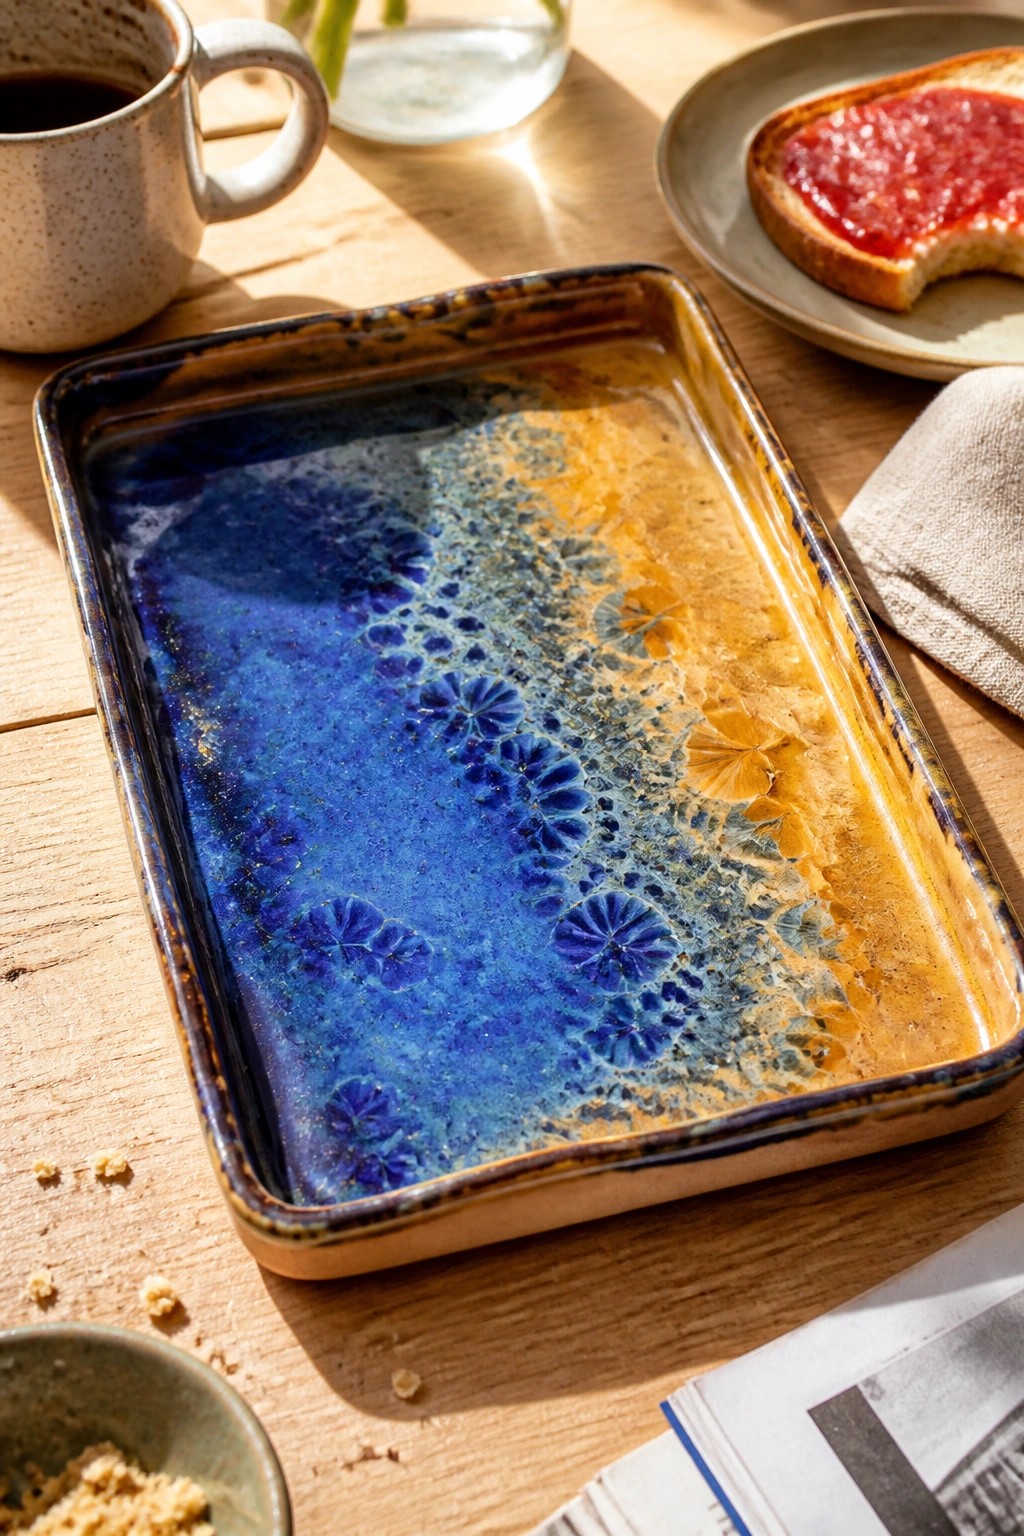
A rectangular ceramic tray finished with a cone 10 glaze that pools heavily into deep blues while breaking into amber and gold across the surface. The flat interior gives the glaze room to form scattered circular patterns and metallic flecks where the colors shift. This approach relies on the natural movement of the glaze during firing rather than added surface decoration.
What makes this idea useful is that the tray shape provides a large, stable area for dramatic color breaks to develop fully. You could adapt the same glaze pairing to smaller rectangular dishes or a set of plates to test how the pooling behaves at different scales. In a kitchen this kind of piece works as both a serving tray and a visual focal point because the high contrast between the blue and orange sections draws attention without extra detail. The format also translates easily to a wall-mounted version if you want the glaze effect without the functional tray.
Drippy Iron Glaze on a Tall Bottle Vase
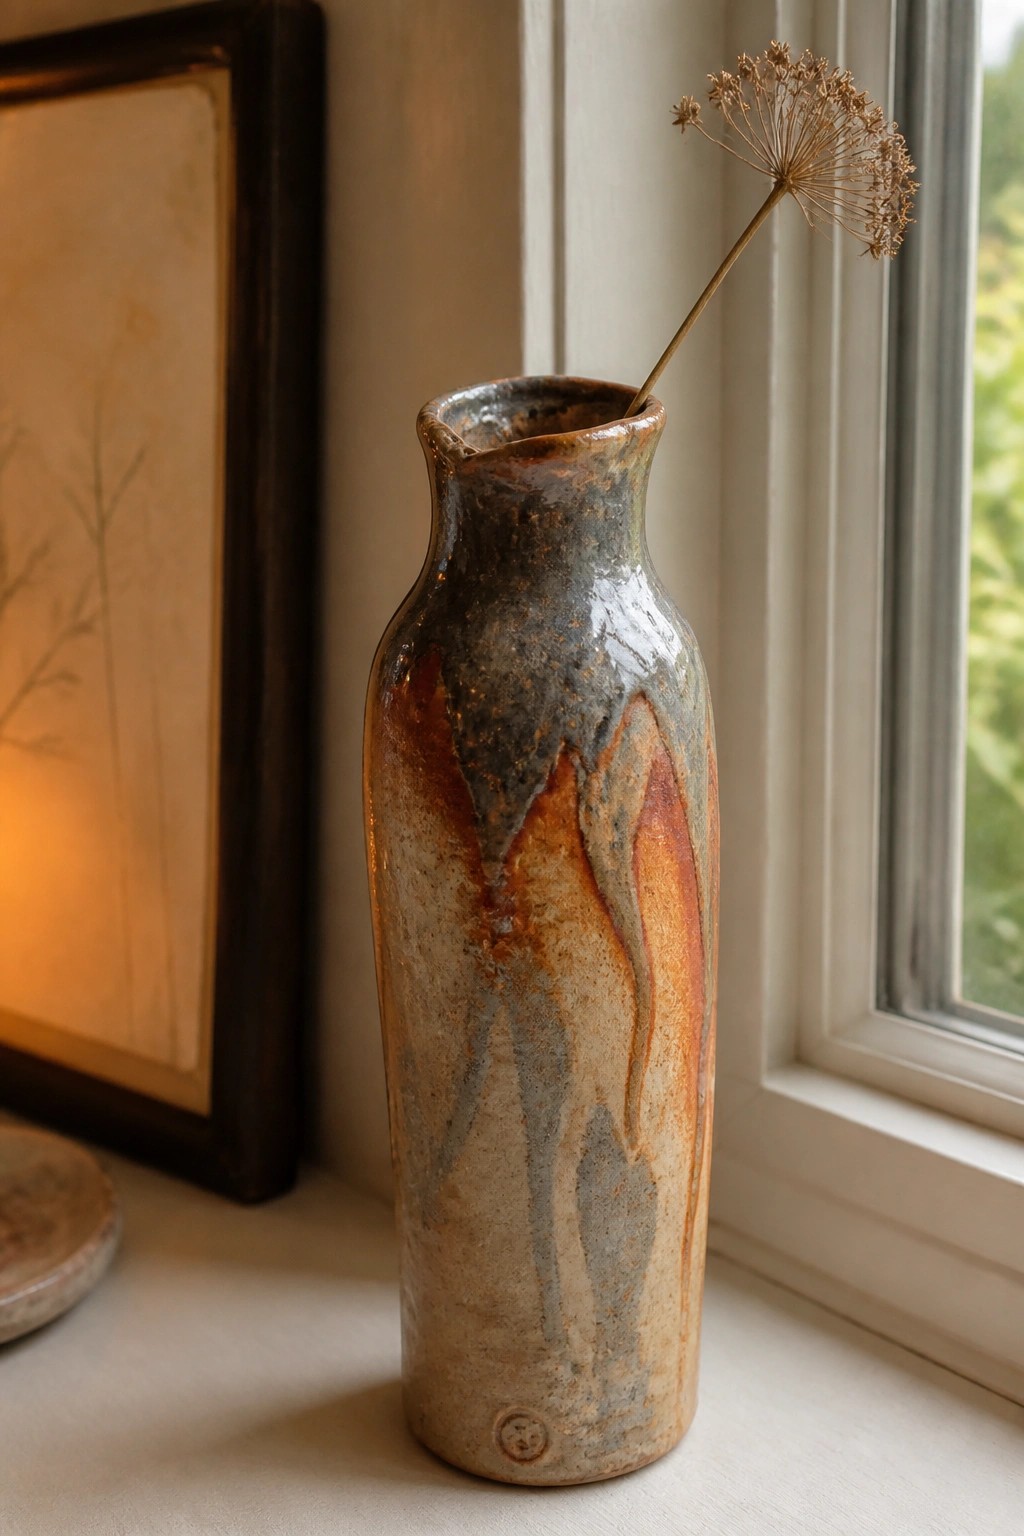
A tall, narrow bottle vase uses a cone 10 glaze that breaks from gray into warm orange and brown where it thins and runs. The glaze creates long vertical drips and pools that emphasize the form without any carving or added texture. This approach relies on the firing to produce the surface interest on a simple wheel-thrown shape.
What makes this idea useful is how the vertical walls give the glaze room to move and show its color shifts clearly. The same glaze would work on a shorter cylinder or a wider pitcher if you want the drips to settle differently. A piece like this fits on a shelf or windowsill and needs only a single stem or branch to look finished.
Purple Flow Breaks on a Speckled Oval Spoon Rest
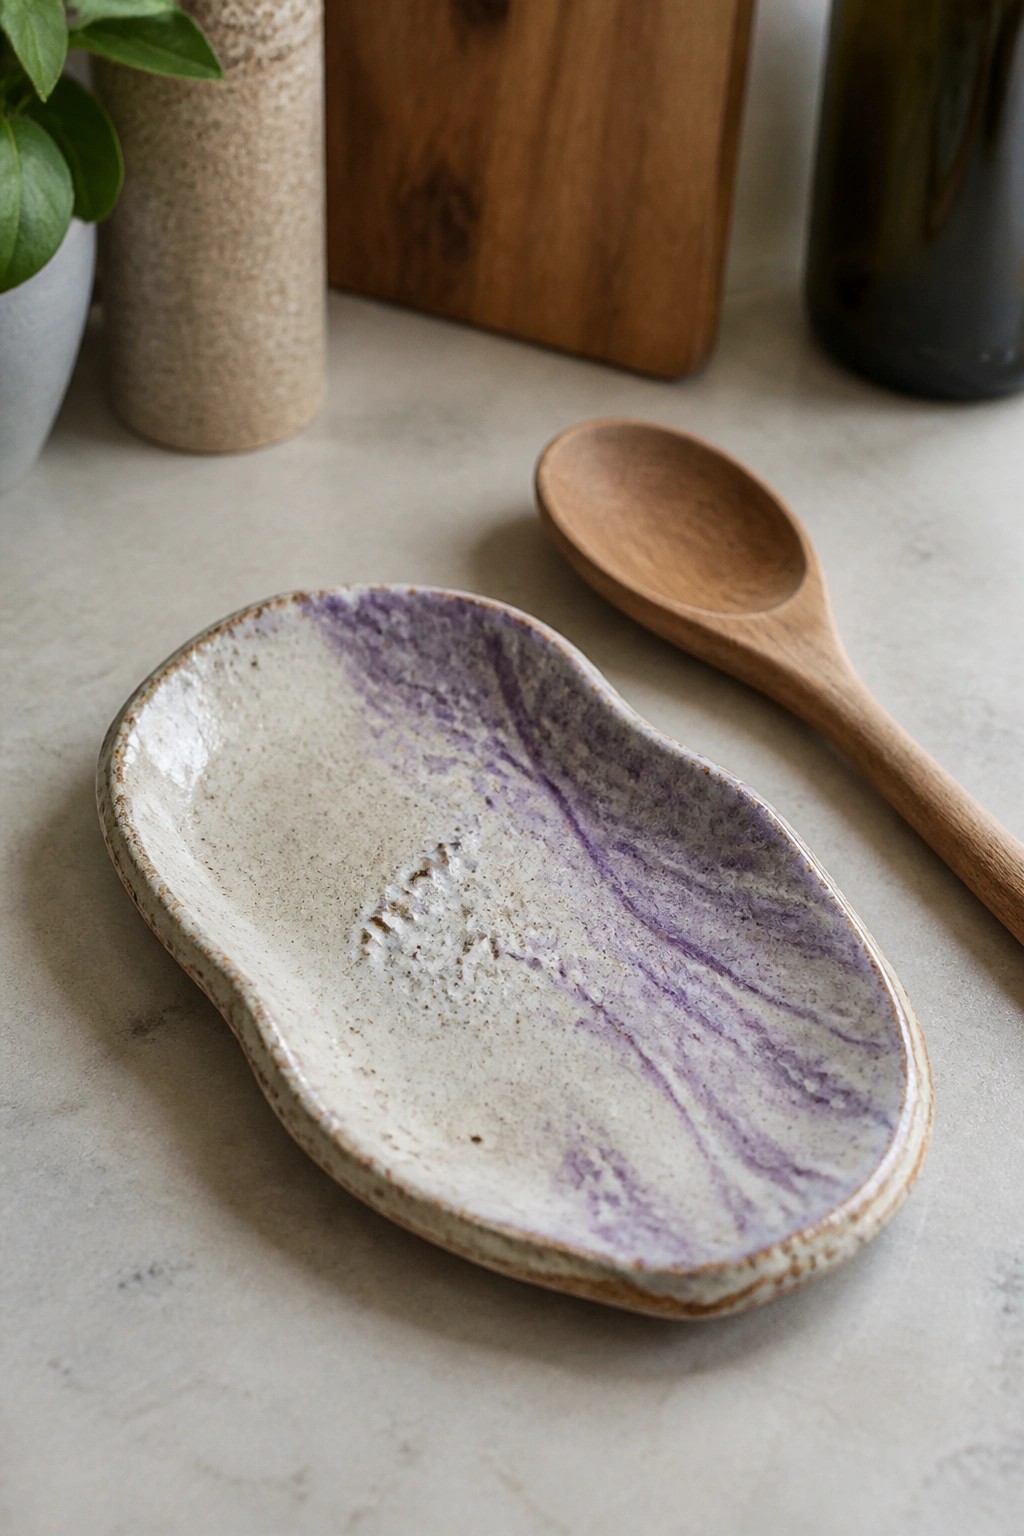
A small oval ceramic tray uses a flowing purple glaze over a speckled off-white base to create visible color breaks and movement across the surface. The irregular shape keeps the eye moving along the glaze streaks while the matte texture helps the purple separate and pool in places. This approach works as a simple kitchen piece like a spoon rest or small prep dish where the glaze effect can be seen up close.
The shape does a lot of the work here because the low oval form is quick to throw or hand-build and needs little trimming. A piece like this works especially well as a spoon rest next to the stove or as a small catch-all on a counter. The same glaze combination could be adapted to a larger tray or a set of small plates by keeping the base speckled and letting the purple run in one direction. The contrast between the two tones makes the surface stand out in photos without needing extra decoration.
Dripping Brown Glazes on Compact Tea Light Holders
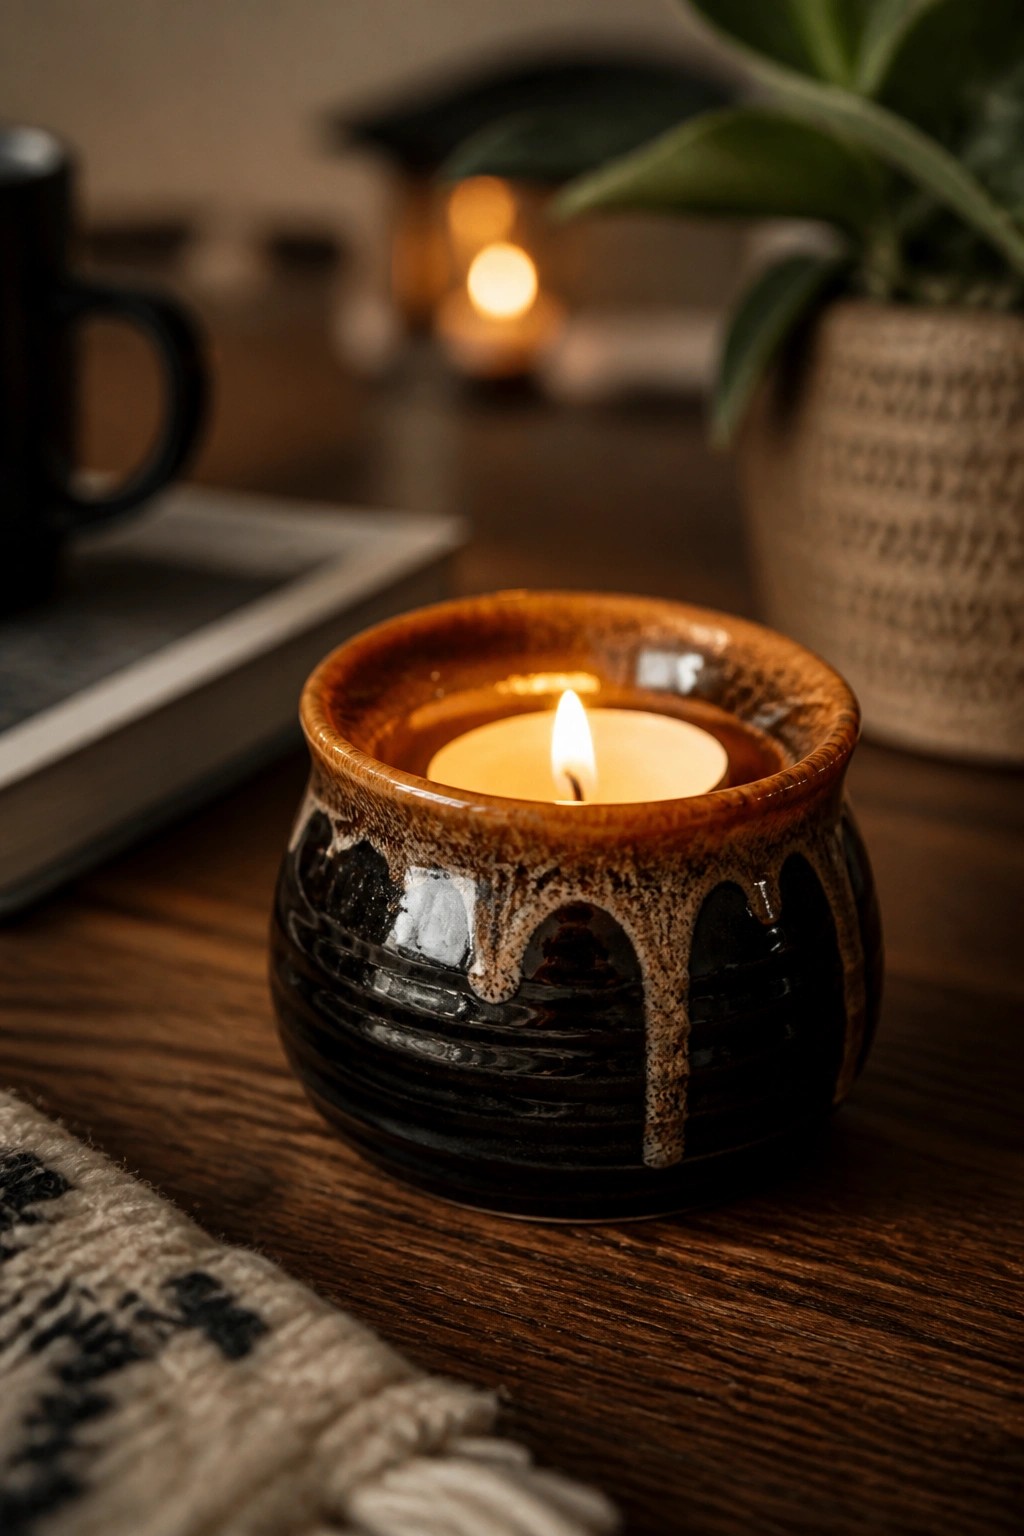
A small rounded tea light holder in dark stoneware shows how a fluid brown glaze can be applied over a saturated base so it breaks and runs during a cone 10 firing. The drips collect along the shoulder and create visible streaks and pools that highlight the simple wheel-thrown curve. Keeping the form low and wide gives the glaze plenty of vertical surface to travel without overwhelming the piece.
What makes this idea useful is how the same drip placement works on other small functional shapes such as pinch bowls or spoon rests. The limited size lets you test strong color breaks without committing to a large piece or using much kiln space. You can swap the dark base for a different iron-rich clay body and still keep the contrast that shows up clearly in photos.
Leaf-Shaped Ring Dish with Breaking Cone 10 Glaze
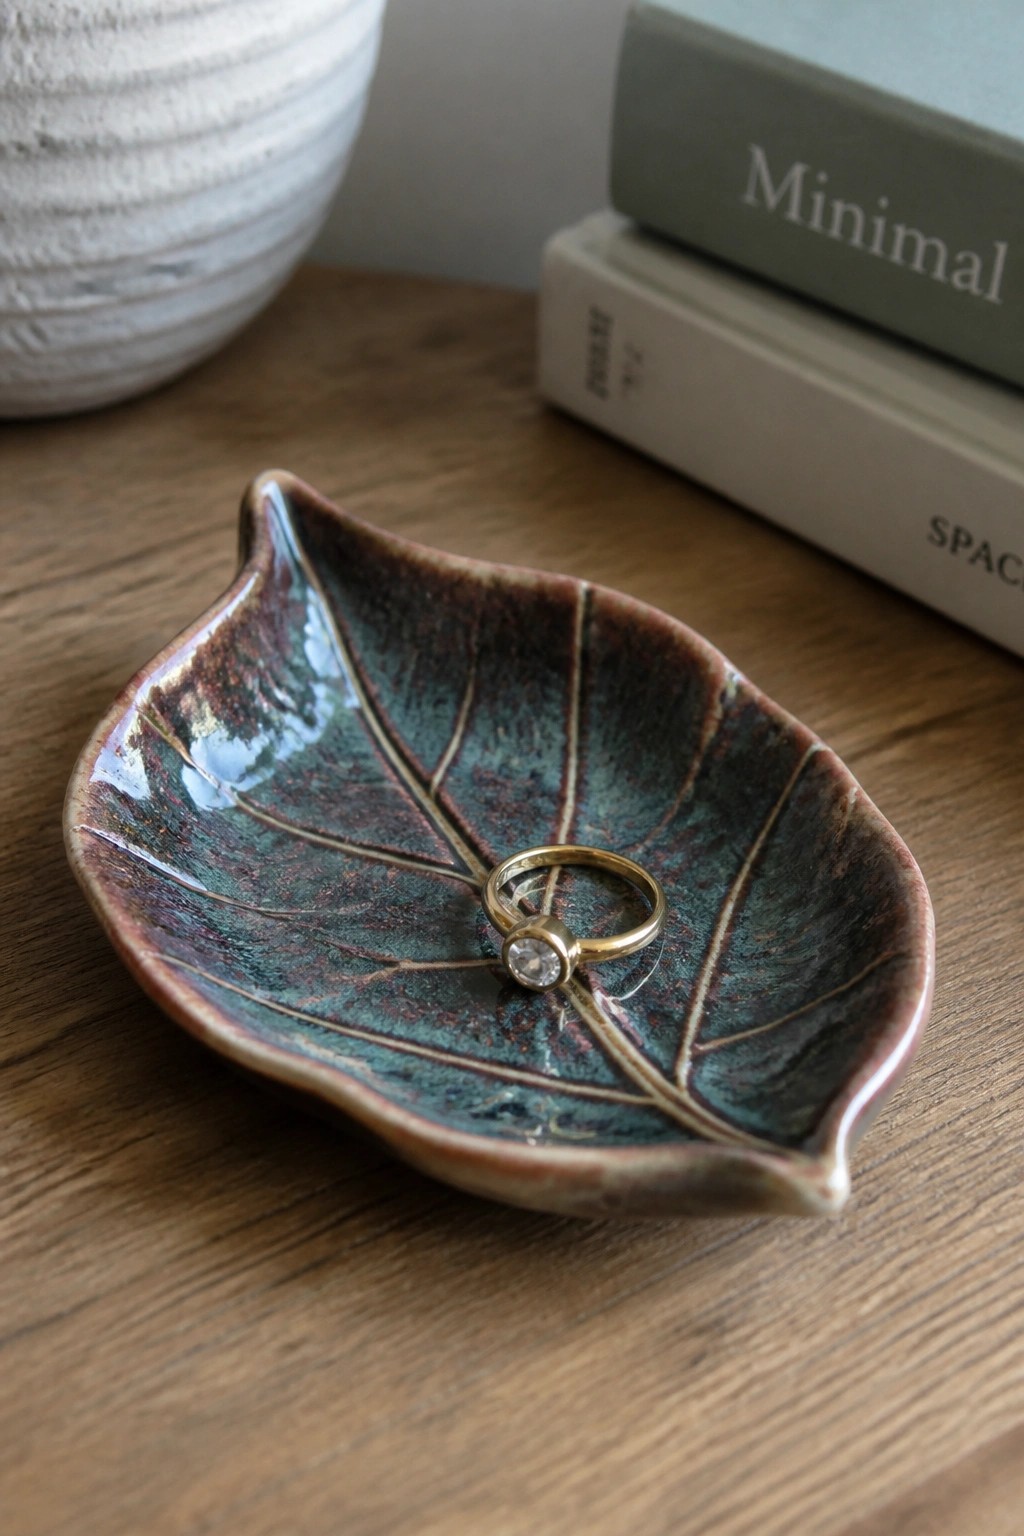
A leaf-shaped ring dish gives you a compact way to test how a cone 10 glaze breaks across raised veins and thinner edges. The form is usually made from a simple slab or press mold, then the glaze pools differently in the recesses to produce the shift from green to brown and rust. This setup lets the clay and glaze do the work, so you get varied color without added carving or underglaze.
The small size fits easily on a dresser or desk for daily jewelry storage. You can scale the same leaf template up for a soap dish or down for a pendant holder, or swap in another breaking glaze to see how the edges and center respond. What makes this idea useful is how the veins guide the glaze movement, so the finished piece shows clear variation even on a single firing.
Jewelry Dish with Cone 10 Glaze Breaks
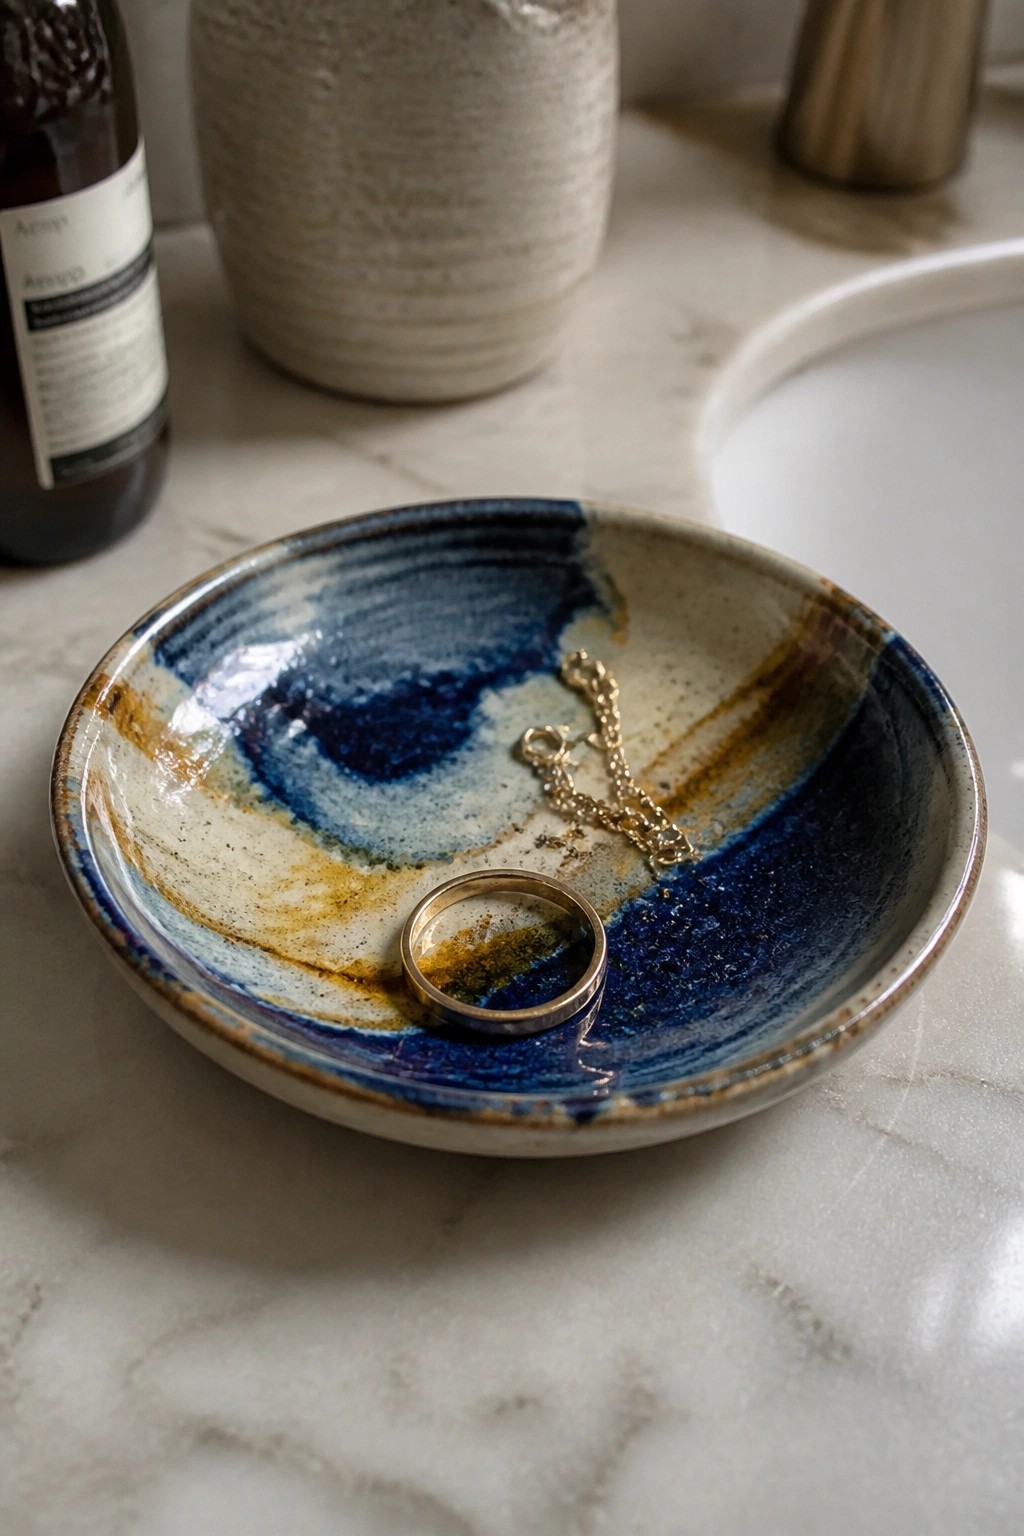
A small ceramic dish makes an effective jewelry holder when finished with a cone 10 glaze that separates into distinct color zones. The glaze thins on raised areas and pools in the center, creating sharp shifts from deep blue to brown and cream. This approach works especially well on a low, open form because the surface stays mostly visible and the movement of the glaze stays easy to read.
The compact shape fits on a bathroom counter or bedside table without crowding other items. You can scale the same glaze idea down to a square tray or up to a shallow plate if you want more surface area for larger pieces. The strong color breaks also photograph clearly, which helps the finished piece stand out in project roundups or shop listings.
Double Compartment Dish for Glaze Contrast
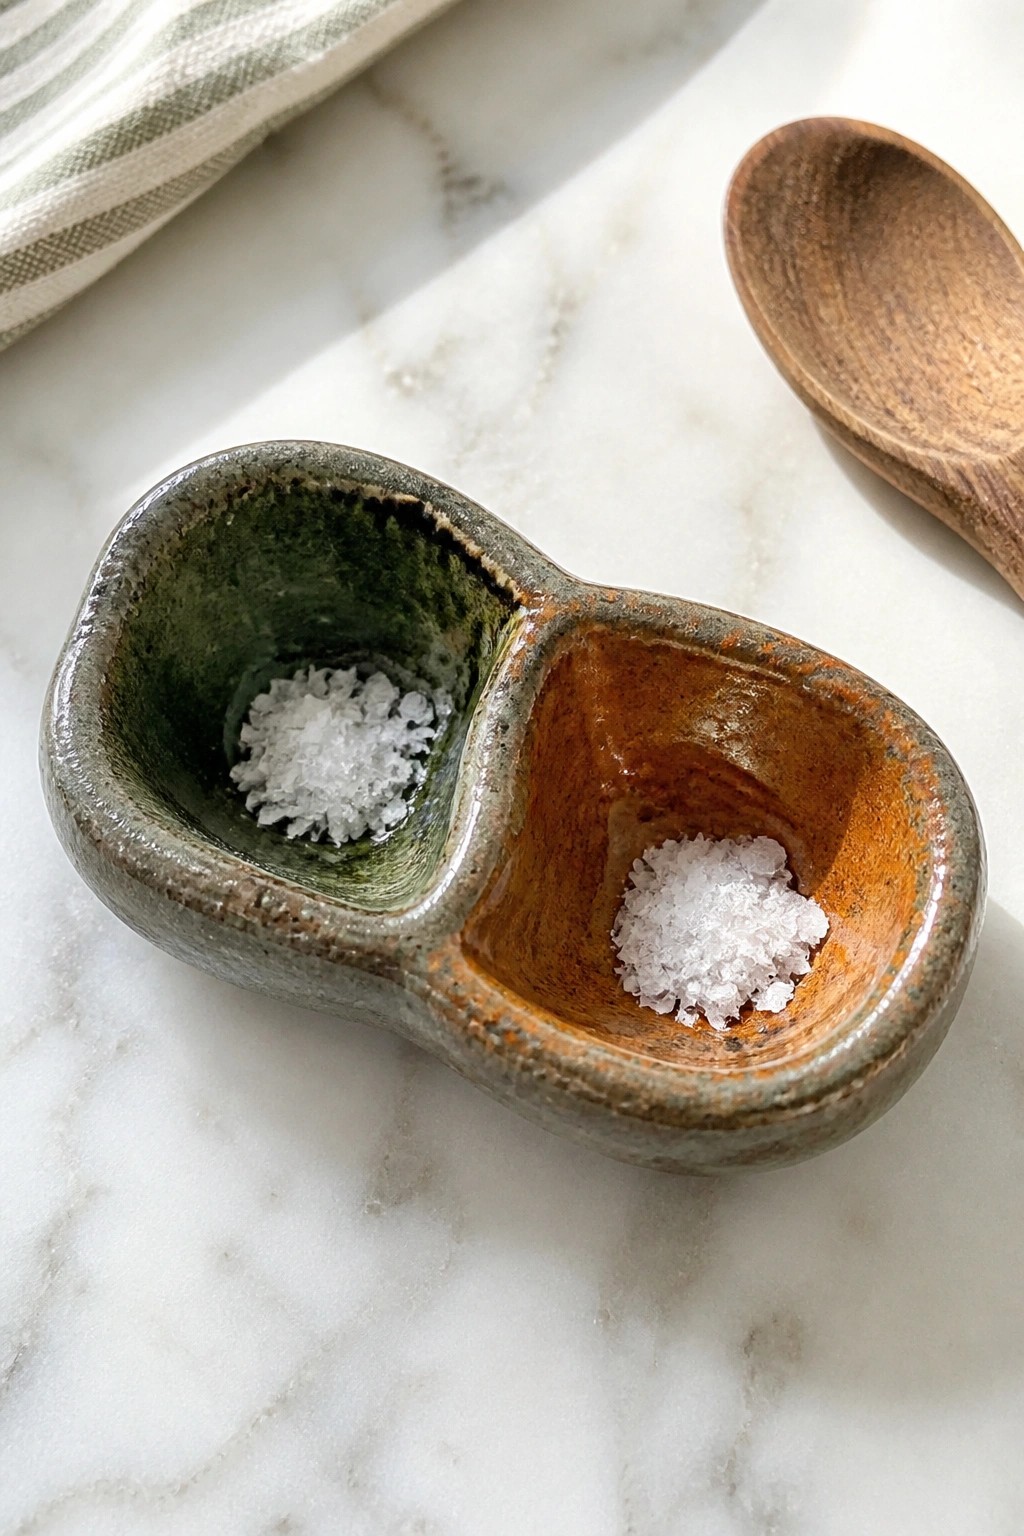
A small double-chambered dish lets you place two different cone 10 glazes side by side in separate wells so each one can develop its own color and texture. The left chamber uses a green glaze while the right uses a warmer orange-brown, creating clear visual separation that highlights how the glazes break and pool on their own. This shape works as a kitchen item for salt, pepper, or small spices and keeps the two surfaces distinct during firing.
The compact size makes it simple to fit on a counter or table without taking much space. You can adapt the form by trying other glaze combinations in each well or adjusting the depth of the chambers for different amounts of seasoning. A piece like this photographs clearly for reference because the divided layout shows exactly how each glaze performs next to the other.
Spiral Yarn Bowl with Breaking Blue Glaze
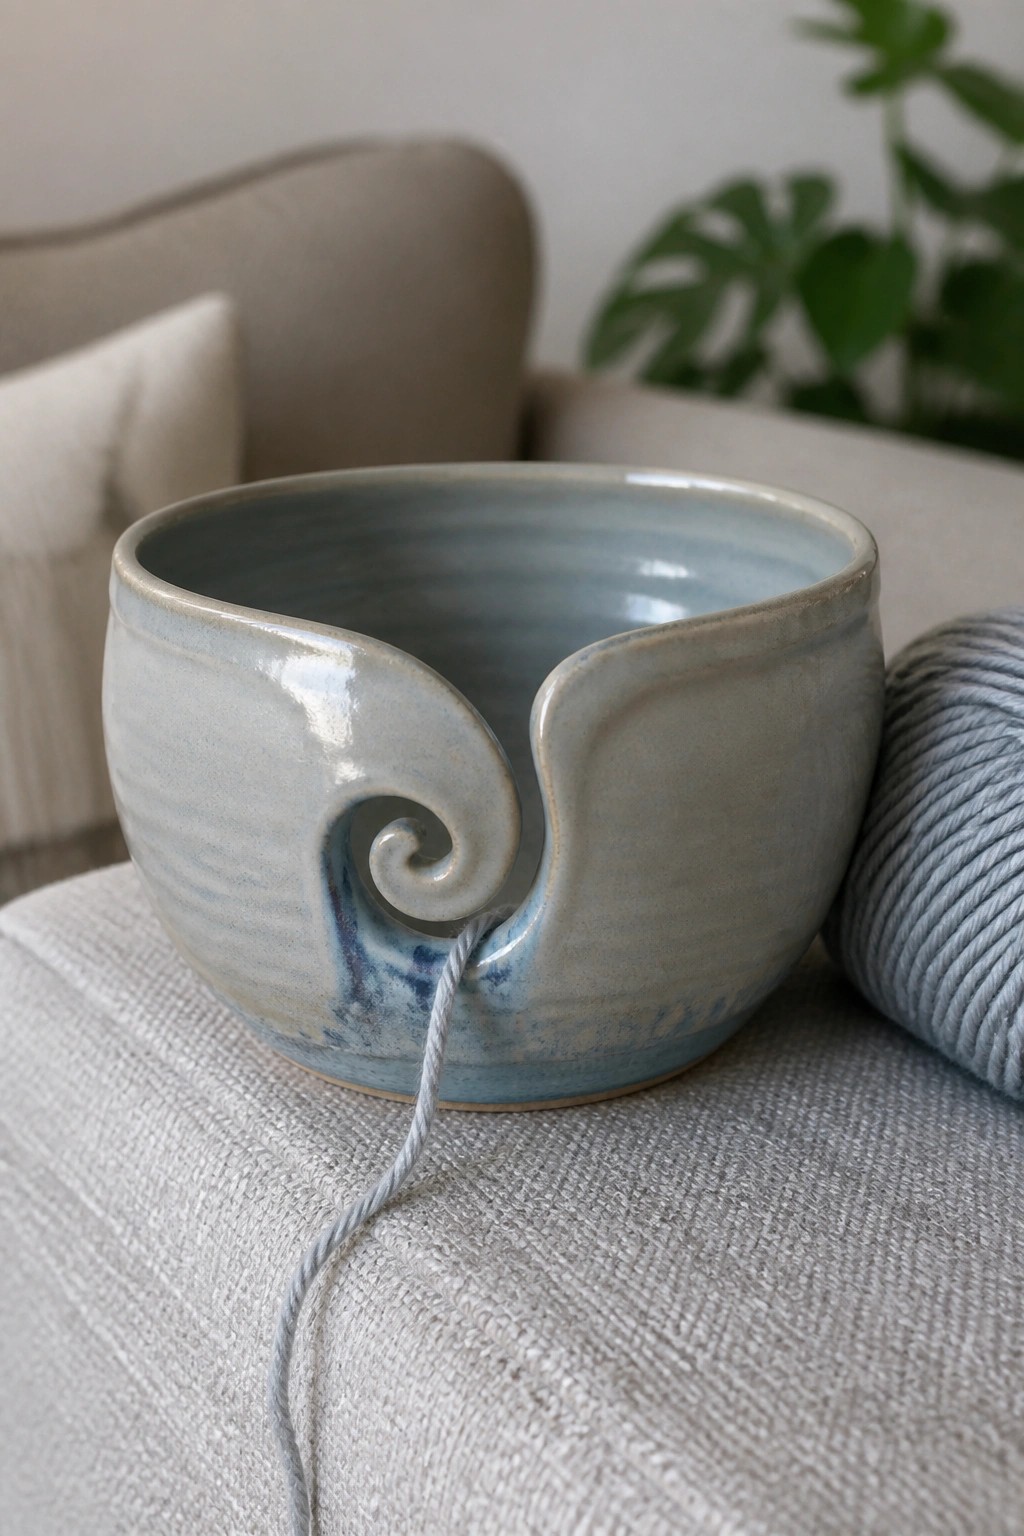
A yarn bowl shaped from stoneware includes a large spiral cutout on one side so the strand can pull freely without the ball rolling away. The light blue cone 10 glaze shows soft pooling and small color breaks along the inner curve of the spiral, giving the surface quiet variation against the clay body. This turns an ordinary bowl into a functional holder that fits neatly beside a knitting project or on a craft table.
What makes this idea useful is the way the cutout becomes part of the form instead of an afterthought. You could repeat the same spiral notch on a smaller bowl for embroidery thread or scale it up for chunky yarns and roving. The glaze performs well at cone 10 because the modest breaks accent the curve without covering the whole surface. In a studio or living space, the bowl keeps yarn contained while still serving as a simple decorative piece when not in use.
Cone 10 Drip Glaze on a Multi-Hole Holder
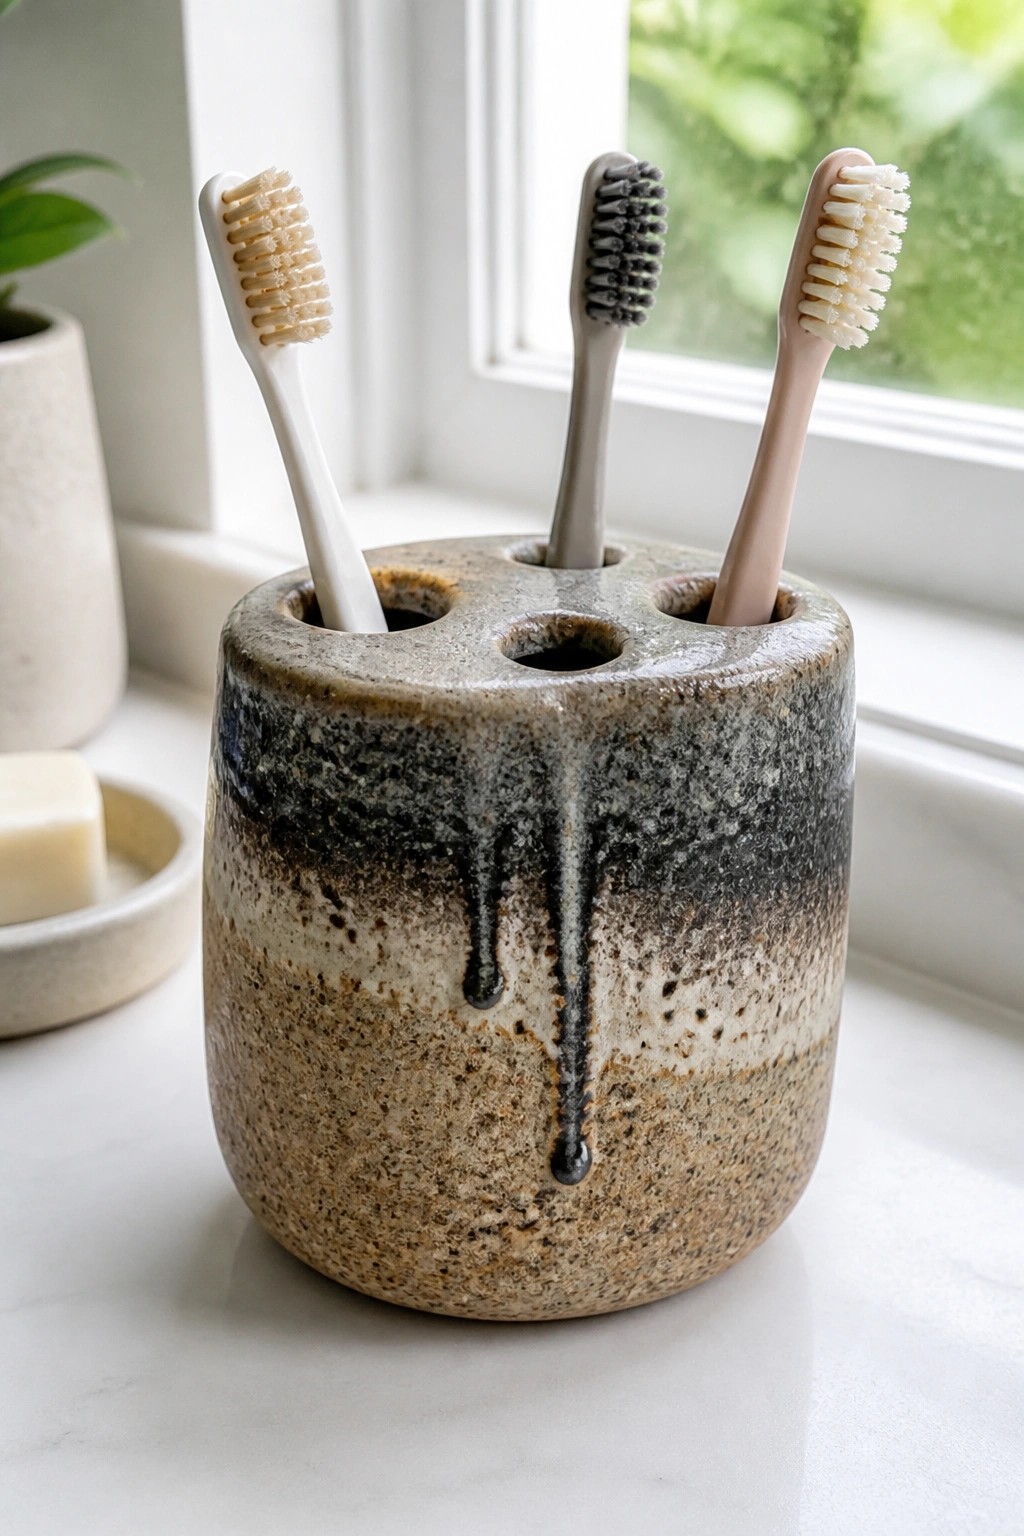
A simple cylindrical holder with three drilled openings works well for storing toothbrushes or small tools. The glaze combines a mottled base of brown and beige with a dark, fluid layer that breaks into long drips down the sides. The speckled clay body shows through in places, creating contrast and surface variation that reads clearly at cone 10 temperatures. This approach turns a basic bathroom form into a vehicle for showing off dramatic glaze movement without extra carving or texture.
The shape does a lot of the work here because the vertical walls give the drips a clear path to run and pool. You can adapt the same glaze layering to soap dishes, small vases, or utensil crocks by keeping the walls straight and the rim simple. In a bathroom setting the holder stays practical while the dark drips add enough visual weight to stand out against tile or marble. The idea is easy to scale down to a two-hole version or swap into a wider planter shape if you want to test the same glaze on a different profile.
Cone 10 Red to Dark Speckled Break on a Bird Figurine
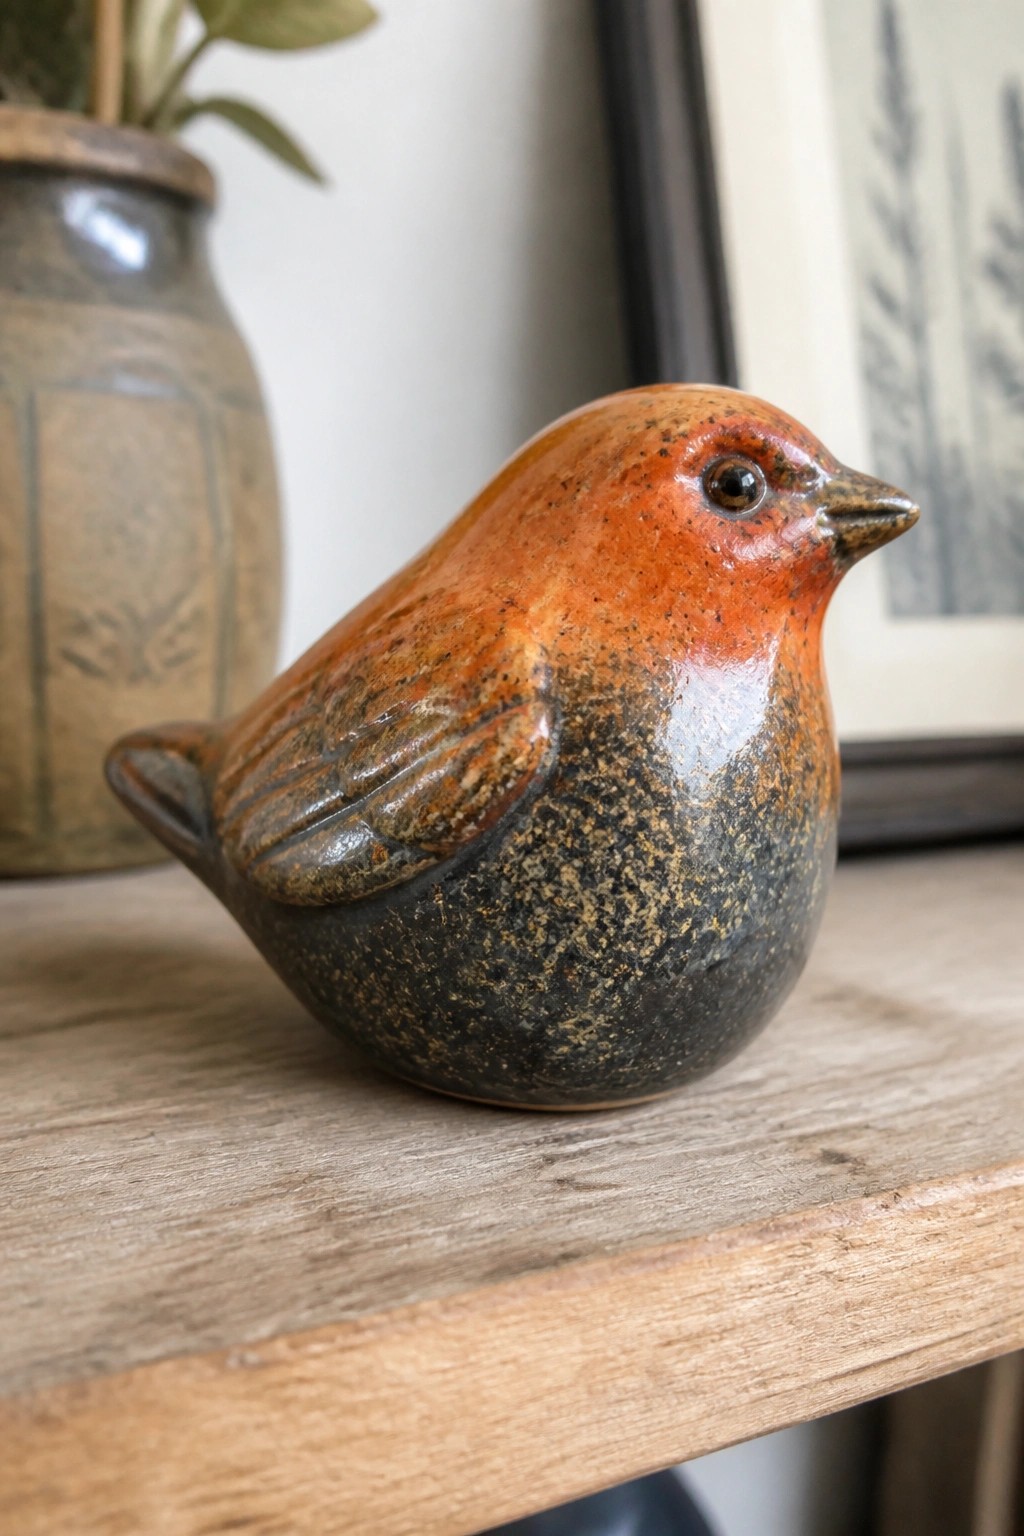
A small bird figurine shows how a cone 10 glaze can shift from a warm red-orange on the head and upper body into a dark, iron-rich lower section with heavy speckling. The sculpted wing lines hold the glaze differently across the form, which helps the color break stay readable instead of blending into one tone. This works as a simple decor object where the glaze movement supplies the main interest without extra carving or underglaze work.
What makes this idea useful is how the rounded shape lets the glaze flow and break naturally during a high firing. You can scale the same approach down to a smaller egg form or try it on a different animal body to test how the color split changes. On a shelf or mantel, the strong contrast stands out even when grouped with other pieces. The compact size also makes it practical for testing new cone 10 recipes without using much clay or kiln space.
Bold Red Glaze Breaks on a Compact Cream Pitcher
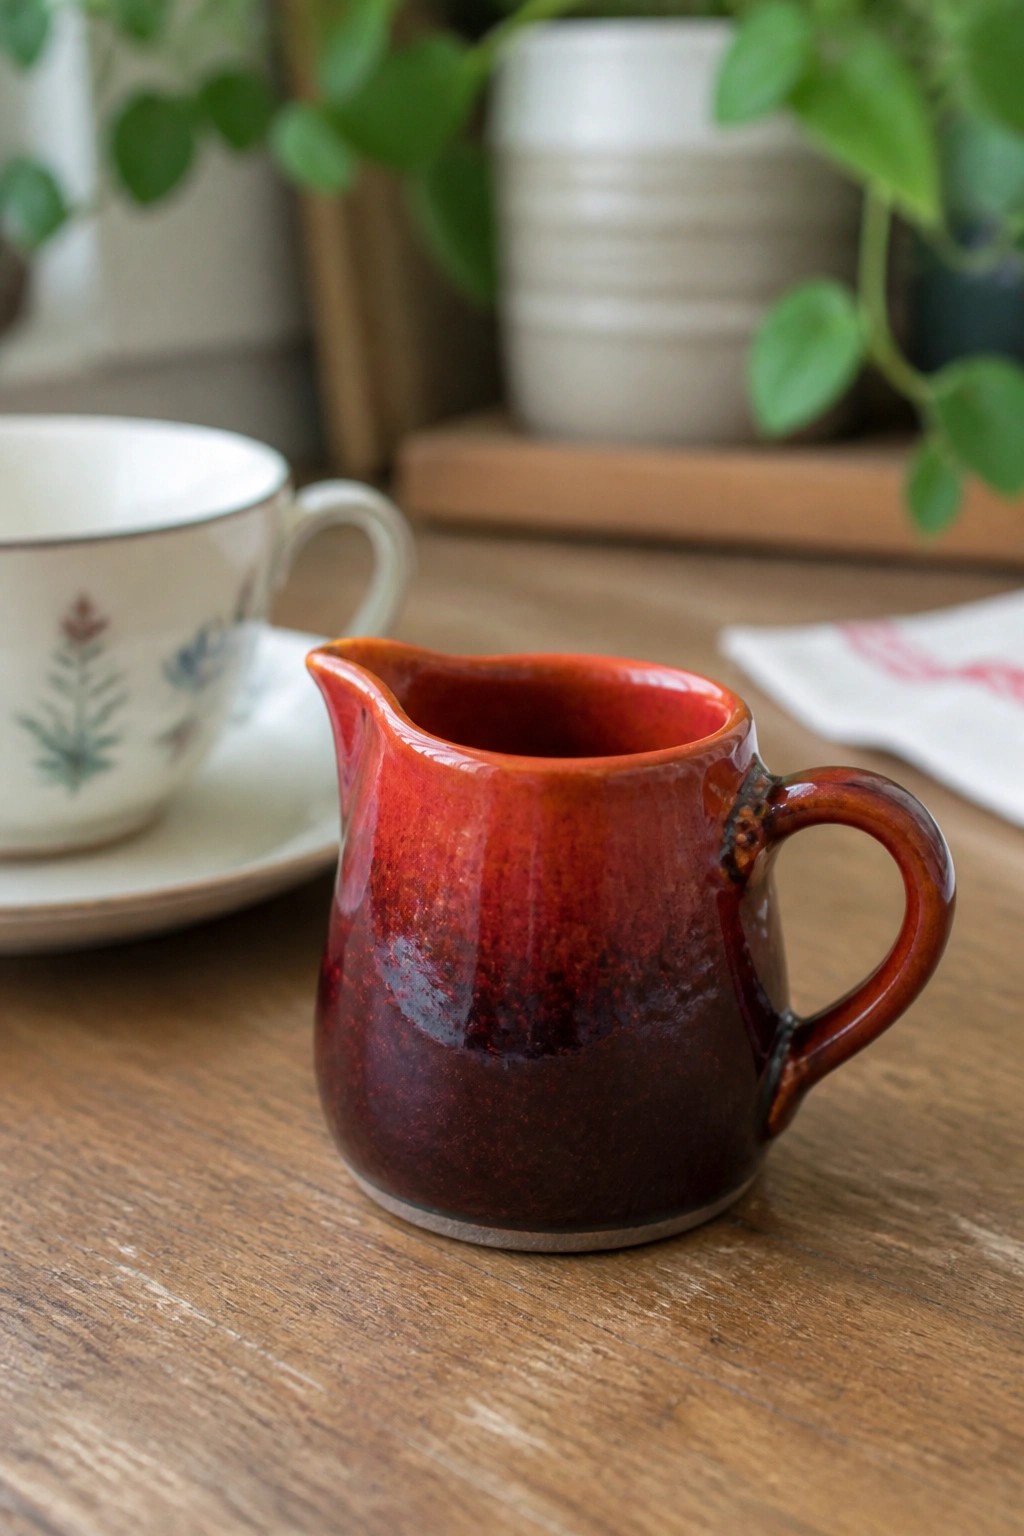
A small ceramic creamer with a simple pulled spout and attached handle shows how an iron-rich glaze can create strong color variation across a curved surface. The glaze shifts from bright red-orange at the rim through deep burgundy to near-black where it pools, producing visible breaks and texture without added decoration. This approach works on any small functional form where the shape lets the glaze move and settle during firing.
The small scale makes this an easy test piece for trying reduction or high-iron glazes before committing to larger work. A piece like this fits well on a breakfast table for milk or cream and can be adapted into a sugar bowl or small syrup server using the same glaze. The rounded body and short handle also translate directly to a bud vase or small utensil holder if you want to keep the form but change the function.
Breaking Glaze on an Oval Ceramic Tray

An oval ceramic tray with a wavy rim relies on a cone 10 glaze that breaks into dark blue, black, and brown tones across the surface. The glaze pools and thins naturally on the flat form, creating visible color shifts and speckling without extra decoration. This idea fits the category of a serving tray or large platter where the glaze movement becomes the main design element.
A piece like this works especially well as a cheese board or centerpiece on a dining table. The same glaze can be tested on rectangular or round platters to see how the breaks change with different curves and edges. You can adapt the shape by softening the rim or scaling it down for smaller dishes while keeping the focus on the reactive surface. This approach stands out on Pinterest because the dramatic color variation reads clearly even in small photos.
Crescent Moon Relief Tile With Breaking Glaze
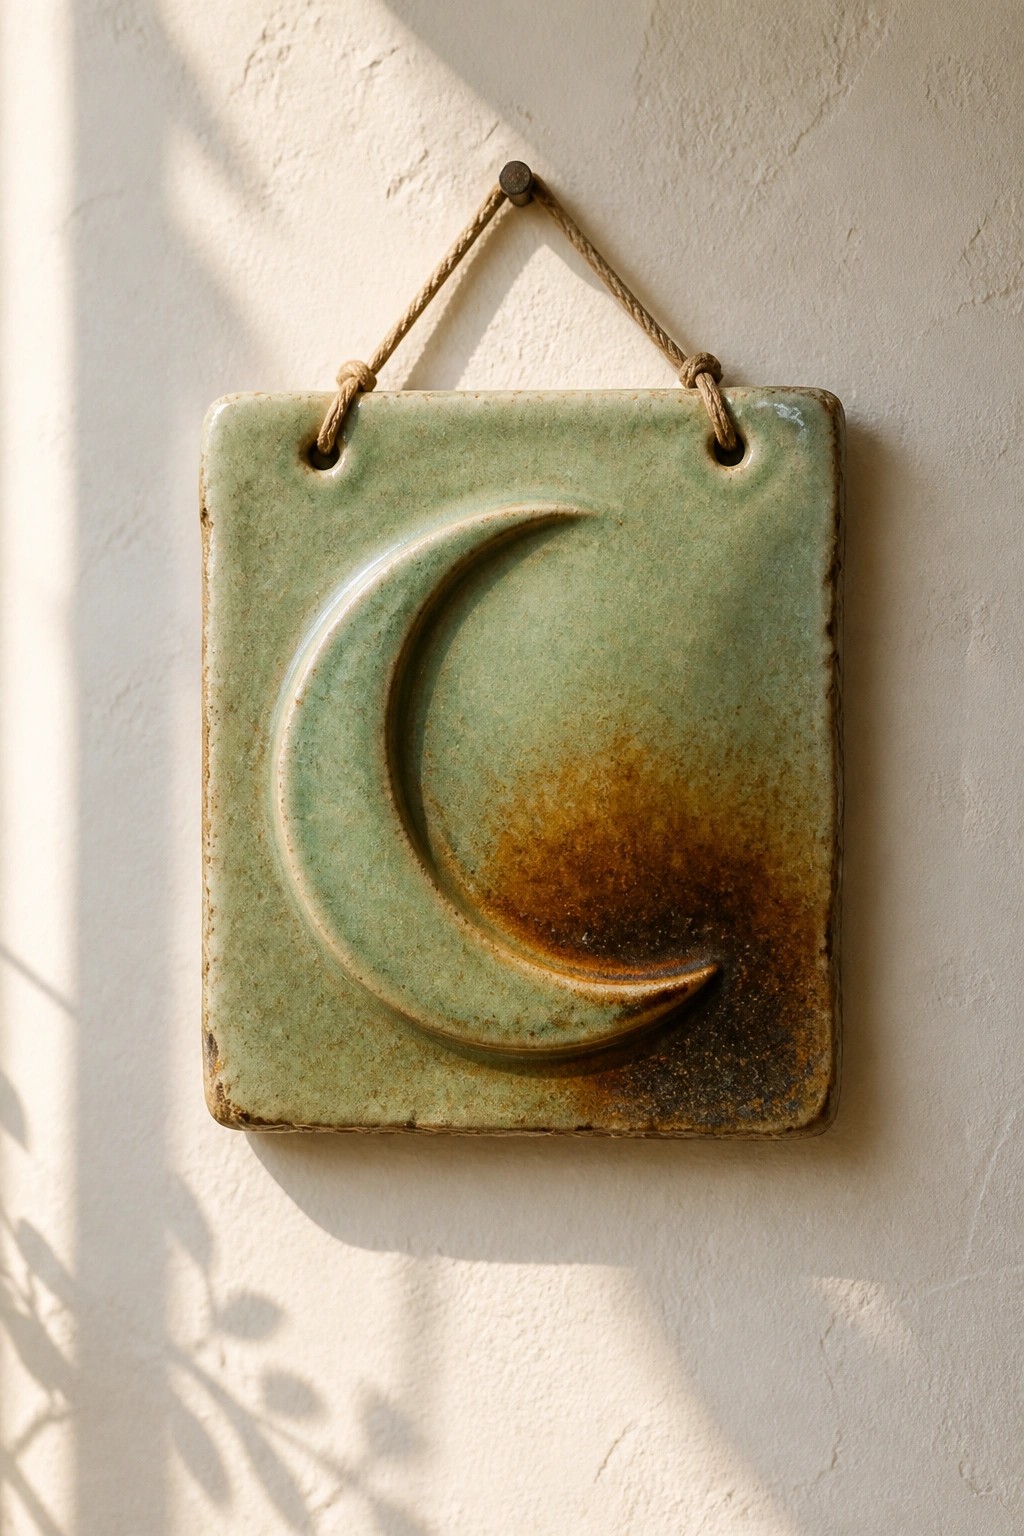
A square ceramic tile with a raised crescent moon in relief creates an effective wall hanging. The glaze shifts from green on the flat surface to a deeper brown where it pools in the recessed areas around the moon. This decor object relies on the contrast between the smooth raised form and the textured glaze break to make the design stand out. The simple hanging cord keeps the focus on the tile itself.
What makes this idea useful is how the square shape and rope hanger turn a standard tile into finished wall art without extra framing. You could scale the same relief down for smaller tiles or repeat the moon motif across a larger panel for more impact. The glaze break does the work of highlighting the sculpted detail, so the piece reads clearly even from a distance. In a living room or entryway, this format gives you a compact option that still catches attention on a plain wall.
Mottled Glaze on a Lidded Condiment Jar
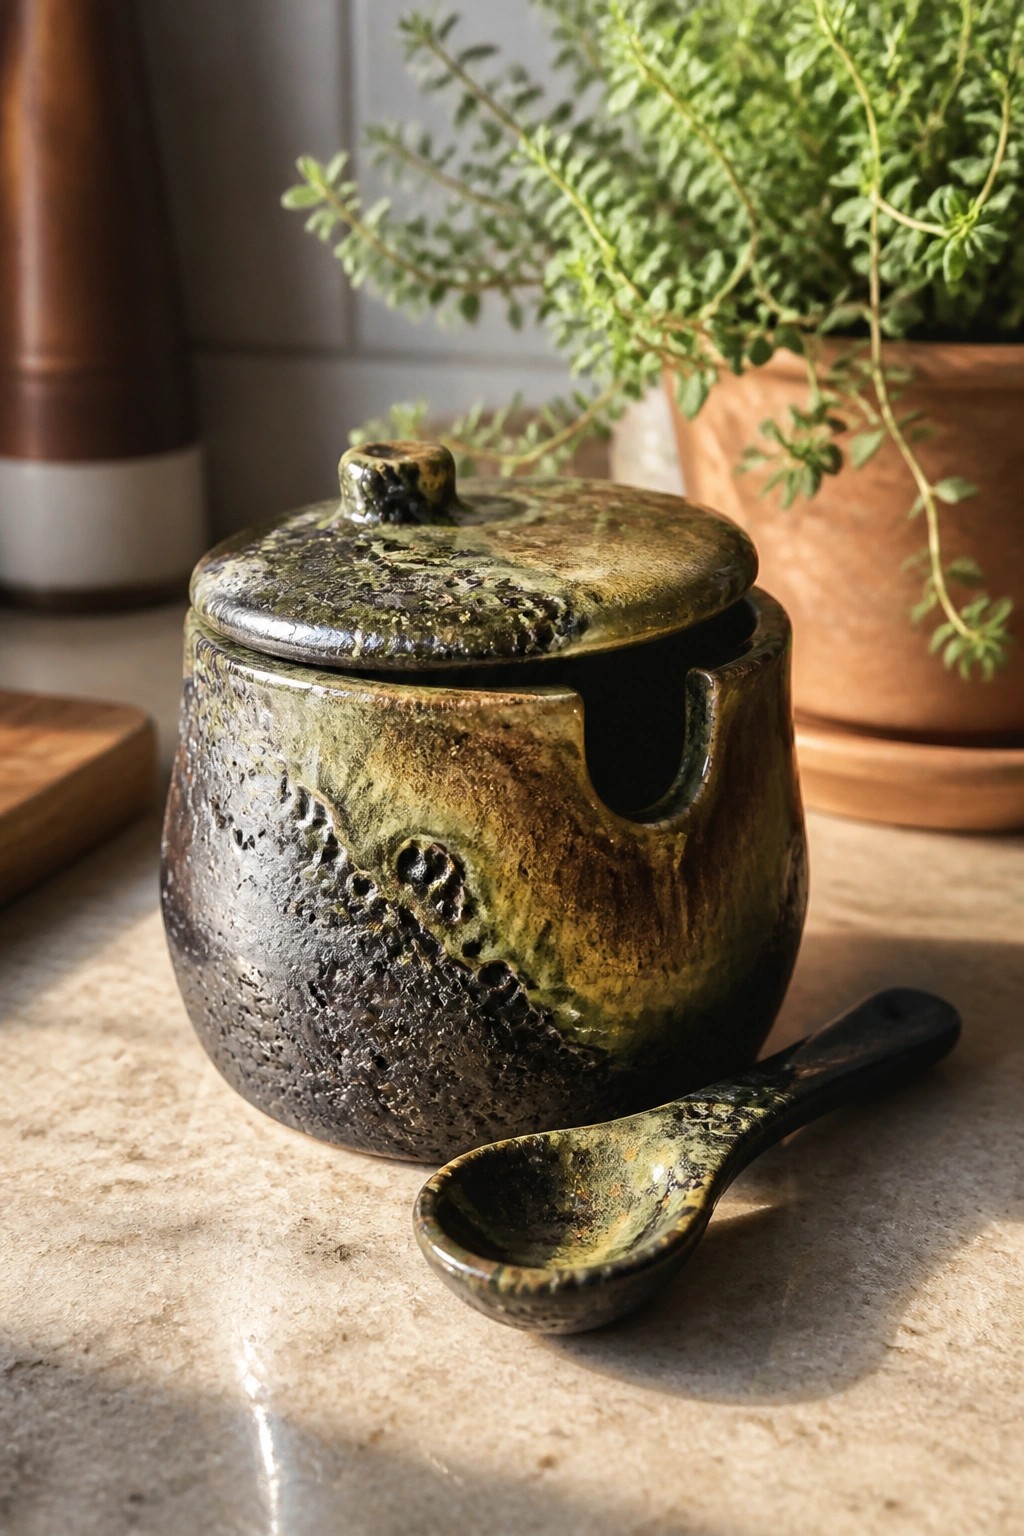
A small ceramic jar with a fitted lid and matching spoon works as a kitchen container for salt, spices, or herbs. The rim has a cutout that holds the spoon in place so it stays with the jar. The glaze creates strong color breaks where dark browns and blacks run over olive and mustard tones, highlighting the rough, speckled texture underneath.
The shape does a lot of the work here because the compact size and spoon rest make it ready for daily counter use without extra pieces. You can scale the same form up for a sugar jar or down for a single-person salt dish, and the glaze will still show the same breaking pattern on different clay bodies. For a gift, this kind of piece stands out on a board because the built-in spoon keeps it functional instead of purely decorative.
Frequently Asked Questions
Q: What exactly is Cone 10 firing and why does it suit bold glazes with color breaks? A: Cone 10 reaches about 2345 degrees Fahrenheit and creates a fluid melt in many glaze formulas. This high temperature lets fluxes and colorants interact strongly so that one glaze can run into another and form sharp lines or pools of contrasting color. The result is the rich separations and dramatic surfaces described in the article.
Q: How thick should I apply these glazes to encourage good color breaks without running off the piece? A: Apply each glaze to about the thickness of a credit card for most formulas. On vertical surfaces brush two to three even coats and let each coat dry before adding the next. For extra drama on horizontal areas you can add a fourth light coat in spots where you want deeper pooling. Always leave a quarter inch margin at the foot to keep the glaze from reaching the kiln shelf.
Q: Which clay bodies give the strongest contrast with these Cone 10 glazes? A: Iron rich stoneware or porcelain with 2 to 6 percent iron content usually produces the boldest color response. The iron in the clay reacts with the glaze during the long high temperature hold and intensifies the breaks. Test tiles made from your clay are the best way to confirm the final surface before committing to a full piece.
Q: How can I combine two or more of the listed glazes to create layered dramatic effects? A: Brush a base glaze over the entire form then trail or sponge a second glaze in selected areas while the first is still damp. The article ideas work especially well when a fluid matte glaze sits under a brighter glossy one. Fire to Cone 10 with a short hold at peak temperature to let the layers mingle without complete blending.
Q: What steps help prevent common problems like bubbling or pinholing with these high fire glazes? A: Sieve all mixed glazes through an 80 mesh screen to remove undissolved particles. Apply on bisque that has been fired to at least Cone 04 so moisture and gases escape early. If bubbles appear after the first firing, refire the piece to Cone 10 with a slower ramp between 1800 and 2000 degrees to allow the surface to heal.

Pottery Path is my cozy corner of the internet where I share clay ideas, pottery inspiration, and simple projects you can recreate at home. I love exploring everything from air dry clay to handbuilt pottery to cute minis that brighten your day. My goal is to make clay crafting feel easy, fun, and welcoming for anyone who wants to try it.
You will find beginner friendly tutorials, creative pottery painting ideas, and lots of warm inspiration for slow and happy crafting. If you enjoy hands on creativity, this space will feel like home.