I’ve been playing around with clay on and off for a couple of years now.
Mugs are one of the first things I tried because they don’t need much detail to be useful.
I stuck to basic forms at the start and found a few shapes that were easy to repeat without getting frustrated.
Here are the ones that worked well for me when I was still figuring out how the clay behaves.
They are nothing fancy but they hold up fine for daily use.
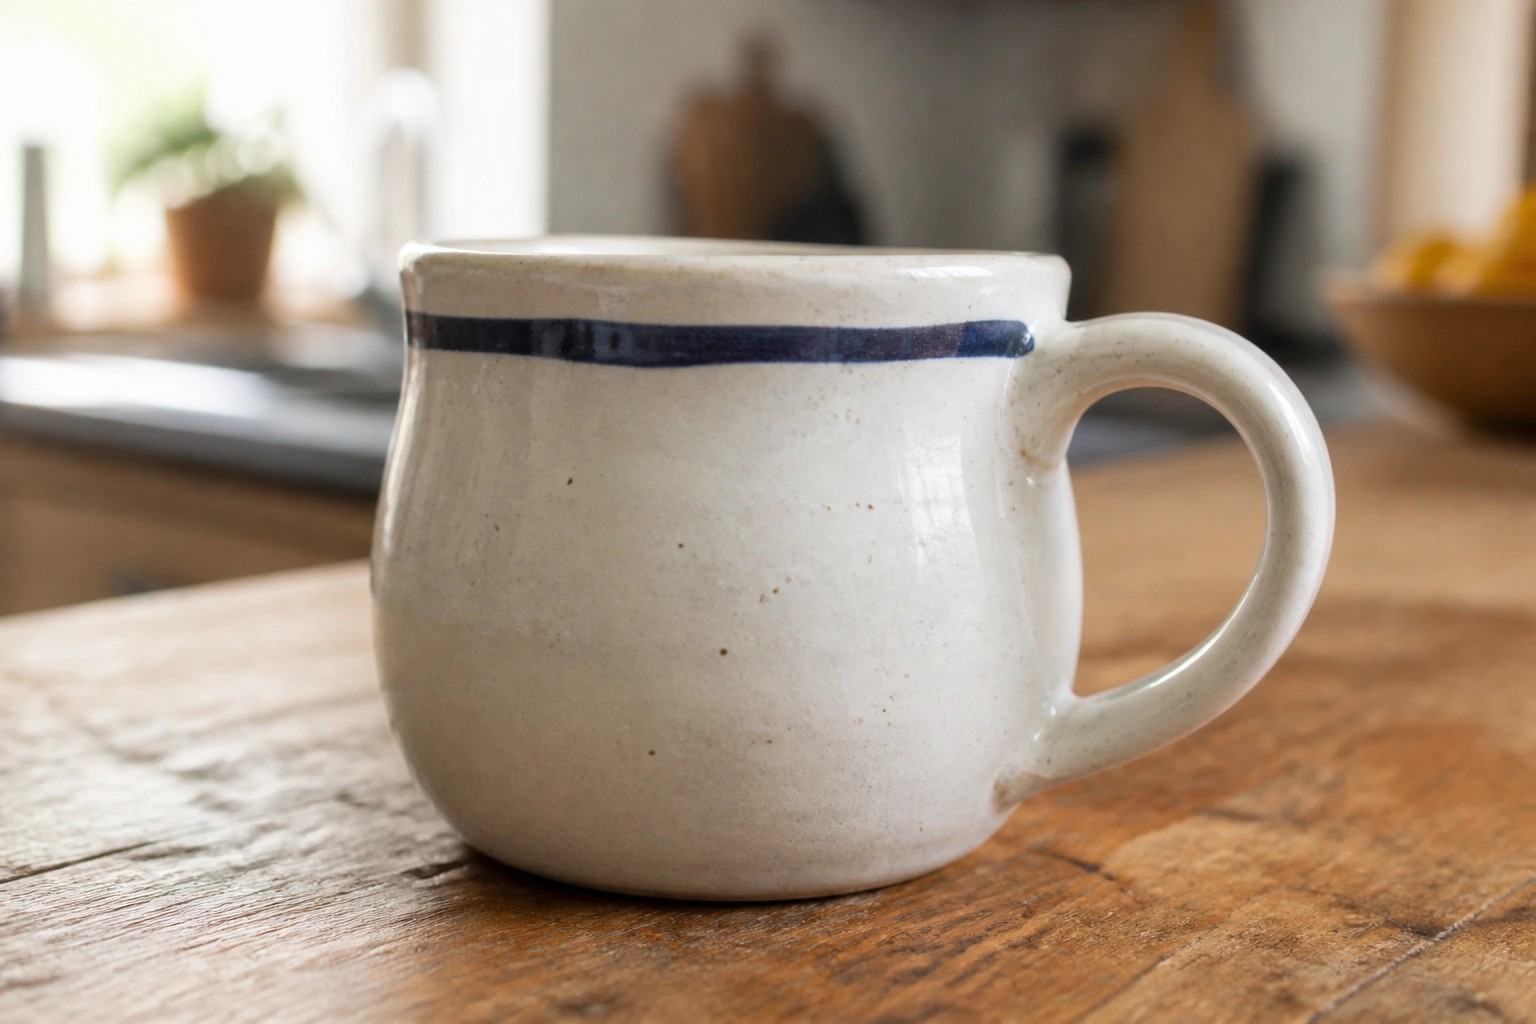
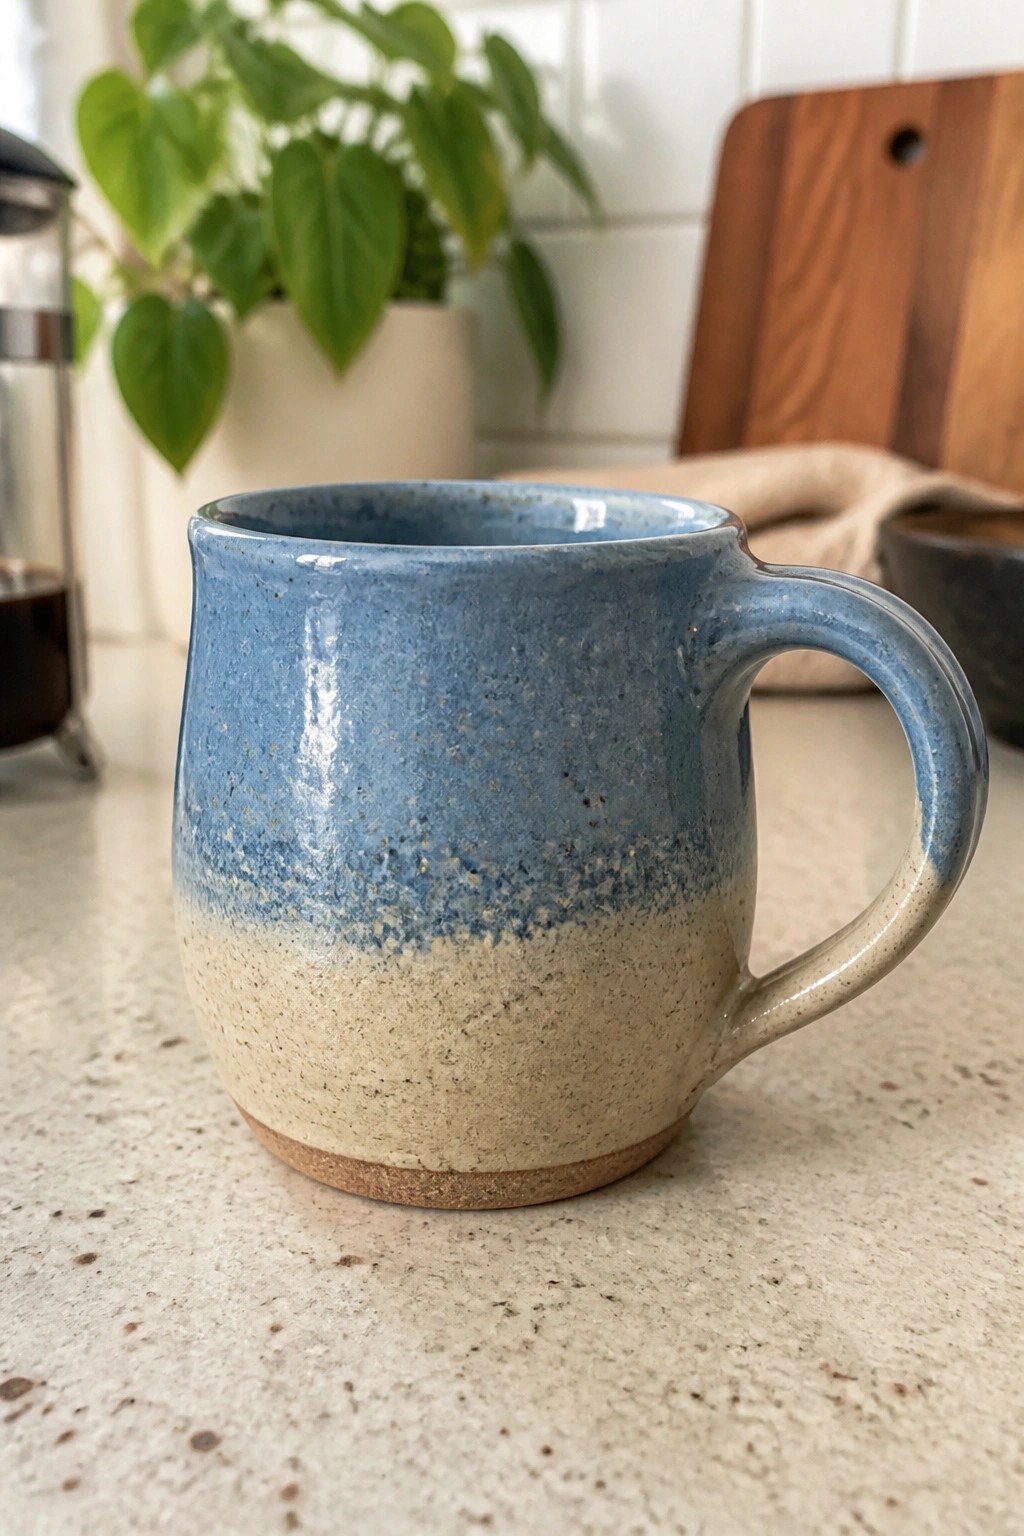
Blue Banded Rim Mug
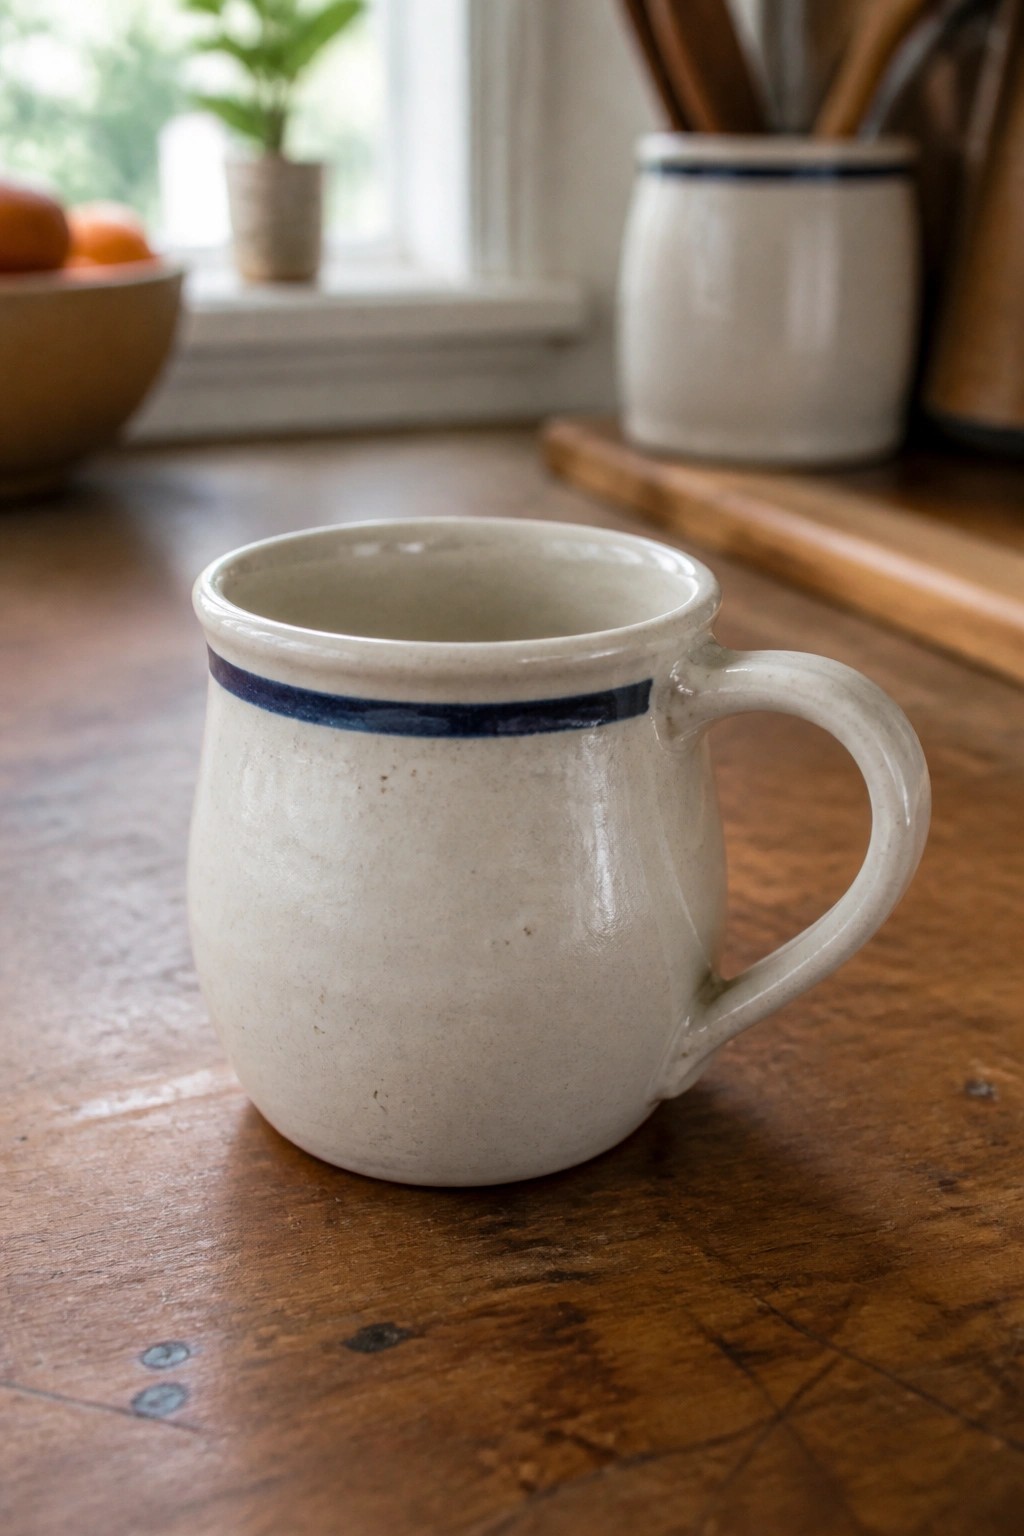
A simple wheel-thrown mug with slightly tapered sides and a sturdy pulled handle gains focus from one narrow blue band placed just below the rim. The light speckled glaze keeps the surface quiet so the stripe becomes the only accent. This approach belongs in the minimal mug category where beginners practice basic forms and add one controlled line of color.
What makes this idea useful is how the band can be widened, narrowed, or shifted lower to change the look without new techniques. The rounded shape fits comfortably in the hand and works for daily coffee or tea. You could make a set using different stripe colors or repeat the same band on taller and shorter versions to create matching pieces for gifts.
Speckled Green Mug with Thumb Rest

A small cylindrical mug made from clay uses a simple indented thumb rest on one side instead of a looped handle. The form stays compact and the surface is covered in a matte green glaze with fine brown speckles that highlight the handmade texture. This approach keeps the mug easy to throw on the wheel while still giving a secure hold for everyday drinking.
What makes this idea useful is how the thumb rest reduces bulk yet keeps the piece functional. You could swap the glaze for a solid color or add light stamping around the base to change the look without altering the shape. The size works well for coffee or tea at a desk and the same cylinder could be shortened into an espresso cup or lengthened into a taller tumbler.
Two Tone Lidded Jar
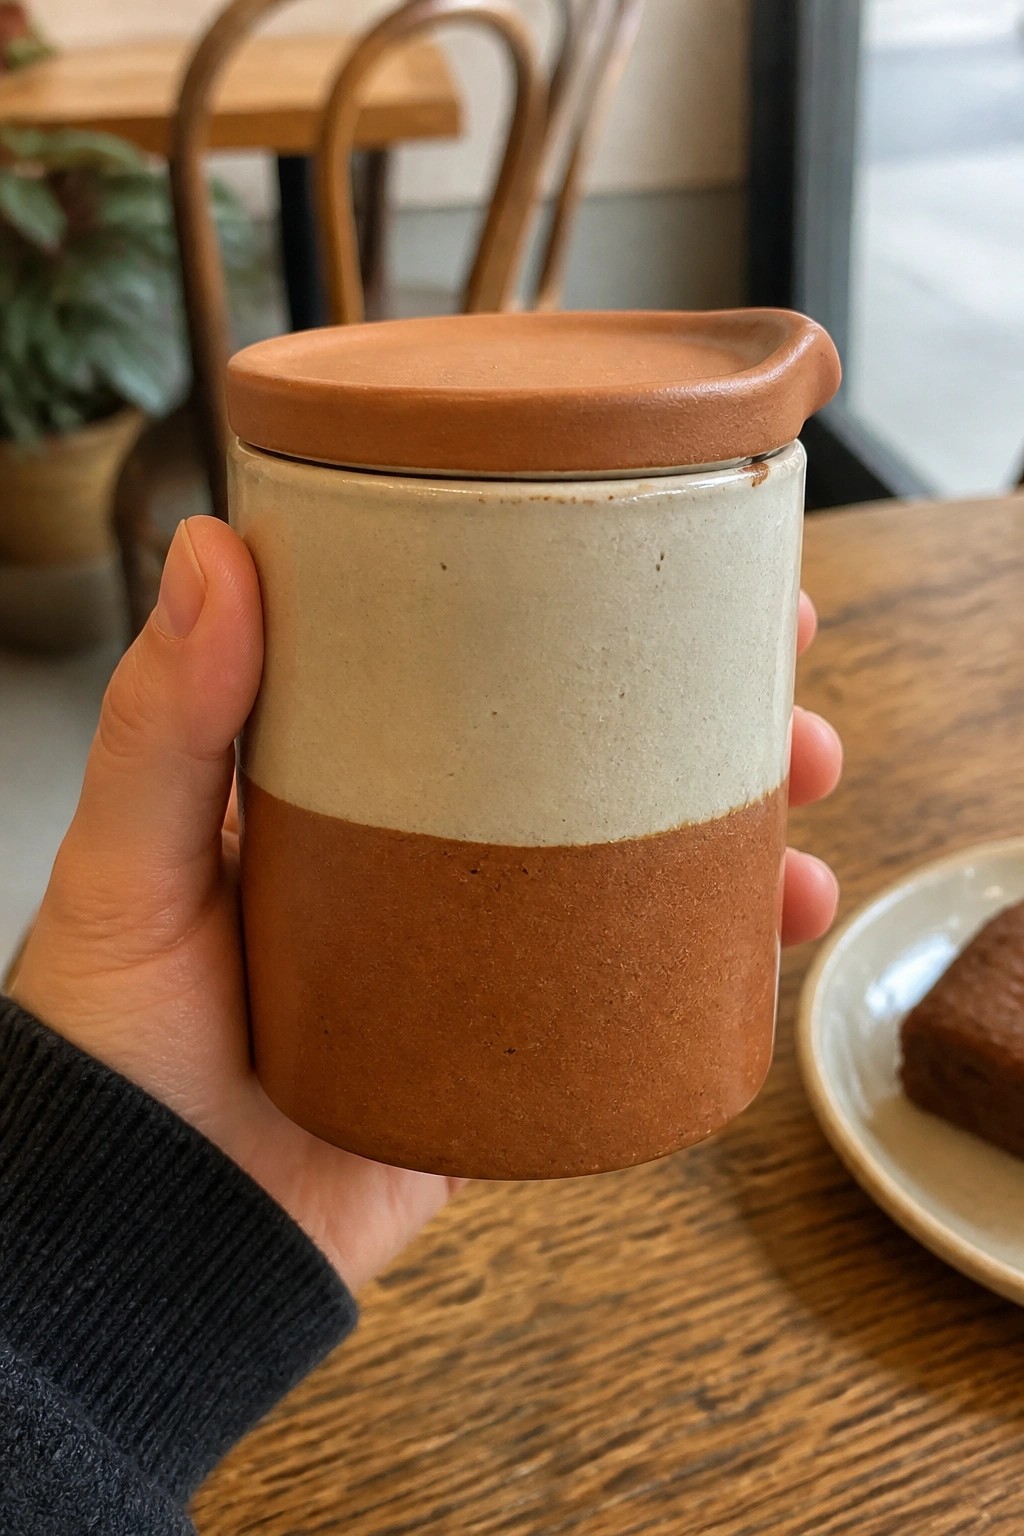
A small cylindrical jar with a fitted lid gives beginners a straightforward form to throw or hand-build. The piece uses a horizontal split between a light upper band and a darker lower section, keeping the surface simple so the shape and color change do the work. The lid sits flush and repeats the darker tone, turning the jar into a closed container rather than an open mug.
What makes this idea useful is that the same cylinder can hold tea, sugar, or cotton swabs once the lid is added. You can switch the color split higher or lower, or leave the top section unglazed for more contrast. The compact size also works as a desk holder for pens or small tools, and the lid detail makes the piece feel finished without extra carving.
Two Tone Speckled Mug

A simple mug with a pink glazed interior and a speckled beige exterior lets beginners practice basic glazing while leaving most of the clay body visible. The rounded bowl shape and single pulled handle keep the form straightforward, and the contrast between the glossy inside and matte outside makes the piece read as intentional rather than plain. This style fits the category of functional drinking mugs that still highlight the texture of the clay.
The shape does a lot of the work here because the wide opening and comfortable handle translate easily to daily use for coffee or tea. You can change the interior color to any glaze you already have on hand without altering the rest of the form. The same mug body could be reworked into a small soup bowl by removing the handle or scaled down for an espresso cup. In a kitchen or on a desk, the two-tone finish stands out in photos because the speckled surface catches light differently than a solid glaze.
Mug with Stacked Horizontal Ridges

This mug uses a simple cylinder form with evenly spaced horizontal ridges pressed into the clay before glazing. The deep green glaze settles into the grooves to emphasize the bands while the rest of the surface stays smoother. The idea stays in the beginner mug category because it relies on basic shaping and a single glaze rather than added sculpting or multiple colors.
The shape does a lot of the work here since the ridges can be added with a simple tool or even a fingertip at the leather-hard stage. A piece like this works especially well as a daily kitchen mug because the texture provides grip and the glaze hides minor surface flaws. You could rework the same banding on a shorter form to make a small planter or stretch it taller for a tumbler without changing the overall approach.
Cat Face Mug with Sculpted Ears
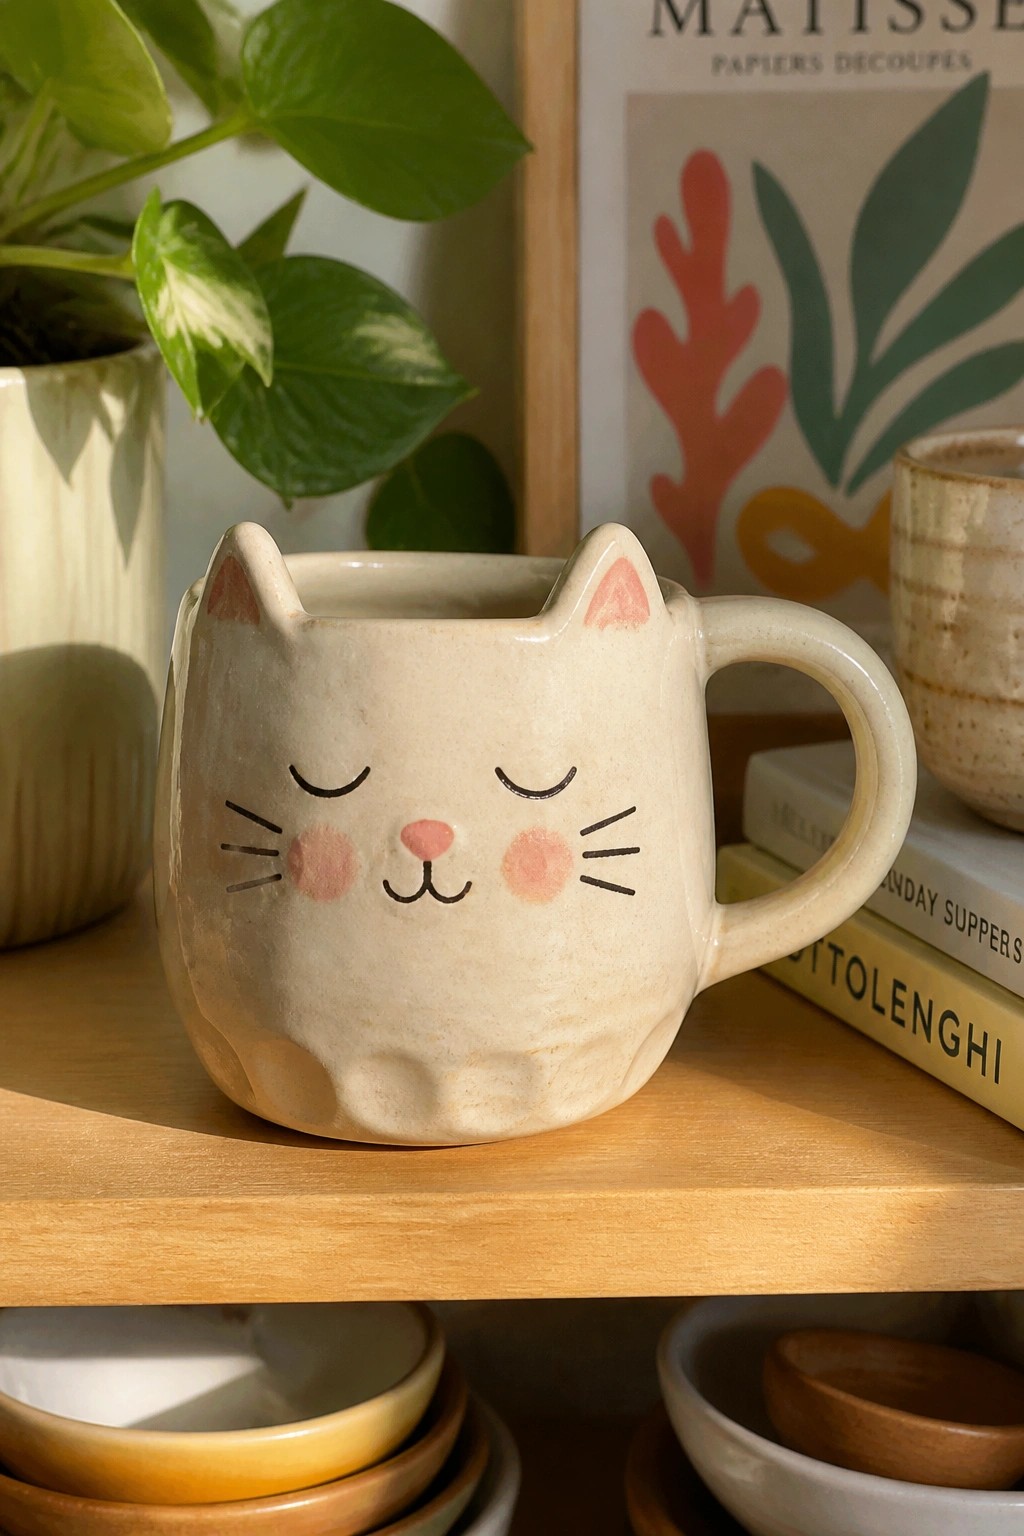
A basic mug can be shaped into a cat by pinching two ear forms at the rim and smoothing the clay body into a rounded face. Once bisque fired, a light glaze covers the surface and black lines plus soft pink marks create the eyes, whiskers, nose, and cheeks. The handle stays functional on one side so the piece still works as a regular drinking mug. This keeps the project focused on simple sculpting and painting rather than complex construction.
The small size and flat face area make it straightforward to personalize with different animal features or color choices. Try the same ear shaping on a shorter cylinder to make a small planter or add a second handle for a sugar bowl. It fits on a kitchen shelf or desk without taking much space and stands out in photos because of the clear face motif. For a first attempt, keep the painting limited to three or four lines so the form does most of the work.
Speckled Yellow Mug with Handle

A small mug built from clay gains a lot of visual interest from a heavily textured surface covered in a single bright yellow glaze. The dark speckles in the glaze create contrast against the rough clay body while the simple pulled handle keeps the overall form easy to shape. This kind of project fits beginner mug ideas because it uses one glaze color and basic wheel or hand-building techniques without extra carving or multiple firings.
The compact size makes this easy to adapt into an espresso cup or a small dip bowl by shortening the walls or skipping the handle. You could repeat the same textured body and swap the yellow for teal or rust to match different tableware sets. In a kitchen this style stands out on open shelves because the speckled glaze gives depth without needing painted designs. For a gift it works well paired with a small bag of coffee beans or loose tea.
Dip-Glazed Two-Tone Mug
A standard mug form uses a simple dip glaze to cover the top half in a speckled blue while leaving the lower half in the natural clay color. The handle receives the same blue glaze, and the base stays mostly bare. This creates a clear color break that highlights the mug’s shape without added decoration.
What makes this idea useful is how the same mug can be repeated with different glaze pairs to build a set. The color split works on both small and larger mugs and needs only basic dipping rather than brushing or carving. In a kitchen it holds up for daily coffee or tea and looks finished next to plain white mugs. The approach also adapts quickly to other simple forms like small bowls by changing only the glaze line.
Square Mug with Embossed Leaves
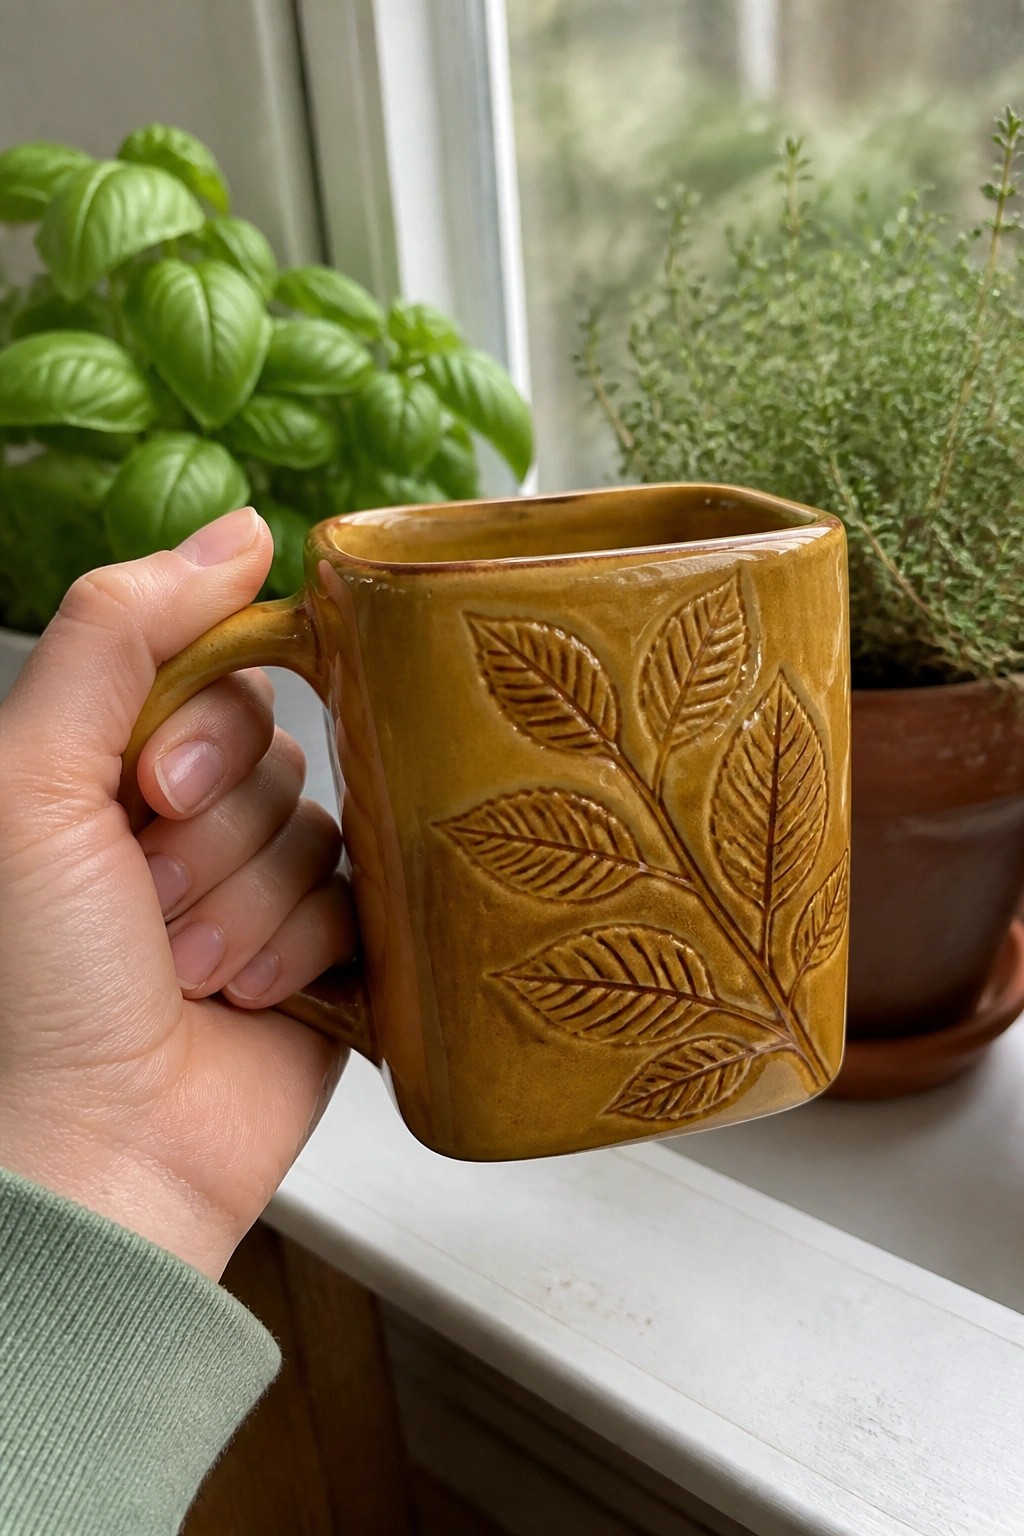
A square mug gives a simple way to move beyond round forms while staying beginner-friendly. The flat sides are made by altering a basic cylinder or building with slabs, then a leafy branch is pressed or carved into one face for texture. An amber-toned glaze highlights the raised details and creates a durable, food-safe surface.
What makes this idea useful is how the flat sides let you add texture without crowding the form. You can swap the leaf motif for other stamps or shallow carving, or leave one side plain if you want a quicker project. The shape works especially well for everyday drinking because it sits steady on a desk or shelf and still holds a normal amount of liquid. For gifts, the same square body can be scaled down into an espresso cup or turned into a small planter by leaving the top open.
Polka Dot Painted Mug
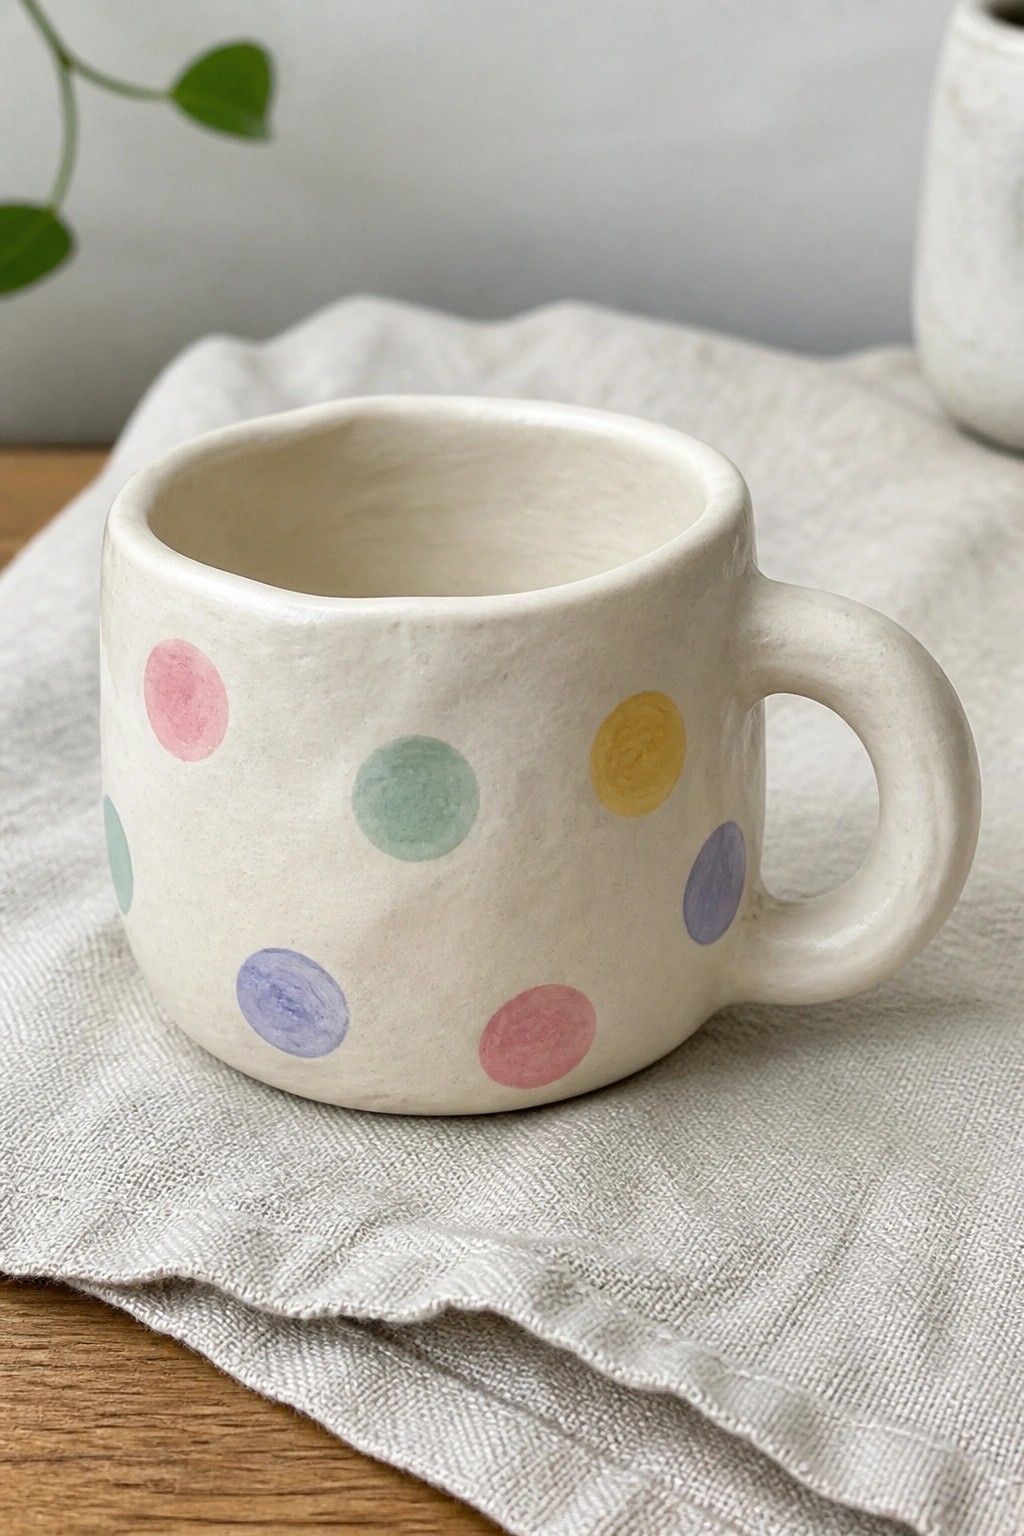
A basic ceramic mug with a slightly irregular rim and comfortable handle takes on a fresh look when covered in scattered painted dots. The white clay surface acts as a clean base that makes the soft pink, mint, yellow, lavender, and teal circles pop without any extra layers. This style keeps the decoration limited to simple brushwork so the focus stays on the form and the pattern rather than on complex glazing.
What makes this idea useful is how quickly the dots can be changed to match different color palettes or scaled up or down in size. The same approach works for a set of mugs or can be adapted to small bowls using the same dot spacing. In a kitchen or on a breakfast tray the pattern reads clearly from a distance, which helps the piece photograph well for sharing. For a first attempt at surface decoration, the dots require only basic paint control and let you test color placement before moving on to tighter designs.
Two-Handled Speckled Mug
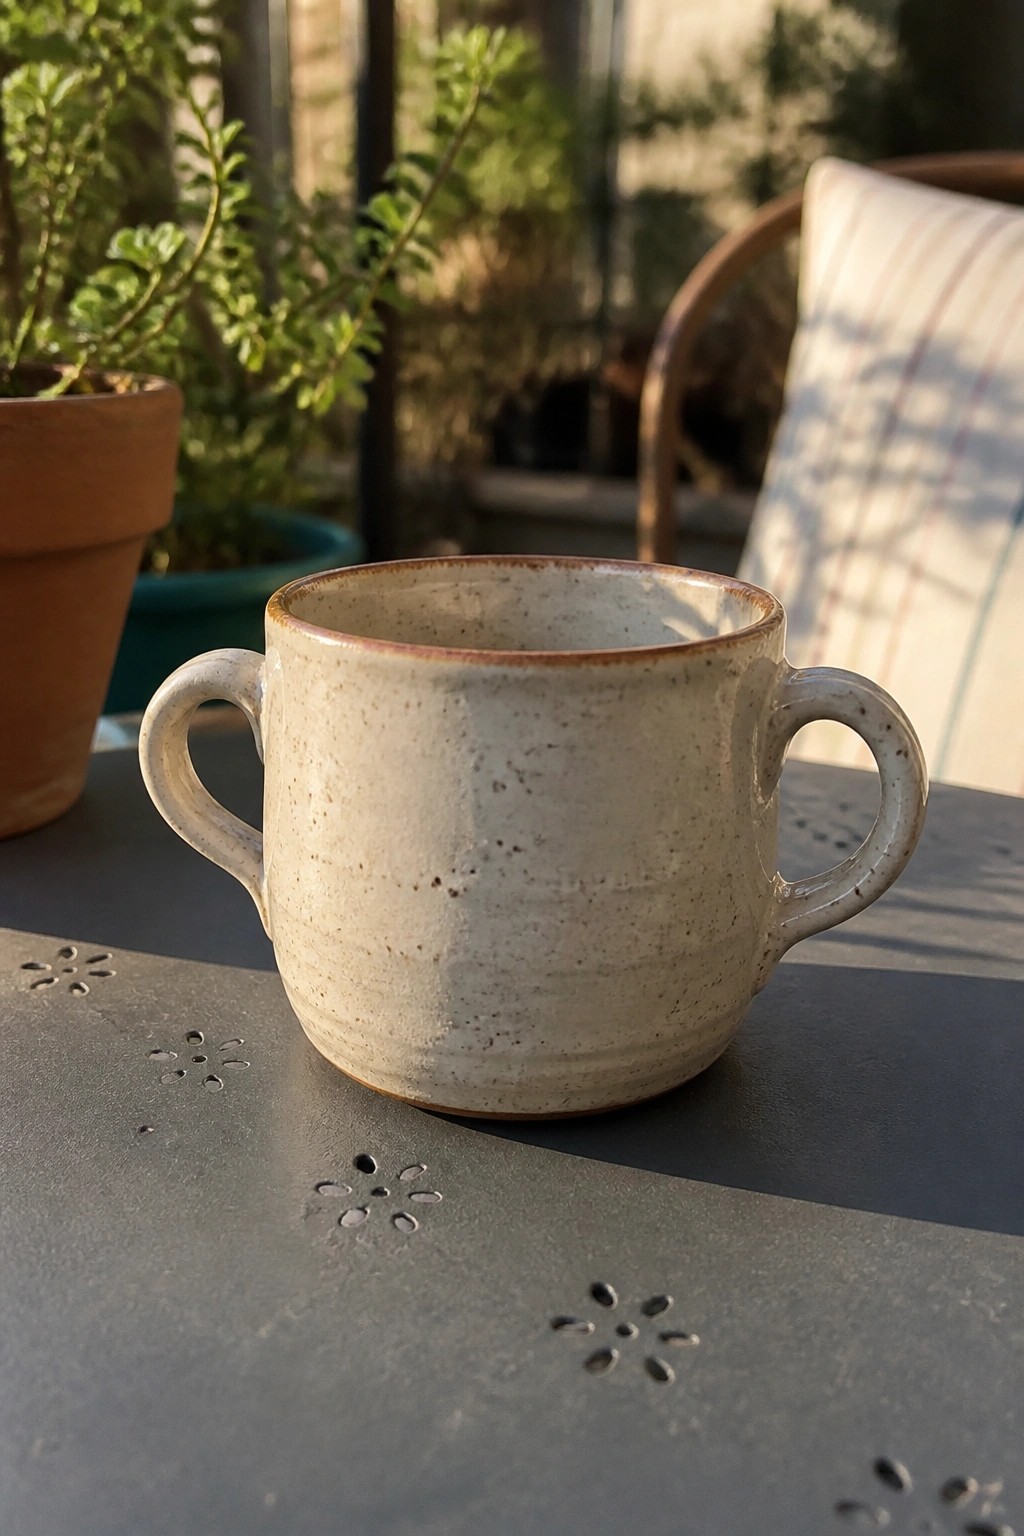
A small two-handled mug gives beginners practice with basic cylinder forms and handle pulling or attaching. The light speckled glaze lets the clay body show through for texture while keeping the surface simple and functional. This project sits in the mug category and stands out because the paired handles add grip without needing extra sculpting or color work.
What makes this idea useful is how the compact shape works well for coffee or tea on a desk or table. You can adapt the same form by changing handle thickness or scaling it up slightly for a different capacity. For a gift, something like this feels straightforward to make yet different from a standard single-handle mug. The small size also means it takes less clay and kiln space if you want to test glaze variations.
Dark Cylinder Mug with Horizontal Ridges
A simple cylindrical mug formed from dark clay uses horizontal ridges across the surface for subtle texture without added decoration. The straight sides and slightly irregular rim keep the shape easy to throw or hand-build while the dark finish reduces the need for perfect symmetry. This approach fits the mug category well because the form stays functional for drinking or small storage and the ridges add interest through the making process itself.
The shape does a lot of the work here since the tall cylinder is quick to repeat and the open top works for both drinks and desk items. You could adapt the ridges by pressing them in with a tool or skipping them for a smoother version in a lighter clay. This style stands out on Pinterest for its clean profile and works as a first wheel project because small size keeps drying and firing straightforward. For a gift, the same form scales easily into a shorter espresso cup or a wider brush holder.
Bird Shaped Mug with Wing Texture

A bird-shaped mug starts with a rounded body that holds liquid while the tail extends into a functional handle. Low-relief feathers pressed into the clay add surface texture across one side, and a simple beak and eye give the form clear direction. The soft blue glaze covers the entire piece evenly, making the raised details stand out without extra color work. This style belongs in the character mug category, where beginners combine basic pinching and slab work to create recognizable animal forms.
The compact size makes it easy to place on a desk or small shelf where a standard mug would feel bulky. You can rework the same body into a small creamer by narrowing the beak into a pour spout or swap the blue for a matte white glaze to test different finishes. The wing texture requires only a stamp or tool impressions, so the idea translates quickly to other animals like owls or fish while keeping the same construction steps.
Terracotta Mug with Sweeping White Brushstrokes

A wheel-thrown mug in red clay uses wide white brushstrokes to create loose curved shapes across the body. The contrast between the orange surface and the white marks makes the pattern stand out while staying simple to apply. A small sculpted bump on the rim gives the top edge a slight variation without adding much complexity. This fits the category of decorated mugs that rely on surface painting rather than carved or added clay details.
The shape does a lot of the work here since the comfortable handle and open mouth make it ready for everyday drinks without extra finishing steps. You can adapt the brushstroke pattern by using fewer strokes or switching to a different clay color underneath to change the look quickly. In a kitchen this kind of piece works well because the earthy tone pairs with most dish sets and the size holds a standard serving. The same painted approach could move to a small bowl or planter if you want to repeat the idea across a set.
Mug and Saucer Set in One Glaze

A straightforward mug and saucer set uses the same glaze across both pieces so they read as a unit. The mug keeps a simple cylinder shape with a pulled handle while the saucer sits slightly wider to support it. The teal glaze shows natural variation at the rim where it pooled and dripped, which adds interest without any added carving or painting. This approach fits the basic mug category and works for anyone who wants to make matching pieces in a single firing.
What makes this idea useful is how the saucer turns an ordinary mug into a complete drink setup that stays tidy on a counter or table. You can adapt it by switching the glaze to a matte finish or testing a different rim texture on the saucer only. In a kitchen this kind of set keeps things practical because the lower piece catches condensation or holds a spoon. The same stacked form could also be scaled down slightly to make a small dessert plate and cup pair instead.
Smiley Face Mug with Indented Details

A standard rounded mug can be made more engaging by pressing two small dots and a curved line into the clay before glazing to create a smiley face. The peach glaze sits evenly across the surface and lets the indented lines stay visible without extra paint or carving tools. This keeps the project limited to basic forming and one glaze color while still giving the mug a clear decorative element.
The shape does a lot of the work here because the rounded body gives plenty of flat space for the face without crowding the handle. The same indented motif could be reworked with different mouth shapes or eye placements to suit kids or desk use. For a gift this style photographs well in small sizes, and the carving step adds almost no extra time once the mug is formed.
Incised Leaf Mug

A handmade ceramic mug with a cylindrical form and comfortable handle features botanical patterns created by carving or incising leaf shapes directly into the clay surface. The dark clay body contrasts with the lighter lines of the designs, giving the patterns clear definition without added color. This approach keeps the decoration simple while adding visual interest through texture and negative space. It belongs to the category of surface-decorated mugs that use basic carving techniques on a standard wheel-thrown or hand-built shape.
The shape does a lot of the work here since the straight sides provide an easy canvas for repeating leaf motifs. You could adapt the same idea by swapping ferns for other simple outlines like branches or geometric leaves, or scale the design down to just a few clusters near the base. A piece like this works especially well as an everyday drinking mug or a small gift that still shows effort. The carving method also translates easily to other forms such as small bowls or planters if you want to reuse the pattern.
Dripping Glaze Coral Mug

A simple straight-sided mug takes on more visual interest when a fluid glaze is applied so it runs down the lower half in irregular drips. The coral top layer contrasts with the lighter base coat to emphasize the flow lines without needing extra carving or painting. This decoration works on either a wheel-thrown or slab-built form because the glaze movement supplies the pattern.
What makes this idea useful is that most potters already have glazes that run, so no new materials are required. The drip zone stays low on the mug so the upper section stays easy to grip. You can scale the same approach down to an espresso cup or try it on a wider breakfast mug to change how much surface the glaze covers. In a kitchen the finished piece reads as both functional and distinct from solid-color mugs.
Mountain Landscape Mug
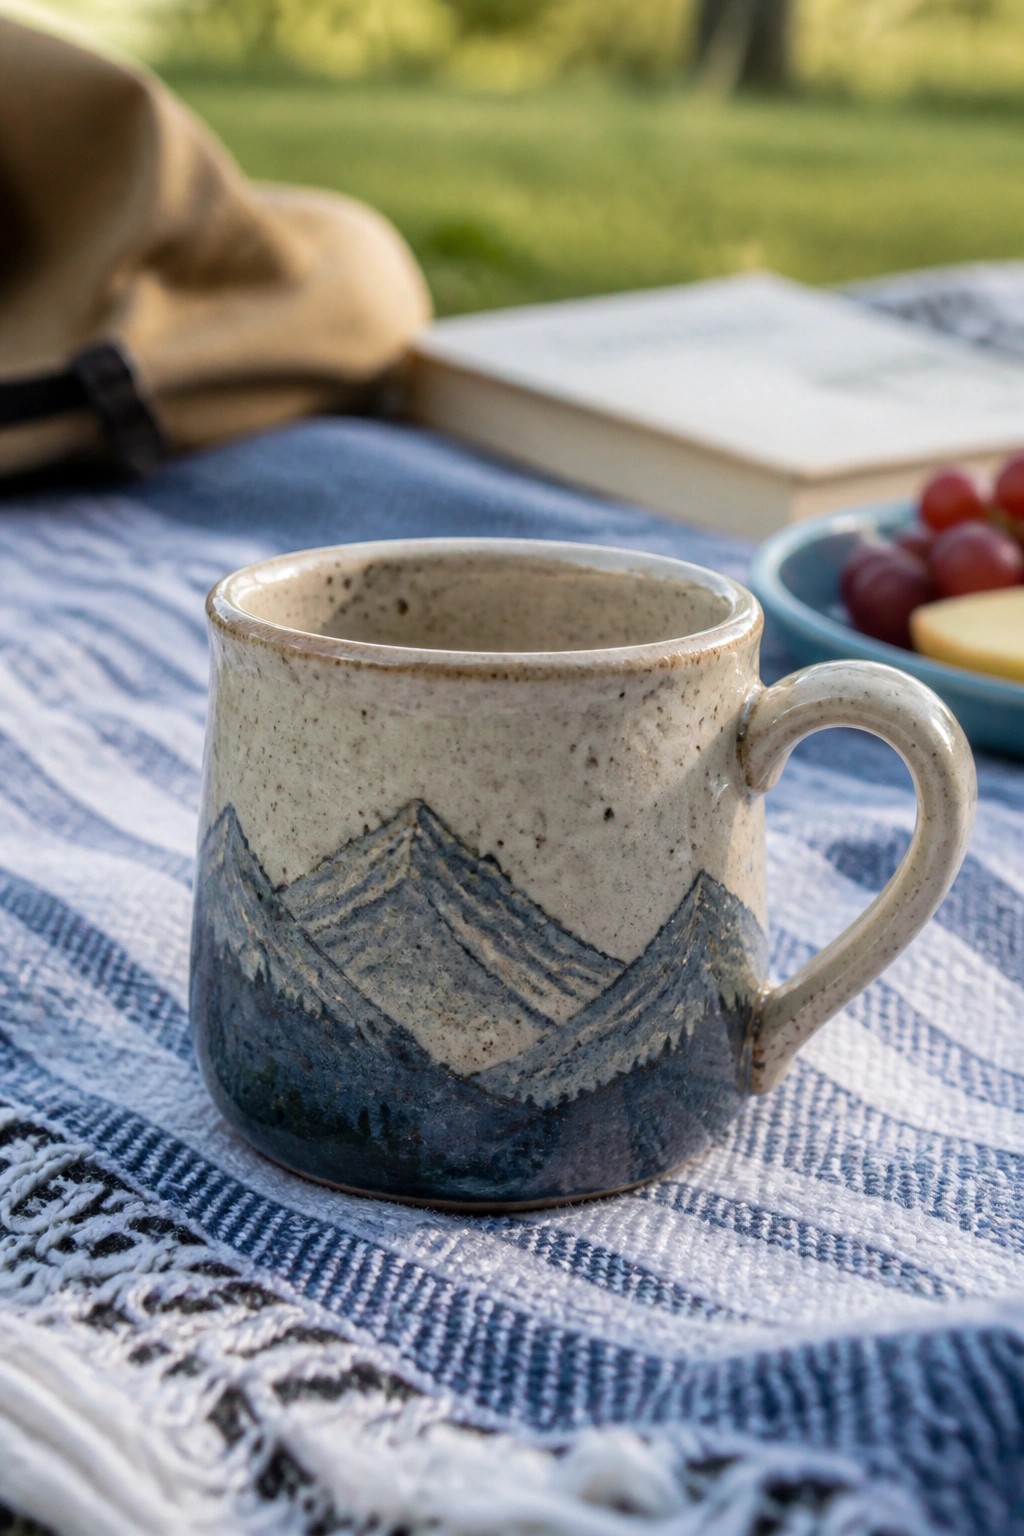
A handmade ceramic mug with a wide body and comfortable handle features a wraparound mountain scene created with layered blue tones. The lower half shows overlapping peaks and evergreen details that gradually fade into the natural speckled clay above, leaving the rim clean and light. This approach fits the painted motif category for mugs, where a simple silhouette gives the piece visual interest without needing complex carving or multiple glazes.
What makes this idea useful is how the horizontal band of mountains turns a basic cylinder into something distinctive while staying beginner-accessible. You could adapt the same layout to a smaller espresso cup or a wider soup bowl by adjusting the height of the design band. For gifts, the nature theme works especially well for hikers or cabin owners, and the color scheme can be swapped for different regions like desert reds or coastal blues. The small scale keeps the project manageable for a first attempt at surface decoration on a wheel-thrown or hand-built form.
Notched Rim Mug

A basic cylinder mug gains extra function from a simple notch cut into the rim opposite the handle. The cut creates a clean pouring edge that reduces drips when serving tea, broth, or small amounts of liquid. The light green glaze with its soft streaked texture keeps the surface smooth while adding subtle variation that still reads as a single color from a distance. This approach fits the category of everyday kitchen mugs that use one small shape change to improve use.
What makes this idea useful is how the notch solves a common pouring problem without adding parts or extra steps. You can adapt the same cut on taller mugs or shorten it for smaller cups depending on what you drink most often. In a kitchen this kind of piece works well for daily use and stands out in photos because the notch creates a clear silhouette. The same rim modification can be tried on small bowls or creamers to test the shape before committing to a full mug.
Whale Tail Handle Mug
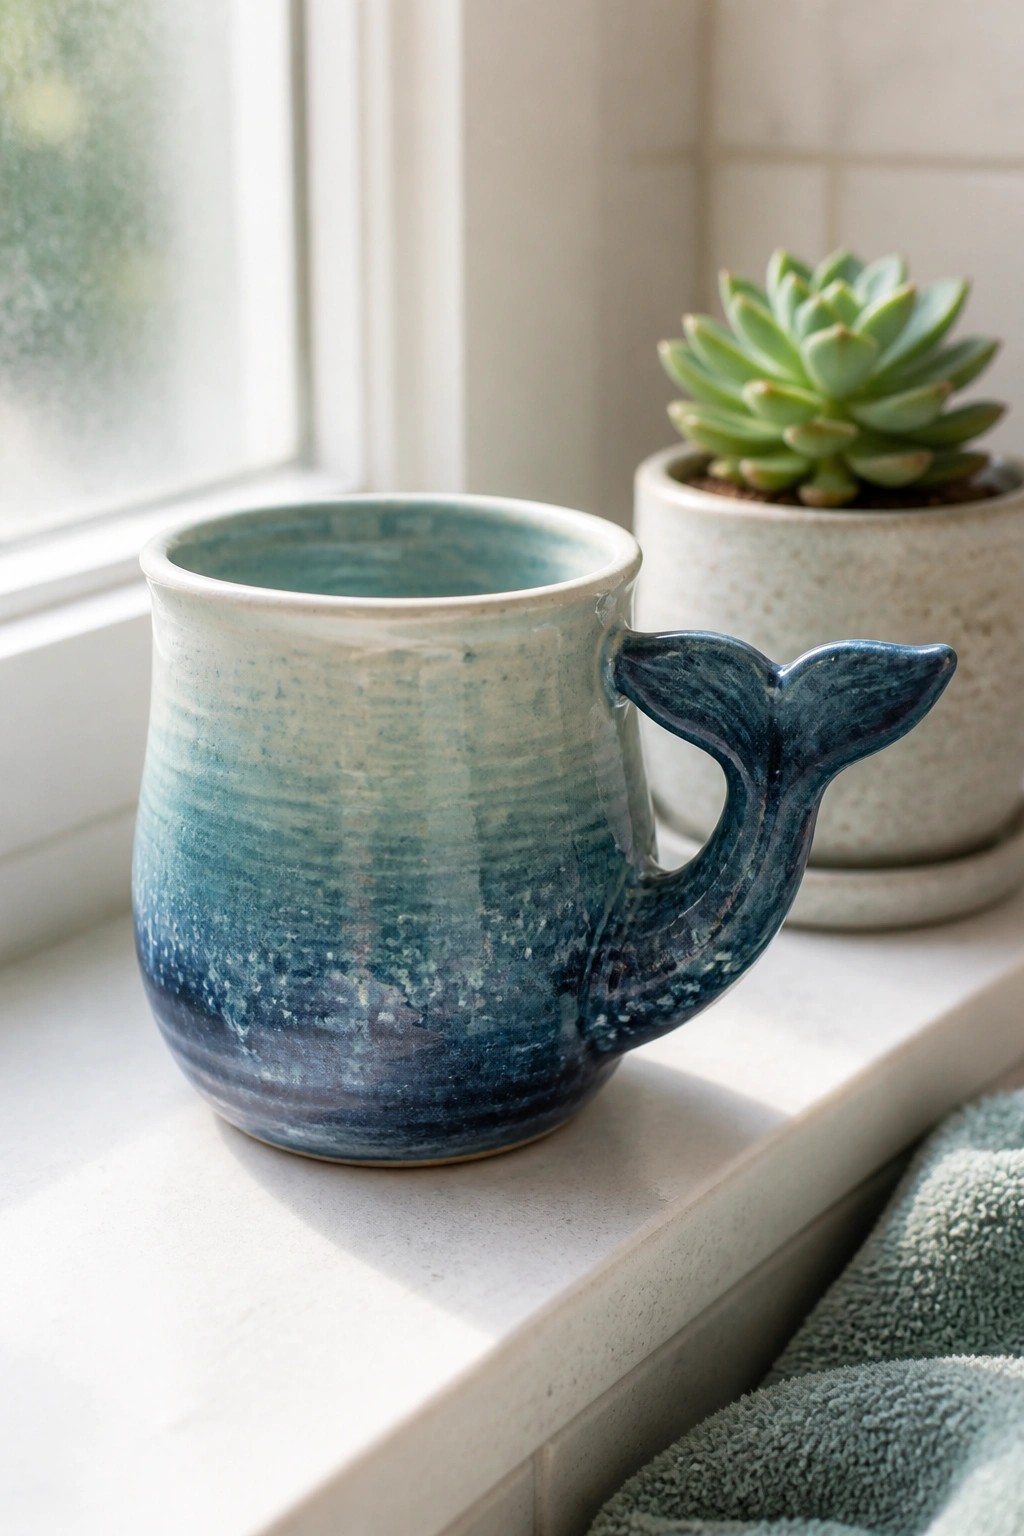
A basic mug shape gains a clear focal point when the handle is replaced by a sculpted whale tail. The tail curves outward to create a functional grip while keeping the overall form compact. A blended blue-green glaze lets the tail stand out through color variation rather than extra detail work.
What makes this idea useful is how the tail shape can be simplified or swapped for other curved forms like a dolphin fin or abstract wave. The mug stays practical for everyday drinks because the body remains standard size. You could adapt the same handle on a shorter tumbler or change the glaze to a single solid color if you want less variation. The sculpted detail also photographs well for sharing on Pinterest without needing complex surface patterns.
Cable Knit Textured Mug

A basic cylinder mug built from clay and finished with a repeating cable pattern pressed or carved vertically around the outside wall. The light speckled glaze settles into the recessed lines so the raised braid details stand out without extra color work. This keeps the overall form straightforward while adding surface interest that still feels practical for daily use.
What makes this idea useful is that the texture can be added with a simple stamp or rib tool once the mug walls are firm enough to hold detail. The same pattern works on a shorter tumbler or a wider soup mug if you want to change the proportions. A single glaze color lets the carved lines do the work, so the piece stays easy to repeat and photograph for sharing.
Mushroom Lidded Mug with Painted Motif

A lidded mug built around a mushroom form uses a simple dome lid with a knob on top to mimic the cap. The red surface with scattered white dots gives the lid its main visual impact, while the off-white body carries only a small painted mushroom and a few grass marks near the base. This approach keeps the shape straightforward and limits the painted work to one focal area.
The small overall size lets the mug work as a desk cup or a container for loose tea or sugar. You could change the lid color or swap the painted mushroom for another basic shape like a berry or leaf without changing the construction. Adding a lid to a standard mug shape requires only one extra piece and gives the finished item more use. This kind of project shows up well in searches because the lid and motif together create a clear theme that still stays easy to form.
Crescent Moon Painted Mug
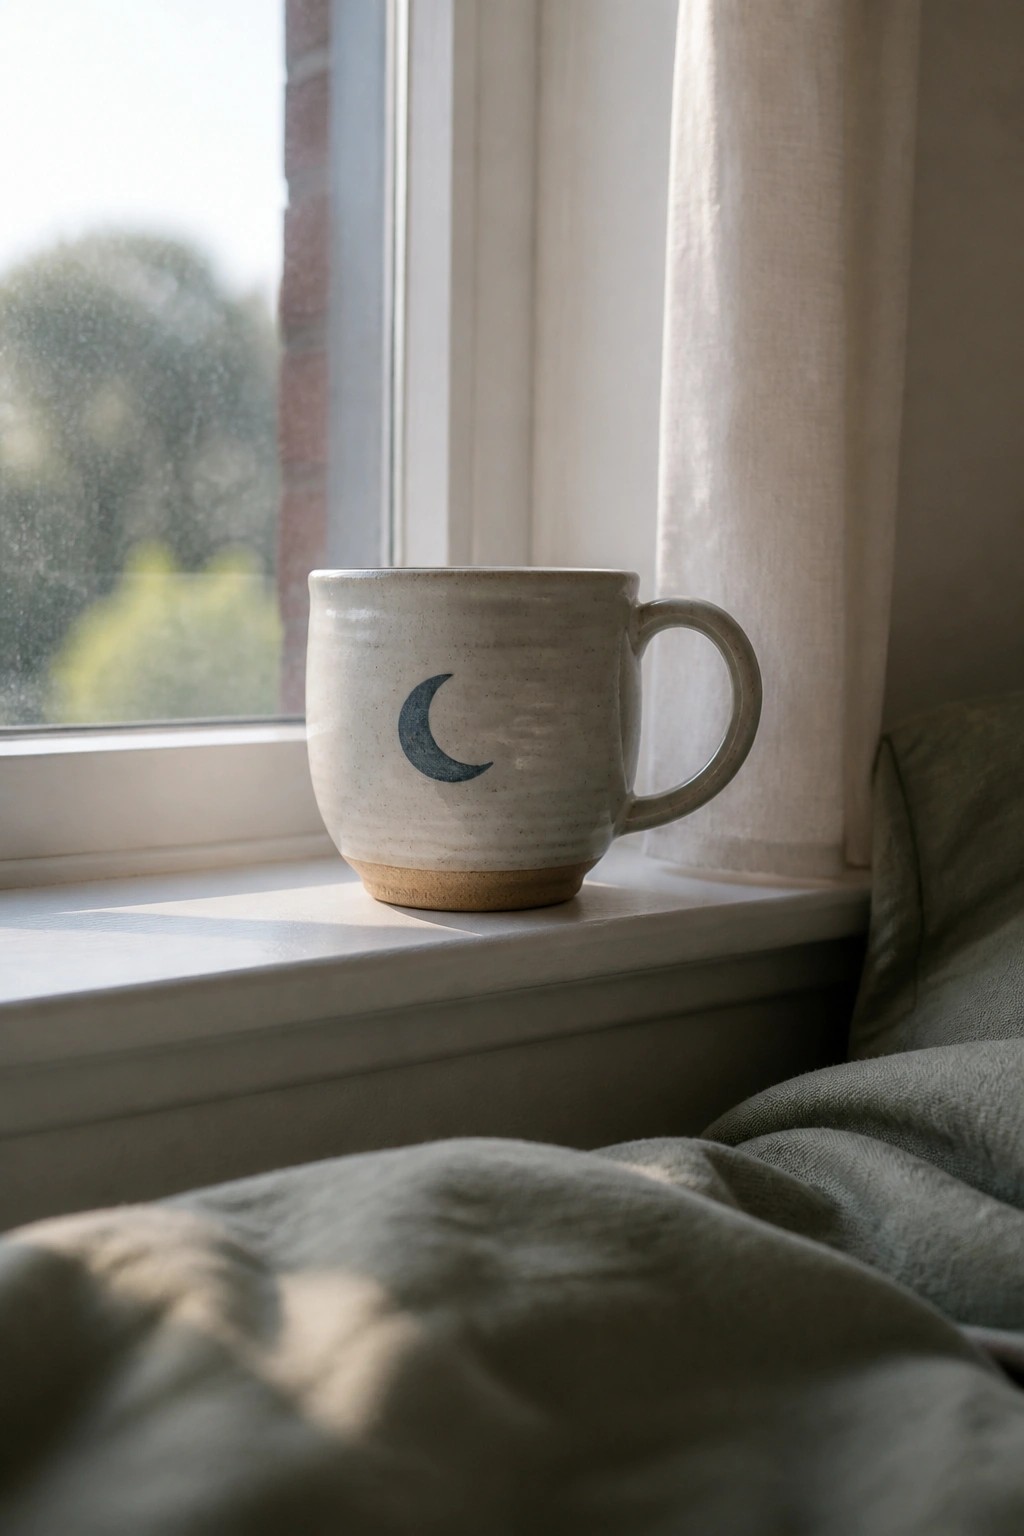
A standard wheel-thrown or hand-built mug finished with a light speckled glaze provides a clean surface for a single painted crescent moon. The moon is applied in a dark blue underglaze or stain after the first firing, then covered with a clear glaze for the final fire. This approach keeps the project simple while turning a basic mug shape into something more distinct through minimal surface decoration.
The painted detail works especially well on a light background because it stays visible without competing with texture or color. You can adapt the same idea by testing other single motifs like stars or simple line drawings, or by changing the moon color to fit a different glaze palette. For beginners, this format lets you practice centering and glazing a mug first, then add the painted element on a later piece without needing complex carving or multiple colors.
Frequently Asked Questions
What kind of clay works best for beginners trying simple mug forms? Earthenware clay is an excellent starting point because it is forgiving, fires at lower temperatures, and resists cracking when you keep walls even and dry pieces slowly. Begin with a 1 kilogram ball, wedge it thoroughly to remove air pockets, and center your form by patting it into a cylinder before pinching or coiling upward. This approach supports many of the 24 mug ideas that rely on basic hand building rather than advanced wheel skills.
How thick should the walls of a beginner mug be to stay sturdy yet lightweight? Aim for walls about 6 to 8 millimeters thick throughout. Check thickness by pinching gently between your fingers or using a needle tool to measure from the inside. Consistent thickness helps the mug survive drying and firing while keeping it comfortable to hold. If an idea calls for a wider base or slight flare, maintain that same wall depth so the form does not become fragile at the rim.
How can I attach a handle without it falling off during drying? Score both the mug body and the handle ends with a serrated tool, apply a small amount of slip, and press firmly. Wrap the joint with a thin coil of clay for extra support, then smooth the seam. Let the mug and handle reach the same leather hard stage before attaching so shrinkage rates match. This method works well with the simpler handle styles shown in the 24 ideas, such as pulled straps or small coils.
What steps help a hand built mug hold liquid after firing? Once the piece is bone dry, bisque fire it, then apply two to three thin coats of food safe glaze on the interior and exterior. Avoid glazing the bottom so the piece does not stick to kiln shelves. Follow the glaze manufacturer firing schedule exactly. Many of the beginner mug designs succeed when the glaze is chosen to fit the clay body, creating a waterproof surface that withstands daily use.
How long should I let a simple clay mug dry before firing? Allow at least one to two weeks of slow, even drying at room temperature. Cover the mug loosely with plastic for the first few days, then gradually uncover it. Turn the piece daily so all sides dry at the same rate. This careful drying prevents cracks in the thin walls common to beginner forms and prepares the mug safely for the kiln.

Pottery Path is my cozy corner of the internet where I share clay ideas, pottery inspiration, and simple projects you can recreate at home. I love exploring everything from air dry clay to handbuilt pottery to cute minis that brighten your day. My goal is to make clay crafting feel easy, fun, and welcoming for anyone who wants to try it.
You will find beginner friendly tutorials, creative pottery painting ideas, and lots of warm inspiration for slow and happy crafting. If you enjoy hands on creativity, this space will feel like home.